1
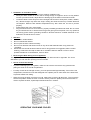
Vinobox110 GC/PC Vinobox168 GC/PC USER MANUAL FOR WINE COOLER Model: Vinobox 110 1T PC Vinobox 110 1T GC Vinobox 110 2T PC Vinobox 110 2T GC Vinobox 168 1T PC Vinobox 168 1T GC Vinobox 168 2T PC Vinobox 168 2T GC BEFORE USE, PLEASE READ AND FOLLOW ALL SAFETY RULES AND OPERATING INSTRUCTIONS. 1 WARNING To prevent damaging the door gasket, make sure to have the door all the way opened when pulling shelves out of the rail compartment. The appliance must be positioned so that the plug is accessible.Release the electric cord. Move your cabinet to its final location. Do not move your Cabinet while loaded with wine. You might distort the body. The wine cooler should be installed in a suitable place in order to avoid Touching the compressor with the hand. If the supply cord is damaged, it must be replaced by manufacturer of its Service agent or a similarly qualified person in order to avoid a hazard. IMPORTANT SAFETY INSTRUCTIONS WARNING • • • • • • To reduce the risk of fire, electrical shock, or injury when using your appliance, follow these basic precautions: Read all instructions before using the Wine cooler. DANGER or WARNING: Risk of child entrapment. Child entrapment and suffocation are not problems of the past. Junked or abandoned appliances are still dangerous . . . even if they will “just sit in the garage a few days”. Before you throw away your old Wine cooler: Take off the door. Leave the shelves in place so that children may not easily climb inside. Never allow children to operate, play with, or crawl inside the appliance. Never clean appliance parts with flammable fluids. The fumes can create a fire hazard or explosion. Do not store or use gasoline or any other flammable vapors and liquids in the vicinity of this or any other appliance. The fumes can create a fire hazard or explosion. -Save these instructions- INSTALLATION INSTRUCTIONS Before Using Your Wine Cooler • Remove the exterior and interior packing. • Before connecting the Wine Cooler to the power source, let it stand upright for approximately 2 hours. This will reduce the possibility of a malfunction in the cooling system from handling during transportation. • Clean the interior surface with lukewarm water using a soft cloth. • When replace the illuminating lamp, please select the lamp which comply with the rated power input of lamp according to the rating label. Shut off the power supply before replacing the lamp. • When disposing your appliance, please choose an authorized disposal site. 2 Installation of Your Wine Cooler • This appliance is designed to be for free standing installation only. • Place your Wine Cooler on a floor that is strong enough to support it when it is fully loaded. To level your Wine Cooler, adjust the front leveling leg at the bottom of the Wine Cooler. • Locate the Wine Cooler away from direct sunlight and sources of heat (stove, heater, radiator, etc.). Direct sunlight may affect the acrylic coating and heat sources may increase electrical consumption. Extreme cold ambient temperatures may also cause the unit not to perform properly. • Avoid locating the unit in moist areas. • Plug the Wine Cooler into an exclusive, properly installed-grounded wall outlet. Do not under any circumstances cut or remove the third (ground) prong from the power cord. Any questions concerning power and/or grounding should be directed toward a certified electrician or an authorized Products service center. Attention Store wine in sealed bottles. Do not overload the cabinet. Do not open the door unless necessary Do not cover shelves with aluminum foil or any other shelf material which may prevent air circulation. Should the wine Cooler be stored without use for long periods it is suggested, after a careful cleaning, to leave the door ajar to allow air to circulate inside the cabinet in order to avoid possible formations of condensation, mold or odors. Reversing the Door Swing of Your Appliance This appliance has the capability of the door opening from either the left or right side. The unit is delivered to you with the door opening from the left side. How to remove the Shelves • To prevent damaging the door gasket, make sure to have the door all the way opened when pulling the shelf out of the rail compartment. • For easy access to the storage content, you must pull the shelf approximately 1/2 out of the rail compartment, however this unit was designed with a plastic post on each sides of the shelf track to prevent bottles from falling. • When removing the shelf out of the inner rail, make sure to remove all items first. Then move the shelf to the position where the notch of shelf is exactly under the plastic post and lift the shelf. In order to replace the shelf, repeat steps described above in reverse. OPERATING YOUR WINE COOLER 3 The Wine Cooler should be placed in where the ambient temperature is between 32-95 degrees Fahrenheit(0-35℃). If the ambient temperature is above or below this range, the performance of the unit may be affected. For example, placing your unit in extreme cold or hot conditions may cause interior temperatures to fluctuate. The range of 5-18 may not be reached. For Vinobox 110 1T PC Vinobox 110 1T GC Recommended Temperatures for Chilling Wine. Red Wines: 15-18℃ (58-64° F) Dry/White Wines 9-14℃ (48-57° F) Sparkling Wines 5- 8℃ (41-47° F) Vinobox 168 1T PC Vinobox 168 1T GC The above temperatures may fluctuate depending on whether or not the interior bulb is ON or OFF or whether the bottles are located on the upper/middle or lower section. • • • • • • ON/OFF Power To turn OFF the appliance, press the ON/OFF button. (Press and hold the button for approximately 2 seconds) Setting the Temperature Control You can set the temperature as you desire by pushing the UP(+) or DOWN(-) button. When you push the two buttons for the first time, the LED readout will show the original temperature set at previous time (the temperature preset at the factory is 54ºF(12℃). The temperature that you desire to set will increase 1ºF or 1ºC if you push the UP(+) button once, on the contrary the temperature will decrease 1ºF or 1ºC if you push the DOWN(-) button once. When you store mostly red wines, the temperature which you control by pushing the above two buttons need to be set at between 58 to 64° F(15-18℃) and the LED lamp under “RED” will be lit red. When you store mostly white wines, the temperature needs to be set at between 48 to 57° F(9-14 ℃) and the LED lamp under “WHITE” will be lit green. When you store mostly sparkling wines, the temperature needs to be set at between 41 to 47° F (5-8℃)and the LED lamp under “SPARKL” will be lit amber. You can select temperature display setting from Fahrenheit to Celsius degree by pushing the UP(+) and DOWN(-) button at the same time for 5 seconds. Fahrenheit and Celsius degrees indicator will appear in green color in the “SET” window. (Due to different market, some units can only display Fahrenheit or Celsius) For Vinobox 110 2T PC Vinobox 110 2T GC Vinobox 168 2T PC Vinobox 168 2T GC The above temperatures may fluctuate depending on whether or not the interior bulb is ON or OFF or whether the bottles are located on the upper/middle or lower section. ON/OFF Power To turn ON/OFF the appliance, press the ON/OFF button. (Press and hold the button for approximately 2 seconds) Setting the Temperature Control 4 • Each cooling compartment of the Beverage Coolers (upper & lower) is independently controlled. To set the temperature: Connect the power cord to a properly grounded outlet. In the event of a power interruption, all previous temperature settings are automatically erased and each compartment will default to a preset temperature setting of: 6℃ (43℉) for upper compartment and 12℃(54℉) for lower compartment. Set the desired cooling temperature by pressing the buttons adjacent to the “set upper/set lower” program. Each depression of the buttons will scroll through the available temperature settings (for each compartment) in increments of 1 degree. The temperature selected will flash in the LED display for approximately 5 seconds, then revert back to display the temperature of the internal cabinet Upper compartment: The temperature setting can be adjusted from 5 to 12 (41 to 54 ). Lower compartment: The temperature setting can be adjusted from 12 to 18 (54 to 64 ). To view the “set” temperature. (anytime) press and hold the corresponding button for approximately 5 seconds, the “set” temperature will temporarily “flash” in the LED display for 5 seconds. • This unit has the option to display temperatures in either Celsius or Fahrenheit. To change the setting, press and hold both buttons (Set Upper/Set Lower) simultaneously for approximately 5 seconds, a prompt (beep) will sound and the blue pilot light adjacent to the C or F mode illuminates. (Due to different market, some units can only display Fahrenheit or Celsius) NOTE: • If the unit is unplugged, power lost, or turned off, you must wait 3 to 5 minutes before restarting the unit. If you attempt to restart before this time delay, the Wine Cooler will not start. • When you use the wine cooler for the first time or restart the wine cooler after having been shut off for a long time, there could be a few degrees variance between the temperature you select and the one indicated on the LED readout. This is normal and it is due to the length of the activation time. Once the wine cooler is running for a few hours everything will be back to normal. Interior Light You can turn the interior light ON or OFF by pushing the button marked with the “bulb” symbol . Door Lock Your unit is provided with a lock and key combination. The keys are located inside the plastic bag that contains the User’s Guide. Insert the key into the lock and turn it counterclockwise to unlock the door. To lock the door do the reverse operation making sure metal pin is engaged completely. Remove the key and place it in a secure place for safekeeping. CARE AND MAINTENANCE 5 Replacing Your LED Light • • • • • • Please remove 2 the top shelves. (Attention: LED light is covered by electrical box.) Please take out lock screw by “+” type head screwdriver first, then take out the light cover. (Fig.A) Please pull out Housing 4 from 6 of LED light board. (Fig. B) Please take out 2pcs of screw 5 by “+” type head screwdriver. (Fig.C) Please pull out LED light board 6 from light cover. (Fig.D) Please replace new LED light according above method. 1. Inner liner 2. Lock screws 3. Lamp cover 4. Housing 5. Screws 6. LED light Cleaning Your Wine Cooler • Turn off the power, unplug the appliance, and remove all items including shelves and rack. • Wash the inside surfaces with a warm water and baking soda solution. The solution should be about 2 tablespoons of baking soda to a quart of water. • Wash the shelves with a mild detergent solution. • Wring excess water out of the sponge or cloth when cleaning area of the controls, or any electrical parts. • Wash the outside cabinet with warm water and mild liquid detergent. Rinse well and wipe dry with a clean soft cloth. • Power Failure Most power failures are corrected within a few hours and should not affect the temperature of your appliance if you minimize the number of times the door is opened. If the power is going to be off for a longer period of time, you need to take the proper steps to protect your contents. • Vacation Time Short vacations: Leave the Wine Cooler operating during vacations of less than three weeks. 6 • Long vacations: If the appliance will not be used for several months, remove all items and turn off the appliance. Clean and dry the interior thoroughly. To prevent odor and mold growth, leave the door open slightly: blocking it open if necessary. Moving Your Wine Cooler • Remove all items. • Securely tape down all loose items (shelves) inside your appliance. • Turn the adjustable leg up to the base to avoid damage. • Tape the door shut. • Be sure the appliance stays secure in the upright position during transportation. Also protect outside of appliance with a blanket, or similar item. Energy Saving Tips • The Wine Cooler should be located in the coolest area of the room, away from heat producing appliances, and out of the direct sunlight. 7 PROBLEMS WITH YOUR WINE COOLER? You can solve many common Wine Cooler problems easily, saving you the cost of a possible service call. Try the suggestions below to see if you can solve the problem before calling the servicer. TROUBLESHOOTING GUIDE PROBLEM Wine Cooler does not operate. POSSIBLE CAUSE Not plugged in. The appliance is turned off. The circuit breaker tripped or a blown fuse. Check the temperature control setting. External environment may require a higher setting. The door is opened too often. The door is not closed completely. The door gasket does not seal properly. The room temperature is hotter than normal. A large amount of contents has been added to the wine cooler. The door is opened too often. The door is not closed completely. The temperature control is not set correctly. The door gasket does not seal properly. Not plugged in. The circuit breaker tripped or a blown fuse. The bulb has burned out. The light button is “OFF”. Check to assure that the Wine Cooler is level. The rattling noise may come from the flow of the refrigerant, which is normal. As each cycle ends, you may hear gurgling sounds caused by the flow of refrigerant in your Wine Cooler. Contraction and expansion of the inside walls may cause popping and crackling noises. The Wine Cooler is not level. The Wine Cooler is not level. The door was reversed and not properly installed. The gasket is dirty. The shelves are out of position. Wine Cooler is not cold enough. Turns on and off frequently. The light does not work. Vibrations. The Wine Cooler seems to make too much noise. The door will not close properly. 8