1
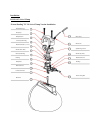
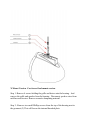
TM
ICON 8
Owner’s Manual & “Limited” Warranty
Technology Specifications:
Thank You for purchasing this Wet Sounds product. Wet Sounds marine audio products
represent the ultimate in high performance standards. The Icon series is specifically
engineered to withstand the rigorous marine environment. Utilizing state of the art acoustic
engineering and three dimensional computer aided design, the ICON series represents the
most advanced technologies available for wakeboard tower speaker systems. The Icon series
also provides multiple fitment options from direct cast mount to fixed clamp mount to our
revolutionary (Patent Pending) stainless steel TC3 Quick Disconnect Swivel clamp.
Please take a moment to read the instruction manual before starting your installation. This
manual will explain the benefits of the technologies developed by Wet Sounds and will help
you understand the correct installation methods and use of this product. If you have any
questions or concerns please contact a certified Wet Sounds dealer. You may also contact
Wet Sounds technical support by dialing 1-877-WET-SPKR (1-877-938-7757)
SPEAKER SPECIFICATIONS ICON 8
RMS: 150 watts
Peak: 300 watts
Mid Bass: 8 inch composite cone with polyurethane surround
High Frequency: 1 inch HLT Titanium Tweeter
Impedance: 4 ohm
Frequency Response: 20Hz to 20 kHz
Sensitivity: 92DB at 1W/1M
The ICON series represents the highest level of performance in tower speaker technology for
today’s extreme audiophile customers. The ICON series is a high output true sound quality
tower speaker able to provide maximum output while still providing world class sound
quality without the listener fatigue usually associated with high volumes. The unique
qualities of the ICON series components provide remarkable volume and mid bass and
dynamic full range sound quality. A full passive crossover network delivers tuned
frequencies to the driver resulting in rich smooth sound. The driver compliment in each
ICON 8 combines one sealed 8 inch midbass woofer made from composite cone materials
and a grille mounted Wet Sounds “HLT” 1 inch titanium tweeter. Utilizing the Wet Sounds
“HLT” Tweeter design every type of riding sport from wakesurfer to wakeboarder can enjoy
true quality sound.
***Caution: Do not spray any of the speakers directly with any liquid base substance.
Warranty will be voided if improper care is discovered during extensive examination of the
product.
Installation:
ICON 8 FC Fixed Clamp
TC3-F Fixed Clamp Pipe Version Installation (pipe tower)
Step 1: Attach Male Connector (7) from clamp base to Female Connector (8)
Step 2: Push connector into center hole of speaker as you place clamp base
onto the speaker housing. Please make sure the grommet (9) is seated properly.
Step 3: Attach two short Allen Bolts (4) through the clamp base and tighten
into the housing. Please make sure these are tight. It is also recommend to use
a Blue Loctite on these bolts.
Step 4: Find the mounting location for the speaker and clamp and then mark the
location on the bottom side of the pipe for the speaker wire. The speaker wire
will be inserted back into the pipe for a clean installation.
Step 5: Drill a small hole in the pipe and de burr the hole so there is no sharp
edges. It is also recommend to install a rubber grommet in this hole to protect
the wire.
Step 6: Slide the wire jacket (1) down the wire and Butt Connect the speaker
wire coming from the tower to the speaker wire plug (5). Red is positive and
black is negative
Step 7: Attach Clamp Top (3) to clamp base (6) using the two long Allen Bolts
(2)
Step 8: Make sure the clamp is tightened all the way so there is no movement
Installation:
ICON 8 SC Swivel Clamp
“Patent Pending” TC3-S Swivel Clamp Version Installation
Allen Bolts (long)
Clamp Top
Clamp Bottom
Wire Jacket
Female Speaker Plug
Detachment Plate (cast towers)
Allen Bolts for Plate
Wire Sleeve
Speaker Plug Screws
Male Speaker Plug
Allen Bolts (short)
Bushing
Detachment Fork
Clamp Base
Bushing
Male Connector
Female Connector
Allen Locking Bolt
Grommet
Pipe Tower Mount Version using the TC3-S
Step 1: Attach Male Connector (10) from clamp base to Female Connector (11)
Step 2: Push connector into center hole of speaker as you place clamp base
onto the speaker housing. Insert 4 bare wires down into this hole as well. These
wires are only used if you are adding the LED speaker rings. (please see LED
speaker install instructions for LED install) Please make sure the grommet (12)
is seated properly.
Step 3: Attach two short Allen Bolts (16) through the clamp base and tighten
into the housing. Please make sure these are tight. It is also recommend to use
a Blue Loctite on these bolts.
Step 4: Clamp Bottom (3) and Detachment Plate (5) are already connected
together. Insert the detachment plate into the clamp base (9). Please make sure
the male speaker plug (7) and female speaker plug (4) are lined up properly.
The male speaker plug (7) inside the clamp base can rotate. Please rotate this
so that it is facing the proper direction. There is a U shaped groove on the
female that lines up with a boss on the male.
Step 5: Slide the detachment fork (17) into the grooves on the clamp base.
Attach the allen locking bolt (19) and tighten down.
Step 6: Find the mounting location for the speaker and clamp and then mark the
location on the bottom side of the pipe for the speaker wire. The speaker wire
will be inserted back into the pipe for a clean installation.
Step 5: Drill a small hole in the pipe and de burr the hole so there is no sharp
edges. It is also recommend to install a rubber grommet in this hole to protect
the wire.
Step 6: Slide the wire jacket (13) down the wire and Butt Connect the speaker
wire coming from the tower to the speaker wire plug (4). Red is positive and
black is negative. If you have added the LED accessory, this speaker wire plug
(4) will have 6 conductors. Please refer to the LED install instructions.
Step 7: Attach Clamp Top (2) to clamp bottom (3) using the two long Allen
Bolts (1)
Step 8: Make sure the clamp is tightened all the way so there is no movement
Step 9: The swivel clamp allows you to rotate the speaker any direction you
may want. Loosen the allen locking bolt (19) and rotate the speaker to the
direction you like. Then tighten the bolt to lock it in place.
Step 10: The swivel clamp also allows you to remove the speaker from the
tower in seconds. Loosen the allen locking bolt (19) and remove the
detachment fork (17). Once removed, the speaker will disconnect from the
clamp. The clamp remains on the tower. To reinstall, line up the male speaker
plug (7) so that it is centered and insert the speaker by plugging the connector
together and reinstalling the detachment fork.
Cast Mount Tower Version using the TC3-S clamp for quick disconnect
and swivel function.
Step 1: Attach Male Connector (10) from clamp base to Female Connector (11)
Step 2: Push connector into center hole of speaker as you place clamp base
onto the speaker housing. Insert 4 bare wires down into this hole as well. These
wires are only used if you are adding the LED speaker rings. (please see LED
speaker install instructions for LED install) Please make sure the grommet (12)
is seated properly.
Step 3: Attach two short Allen Bolts (16) through the clamp base and tighten
into the housing. Please make sure these are tight. It is also recommend to use
a Blue Loctite on these bolts.
Step 4: Clamp Bottom (3) and Detachment Plate (5) are already connected
together. Remove allen bolts (6) that hold the detachment plate (5) to the clamp
bottom (3). Clamp Top (2) and Clamp Bottom (3) will not be used for a cast
tower mount.
Step 5: The detachment plate (5) will be hard mounted to a cast tower. Butt
connect speaker wires from detachment plate connector (4) to the speaker wires
from the cast tower. Red is positive and Black is negative.
Step 6: Push wires into center hole back into the tower and attach the
detachment plate to the tower.
Step 7: Please make sure the male speaker plug (7) and female speaker plug (4)
are lined up properly. The male speaker plug (7) inside the clamp base can
rotate. Please rotate this so that it is facing the proper direction. There is a U
shaped groove on the female that lines up with a boss on the male.
Step 8: Insert speaker with base onto detachment plate. Slide on detachment
fork (17) and allen bolt (19) and tighten allen bolt so the speaker does not
move.
Step 9: The swivel clamp also allows you to remove the speaker from the tower
in seconds. Loosen the allen locking bolt (19) and remove the detachment fork
(17). Once removed, the speaker will disconnect from the clamp. The
detachment plate remains on the tower. To reinstall, line up the male speaker
plug (7) so that it is centered and insert the speaker by plugging the connector
together and reinstalling the detachment fork.
X Mount Version. Cast tower fixed mount version.
Step 1: Remove 4 screws holding the grille and driver onto the housing. And
remove the grille and speaker from the housing. Disconnect speaker wires from
mid bass and tweeter. Remove acoustic dampening material.
Step 2: Remove two small Phillips screws from the top of the housing next to
the grommet (2) This will loosen the internal threaded plate.
Step 3: From inside the housing. Slide out the internal threaded plate and
replace with non threaded plate from X kit. Make sure to install it in the same
direction so the screw holes line up.
Step 4: Remove the center grommet (3) so that the two top plates sit flush on
top of the speaker. Take the two powder coated top plates and attach on top of
the speaker. Use two longer Phillips screws provided in the X kit to attach top
plates into internal non threaded plate.
Step 5: Butt connect Male Connector (1) to the factory wires. Red for positive
and black for negative.
Step 6: Take housing and hold up to the tower and plug the connectors together
(1) and (2) and push as much back into the tower and feed the remaining and
connectors into the center hole of the housing.
Step 7: Take the 2 bolts using the washers and lock washers and bolt the
housing up to the tower. Please make sure that these bolts are tight. Some
towers and adapters will only need a single lock washer and single regular
washer. Other towers and adapters may need extra washers that have been
provided in the kit. If you find that the bolt bottoms out and the housing is not
tight, please add washers to properly seat and tighten the housing to the tower.
(The holes on the plates should line up directly with the factory threaded insets.
However we have seen some towers that are not threaded in the proper
locations. If this is the case, please contact Wet Sounds at 877-938-7757 for
advice)
Step 8: Insert the acoustic dampening material.
Step 9: Hold the driver up to the housing to connect the speaker wires. Connect
the mid bass speaker wires and tweeter wires. The spade connectors for the mid
bass driver will be a larger size for the (+) and smaller size for the (-). These
will only install one way on the mid bass driver. The tweeter wire will have a
solid wire and a wire with dash lines. Please make sure to plug the tweeter
wires back together properly matching the non marked with non marked and
dash marked wire with the dash marked wire.
Step 10: Insert the driver into the housing. Insert the grille into the housing
making sure to line up all 4 mounting locations and attach the 4 stainless screws
around to the housing. Please make sure these are tight but DO NOT over
tighten
“Limited Warranty”
What This Warranty Covers
This is a "Limited" warranty. This warranty covers any defects in materials and workmanship
and warranty only applies to the original purchaser and is not transferable. This warranty is
also only valid if the original purchase was made from an authorized Wet Sounds™ dealer.
How Long Coverage Last
This warranty runs for 2 years from the date of the purchase. It is recommended to
REGISTER your warranty online within 45 days of your purchase at www.wetsounds.com click on "warranty registration".
What Is Not Covered
This warranty does not cover fading or discoloration caused by exposure to sunlight or
chemicals such as ammonia, household bleach, or any cleaning material that contains
abrasive substances. (For information on how to prevent fading or discoloration, consult for
recommendations on cleaning products) Wet Sounds, Inc. does not cover the cost for
removal and reinstallation of any kind. Additionally, shipping TO Wet Sounds, Inc. is
covered by the purchaser This warranty is void and inapplicable if Wet Sounds™ deems that
the product was abused or misused; including but not limited to Speaker product that has
been improperly-powered (under or over powered), causing thermal (burnt voice coil) and/or
mechanical failure (torn surrounds or spiders), damage caused by accident, mishandling,
improper installation, negligence, normal wear and tear, excessive water or heat damage,
freight damage or products that have been altered in any way. Product owned by anyone
other than the original purchaser from an authorized Wet Sounds dealer. (The warranty is not
transferable and will not apply to products purchased from unauthorized dealers.) Wet
Sounds is not responsible for any damages to a consumer's boat or person from a product
failure. The warranty is void if Wet Sounds deems the product was installed or used
improperly. Wet Sounds shall not be responsible for any incidental or consequential
damages, except to the< extent provided (or prohibited) by applicable law. This warranty
gives you specific legal rights, and you may also have other rights which vary from state.
What Wet Sounds™, Inc. Will Do
Wet Sounds, Inc will repair any part of your product that proves to be defective in materials
or workmanship. In the event repair is not possible, Wet Sounds, Inc will replace the product
in question. If it is deemed necessary Wet Sounds, Inc. will either replace the entire product
with a refurbished unit or it will be replaced with a model that is similar in price if that model
is no longer available. Labor cost and materials needed to complete this service will be at no
charge to the purchaser. Additionally, the cost of shipping TO the consumer is also covered
under this warranty.
How to Obtain Warranty Service
Contact Wet Sounds, Inc. either by phone at 877-938-7757 or by email at
[email protected]. A service representative will assist you in the necessary actions
to verify that the problem that you are experiencing is covered under warranty. If it is in fact
a warranty issue, Wet Sounds will issue an RA number for tracking purposes and give
instructions on sending the product in for evaluation. Wet Sounds™, Inc. How State Law
Applies This warranty gives you specific legal rights, and you may also have other rights
which vary from state to state.
Internet Warning
Wet Sounds, Inc. products sold on any non authorized web site or internet auction site are
void of any and all manufacturer's warranty. Please contact Wet Sounds™ at 877-938-7757
or visit our web site at www.wetsounds.com to search for an authorized site and/or an
authorized retailer near you.
Caution & Respect
Wet Sounds™ speakers can achieve very high sound pressure levels. Please use this product
responsibly. Be aware that sound travels great distances across water so please respect other
boaters especially while loading/unloading at the ramp or dock. Wet Sounds, Inc. is not
responsible for any violations of the law that may be a direct result of excessive volume.
Please abide by the rules but have fun doing it.
Wet Sounds, Inc.
9330 West Airport Blvd. suite 170
Houston, Texas 77031
www.wetsounds.com
Toll Free: 877-938-7757