1
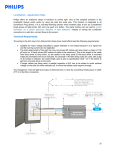
MultiOne Getting started © Philips Lighting B.V. 2014 Getting started Philips MultiOne 1 Introduction This Getting started guide covers the following topics to help you start using MultiOne: The MultiOne system The MultiOne software Working with the USB2DALI interface Working with the USB2ZigBee interface Working with the SimpleSet interface For detailed information, consult the MultiOne or the MultiOne Workflow User manual. 2 Getting started 2 Philips MultiOne Table of contents 1 Introduction........................................................................................................................................2 3 The MultiOne system ......................................................................................................................5 4 5 3.1 DALI...............................................................................................................................................5 3.2 ZigBee ..........................................................................................................................................6 3.3 SimpleSet ....................................................................................................................................6 MultiOne software ...........................................................................................................................7 4.1 Download....................................................................................................................................7 4.2 Minimum system requirements ..........................................................................................7 4.3 Installing ......................................................................................................................................7 Working with the Philips LCN8600 MultiOne interface USB2DALI ................................8 5.1 Connecting the USB2DALI interface .................................................................................8 5.2 Scanning and commissioning a DALI network..............................................................9 5.3 Selecting devices for communication ........................................................................... 10 5.3.1 6 7 DALI groups .................................................................................................................... 10 Working with the Philips LCN8650 MultiOne interface USB2ZigBee ......................... 11 6.1 Connecting the USB2ZigBee interface .......................................................................... 11 6.2 Scanning a ZigBee area ...................................................................................................... 11 6.3 Selecting devices for communication ........................................................................... 12 Working with the Philips LCN9600 MultiOne interface SimpleSet ............................. 13 7.1 Connecting the SimpleSet interface............................................................................... 13 7.2 Scanning a SimpleSet device ............................................................................................ 13 7.3 Selecting devices for communication ........................................................................... 14 7.3.1 Auto read ......................................................................................................................... 14 8 Disconnected interface................................................................................................................ 15 9 Configuring device features ...................................................................................................... 16 9.1 Reading and writing device features ............................................................................. 16 10 Copyright.......................................................................................................................................... 18 11 Disclaimer ......................................................................................................................................... 19 3 Getting started Philips MultiOne 12 Limitations of damages ............................................................................................................... 20 4 Getting started Philips MultiOne 3 The MultiOne system With MultiOne, you can configure all features that are supported by a specific Philips device. A feature typically belongs to one or two device families (LED Indoor/Outdoor, HID or FLUO), but this does not mean that every device from a device family does support all features. MultiOne only works in combination with Philips LCN8600 MultiOne interface USB2DALI, with Philips LCN8650 MultiOne interface USB2ZigBee or with Philips LCN9600 MultiOne interface SimpleSet. 3.1 DALI The MultiOne system for DALI devices consists of the following components: Philips LCN8600 MultiOne interface USB2DALI, the interface between the PC and the DALI devices. USB cable, to connect the PC with the USB2DALI interface. MultiOne software, to be installed on the PC or laptop. See next chapter. 5 Getting started Philips MultiOne 3.2 ZigBee The MultiOne system for ZigBee devices consists of the following components: Philips LCN8650 MultiOne interface USB2ZigBee, the interface between the PC and the ZigBee devices. MultiOne software, to be installed on the PC or laptop. See next chapter. 3.3 SimpleSet The MultiOne system for SimpleSet devices consists of the following components: Philips LCN9600 MultiOne interface SimpleSet, the interface between the PC and the SimpleSet devices. USB-A to USB-B cable to connect the PC with the SimpleSet interface. MultiOne software, to be installed on the PC or laptop. See next chapter. 6 Getting started Philips MultiOne 4 MultiOne software 4.1 Download MultiOne can be downloaded from www.philips.com/MultiOne. This zip-file contains the following files: The MultiOne installation file The MultiOne Workflow installation file The Getting started document The User manual The readme file 4.2 Minimum system requirements Before installing, make sure the PC or laptop complies with the minimum system requirements for using MultiOne: PC or laptop with Microsoft Windows XP SP3, Windows 7, Windows 8 or Windows 8.1 One or multiple USB 2.0 port(s): o Two free USB 2.0 ports for use with USB2DALI interface o One free USB 2.0 port for use with USB2ZigBee interface o One free USB 2.0 port for use with SimpleSet interface At least 30 MB of free disk space Microsoft .NET Framework 3.5 SP1 (download here for offline installation) 4.3 Installing The MultiOne installation file is the installer for the full version of MultiOne. The MultiOne Workflow installation file is the version of MultiOne which is meant to be used in a production environment. To install the software, launch the installer for the desired version and follow the instructions on your screen. The installation wizard will guide you through the process of installing the software and will ask you where the software needs to be installed. At the end, it will give you the option to immediately start MultiOne. 7 Getting started Philips MultiOne 5 Working with the Philips LCN8600 MultiOne interface USB2DALI 5.1 Connecting the USB2DALI interface Before launching MultiOne, make sure the USB2DALI interface is connected. First connect both USB plugs (USB-A) of the provided cable into your PC’s USB ports. When only one USB port is available, connect the black USB plug. 2 x USB-A plug . Second, connect the other end of the cable (mini-USB) to the USB2DALI interface. mini-USB plug Connect the USB2DALI interface to a (network of) DALI device(s), using the double DALI connectors (WAGO 250 connectors). The double DALI connectors allow a wiring scheme in which the USB2DALI interface is wired in a sequence together with other DALI devices (daisy chain). Status LEDs Finally make sure the DALI devices are connected to the mains. 8 Double DALI connectors Getting started Philips MultiOne The status LEDs have the following meaning: Green led: is on when the USB2DALI interface is powered. Red led: is on when the DALI power supply is on. Orange led: blinks when there is DALI communication. When MultiOne is started you need to make sure the USB2DALI interface is used. This can be done by going to the Tools Connection settings. In the pop-up window select DALI; select the port to which you connected the USB2DALI interface and click OK. 5.2 Scanning and commissioning a DALI network When starting MultiOne, the connected DALI devices to the USB2DALI interface are not automatically identified. There are two buttons in the Network tab on the left-hand side of the application window: Scan network and Commission. Scan network: all devices are scanned for their short addresses. This procedure does not change any short addresses or other properties of the connected devices. In order to identify a device, a short address is needed; devices without a short address are being assigned with one. When two or more devices have the same short address, a warning is given. Commission: all devices are given a new short address, starting at 0. Be aware that existing short addresses are erased and new short addresses are re-assigned to all devices connected. This procedure 9 Getting started Philips MultiOne ensures that all devices have a short address and that there are no duplicate short addresses. After commissioning or scanning the network, the list of identified devices is shown in the Network tab. 5.3 Selecting devices for communication After having commissioned or scanned the network, the Network tab shows all devices present in the DALI network. By clicking on a device you will make that particular device the active one, meaning that all commands will be sent to this device only, and will be ignored by all other devices. Besides selecting a single device for communication, it is also possible to communicate with multiple devices. The options are: Select All devices. All commands will now be sent as broadcast commands. Note that unidentified DALI devices will also respond to commands. Select User-defined groups. All commands will now be sent to devices that belong to a user-defined group. Expand or create User-defined groups and select the desired user-defined group. All commands will now be sent to devices that belong to this specific user-defined group. 5.3.1 DALI groups When all the drivers in the DALI network are known, it is possible to work with DALI groups. Select the Groups tab and press Scan groups. After having scanned the network, the Groups tab shows all the DALI groups and the found devices for every group. By clicking on a device you will make that particular device the active one, meaning that all actions will be performed on this device only, and will be ignored by all other devices. Besides selecting a single device for communication, it is also possible to communicate with a group of devices. Select Group n. All commands will now be sent to devices that belong to this specific DALI group. 10 Getting started Philips MultiOne 6 Working with the Philips LCN8650 MultiOne interface USB2ZigBee 6.1 Connecting the USB2ZigBee interface Before launching MultiOne, make sure the USB2ZigBee interface is connected and make sure the ZigBee devices are connected to the mains. When MultiOne is started you need to make sure the USB2ZigBee interface is used. This can be done by going to the Tools Connection settings. In the pop-up window select ZigBee; select the port to which you connected the USB2ZigBee interface and click OK. 6.2 Scanning a ZigBee area After selecting the USB2ZigBee interface, the ZigBee devices and networks in the area of the interface are not automatically known. To find the devices and networks in the area press Scan area: the area is scanned for all devices and networks which are in range. After scanning the area, the found devices and networks are shown in the Network tab. 11 Getting started 6.3 Selecting devices for communication After having scanned the area, the Network tab shows all devices and networks in range of the USB2ZigBee interface. By clicking on a device or network you will make that particular device or network the active one, meaning that all actions will be performed on this device or network only, and will be ignored by all other devices or networks. Once you have scanned the area and found devices and networks in range, it is possible to scan a specific network for zones. Select the Zones tab, select a Network and press Scan zones. After having scanned the network, the Zones tab shows the found devices and zones within the specified network. By clicking on a device or zone you will make that particular device or zone the active one, meaning that all actions will be performed on this device or zone only, and will be ignored by all other devices and zones. For detailed information on devices, networks and zones, please be referred to the MultiOne User manual. 12 Philips MultiOne Getting started Philips MultiOne 7 Working with the Philips LCN9600 MultiOne interface SimpleSet 7.1 Connecting the SimpleSet interface Before launching MultiOne, make sure the SimpleSet interface is connected. NOTE: If a device is to be powered during configuring, make sure it is connected to the mains ground. Without the ground connection, reliable communication may not be achieved. When MultiOne is started you need to make sure the SimpleSet interface is used. This can be done by going to the Tools Connection settings. In the pop-up window select SimpleSet and click OK. 7.2 Scanning a SimpleSet device After selecting the SimpleSet interface, a SimpleSet device near the interface is not automatically known by MultiOne. To get the device press Scan for device; touch and hold the SimpleSet interface close to the device until the scan has completed, if needed, a pop-up will appear indicating the device and the SimpleSet interface must touch. The scanned device will be shown in the Network panel. 13 Getting started Philips MultiOne 7.3 Selecting devices for communication After having scanned the SimpleSet device, the Network tab shows the device. By clicking on a device you will make that particular device the active one, meaning that all actions will be performed on this device and will be ignored by all other devices. 7.3.1 Auto read After a device gets selected all features are shown on the Features tab and auto read gets activated. Auto read automatically start reading the configuration of all features. Progress is shown. NOTE: If the SimpleSet interface is not close to the device, Auto read will not work. 14 Getting started Philips MultiOne 8 Disconnected interface If the USB2DALI, USB2ZigBee or SimpleSet interface becomes disconnected during use, MultiOne must be restarted. After closing MultiOne, reconnect the interface via its USB plug. Restart MultiOne and, as before, scan the device/network and resume communication. 15 Getting started Philips MultiOne 9 Configuring device features In the main application window, click the Device features tab. The content of this tab depends on the device that has been selected in the Network tab. If a device does not support any feature, a message will be displayed. If a group of devices is selected, no features will be shown since it is not possible to configure features for multiple devices at once1. Upon selecting a device in the Network tab, the Device features tab displays the features that are supported by this device. After selecting another device, the Device features tab is updated to show only the features supported by the newly selected device. You will have to click the Read button to see the exact configuration, except when using the SimpleSet interface. See 7.3.1. Use the various graphs, sliders and input boxes to configure the various feature parameters. For detailed information on device features, please be referred to the MultiOne User manual. 9.1 Reading and writing device features The Device features tab can do three things: show the default values used by MultiOne, display the feature configuration currently stored in a device and write a new feature configuration to the device. To display the current feature configuration stored in a device, select the device in the Network tab. The device features of the selected device are shown at the Device features tab. Click the Read button in the toolbar. A dialog window pops up in which you can make a selection of device features to be read. Make a selection and click Read. After a few seconds the current feature configuration is shown on the Device features tab. The feature configuration can now be adjusted manually. After adjusting the values, click the Write button in the toolbar. A dialog window pops up in which you can 1 To configure device features for multiple devices you can use virtual devices. Please be referred to the MultiOne User manual for details. 16 Getting started Philips MultiOne make a selection of device features to be written. Make a selection and click Write. After a few seconds the status bar will indicate that the data was successfully written. To save the current feature configuration to a file, click the Save icon on the toolbar or select File Save as. Enter a file name and a location and click Save. 17 Getting started Philips MultiOne 10 Copyright Copyright © 2014 by Philips Lighting B.V. All rights reserved. No part of this publication may be reproduced, transmitted, transcribed, stored in a retrieval system or translated into any language or computer language, in any form or by any means, electronic, mechanical, magnetic, optical, chemical, manual or otherwise, without prior written permission from Philips. Brands and product names are trademarks or registered trademarks of their respective companies. 18 Getting started Philips MultiOne 11 Disclaimer Philips makes no warranty of any kind with regard to this material, including, but not limited to, the implied warranties of merchantability and fitness for a particular purpose. Philips assumes no responsibility for any error that may appear in this document. Philips makes no commitment to update nor to keep current the information contained in this document. 19 Getting started Philips MultiOne 12 Limitations of damages The vendor will not be liable for any indirect, special, incidental or consequential damages (including damages for loss of business, loss of profits, or the like), whether based on breach of contract, tort (including negligence), product liability or otherwise, even if the vendor or its representatives have been advised of the possibility of such damages and even if a remedy set forth herein is found to have failed its essential purpose. 20