1
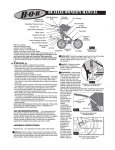
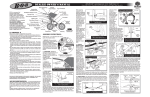
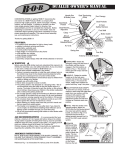
RescueTec PFD | USER’S MANUAL
RescueTec PFD
SPECIFICATIONS
The RescueTec PFD is designed for the special requirements of a trained rescue professional.
ENVIRONMENTS:
This RescueTec PFD can be used in all river, lake, and ocean environments including:
» Aerated moving water
» Flood waters
» Surf
CERTIFICATION:
USCG Type V Professional Rescue PFD
FLOTATION:
Minimum 22 lbs (10 kg)
2 SIZES:
S/M for chest size 28” - 40” (71-102 cm) and L/XL for chest size 40”-52” (102-132 cm)
FEATURES
» Integrated 1.8 inch Mil Spec nylon webbing over shoulder strap with 6000 lb breaking strength.
» High Tenacity 420 denier fabric.
» 100% Nylon webbing for maximum wear resistance.
» Many webbing loops to attach optional front pockets and other equipment.
» Two inch Quick Release Rescue Belt with fast pull cam buckle and Stainless Steel hardware.
» Soft, flexible closed-cell foam.
» Optional (detachable) Front (Molle) pockets for Rescue Swimming, (one with internal radio holster,
one with internal multipurpose equipment attachment loops).
» Knife / scissors and strobe light attachments on both sides /shoulders.
» Handle on back to assist in pulling the rescuer to safety.
» Reflective tape front and back and on both detachable front pockets.
» Inside quick drainage mesh.
» Elastic loops to hold all excess webbing.
» Over the shoulder anodized aluminum adjustment buckles.
» Adjustable compression straps across front to protect the zipper (at top and bottom)
» Three part adjustable 1.5” waistbelt for maximum fit adjustment.
» Waistbelt sleeves have sticky neoprene to hold the PFD in the best position for fit.
» Vertical waistbelt adjustment on L/XL size to fit larger individuals.
» Two Quick Release Gear / Compression Straps for attaching Throw Bags.
» Optional Detachable Rescue Swimming Leg Loops.
» Large Velcro patch on back to attach name tags.
» Dee-rings for emergency whistle.
» Neoprene neck collar for comfort.
page
2
Force 6
1. Knife/Strobe Holder
2. Reflective tape
3. Zipper safety buckle
4. Pocket attachment webbing
5. Quick release rescue belt
6. Side compression strap buckles
7. Gear/Compression strap
8. Leg loop attachment buckles
9. Zipper safety buckle
10. Waistbelt height adjustment
buckle (L/XL size only)
11. Waistbelt height adjustment
panel (L/XL size only)
12. Waistbelt
13. Center waistbelt buckle
6
1
2
2
3
4
2
4
5
4
7
9
8
10
11
13
12
RescueTec Front View
1
2
3
4
4
5
6
7
8
9
10
11
RescueTec Back View
1. Neoprene collar
2. Shoulder strap adjustment buckles
3. Handle
4. Reflective tape
5. Velcro loop
6. O-ring
7. Quick release rescue belt
8. Side compression strap buckles
9. Gear/Compression strap
10. Waistbelt adjustment buckles
11. Leg loop attachment buckles
RescueTec PFD
FITTING (DONNING) INSTRUCTIONS:
The RescueTec PFD is designed to properly fit a wide range of sizes, and therefore it has more adjustments
than a regular PFD. However, many of the adjustments only have to be adjusted once. Specifically, the over
shoulder adjustment and the waistbelt height adjustment (L/XL size only) would only be adjusted the first
time the PFD is worn. The side compression straps and waistbelt side adjustment would only need minor
re-adjustment on subsequent times it is worn.
1) Open all buckles, extend straps, put (don) the jacket on and close the zipper.
2) Clip together the front waistbelt buckle (one dual adjusting side release buckle 1-1/2”). Locate the
waistbelt to maximize its ability to stay in position based on your body shape. This is a critical step in
determining the proper performance of this PFD. Take a deep breath, hold, and adjust the waist belt
side buckles (two ladderlock buckles towards the back) until the PFD is snug around the waist. Then
adjust the center waistbelt buckle. Exhale.
3) On the L/XL, for those taller people or those with a larger midriff (lower girth), extend the four waistbelt
height adjustment webbings down to the appropriate place (Two buckles on the front and one on each
side).
4) Adjust the over-shoulder straps until the PFD sits snugly on the shoulders and tuck the extra webbing
into the tunnels on the front shoulders.
5) Take a deep breath and fill your diaphragm, hold.
6) Tighten the 1” side compression straps on each side of the PFD. Note: There are slides on the front and
back. It is a good idea to use one set (usually the back set) for macro adjustment when fitting the PFD
for the first time. Use the other set (whichever is easiest) for re-adjusting each time the PFD is put on.
Centering the web will make it easier to tuck the ends away.
7) Snap together the two zipper safety buckles on the front (top and bottom of the zipper) and adjust until
snug. Exhale.
8) If you are using the optional, quick/release throw bag system, feed the 1.5” Gear/compression strap(s)
through the 4 loops on the back of the Force 6 Dart throw bag, then clamp into the cam buckles on the
front of the PFD. The Force 6 Dart throw bag and other throw bags are sold separately.
9) Remove the PFD and place all excess webbing straps in their appropriate elastic containment loops.
10) Don (put on) the PFD and take a deep breath, hold, thread the 2” quick release rescue belt through the
stainless friction plate, pull tight, through the cam buckle and close. Release your breath. Regulations
require that the buckle must be threaded as per the diagram on page 5. Note that there are elastic
loops to hold the belt in place at the sides. Additionally, it should be threaded behind the Mil Spec
webbing on the back and on the right front. The O-Ring is positioned between the Mil spec web as
shown in the diagram on page 5.
page
4
Force 6
Threading Rescue Belt through Cam Buckle
A) The loose end of the rescue belt should be
threaded through the metal tri-glide and cam
buckle as shown here.
1
2
3
1. Cam Buckle
2. Loose end of rescue belt
3. Metal Tri-glide
1
2
3
Threading Rescue Belt on Back of PFD
A) Rescue belt is threaded behind Mil Spec webbing
on PFD back.
B) O-Ring is centered between the Mil Spec webbing.
1. Mil Spec Webbing
2. O-Ring
3. Rescue Belt
11) Re-fit the PFD when wet; as wet nylon can stretch under moderate tension.
After re-tightening, if the PFD will not stay in place (around the waist) when you are floating vertically
in the water and rises up on the body, you will need to use the Rescue Swimming Leg Loops.
Rescue Swimming Leg Loops: Connect the leg loop elastic 1” straps with the 1” female buckles
on the back above the waistbelt. Then connect the leg loop 1” webbing straps to the 1” female
buckles on the front of the PFD. And finally clip the 1.5” buckle around each thigh below the thickest
part of the thigh muscle and adjust. See diagram on page 7.
The elastic back straps are to be adjusted so the back of the leg loops do not sag below
the same height as the front part of the leg loops. The front adjustable connection straps
hold the front part of the loops in a comfortable, flexible position. When in the water
these straps on the front vertical connections are pulled down to anchor the PFD in the
swimming position.
When the PFD is on properly and your diaphragm is full of air, you should not be able to pull it up to your
ears and when your diaphragm is full the PFD should feel comfortably snug across the chest.
Remember, Rescuers have become entrapped in their PFDs. Practice getting out of the PFD
quickly (4 buckles and the zipper, plus 2 buckles on the optional leg harness), in simulated
swiftwater entrapment training.
RescueTec PFD
CARE AND MAINTENANCE
1)
2)
3)
4)
5)
6)
7)
8.
WASH WITH FRESH WATER AFTER USE.
HANG TO DRY THOROUGHLY.
STORE IN WELL VENTILATED AREA TO PREVENT MOLD GROWING ON PFD.
AVOID STORING IN DIRECT SUNLIGHT (PROLONGED EXPOSURE TO SUNLIGHT WILL DETERIORATE
THE NYLON FABRIC).
IMPORTANT – DO NOT CRUSH PFD WHEN STORING (FOAM WILL DEFORM OVER TIME if heavy
objects are placed on top).
DO NOT MACHINE WASH.
DO NOT DRY CLEAN.
INSPECT YOUR PFD REGULARLY FOR DAMAGE including tears, abrasion, UV damage, broken
buckles and damaged webbing. If in doubt contact Force 6 at [email protected].
CAUTION!
QUICK RELEASE RESCUE BELT
1) FAILURE TO RELEASE: Confirm, by testing before using the quick release rescue belt, that
the force transferred to your body by moving water, is sufficient to give full release of the
quick release belt through the double weave stainless steel tri-glide / friction plate. This is
especially important for lighter weight people. If not, be prepared to pull the webbing through
the buckle system or to cut the belt where it enters the cam buckle with a pair of safety
scissors.
2) FALSE RELEASE: A false release is caused by:
A) The incorrect position of the belt in the cam buckle when it is closed.
B) A panicking subject pulling on the red quick release toggle.
C) The red quick release toggle becoming snagged, and opening the cam buckle.
Be prepared for this.
LOCKING CARABINER and QUICK RELEASE RESCUE BELT.
1) A Locking Carabiner typically requires 2 hands to operate.
2) A Locking Carabiner can jam closed and the spring mechanism can fail in icy water.
3) Both salt and silt suspended in water may cause the locking carabiner to jam closed.
Any questions, comments, or feedback, please contact Force 6 at:
page
6
[email protected]
Force 6
ATTACHING OPTIONAL FRONT POCKETS
1
2
1)
2)
4
3.
PFD FRONT
3
Follow the webbing diagram shown here when attaching the
front pockets.
It is important to note that the loose webbing straps on the
back of the pockets should never be threaded around or
under the quick release belt. This is critical in ensuring that
the belt will move freely when released.
After routing the loose webbing straps as shown here, secure
the snaps on the loose webbing strap ends to the bottom of
the front pockets.
1. Pocket attachment webbing
found on PFD front
2. Attachment webbing on pocket
3. Quick release belt
4. Front pocket
ATTACHING OPTIONAL RESCUE
SWIMMING LEG HARNESS
1)
2)
3)
4)
Follow the diagram shown here when
attaching the swimming harness.
The nylon webbing straps on the harness
clip into the leg loop attachment buckles on
the front of the PFD.
The elastic webbing straps on the harness
clip into the leg loop attachment buckles on
the back of the PFD.
It is important to note that the large 1.5”
quick release thigh buckles should rest
on the inside of the thighs to ensure quick
egress from the harness.
Force 6 Safety Products, Inc.
3340 Ullsmore Ave.
Richmond, BC V7C 1S1
Toll Free (North America): 1-800-357-1975
Tel. 604-244-3001 | Fax 604-244-3026
or contact us at [email protected]
www.force6.com
© Force 6 Safey Products, Inc., 2013 - All rights reserved.