1
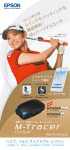
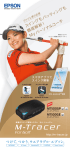
If fluid leaks from the battery, do not touch it with your bare hands. If fluid comes into contact with your
body, immediately rinse it off with tap water and then contact a doctor as this could cause burns, injury,
and loss of sight.
MT500G
Start Here
Do not charge this product in a location that may become hot such as near a fire or heating appliance,
in a location subject to direct sunlight, or inside a car. Doing so may cause a fire, burns, the battery to
deteriorate, and so on.
Do not disassemble and repair the product yourself. Doing so may cause an electric shock or accident.
Do not leave this product within the reach of small children. This is a choking hazard and is extremely
dangerous if licked or placed in a mouth.
Caution
Charging Micro USB Port and Cover
Open the cover to charge the device.
Control Button
Turns the power on/off.
Reset hole
(bottom of the unit)
Resets the unit.
Clean the product by gently wiping it with a soft, dry cloth.
Thank you very much for purchasing this M-Tracer.
Read this manual carefully to use this product correctly.
- Publication of the content of this manual in whole or in part without permission is
prohibited.
- The information in this manual is subject to change without notice.
Introducing the Product
This product analyzes golf swings based on extensive measurements and scientific
analysis. The analysis results, which can be easily checked on your smartphone, are useful
in helping you to improve your game.
This product is compatible with the following iPhones running iOS7 or later.
- iPhone 5
- iPhone 5s
- iPhone 5c
Checking the Contents of the Package
Check the contents of this package. If anything is missing or defective, contact the place
of purchase.
This product can be used with a grip that has a circumference within a range of 54 to 69
mm at a position 35 mm from the club head end of the grip.
Attachments (1 L size, M size, and S size)
M size
2 marks
Start Here
Meaning of Status Lamp Display
Be sure to remove this product from the golf club before storing or carrying the golf club.
Before Getting Started
Micro USB Cable
The lamp flashs to indicate the status of the
product. For more details, check the Help in
the application (Epson M-Tracer for Golf ).
Before using this product, check that it is secured to the golf club properly. If it is insufficiently secured,
the sensor may come off, causing an injury or malfunction.
Take care not to trap your fingers when mounting the unit to the attachment.
L size
3 marks
Charging lamp
(orange)
Bright light: Charging
Dim light: Charging
complete
Status lamp (blue and red)
Make sure the attachment is attached in the correct direction.
©2014 Seiko Epson Corporation.
All rights reserved.
Issued February 2014 Printed in Japan
Unit
1. Part Names and Functions
S size
1 marks
Using the Product Safely
Read this document carefully to use this product safely. Failure to handle the product as
instructed in this manual may result in a malfunction or accident.
- Keep this manual at hand to answer any questions you have about this product during
use.
- This product is designed specifically for use in Japan. If this product is to be taken and used
outside of Japan, check the relevant laws and regulations of the corresponding country/
region.
Meaning of Symbols
The following symbols are used to warn of operations and handling that may be dangerous
to prevent harm to the user or others and damage to property. Understand these symbols
before reading this manual.
Warning
This symbol indicates information that, if ignored, could possibly result in
death or serious injury due to incorrect handling.
Caution
This symbol indicates information that, if ignored, could possibly result in
personal injury or physical damage due to incorrect handling.
This symbol indicates operations (instructions and actions) you must perform.
This symbol indicates actions (prohibited actions) that must not be performed.
Precautions About this Product and Accessories
Warning
Turn the power off in public facilities and on public transport. This product communicates with your
smartphone wirelessly. The radio waves may interfere with devices around you, causing a malfunction,
accident, or injury.
Display
The blue lamp turns on for one second, and then flashes
once every two seconds.
Communicating
The blue lamp flashes twice every two seconds.
Turning off
The blue lamp turns on and then turns off.
No battery power remaining
The red lamp flashes once every five seconds.
Take care not to hit any people or objects when swinging the golf club.
In pairing mode
The blue and red lamps flash alternately.
Do not use chemicals, detergent, and so on..
Normal error
The red lamp flashes on and off every one second.
Hardware error
The red lamp turns on for five seconds and then turns off for
0.5 seconds repeatedly.
Check that the micro USB port cover is closed securely before use.
When the product is placed in a bag and so on, make sure that it does not end up below a heavy
object. The case may crack or the battery may rupture, causing an injury or burn.
Make sure you exercise based on your physical condition. Sudden acute exercise and overexertion are
dangerous.
Do not use the product for anything except for its intended purpose.
Do not throw the product or subject it to strong impacts. This could result in damage or a malfunction,
or cause an injury.
Do not wet the product or insert a foreign object inside the product. This product is not waterproofed
so there is the risk of a malfunction or electric shock.
Do not leave the product in a hot or humid location or in direct sunlight.
2. Charging the Battery
Do not attach this product to anything other than a golf club.
Do not mount the attachment toa golf club that is scratched as this could interfere with the
attachment.
Precautions Regarding Wireless Transmissions
About Wireless Equipment
This product contains wireless equipment that has been certified as a low power, data
communications wireless unit based on Radio Law.
About Frequencies
This product operates on 2.402 GHz to 2.480 GHz in the 2.4 GHz band. Other wireless devices
may use the same frequencies. Note the following to prevent radio waves from interfering
with other wireless devices.
Warranty Booklet
The supplied micro USB cable is designed specifically for this product. Do not use it for
anything other than charging this product.
Status
Turning on
Make sure you charge the battery before using the product for the first time.
Use an AC adapter for a smartphone and a micro USB cable to charge the battery
(you can also charge from a computer's USB port). If you do not have an AC
adapter for a smartphone, purchase our optional AC adapter.
Turn off the product and then connect the micro USB cable supplied with the
product to the AC adapter for the smartphone and the unit to start charging.
This wireless device uses the 2.4 GHz band. It
uses the FHSS modulation method and has an
interference distance of 10 m.
Precautions when Using this Product
The frequencies used by this product are in the 2.4 GHz band. Microwaves and other
industrial, scientific, and medical devices, other similar radio stations, in-plant radio stations
for mobile object identification requiring a license used on, for example, the production
lines of factories, specified low power radio stations not requiring a license, and amateur
radio stations (hereafter abbreviated as “other radio stations”) operate in this frequency band.
1. Before using this product, make sure there are no other radio stations being used in the
vicinity.
2. If radio wave interference occur between this product and another radio station,
immediately change the location where this product is used or stop using this product
(stop the emission of radio waves).
3. If you have any questions or other problems occur, contact our information center.
Precautions
- Use this product where there is a clear line of sight.
- If this product is used together with a wireless LAN (IEE 802.11g/b/n) that uses the same
2.4 GHz band, the communication speed may deteriorate or a connection may not be
possible.
In this case, change the location where this product is used or turn off the power of
devices not being used.
Other Precautions
About the Built-in Battery
- The battery is a consumable item that deteriorates even under normal use.
- Battery performance will decline if this product is stored for a long period of time without
being used.
- The battery duration will become shorter in an environment with a low ambient
temperature.
This product uses a lithium polymer rechargeable battery for the internal
battery.
The lithium polymer rechargeable battery is a recyclable resource.
When disposing of this product, do not remove the battery yourself but
instead consult with your relevant local authority.
Micro USB Cable (Supplied
with this Product)
The charging lamp (orange) turns on. The charging lamp dims when charging is
complete.
Stop charging if it does not complete after 3 hours. Continuing to use the
product in this condition could cause it to leak, catch fire, overheat, or explode.
3. Connecting the Product to a Smartphone
To use this product, you need to pair it to a smartphone using a Bluetooth
connection.
1. Place the unit within 1 m of the smartphone.
2. With the product turned off, hold down the control button for at least five
seconds.
The unit enters pairing mode and the status lamp flashes blue and red alternately.
3. Turn on the Bluetooth setting of the smartphone.
Example: [Settings] - [Bluetooth] - [ON]
4. Tap "MT + last 5 digits of the serial number" in the list of detected devices.
(Example: M12345)
When pairing is complete, a message is displayed on the smartphone. The status
lamp flashes twice every two seconds.
The serial number is printed on the sticker on the back of the unit.
4. Preparing the Application
1. Hold down the control button on the unit for at least two seconds to turn
Install Epson M-Tracer for Golf on the smartphone.
it on.
1. Download Epson M-Tracer for Golf to the smartphone.
The blue status lamp flashes twice every two seconds.
Search for and download Epson M-Tracer for Golf.
2. Turn on the Bluetooth setting on the smartphone.
2. Install Epson M-Tracer for Golf on the smartphone.
3. Tap
Follow the on-screen instructions.
3. Tap
8. Basic Specifications
6. Using this Product
on the smartphone to start Epson M-Tracer for Golf.
The blue status lamp flashes twice every two seconds when the smartphone and
the unit are communicating.
.
Epson M-Tracer for Golf starts.
4. Tap the [Measure] button to switch to the measuring display.
4. You need to register the first time you use Epson M-Tracer for Golf.
Follow the on-screen instructions to perform Epson Sensing ID and player
registration.
5. Tap the [Setup] button to set the club being used and the intended line of
flight.
6. Tap the [Start] button to begin measuring.
• The Epson Sensing ID allows you to use multiple services and functions provided by
Epson with one ID and password. More services will be added over time.
• Epson Sensing ID and MyEPSON ID are different.
The user is responsible for any communication charges incurred when
exchanging data using your smartphone. For information on charges and other
items, contact your carrier.
The red status lamp turns on and the unit enters the measuring status.
7. Square the club to the target line and remain still.
Remain still while the face of the club and the shaft are square with the target line.
When the unit detects that you are standing still (about two seconds), the blue
status lamp turns on and you can take your swing.
Target Line
When the impact from the swing is detected, the blue status lamp flashes and the
data is transferred to the smartphone.
Repeat steps 7 and 8 to continue measuring your swings.
9. Tap the [Stop] button to stop measuring..
Stopper
Slide the unit along the rails until it comes into
contact with the stoppers at the ends.
10. Tap the [<] button to switch to the analysis display.
11. Hold down the control button for at least two seconds to turn off the unit.
The unit is also turned off automatically after approximately 10 minutes if the
smartphone is on any other display than the measuring display.
- Note that the procedure for swing measurement and the lamp indicators may
be updated when Epson M-Tracer for Golf is updated.
For the latest specifications, see the Help of Epson M-Tracer for Golf.
- If the unit enters a normal error status (the red status lamp flashes on and off
every one second), follow the displayed instructions.
- If the unit enters a hardware error status (the red status lamp turns on for five
seconds and then turns off for 0.5 seconds repeatedly), turn the unit off and
then back on.
- If the unit operation becomes unstable, insert the reset hole with a toothpick,
and reset the unit.
7. Viewing the Help
Your swings are measured using Epson M-Tracer for Golf. For details on using the product,
see the Help.
3. Check the mounting status.
After mounting the unit, confirm that the attachment and unit are secured
properly.
If the attachment is mounted loose (if it turns), change the attachment mounting
position to a location where the grip is thicker.
- We recommend mounting the unit to the lower end of the golf club so that
it cannot be seen in the address position. If you find it difficult to check the
status lamp, try mounting it at the upper end of the golf club.
- Normally use the M size attachment. If you use a club with a narrow grip such
as a club for ladies or a club for juniors, use the S size attachment. If you use a
club with a grip that is too thick to mount the M size attachment, use the L size
attachment.
- Attachment mounting marks may be left on the bottom of the unit but this will
not cause a problem with the functions of the product.
Approx. 4 hours*2
Built-in battery
Lithium polymer rechargeable battery
Charging method
USB bus power (+5 V DC)
Charging time
Approx. 2 hours*3
Operating temperature
range
0 to +40°C*4
Storage temperature range
-20 to +45°C
External dimensions
50 (D) x 25 (W) x 15.5 (H) mm (excluding protrusions)
Weight
Approx. 15 g
* The communication distance varies depending on the surrounding environment and the
performance of the Bluetooth device that is the communication target.
*2 The operation time conditions are in compliance with our measurement conditions.
3
* The charging time will increase or decrease in accordance with the usage conditions of
the charging battery.
Charging may take about 3 hours from the fully discharged state.
4
* +10 to +35°C during charging of the battery (Charge the battery at room temperature as
much as possible).
f Information Center
f Repairs
8. Swing the club.
Slide the unit onto the attachment rails.
If it is difficult to slide the unit, try sliding it
while pressing the parts indicated by the
marks on the sides of the attachment.
You can also try changing the attachment
mounting position to a location where
the grip is narrower.
Operation time
Call us if you have any questions about the product.
Support from the Information Center is only available in Japanese.
[Tel] 050-3155-8280
- Call 042-585-8590 if you cannot use the above phone number.
Attach the attachment so that the golf club mark on the side of the attachment
match the orientation of the golf club. The attachment may come off if it is
attached upside down and it may cause an injury.
Make sure the center of the attachment is aligned with the center of the golf club.
2. Mount the unit to the attachment
Approx. 10 m (with no obstructions)*1
9. Contact Us
90°
1. Attach the attachment to the grip.
Golf club mark
Bluetooth 2.1+EDR Class 2
Communication distance
1
5. Mounting the Unit to a Golf Club
The M size has
2 marks.
Communication method
1. Tap the menu button at the top left of the analysis screen.
2. Tap the Help button.
For further details on using this product, visit the Epson product information page (http://
www.epson.jp/products/msensor).
Take the product to your reseller or send it to the following repair center.
Matsumoto Repair Center
[Address] Epson Service Corporation, 1563 Kanbayashi, Matsumoto-shi, 390-1243
[Tel] 050-3155-7110
* Note that the address and telephone number are subject to change without
notice.
* See the Epson website for details on repairs. http://www.epson.jp/support/
- Call the following phone number if you cannot use the above phone number.
Matsumoto Repair Center: 0263-86-7660
f Showroom
* You can also visit the Epson website for more details.
http://www.epson.jp/showroom/
Epson Square Shinjuku, 1F Nishi-shinjuku Mitsui Bldg, 6-24-1 Nishi-shinjuku,
Shinjuku-ku, Tokyo 160-8324
[Opening hours] Monday to Friday 10:00 - 17:00 (excluding bank holidays and our
designated holidays)
f Purchasing Optional Products and Consumables
You can purchase them from your nearest Epson reseller or Epson Direct
(http://www.epson.jp/shop/ or call free to 0120-545-101) (May 2012 current)
10 Customer Service
- For repair and maintenance of this product, contact your local dealer or our repair center.
- The attachment and USB cable are not covered by the warranty. If you need to purchase
any of these items, contact your local dealer or our information center.
- Spare parts for repairing and maintaining this product will be available for six years after
the product has stopped being manufactured.
f Epson website http://www.epson.jp
Visit the Epson website for various product information, driver downloads, support
information, and more.
You can confidently expect excellent customer service from Epson.
FAQs are also published on the website.
We look forward to your visit.
http://www.epson.jp/faq/
11. Trademarks
* iPhone is a trademark of Apple Inc., registered in the U.S. and other countries.
* Bluetooth and the Bluetooth logo are trademarks of Bluetooth SiG, Inc. in the
United States. The ® mark is omitted in this manual.