1
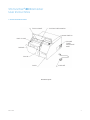
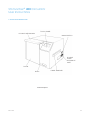
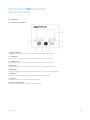
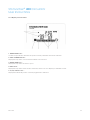
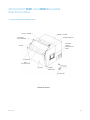
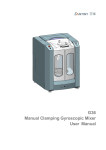
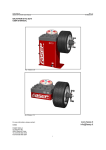
Stomacher®
User Instructions
Issue 3.5
1
Stomacher®
User Instructions
CONTENTS
1.
INTRODUCTION
3
7.
STOMACHER® 3500 AND 3500 BIOWASHER 21
2.
DESCRIPTION
3
7.1 Application22
3.
MARKINGS AND MEANINGS
4
7.1.1 Bag Selection and Filling
4.
OPERATION (ALL MODELS)
5
7.1.2
Speed Selection22
4.1
Preparing For Use
5
Control Key Functions
22
4.2
Processing
6
7.2.1 Instructions For Use
23
4.2.1 Paddle Adjustment
6
24
6
7.3.1 American and Japanese Products
24
7.3.2 EU and UK Products
25
26
5.
4.3
After Processing
STOMACHER® 80 BIOMASTER
Application
8
8.
8
5.1
7.3 Specifications
7
5.1.1 Bag Selection and Filling
7.2
22
STOMACHER® 3500 THERMO
8.1
Application
26
5.1.2
Speed Selection8
8.1.1 Bag Selection and Filling
26
Control Key Functions
8
8.1.2
Speed Selection26
5.2.1 Instructions For Use
9
10
8.2.1 Instructions For Use Without Heater
Function28
5.2
5.3 Specifications
8.2
Control Key Functions
27
5.3.1 UL-Designated and Japanese Products
10
5.3.2 EU and UK Products
11
8.2.2 Instructions For Use With Heater Function
28
8.3 Specifications
30
6.
12
8.3.1 American Product
STOMACHER® 400 CIRCULATOR
6.1 Application13
6.1.1 Bag Selection and Filling
13
6.1.2
Speed Selection13
6.2 Operation14
6.2.1 Control Key Functions
14
6.2.2 Display Icon Functions
15
6.2.3
Manual Operation16
6.2.4
Automatic Operation17
6.2.5 Storing Processing Programmes
17
6.2.6 Using Stored Processing Programmes
18
30
8.3.2 EU and UK Products
31
9.
32
MAINTENANCE
9.1
Cleaning32
9.2
Replacing Primary Fuses
32
9.3
Servicing and Spare Parts
32
10.
WARRANTY AND SERVICE POLICY
33
11.
COMPLIANCE
33
12.
STORAGE AND TRANSPORT
33
6.2.7
Stall Condition18
6.3 Specifications
19
6.3.1 UL-Designated and Japanese Products
19
6.3.2 EU and UK Products
20
Stomacher® is a registered Trademark and may not be used without the express permission of Seward Ltd.
2
Stomacher®
User Instructions
1. INTRODUCTION
This manual contains operating instructions for the Stomacher® 80 Biowasher, 400 Circulator, 3500, 3500
Biowasher and 3500 Thermo models. Sections 5, 6, 7 and 8 respectively contain model-specific instructions. All
other instructions are common
The Seward Stomacher® was originally developed in conjunction with Unilever’s Research Centre at Colworth
House; Bedfordshire as a solution to many of the problems previously experienced in microbiological sample
preparation. Subsequently it was decided to market the instrument in response to the interest expressed in the
Stomaching technique to meet the ever- increasing demands for sample preparation in a fast, consistent and
efficient way. Since then, Seward have continually developed the Stomacher® to maintain its position as the
market leader ensuring exacting performance, high quality and exceptional reliability.
This manual provides the user with all the information to install, operate and maintain the Seward Stomacher®.
Please read the manual carefully before using this equipment.
CAUTION: - This equipment should not be used if damaged in any way. If in doubt please contact your local
Seward authorised service centre.
Should any other questions arise please do not hesitate to contact the Seward Customer Service Department
on
Telephone: Facsimile: E-mail:
+44 (0)1903 236411
+44 (0)1903 219233
[email protected]
2. DESCRIPTION
The Seward Stomacher® is a unique homogenising instrument in which the sample is blended within a special
disposable bag. The instrument acts on the bag in an action similar to the action of a stomach, hence the
name Stomacher®.
The instrument is comprised essentially of an electric motor-driven worm gear unit with twin output shafts
coupled to flexible crank mechanisms, which in turn operate two reciprocating paddles. The paddles act on
the flexible plastic bag to create the blending forces termed the ‘stomaching’ action. An important feature
of the system is that the working parts do not come into direct contact with the sample being processed.
The main body of the instrument is aluminium alloy, finished with durable hygienic paint; the door and
linkage assemblies are stainless steel. All the control functions and displays are ergonomically grouped and
conveniently situated.
In broad terms, the main difference between each of the different Stomacher® models is the sample capacity
(the Stomacher® 3500 Biowasher has the same bag capacity as the 3500 and 3500 Thermo although the bag
compartment is larger to allow for uncompressible samples). The Stomacher® 3500 Thermo is also equipped
with a heated door panel to allow sample heating to be carried out during the stomaching process.
Protection from the moving parts inside the sample compartment is provided by an automatic cutout switch,
which is activated when the door is opened, switching off the paddle operation (and also the heater blanket
in the case of the Stomacher® 3500 Thermo).
Issue 3.3
3.5
3
Stomacher®
User Instructions
3. MARKINGS AND MEANINGS
Markings applied to the Seward Stomacher® have the following meanings: -
Attention, Consult User Instructions
Alternating Current
Power Off
Power On
Protective Earth
Conductive Earth
Issue 3.5
4
Stomacher®
User Instructions
4. OPERATION (ALL MODELS)
4.1 Preparing For Use
Upon receipt of your Seward Stomacher® inspect the shipping carton for any signs of damage.
Carefully unpack and inspect the instrument, reporting any obvious damage or missing parts to the
supplier/dealer/carrier as appropriate.
The carton should contain the following items: 1. One Seward Stomacher®.
2. One Power cord set (two on 0080/000/EU and 0400/001/EU).
3. One User Instructions Manual.
4. One sample sachet of 50 Seward Stomacher® Bags.
Retain the shipping carton in case of a need to return the instrument or for long term storage.
We have tried to provide the correct power cord for your market area, although if you find that the plug is not
compatible with the socket outlet available it will be necessary to obtain a suitable alternative cord set.
CAUTION: - Seward Stomachers® are designed to operate in ambient temperatures above 10°C Therefore, if the instrument has been stored or transported at temperatures below 10°C it should be left in an ambient greater than 10°C, for at least two hours prior to use.
CAUTION: - Before connecting the instrument to a power supply, check that the voltage and frequency details shown on the instrument are compatible with your mains electrical supply. The instrument must only be connected to a protectively earthed mains electrical supply. In the event of uncertainty, a competent qualified electrician should be consulted.
CAUTION: - Ensure that the instrument is not positioned directly against a wall or other equipment such that the ventilation slots are obstructed or restricted; we recommend that a minimum of 75mm (3”) clear space around the unit is maintained.
CAUTION: - If this equipment is used in a manner not specified by Seward, protection provided by the equipment may be impaired.
Connect the Seward Stomacher® to the mains electrical socket using the power cord supplied. Ensure that the
door is properly closed with the slotted lower hinge lugs located fully into the pivot points. Operate the power
switch, which should illuminate indicating that the instrument is now ready for use.
Issue 3.5
5
Stomacher®
User Instructions
4.2 Processing
The Stomacher® 80 Biomaster and 400 Circulator are factory-set with minimal paddle clearance between the
inner face of the door and the fully extended paddles. On the Stomacher® 3500, 3500 Biowasher and 3500
Thermo, the clearance is set to 10mm. Although suited to a wide range of applications these settings are by no
means suitable for all sample processing and adjustment may be necessary for your application.
Provision for this adjustment is provided inside the instrument. Since this requires the removal of the rear cover a
competent qualified technician should carry out this work.
4.2.1 Paddle Adjustment
Switch off and disconnect the instrument from the mains electrical supply. Turn the instrument over, suitably
supporting it to prevent damage. Remove the rear cover and slacken the socket cap screws holding the
motor carriage to the main body via the slotted holes. Do not slacken any of the screws within the carriage
assembly or the motor alignment will be lost. Remove the large hexagon headed blanking plug (if fitted)
from the rear chassis to access the adjusting screw. Turn the adjusting screw until each paddle just touches
the inside face of the door when they are at their maximum forward stroke position, this can be tested by
manually rotating the gearbox output shaft.
If the instrument is run briefly the alternate tapping noise of each paddle touching the door should just be
audible. Take up any backlash in the adjusting screw and turn the screw back one to one and a quarter turns.
This is the minimum clearance setting.
For a greater paddle clearance, each additional backward turn of the adjusting screw increases the
clearance by 1.5mm up to a maximum of 10mm.
When adjustment is complete always re-tighten the socket cap screws, replace the hexagon headed
blanking plug where fitted, and replace the rear cover.
The Stomacher® 3500, 3500 Biowasher and 3500 Thermo are fitted with a neoprene rubber protective lining to
the stomaching chamber to prevent any possibility of the bags being trapped behind the paddles, especially
when using relatively small sample volumes.
Do not attempt to run the instrument without the protective lining in place.
4.3 After Processing
Due to the infinite variety of samples that may be processed in a Stomacher® it is not possible to provide
definitive procedures for every application, or give any undertaking, implied or otherwise, as to the validity of
any method used. Seward Limited maintain a library of reference papers covering practical experience with
the Stomacher® system over many years and these details are available to users upon request.
Issue 3.5
6
Stomacher® 80 Biomaster
User Instructions
5. Stomacher® 80 Biomaster
TOUCH PANEL
CLOSING MECHANISM
MAINS SWITCH
BAG CLAMP
DOUBLE
FUSED
APPLIANCE
INLET
PADDLE
DOOR
BODY
CORD SET
General Layout
Issue 3.5
7
Stomacher® 80 Biomaster
User Instructions
5.1 Application
There are no set rules in the application of the Stomacher® instrument and the following is intended as a guide
only and not to restrict laboratory technique.
5.1.1 Bag Selection and Filling
For best results it is recommended that only genuine Seward Stomacher® Bags be used. Deep frozen foods
should not harm the bags but hard particles such as bone, grit, fruit-stones and seeds may cause puncturing.
Where a marginal condition exists or any hazardous material is being blended it is recommended that two
bags are used one inside the other.
If required, several bags may be processed simultaneously providing the total volume does not exceed 80 ml.
When doing so, it is recommended that they be layered vertically so that the ‘load’ is fairly evenly distributed
over the paddle faces.
For volumes greater than 80ml, an alternative Stomacher® model should be used.
5.1.2 Speed Selection
The NORM. (normal) speed is suitable for the vast majority of applications and the instrument will always set
automatically to that position upon powering up. If an alternative speed setting is desired this may be selected
either prior to or during operation of the instrument. When depressed a short signal will be heard and the
corresponding small indicator lamp at the top corner of the touch pad will illuminate.
The LOW speed may be more suitable for delicate work e.g. cell separation to reduce or avoid cell damage.
Use of the HIGH speed can provide better agitation when blending predominantly liquid substances possibly
reducing the processing time. In the event of the power being interrupted the speed setting will always revert
to NORM.
5.2 Control Key Functions
The touch control panel, located on top of the Stomacher®, has the following functions: -
STOP
TIMED OUT CYCLES
CONTINUOUS
CYCLE
Issue 3.5
R.P.M CONTROLS
ON/OFF ROCKER
SWITCH
8
Stomacher® 80 Biomaster
User Instructions
5.2.1 Instructions For Use
1. Open the door by raising the handle fully upward and back. This gives access to the paddle
compartment.
2. Place the bag(s) into the paddle compartment leaving 50 to 60mm protruding above the bag clamp and
close the door thus clamping the bag(s).
3. When switching on, the POWER switch illuminates and the Stomacher® preselects the NORM. speed
setting; the indicator in the touch pad shows this by illuminating. The timer is set at zero.
4. If required, either the LOW or HIGH speed can be selected by pressing the appropriate key. Note the
audible signal and indicator illumination,
5. The stomaching process is initiated by the selection of a timed or continuous cycle. Again note the
audible signal and indicator illumination.
6. The stomaching process continues in normal circumstances until either: A) The timed cycle has finished
B) The ‘stop’ control pad has been touched
C) The door has been opened
D) The power has been switched off
WARNING:- Opening the door during the operating cycle causes the instrument to stop. However, this must not
be considered as the normal method for stopping the instrument.
If events B, C or D occur the timer automatically resets to zero.
7. After processing, simply open the door and remove the bag(s). The instrument is immediately ready for
processing the next sample.
NOTE: A motor electrical current limiting device is incorporated into the control circuit. Upon initial start-up, a short
time may elapse before the motor builds up torque and runs normally. This condition is more likely to prevail
under the following circumstances:
i) Upon initial start-up following a period of transportation or storage
ii) The instrument has been stored in a cold environment (less than 10°C allowing the rubber connectors to become stiff).
For condition (i) run the instrument for 5-10 minutes, preferably with a number of stop-start cycles. For condition
(ii) allow the instrument to stand in a warm environment as detailed in Section 5.3, followed by a short period
of running with stop-start cycles.
Issue 3.5
9
Stomacher® 80 Biomaster
User Instructions
5.3 Specifications
5.3.1 American and Japanese Product
Model
Stomacher® 80 Biomaster
Cat No.
0080/000/AJ
Dimensions
290mm wide x 325mm deep x 190mm high (unpacked)
Weight
15kg (unpacked)
Supply Voltage
100-120V
Supply Frequency
50-60Hz
Mains Inlet Fuses*
T2.0A 250V 5x20mm, breaking capacity: 100A @ 250V
Transformer Fuse*
T250mA 250V 5x20mm, breaking capacity: 35A @ 250V
PCB Fuse*
F2.5A 250V 5x20mm, breaking capacity: 100A @ 250V
Insulation
Class 1 (Earthed)
Installation
Over Voltage Category II
Pollution
Pollution Degree 2
Duty Cycle
Continuous
Rated Load
55W
Disposable Bag Size
152mm x 101mm
Minimum Recommended
Capacity
5ml
Maximum Recommended
Capacity
80ml
Maximum Recommended Sample 60°C
Temperature
Recommended Operating
Ambient Temperature Range
10-35°C
Recommended Operating
Relative Humidity Range
10-89%
Fixed Timer Settings
30 seconds (±5%)
60 seconds (±5%)
120 seconds (±5%)
Continuous
No Load Paddle Speeds
(@ nominal 20°C)
230rpm (±5%) LOW
265rpm (±5%) NORM.
300rpm (±5%) HIGH
Paddle Clearance
0-l0mm
* Only these or equivalent UL-approved fuses should be used.
Issue 3.5
10
Stomacher® 80 Biomaster
User Instructions
5.3.2 EU Products
Model
Stomacher® 80 Biomaster
Cat No.
0080/000/EU
Dimensions
290mm wide x 325mm deep x 190mm high (unpacked)
Weight
15kg (unpacked)
Supply Voltage
220-250V
Supply Frequency
50-60Hz
Plug Top Fuse
F5A (UK cord set only)
Mains Inlet Fuses*
T800mA 250V 5x20mm, breaking capacity: 35A @ 250V
Transformer Fuse*
T250mA 250V 5x20mm, breaking capacity: 35A @ 250V
PCB Fuse*
F2.5A 250V 5x20mm, breaking capacity: 100A @ 250V
Insulation
Class 1 (Earthed)
Installation
Over Voltage Category II
Pollution
Pollution Degree 2
Duty Cycle
Continuous
Rated Load
55W
Disposable Bag Size
152mm x 101mm
Minimum Recommended
Capacity
5ml
Maximum Recommended
Capacity
80ml
Maximum Recommended Sample 60°C
Temperature
Recommended Operating
Ambient Temperature Range
10-35°C
Recommended Operating
Relative Humidity Range
10-89%
Fixed Timer Settings
30 seconds (±5%)
60 seconds (±5%)
120 seconds (±5%)
Continuous
No Load Paddle Speeds
(@ nominal 20°C)
230rpm (±5%) LOW
265rpm (±5%) NORM.
300rpm (±5%) HIGH
Paddle Clearance
0-l0mm
* Only these or equivalent UL-approved fuses should be used.
Issue 3.5
11
Stomacher® 400 Circulator
User Instructions
5. Stomacher® 400 Biomaster
TOUCH PANEL
CLOSING MECHANISM
MAINS SWITCH
DOUBLE
FUSED
APPLIANCE
INLET
DOOR
BODY
CARRY HANDLES
General Layout
Issue 3.5
12
Stomacher® 400 Circulator
User Instructions
6.1 Application
There are no set rules in the application of the Seward Stomacher® instrument and the following is intended as
a guide only and is not to restrict laboratory technique.
6.1.1 Bag Selection and Filling
For best results it is recommended that only genuine Seward Stomacher® Bags be used. Deep frozen foods
should not harm the bags, but hard particles such as bone, grit, fruit-stones and seeds may cause puncturing.
Where marginal conditions exist or hazardous material is being blended it is recommended that two bags are
utilised, one inside the other. For the vast majority of foods however, e.g. meats (cooked and raw), vegetables,
fruit and cheeses the use of a single bag has proved to be entirely satisfactory.
If required, several bags may be processed simultaneously providing the total volume does not exceed
400ml. When doing so, it is recommended that the bags be layered vertically so that the ‘load’ is fairly evenly
distributed over the paddle faces.
For capacities less than 80ml and greater than 400ml alternative Stomacher® models should be used.
6.1.2 Speed Selection
There are three pre-set speed settings, 200, 230 and 260rpm. The 230 setting is considered suitable for the vast
majority of applications. The 200 setting may be more suitable for delicate work. The 260 setting can provide
better agitation when blending predominately liquid substances possibly enabling the processing time to be
reduced.
Issue 3.5
13
Stomacher® 400 Circulator
User Instructions
6.2 Operation
6.2.1 Control Key Functions
1. SPEED / TIME key: Toggles the display enunciator icon between SPEED and TIME displays.
2. + (PLUS) key:
Increases the value of the enunciated parameter, i.e. speed / time.
3. – (MINUS) key:Decreases the value of the enunciated parameter, i.e. speed / time.
4. AUTO key:Toggles the instrument between MANUAL and AUTO operating modes.
5. PROG key: Toggles through stored programme selection, P1, P2, P3 and no programme.
6. START key: Starts the instrument when in manual mode and initially in AUTO.
7. STOP key: Stops the instrument in either operational mode.
8. Liquid Crystal Display: Displays selected function values and status icons.
Issue 3.5
14
Stomacher® 400 Circulator
User Instructions
6.2.2 Display Icon Functions
1. ENUNCIATOR icon: Continuously indicates whether the speed or time parameter has been selected.
2. STALL CONDITION icon: Displayed only when a motor stall condition has occurred.
3. DOOR OPEN icon: Displayed only when the door is open.
4. AUTO icon: Displayed only when AUTO mode is selected, there is no icon display for MANUAL mode.
5. P1, P2, and P3 icons: Displayed individually, when a stored programme is selected.
Issue 3.5
15
Stomacher® 400 Circulator
User Instructions
6.2.3 Manual Operation
Please note that pressing any control function key is acknowledged by a short tone (0.1 seconds duration)
emitted from the instruments internal sounder.
1. Ensure the POWER rocker switch is in the on (1) position. The green lamp in the switch should be illuminated
indicating that power is present and the instrument should also emit a short tone. The display should now
indicate the instrument status.
2. Ensure the AUTO icon is not displayed. If AUTO is shown, press the AUTO key to revert to MANUAL mode.
Similarly, if programmes, P1, P2, or P3 are selected, press PROG repeatedly until no programme is selected.
3. Open the door by raising the lid fully upward and back. This gives access to the paddle compartment. The
DOOR OPEN icon will now be displayed.
4. Place the Stomacher® Bag(s) into the paddle compartment leaving 50 to 60mm protruding above the
bag clamp and close the door thus clamping the bag(s). The DOOR OPEN icon will now be off.
5. The ENUNCIATOR icon indicates that the time parameter has been selected (display defaults to 30
seconds). The time parameter can now be adjusted by pressing the + or – key as required. The setting is
variable between 0 seconds and 99 minutes 59 seconds in increments of 1 second. Pressing and releasing
the + or – key increments the time by 1 second, holding down the + or – key accelerates the rate of
change.
6. Pressing the SPEED / TIME key toggles the ENUNCIATOR icon to indicate that the speed parameter has
been selected (display defaults to 230rpm). The speed setting can now be adjusted by pressing the + or –
key as required.
The settings available are 200rpm (low), 230rpm (normal) and 260rpm (high).
7. Pressing the START key will initiate the stomaching process. The instrument will run at the selected speed
and duration. Please note that the time display counts down from the selected time and displays the
remaining processing time. The stomaching process continues in normal circumstances until either: • The timed cycle has finished.
• The STOP key is pressed.
• The door has been opened.
• The power has been switched off.
In all instances the time resets to the selected value.
8. After processing, simply open the door and remove the Stomacher® Bag(s). The instrument is ready for
processing the next sample.
WARNING: - Opening the door during the operating cycle causes the instrument to stop. This, however, must not be considered the normal method for stopping the instrument.
Issue 3.5
16
Stomacher® 400 Circulator
User Instructions
6.2.4 Automatic Operation
If a number of samples are to be processed under the same conditions, i.e. speed / time values, then you may
prefer to select the AUTO mode. When in AUTO the stomaching process is initiated by the opening and closing
of the door between sample loadings.
1. Select speed / time values as previously described in 6.2.3.
2. Press the AUTO key, displaying the AUTO Icon.
3. Load the charged Stomacher® Bag(s) as previously described in 6.2.3.
4. Closing the door will initiate the stomaching process. The instrument will run at the selected speed and
duration. Please note that the time display counts down from the selected time and displays the remaining
processing time. The stomaching process continues in normal circumstances until either: • The timed cycled has finished.
• The STOP key is pressed.
• The door has been opened.
• The power has been switched off.
In all instances the time resets to the selected value.
5. When the processing is completed simply open the door, remove the processed sample and place the next
sample into the instrument. Close the door and processing will commence automatically.
6.2.5 Storing Processing Programmes
It is possible to store up to three combinations of speed / time values as programmes within the instrument’s
memory. This enables the most frequently used or specific processing parameters to be recalled easily and
efficiently.
To store or change a programme: 1. Pressing and releasing the PROG key toggles through the three programme selections denoted by the
P1, P2 and P3 icons and returns to manual (no PROG con). Please note these initially display memory-stored
default values. Press and release the PROG key at the desired programme number.
2. Adjust the speed / time values as described previously in 6.2.3.
3. Simultaneously press and hold down the AUTO key and PROG Key for at least 2 seconds. This is
acknowledged by a longer tone (0.5 seconds’ duration). The displayed speed / time values are stored in the
memory.
Issue 3.5
17
Stomacher® 400 Circulator
User Instructions
6.2.6 Using Stored Processing Programmes
In Manual mode: 1. Press and release the PROG key to select the desired programme. Either the P1, P2 or P3 icon should now
be present on the display.
2. Load the Stomacher® Bag(s) as previously described.
3. Pressing the START key will initiate the stomaching process as previously described.
4. After processing, simply open the door and remove the Stomacher® Bag(s). The instrument is ready for
processing the next sample.
In Auto mode: 1. Press and release the PROG key to select the desired programme. Either the P1, P2 or P3 icon should now
be present on the display.
2. Press the AUTO key, displaying the AUTO icon.
3. Load the Stomacher® Bag(s) as previously described.
4. Closing the door will initiate the stomaching process as previously described.
5. When the processing is completed simply open the door, remove the processed sample and place the
next sample into the instrument. Close the door and processing will commence automatically.
6.2.7 Stall Condition
The drive controller has a factory-set electrical current limiting device to protect the motor in the event of a
stall condition occurring. In the event of a stall condition the STALL icon will be displayed on the control panel
and the instrument will stop. This condition may simply occur due to overloading the paddles in which case the
sample size should be reduced. (See 6.2.2 for LCD icons).
Issue 3.5
18
Stomacher® 400 Circulator
User Instructions
6.3 Specifications
6.3.1 US-Designated Product
Model
Stomacher® 400 Circulator
Cat No.
0400/001/AJ
Dimensions
330mm wide x 355mm deep x 300mm high (unpacked)
Weight
23kg (unpacked)
Supply Voltage
100-120V
Supply Frequency
50-60Hz
Mains Inlet Fuses*
T2.0A 250V 5x20mm, breaking capacity: 100A @ 250V
Transformer Fuse*
T250mA 250V 5x20mm, breaking capacity: 35A @ 250V
PCB Fuse*
F2.5A 250V 5x20mm, breaking capacity: 100A @ 250V
Insulation
Class 1 (Earthed)
Installation
Over Voltage Category II
Pollution
Pollution Degree 2
Duty Cycle
Continuous
Rated Load
140W
Disposable Bag Size
177mm x 304mm
Minimum Recommended
Capacity
80ml
Maximum Recommended
Capacity
400ml
Maximum Recommended Sample 60°C
Temperature
Recommended Operating
Ambient Temperature Range
10-35°C
Recommended Operating
Relative Humidity Range
10-89%
Adjustable Timer Settings
0 seconds - 99 minutes 59 seconds (±5%)
No Load Paddle Speeds
(@ nominal 20°C)
200rpm (±5%)
230rpm (±5%)
260rpm (±5%)
Paddle Clearance
0-l0mm
* Only these or equivalent UL-approved fuses should be used.
Issue 3.5
19
Stomacher® 400 Circulator
User Instructions
6.3.2 EU Product
Model
Stomacher® 400 Circulator
Cat No.
0400/001/EU
Dimensions
330mm wide x 355mm deep x 300mm high (unpacked)
Weight
23kg (unpacked)
Supply Voltage
220-250V
Supply Frequency
50-60Hz
Plug Top Fuse
F5A (UK cord set only)
Mains Inlet Fuses*
T1.0A 250V 5x20mm, breaking capacity: 35A @ 250V
Transformer Fuse*
T250mA 250V 5x20mm, breaking capacity: 35A @ 250V
PCB Fuse*
F2.5A 250V 5x20mm, breaking capacity: 100A @ 250V
Insulation
Class 1 (Earthed)
Installation
Over Voltage Category II
Pollution
Pollution Degree 2
Duty Cycle
Continuous
Rated Load
140W
Disposable Bag Size
177mm x 304mm
Minimum Recommended
Capacity
80ml
Maximum Recommended
Capacity
400ml
Maximum Recommended Sample 60°C
Temperature
Recommended Operating
Ambient Temperature Range
10-35°C
Recommended Operating
Relative Humidity Range
10-89%
Adjustable Timer Settings
0 seconds - 99 minutes 59 seconds (±5%)
No Load Paddle Speeds
(@ nominal 20°C)
200rpm (±5%)
230rpm (±5%)
260rpm (±5%)
Paddle Clearance
0-l0mm
* Only these or equivalent UL-approved fuses should be used.
Issue 3.5
20
Stomacher® 3500 and 3500 Biowasher
User Instructions
7. Stomacher® 3500 and 3500 Biowasher
TOUCH PANEL
REAR COVER
CLOSING
MECHANISM
MAINS SWITCH
DOUBLE
FUSED
APPLIANCE
INLET
BODY
PADDLES
BAG
PROTECTOR
DOOR
CARRY
HANDLES
CORD SET
General Layout
Issue 3.5
21
Stomacher® 3500 and 3500 Biowasher
User Instructions
7.1 Application
There are no set rules in the application of the Stomacher® instrument and the following is intended as a guide
only and not to restrict laboratory technique.
7.1.1 Bag Selection and Filling
For best results it is recommended that only Genuine Seward Stomacher® Bags be used. Deep frozen foods
should not harm the bags but hard particles such as bone, grit, fruit-stones and seeds may cause puncturing.
Where a marginal condition exists or any hazardous material is being blended it is recommended that two
bags are used one inside the other.
If required, several bags may be processed simultaneously providing the total volume does not exceed
3500 ml. When doing so, it is recommended that they be layered vertically so that the ‘load’ is fairly evenly
distributed over the paddle faces.
For volumes less than 400ml an alternative Stomacher® model should be used.
7.1.2 Speed Selection
The NORM (normal) speed is suitable for the vast majority of applications and the instrument will always set
automatically to that position upon powering up. If an alternative speed setting is desired this may be selected
either prior to or during operation of the instrument. When depressed a short signal will be heard and the
corresponding small indicator lamp at the top corner of the touch pad will illuminate.
The LOW speed may be more suitable for delicate work e.g. cell separation to reduce or avoid cell damage.
Use of the HIGH speed can provide better agitation when blending predominantly liquid substances possibly
reducing the processing time. In the event of the power being interrupted the speed setting will always revert
to NORM (normal).
7.2 Control Key Functions
The touch control panel, located on the top of the Stomacher®, has the following functions: -
STOP
TIMED OUT CYCLES
CONTINUOUS
CYCLE
Issue 3.5
R.P.M CONTROLS
ON/OFF ROCKER
SWITCH
22
Stomacher® 3500 and 3500 Biowasher
User Instructions
7.2.1 Instructions For Use
1. Open the door by raising the handle fully upward and back. This gives access to the paddle
compartment.
2. Place the Stomacher® Bag(s) into the paddle compartment leaving 50 to 60mm protruding above the
bag clamp and close the door thus clamping the bag(s).
3. When switching on, the POWER switch illuminates and the Stomacher® pre-selects the NORM. speed
setting; shown by the indicator in the touch pad illuminating. The timer is initially set at zero.
4. If required, either the LOW or HIGH speed can be selected by pressing the appropriate key. Note the
audible signal and indicator illumination.
5. The stomaching process is initiated by the selection of a timed or continuous cycle. Again note the
audible signal and indicator illumination.
6. The stomaching process continues in normal circumstances until either: A) The timed cycle has finished.
B) The STOP key has been pressed.
C) The door has been opened.
D) The power has been switched off.
WARNING: - Opening the door during the operating cycle causes the instrument to stop. However, this must not be considered as the normal method for stopping the instrument.
If events B, C or D occur the timer automatically resets to zero.
7. After processing, simply open the door and remove the Stomacher® Bag(s). The instrument is immediately
ready for processing the next sample.
NOTE: A motor electrical current limiting device instrument is incorporated into the control circuit. Upon initial start-up
a short time may elapse before the motor builds up torque and runs normally. This condition is more likely to
prevail under the following circumstances: i) Upon initial start-up following a period of transportation or storage.
ii) The instrument has been stored or located in a cold environment (less than10°C allowing the rubber connectors to become stiff).
For condition (i) run the instrument for 5 - 10 minutes, preferably with a number of stop-start cycles. For
condition (ii) allow the instrument to stand in a warm environment as detailed in Section 7.3, followed by a
short period of running with stop-start cycles.
Issue 3.5
23
Stomacher® 3500 and 3500 Biowasher
User Instructions
7.3 Specifications
7.3.1 American and Japanese Products
Model
Stomacher® 3500 and 3500 Biowasher
Cat No.
3500: 3500/000/AM, 3500/000/JA
3500 Biowasher: 3500/001/AM
Dimensions
480mm wide x 480mm deep x 445mm high (unpacked)
Weight
36kg (unpacked)
Supply Voltage
100-120V
Supply Frequency
50-60Hz
Mains Inlet Fuses*
T2.0A 250V 5x20mm, breaking capacity: 100A @ 250V
Transformer Fuse*
T250mA 250V 5x20mm, breaking capacity: 35A @ 250V
PCB Fuse*
F2.5A 250V 5x20mm, breaking capacity: 100A @ 250V
Insulation
Class 1 (Earthed)
Installation
Over Voltage Category II
Pollution
Pollution Degree 2
Duty Cycle
Continuous
Rated Load
120W
Disposable Bag Size
380mm x 508mm
Minimum Recommended
Capacity
1000ml
Maximum Recommended
Capacity
3500ml
Maximum Recommended Sample 60°C
Temperature
Recommended Operating
Ambient Temperature Range
10-35°C
Recommended Operating
Relative Humidity Range
10-89%
Fixed Timer Settings
30 seconds (±5%)
60 seconds (±5%)
120 seconds (±5%)
Continuous
No Load Paddle Speeds
(@ nominal 20°C)
125rpm (±5%) LOW
150rpm (±5%) NORM.
175rpm (±5%) HIGH
Paddle Clearance
0-20mm
* Only these or equivalent UL-approved fuses should be used
Issue 3.5
24
Stomacher® 3500 and 3500 Biowasher
User Instructions
7.3.2 EU and UK Product
Model
Sttomacher® 3500 and 3500 Biowasher
Cat No.
3500: 3500/000/EU and 3500/000/UK
3500 Biowasher: 3500/001/EU and 3500/001/UK
Dimensions
480mm wide x 480mm deep x 445mm high (unpacked)
Weight
36kg (unpacked)
Supply Voltage
220-250V
Supply Frequency
50-60Hz
Plug Top Fuse
F5A (UK cord set only)
Mains Inlet Fuses*
T1.0A 250V 5x20mm, breaking capacity: 35A @ 250V
Transformer Fuse*
T250mA 250V 5x20mm, breaking capacity: 35A @ 250V
PCB Fuse*
F2.5A 250V 5x20mm, breaking capacity: 100A @ 250V
Insulation
Class 1 (Earthed)
Installation
Over Voltage Category II
Pollution
Pollution Degree 2
Duty Cycle
Continuous
Rated Load
120W
Disposable Bag Size
380mm x 508mm
Minimum Recommended
Capacity
1000ml
Maximum Recommended
Capacity
3500ml
Maximum Recommended Sample 60°C
Temperature
Recommended Operating
Ambient Temperature Range
10-35°C
Recommended Operating
Relative Humidity Range
10-89%
Fixed Timer Settings
30 seconds (±5%)
60 seconds (±5%)
120 seconds (±5%)
Continuous
No Load Paddle Speeds
(@ nominal 20°C)
125rpm (±5%) LOW
150rpm (±5%) NORM.
175rpm (±5%) HIGH
Paddle Clearance
0-20mm
* Only these or equivalent UL-approved fuses should be used
Issue 3.5
25
Stomacher® 3500 Thermo
User Instructions
8. STOMACHER® 3500 THERMO
8.1 Application
There are no set rules in the application of the Stomacher® instrument and the following is intended as a guide
only and not to restrict laboratory technique.
8.1.1 Bag Selection and Filling
For best results it is recommended that only Genuine Seward Stomacher® Bags be used. Deep frozen foods
should not harm the bags but hard particles such as bone, grit, fruit-stones and seeds may cause puncturing.
Where a marginal condition exists or any hazardous material is being blended it is recommended that two
bags are used one inside the other.
If required, several bags may be processed simultaneously providing the total volume does not exceed
3500 ml. When doing so, it is recommended that they be layered vertically so that the ‘load’ is fairly evenly
distributed over the paddle faces.
For volumes less than 400ml an alternative Stomacher® model should be used.
8.1.2 Speed Selection
The NORM (normal) speed is suitable for the vast majority of applications and the instrument will always set
automatically to that position upon powering up. If an alternative speed setting is desired this may be selected
either prior to or during operation of the instrument. When depressed a short signal will be heard and the
corresponding small indicator lamp at the top corner of the touch pad will illuminate.
The LOW speed may be more suitable for delicate work e.g. cell separation to reduce or avoid cell damage.
Use of the HIGH speed can provide better agitation when blending predominantly liquid substances possibly
reducing the processing time. In the event of the power being interrupted the speed setting will always revert
to NORM (normal).
Issue 3.5
26
Stomacher® 3500 Thermo
User Instructions
8.2 Control Key Functions
The control panel, located on the top of the Stomacher®, has the following functions: 1. POWER switch: powers up the Stomacher® and is illuminated when on.
2. TEMPERATURE CONTROLLER: allows the desired temperature setting to be selected between 20 and 50°C.
The upper (green) display indicates the actual temperature and the lower (orange) display indicates the
set or target temperature.
The set temperature can be adjusted by: - Press the
(STAR) and s(ARROW UP) keys to increase the set
temperature. Press the
and t(ARROW DOWN) keys to decrease the set temperature. Once set this
data is stored until reset and retained when the Stomacher is switched off.
3. HEATER ON/OFF switch: the temperature controller will automatically adjust the heater when the HEATER
switch is in the on position. The LED adjacent to the switch will illuminate to indicate when the heater is
switched on.
4. CYCLE TIME CONTROLLER: allows the desired cycle run time setting to be selected between 0 and
99 minutes, 59 seconds. The upper display indicates the cycle run time remaining and counts down.
The lower display indicates the set cycle run time. The cycle run time can be adjusted by pressing the
appropriate green button on the controller to increment each digit in turn. Once set this data is stored
until reset even if the Stomacher® is switched off.
5. The CYCLE switch enables the operator to select either of the following: TIMED - The Stomacher® runs at the selected speed for the duration of the selected time.
STOP - The Stomacher® will not run, but is still powered up. This switch does not control the heater.
CONTINUOUS - The Stomacher® runs at the selected speed continuously.
6. SPEED selector switch: enables LOW, MEDIUM or HIGH speed to be selected by turning the switch to the
appropriate position.
Issue 3.5
27
Stomacher® 3500 Thermo
User Instructions
8.2.1 Instructions For Use Without Heater Function
1. Open the door by raising the handle fully upward and back. This gives access to the paddle
compartment.
2. Place the Stomacher® Bag(s) into the paddle compartment leaving 50 to 60mm protruding above the
bag clamp and close the door thus clamping the bag(s).
3. When switching on, the POWER switch illuminates.
4. Select desired speed.
5. If a timed cycle is required set the TIMER CONTROLLER as previously described.
6A Setting the CYCLE switch to the TIMED position initiates the stomaching process, which will continue until either: •
The timed cycle has timed out.
•
The CYCLE switch has been set to the STOP position
•
The door has been opened.
•
The power has been switched off.
6B Setting the CYCLE switch to the CONTINUOUS position initiates the stomaching process, which will continue until either: •
The CYCLE switch has been set to the STOP position.
•
The door has been opened.
•
The power has been switched.
WARNING: Opening the door during the operating cycle causes the instrument to stop. However, this must not be considered as the normal method for stopping the instrument.
7.
After processing, simply open the door and remove the Stomacher® Bag(s). The instrument is immediately ready for processing the next sample.
Issue 3.5
28
Stomacher® 3500 Thermo
User Instructions
8.2.2 Instructions For Use With Heater Function
1. Open the door by raising the handle fully upward and back. This gives access to the paddle
compartment.
2. Place the Stomacher® Bag(s) into the paddle compartment leaving 50 to 60mm protruding above the
bag clamp and close the door thus clamping the bag(s).
3. When switching on, the POWER switch illuminates.
4. Set the desired processing temperature as previously described in 8.2.1 and switch the heater on.
5. Select the desired speed.
6. If a timed cycle is required set the TIMER CONTROLLER as previously described.
7A Actuating the cycle switch to the TIMED position initiates the stomaching process, which will continue until either: • The timed cycle has timed out.
• The CYCLE switch has been set to the STOP position.
• The door has been opened.
• The power has been switched off.
7B Setting the cycle switch to the CONTINUOUS position initiates the stomaching process, which will continue
until either: •
The CYCLE switch has been set to the STOP position.
•
The door has been opened.
•
The power has been switched off.
WARNING:- Opening the door during the operating cycle causes the instrument to stop. However, this must not be considered as the normal method for stopping the instrument.
8
After processing, simply open the door and remove the Stomacher Bag(s). The instrument is immediately
ready for processing the next sample.
NOTE: A motor electrical current limiting device is incorporated into the control circuit. Upon initial start up a short
time may elapse before the motor builds up torque and runs normally. This condition is more likely to prevail
under the following circumstances: i)
Upon initial start up following a period of transportation or storage.
ii)
The instrument has been stored or located in a cold environment (less than 10°C allowing the rubber connectors to become stiff).
For condition (i) run the instrument for 5 10 minutes, preferably with a number of stop start cycles. For condition
(ii) allow the instrument to stand in a warm environment as detailed in Section 8.3, followed by a short period
of running with stop-start cycles.
Issue 3.5
29
Stomacher® 3500 Thermo
User Instructions
8.3 Specifications
8.3.1 American Product
Model
Stomacher® 3500 Thermo
Cat No.
3500/002/AM
Dimensions
480mm wide x 480mm deep x 520mm high (unpacked)
Weight
40kg (unpacked)
Supply Voltage
100-120V
Supply Frequency
50-60Hz
Mains Inlet Fuses*
T6.3A 250V 5x20mm, breaking capacity: 63A @250V
Transformer Fuse*
T250mA 250V 5x20mm, breaking capacity 35A @ 250V
PCB Fuse*
T10A 250V 5x20mm, breaking capacity 100A @ 250V
Insulation
Class 1 (Earthed)
Installation
Over Voltage Category II
Pollution
Pollution Degree 2
Duty Cycle
Continuous
Rated Load
420W (of which heater is 300W)
Disposable Bag Size
380mm x 508mm
Minimum Recommended
Capacity
1000ml
Maximum Recommended
Capacity
3500ml
Maximum Recommended Sample 20-50°C
Temperature
Recommended Operating
Ambient Temperature Range
10-35°C
Recommended Operating
Relative Humidity Range
10-89%
Adjustable Timer Settings
0 seconds - 59 seconds or Continuous
No Load Paddle Speeds
(@ nominal 20°C)
125rpm (±5%) LOW
150rpm (±5%) NORM.
175rpm (±5%) HIGH
Paddle Clearance
0-20mm
* Only these or equivalent UL-approved fuses should be used.
Issue 3.5
30
Stomacher® 3500 Thermo
User Instructions
8.3.2 EU and UK Products
Model
Stomacher® 3500 Thermo
Cat No.
3500/002/EU and 3500/002/UK
Dimensions
480mm wide x 480mm deep x 520mm high (unpacked)
Weight
40kg (unpacked)
Supply Voltage
100-120V
Supply Frequency
50-60Hz
Plug Top Fuse
F5A (UK cord set only)
Mains Inlet Fuses*
T3.15A 250V 5x20mm, breaking capacity: 35A @250V
Motor Transformer Fuse*
T250mA 250V 5x20mm, breaking capacity 35A @ 250V
Heater Transformer Fuse*
T10A 250V 5x20mm, breaking capacity 100A @ 250V
PCB Fuse*
6.3A 250V HRC ceramic 5x20mm breaking capacity 100A @
250V
Insulation
Class 1 (Earthed)
Installation
Over Voltage Category II
Pollution
Pollution Degree 2
Duty Cycle
Continuous
Rated Load
420W (of which heater is 300W)
Disposable Bag Size
380mm x 508mm
Minimum Recommended
Capacity
1000ml
Maximum Recommended
Capacity
3500ml
Maximum Recommended Sample 20-50°C
Temperature
Recommended Operating
Ambient Temperature Range
10-35°C
Recommended Operating
Relative Humidity Range
10-89%
Adjustable Timer Settings
0 seconds - 59 seconds or Continuous
No Load Paddle Speeds
(@ nominal 20°C)
125rpm (±5%) LOW
150rpm (±5%) NORM.
175rpm (±5%) HIGH
Paddle Clearance
0-20mm
* Only these or equivalent UL-approved fuses should be used.
Issue 3.5
31
Stomacher®
User Instructions
9. MAINTENANCE
9.1 Cleaning
The instrument should be kept externally clean by wiping over periodically with a cloth damped with mild
liquid detergent. Do not use any solvent-based cleaning agents, as they will damage the paint finish. First
switch the instrument off and disconnect from the mains electrical supply before wiping down all the surfaces
including the control panel.
CAUTION: - Ensure the equipment is switched off and unplugged from the mains electrical supply before cleaning near any electrical components.
To facilitate cleaning the processing chamber, the door hinge lugs are open-slotted to enable the door to be
lifted from the lower pivot pins. To do this open the door in the normal way by lifting the lid fully upward and
back then pull the door sharply upwards. In the Stomacher® 3500, and 3500 Biowasher, the black neoprene
sheet should be removed first by unscrewing the knurled thumbscrews.
Note that the door must not be removed on the Stomacher 3500 Thermo except by a qualified technician
as the procedure is more involved due to the electrical connections to the heater blanket, however the
neoprene sheet can be removed to assist cleaning.
A small handled brush may be helpful for cleaning. It is recommended this procedure be carried out
immediately in the event of any spillage. Refitting of the door is the reversal of the above procedure; ensure
the door hinge lugs are fully engaged on both sides before commencing use.
9.2 Replacing Primary Fuses
The primary fuses can only be removed with the aid of a tool, typically a screwdriver, since they are not
considered operative replaceable. 1n the event of a fuse failure we recommend the equipment and mains
electrical supply is checked by a competent qualified electrician.
WARNING: - When replacing fuses ensure they are replaced with fuses of the same rating and specification, refer to the appropriate model specification section of this manual. Please contact Seward Technical Service if in doubt.
9.3 Servicing and Spare Parts
Suitably qualified persons should only carry out internal servicing and maintenance. A Maintenance Manual
is available giving full details of servicing and repair procedures, wiring diagrams, parts identification and
general assembly drawings. We recommend as a matter of routine that the instrument is inspected and
serviced at least every six months or sooner if extensively used.
Issue 3.5
CAUTION: - This equipment should not be used if damaged in any way. If in doubt please contact your local Seward Ltd authorised service centre.
32
Stomacher®
User Instructions
10. WARRANTY AND SERVICE POLICY
All Seward Stomachers® are protected by a 36-month warranty covering faulty workmanship and materials. In
the event of a fault developing within this period please contact Seward Customer Service who will organise
the collection/return of the instrument for warranty repair and/or replacement at Seward’s discretion.
The warranty is void if the instrument has been damaged as a result of unauthorised service, modification or
subject to neglect, misuse, and accident, improper installation or operation.
11. COMPLIANCE
Seward Stomachers® are designed and manufactured to conform to the following standards: •
IEC 1010-1 : 1990
Safety Requirements for Electrical Equipment for Measurement, Control and Laboratory Use.
•
UL 3101 - 1 : 1993
•
This equipment complies with the essential requirements of the European Council Directive 89/336/
EEC relating to EMC and carries the CE mark.
Electrical Equipment for Laboratory Use General Requirements
12. STORAGE AND TRANSPORT
Recommended storage and transport conditions are:Ambient Temperature Range
-20 to + 50°C
Relative Humidity Range
10 - 90%
Seward Stomachers® should ideally be stored in a clean environment and for long periods of storage it should
be re-packed in the original packaging.
Seward Stomachers® should be transported in the original packaging.
Seward Limited
Dominion House, Easting Close
Worthing
West Sussex BN14 8HQ
United Kingdom
Telephone: +44 (0)1903 823077
Facsimile: +44 (0)1903 219233
E-mail: [email protected]
Issue 3.5
33