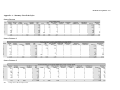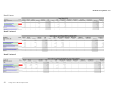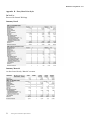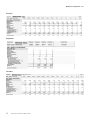
1
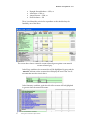
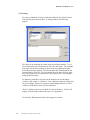
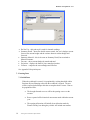
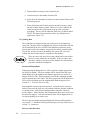
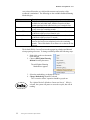
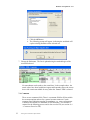
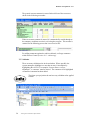
Workbook Training Manual – V3.1
BUSINESS OBJECTS PLANNING
BUDGET/FORECAST PROCESS
TRAINING MANUAL
Version:
Date
3.2
14th October 2008
[email protected]
Tel : 48336
http://www.ucl.ac.uk/finance/finance_pages/financial_project/frp_train_notes.doc
1
Training Notes for Business Objects Planner
Workbook Training Manual – V3.1
1.
2.
Introduction...............................................................................................4
Logging on to BOP Through ADS (Finance Only) ............................... 4
2.1. Installing BOP ..............................................................................................4
2.2. Logging on to BOP Within ADS.................................................................5
3. Logging on to BOP Through WTS (Requires an IS Account)............. 6
3.1. Accessing WTS .............................................................................................6
3.2. Logging on to BOP Within WTS................................................................9
4. The BOP Homepage .............................................................................. 10
4.1. Plan Toolbar ...............................................................................................10
4.2. Treeview......................................................................................................11
4.3. Exiting BOP................................................................................................11
4.4. Using Other Excel Files Whilst in Business Objects Planning ..............11
5. Opening a Workbook ............................................................................ 12
5.1. Opening Workbooks from the BOP Homepage......................................12
5.2. Opening Workbooks from the Plan Menu ..............................................12
5.3. Opening Workbooks from the Treeview .................................................13
5.4. Exiting a Workbook...................................................................................13
6. Workbook Navigation............................................................................ 14
6.1. Workbook worksheets ...............................................................................14
6.2. Summary Worksheet Overview................................................................14
6.3. Entry Worksheet Overview ......................................................................15
6.4. Work Area ..................................................................................................16
6.5. Comments ...................................................................................................16
6.6. Materiality ..................................................................................................16
6.7. Printing .......................................................................................................18
7. Entering Data ......................................................................................... 19
7.1. Initial Data..................................................................................................19
7.2. Updating Data ............................................................................................20
7.3. Standard Planning Methodologies (SPMs)..............................................21
7.4. Comments ...................................................................................................23
7.5. Validation....................................................................................................24
8. Adding a New Account ......................................................................... 26
8.1. The Process .................................................................................................26
8.2. Adding an Account to the Entry Worksheet ...........................................27
8.3. Adding an Account to the Summary Worksheet ....................................29
9. Saving a Workbook ............................................................................... 29
9.1. Saving a Complete Workbook ..................................................................29
9.2. Saving an Incomplete Workbook .............................................................30
9.3. Save the Workbook to Your Directory ....................................................31
10. Process Control ..................................................................................... 31
10.1.
Advancing ...............................................................................................32
10.2.
Returning a Workbook..........................................................................33
10.3.
Workbook History Log..........................................................................34
10.4.
Process Control Manager......................................................................34
11. Administration ....................................................................................... 35
11.1.
Advance Override ..................................................................................35
2
Training Notes for Business Objects Planner
Workbook Training Manual – V3.1
11.2.
Changing Ownership .............................................................................35
11.3.
Rebuilding a Workbook ........................................................................35
12. In Year Adjustment Workbook (IYA Workbook)................................. 35
12.1.
The Purpose of the IYA Workbook .....................................................35
12.2.
The Layout of the IYA Workbook .......................................................36
12.3.
Updating the IYA Workbook ...............................................................36
12.4.
IYA Validation .......................................................................................37
12.5.
IYA New Accounts.................................................................................37
13. Allocations and Reserve Adjustments...... Error! Bookmark not defined.
14. Transfers to FIS ..................................................................................... 41
14.1.
Allocation and Reserve Adjustments Posted to FIS ...........................42
14.2.
Budgets Posted to FIS............................................................................42
14.3.
Forecasts Posted to FIS .........................................................................42
14.4.
Comments Posted to FIS .......................................................................43
15. Reports ................................................................................................... 43
Glossary......................................................................................................... 48
Appendix A – Summary Sheet Print Styles............................................... 49
Appendix B – Entry Sheet Print Styles...................................................... 51
3
Training Notes for Business Objects Planner
Workbook Training Manual – V3.1
1. Introduction
The purpose of BOP is to prepare a Quarterly Forecast process and the update of
the Budget. For each area an Excel Workbook will be produced which will be
pre-populated with the latest position for each account. When the workbooks are
ready for review an email will be sent to the departmental user who will need to
log on to Business Objects Planning to access the workbooks. The data in the
workbooks then needs to be reviewed and updated by the department to reflect the
best estimate of the Budget/Forecast for the year. Once approved at departmental
level the workbook can be forwarded via the system to the nominated first
approver, for Academic Departments normally the Faculty Management
Accountant, who will review the amended workbook and can either approve,
amend or return it to the department for changes to be made. One further level of
approval can be built into the system before the workbook is received within
Finance Division for final review and incorporation into the latest Quarter
Forecast or Budget.
It is possible to divide a department’s accounts between a number of workbooks,
although this will only be recommended for workbooks where the number of
accounts is very high. Movements of reserves or allocations will not be possible
across workbooks and needs to be considered when workbooks are split. It may
be necessary to split workbooks where:
1) There are too many accounts for a single workbook (maximum size
approximately 300 accounts)
2) Different people within the department are responsible for entering the data
3) The workbooks need to follow different approval paths (although this should
be rare)
4) The department wishes to have workbooks for different areas of activity (eg
sub-units) or into more manageable chunks.
2. Logging on to BOP Through ADS (Finance Only)
2.1. Installing BOP
To install Business Objects Planning on to the PC select the following link,
holding down CTRL
<\\as27.adcom.ucl.ac.uk\PlanningDeployment\ClientInstall\Professional
Edition Client.msi>
Select Run, then Next
Click Install when prompted
When this is finished, deselect the view documentation box and click
Finished
4
Training Notes for Business Objects Planner
Workbook Training Manual – V3.1
2.2. Logging on to BOP Within ADS
Start the Business Objects Planning software by choosing Start>All
Programs>Business Objects>Professional Edition
The following log on screen should then appear. Make sure that the system
selected is UCL Planning Live and that the Authentication Type is set to
ADS Explicit (not Planning). When ADS Explicit is selected, the username
is automatically populated and the cursor points to the password. The user
must overwrite the pre-populated password with their ADS password.
5
Training Notes for Business Objects Planner
Workbook Training Manual – V3.1
After entering this, the system should load up the user’s homepage in
Business Objects Planning, which looks similar to the screen below.
3. Logging on to BOP Through WTS (Requires an IS Account)
3.1. Accessing WTS
If the user has used Staff WTS before they should move to Section 3.2 –
Logging on to BOP within WTS.
To access WTS the user must have an IS account. To obtain an IS account
please contact the IS Helpdesk, details of which can be found by selecting
the link below whilst holding down CTRL.
http://www.ucl.ac.uk/is/helpdesk/
There are 2 modes through which the user may access WTS, Standalone
WTS (Section A) and Web Based WTS (Section B). It is recommended that
the user accesses BOP using the Standalone WTS access as this will
automatically map the user’s local drives and printers. Both modes can be
accessed through any PC that has an internet connection. Standalone does
require an installation to be made to the local PC and will therefore take
longer to set up initially.
When using the WTS desktop, this will operate autonomously
from the user’s local desktop. Any processing in WTS is carried
out on the IS server so should not impact on the speed of other
applications running on the users local PC desktop.
6
Training Notes for Business Objects Planner
Workbook Training Manual – V3.1
A) Standalone WTS (Installation)
Using standalone WTS, all of the user’s drives that can be accessed through
their PC should be available in WTS. All of the users Printers should also
be available through WTS.
The user is able to enter their username and password when
setting up their standalone WTS session so that they can log
straight into WTS without having to enter their details every time
(NOTE: they must still enter their password to access BOP).
Select the following link, holding down CTRL, to log on to Staff WTS.
http://www.ucl.ac.uk/is/wts/standalone/
This will direct the user to the Information Support Division web pages. The
user must choose the relevant operating system and then follow the on
screen instructions. For help with installing standalone WTS please contact
the IS Helpdesk, details of which can be found by selecting the link below
whilst holding down CTRL.
http://www.ucl.ac.uk/is/helpdesk/
B) Web Based WTS
Select the following link, holding down CTRL, to log on to Staff WTS.
http://www.ucl.ac.uk/is/wts/web/
This will direct the user to the Information Support
Division web pages. Click on the Staff WTS button.
This will start to load the Staff WTS connection. The user needs to choose
Click to Connect and the system will move into the Staff WTS environment.
7
Training Notes for Business Objects Planner
Workbook Training Manual – V3.1
The default screen size for Web WTS is 1024 x 700. This screen size may
be too small. If this is the case, the user can either use the standalone
installation of WTS (See Part A). Alternatively, if the user has a 19inch
monitor then they can select the following link, holding down CTRL
http://www.ucl.ac.uk/is/wts/web/resolution.htm#
Choose ‘Launch Session 1260 x 1024’ (See below).
The user will then need to choose to log on to ‘UCLUSERS’ and enter their
Information Systems username and password when prompted.
The following message will be displayed before the system logs the user on
to Staff WTS. Select yes to proceed.
8
Training Notes for Business Objects Planner
Workbook Training Manual – V3.1
3.2. Logging on to BOP Within WTS
Once logged on to Staff WTS, start the Business Objects Planning software
by choosing Start>Program>Software A-D>Business Objects
Planning>UCL Professional Edition
The system will then prompt the user again for their Information Systems
username and Password. (Note: This prompt may be hidden from view and
appear to stall. If this is the case, click on the toolbar at the bottom of the
screen and then click back on the WTS desktop. The login screen should
appear.) Before entering their username and password, the user must make
sure that the system selected is UCL Planning Live and that the
Authentication Type is set to ADS Explicit (not Planning). When ADS
Explicit is selected, the username is automatically populated and the cursor
points to the password. The user must overwrite the pre-populated password
with their Information Systems password.
9
Training Notes for Business Objects Planner
Workbook Training Manual – V3.1
To disconnect from Staff WTS, select the Disconnect button.
4. The BOP Homepage
The BOP homepage should be similar to the screen below. The larger part
of the screen is the BOP homepage. At the left of the homepage is the
Treeview (see section 4.2 - Treeview). The BOP homepage is split into 3
sections. At the top is the ‘Currently Assigned’ section where there will be a
list of workbooks for which the user is currently assigned as the owner. For
more information about workbooks see section 5 – Opening a Workbook. In
the centre of the BOP homepage there is an announcements section. This
will contain the last time data was loaded from FIS and any useful hints or
information. The section at the bottom of the BOP homepage holds a list of
useful links, such as a link to the user manual.
4.1. Plan Toolbar
The Plan toolbar sits within the standard Microsoft
toolbar. Everything that the user requires can be
accessed through the Plan toolbar. The toolbar will
change depending on the task that the user is doing
within BOP. There is some functionality that will
be duplicated within other menus on the toolbar,
such as the save option. In all cases it is
recommended that the Plan option is used as there
10
Training Notes for Business Objects Planner
Workbook Training Manual – V3.1
are some instances where the Plan option performs BOP specific actions not
performed by the alternatives on the other menus.
4.2. Treeview
The Treeview offers a quick menu route to
perform a number of key tasks. To select an
item though the Treeview, drill though the
levels in the Treeview to get to the action
required. To activate that action, double click
the select mouse button on that action. If the
action is performed regularly, clicking the
query mouse button on the action brings up a
menu with the ‘Add to favourites’ option.
Selecting this will move the action into the
Favourites section at the top of the Treeview.
Selecting the double arrow
at the top right hand corner of
the Treeview minimises the Treeview to allow more space for
anything being displayed on the BOP homepage.
4.3. Exiting BOP
To log out, select from the Business Objects Planning toolbar
Plan>Exit>Desktop.
(Alternatively, from the Treeview drill into Exit and double click the mouse
button on the Desktop action).
4.4. Using Other Excel Files Whilst in Business Objects Planning
Whilst logged on to Business Objects Planning the user may find that
clicking on other excel files (e.g. email attachments or from windows
explorer) will open them into the BOP session. To overcome this problem
the user should first open a separate excel session on their desktop in the
normal way. When the user would like to open an excel file they should first
make sure they have accessed the separate excel session on their desktop
toolbar immediately before clicking the excel file to open. This will then
open the file in the separate excel session. If BOP was the last session
accessed then the excel file will automatically open there. To close a file
11
Training Notes for Business Objects Planner
Workbook Training Manual – V3.1
inadvertently opened in BOP click on the top right hand X of the worksheet
area in the normal way. This will not be the case if the user is accessing
BOP through WTS but is opening up excel files on their local desktop as
both desktops operate autonomously.
5. Opening a Workbook
5.1. Opening Workbooks from the BOP Homepage
Budget workbooks can be opened from each users Home page. At the top of
the home page there is a list of all workbooks that are currently at a stage
where the logged in user is assigned as the owner. The list includes the name
of the Workbook, the stage due date, the date last saved and by whom. The
status of these workbooks is colour coded according to the following key.
•
•
Green – The workbook is within the due date
Red – The workbook is past its due date for its current stage
Users can click on the workbook names to open a workbook directly.
5.2. Opening Workbooks from the Plan Menu
Workbooks can be opened through the Plan menu by choosing Plan>Budget
Workbooks. NOTE: the term ‘Budget Workbook’ is a generic description in
the database and has no relation to the standard process being performed (i.e.
These workbooks may be Budget Workbook or Forecast Workbooks). A
‘Budget to Open’ dialog box similar to the following appears:
T
h
e
w
o
r
k
b
o
o
k
s
12
Training Notes for Business Objects Planner
Workbook Training Manual – V3.1
displayed will be only those workbooks that the user has access to. This
includes read-only workbooks that have been advanced for review (see
section 10.1- Advancing) and are no longer available for the user to amend.
The table below shows how the list of workbooks can be sorted by selecting
the relevant check box.
Options
Default
View by Description
View by Stage Order
Description
The list appears sorted by the workbook code
Sorts the list by workbook description
This option sorts the workbooks by the stage they are at (see
section 10 - Process Control)
To open a particular workbook, double click on a Department name, or
select the department name and click OK. Only one workbook may be
opened at a time.
5.3. Opening Workbooks from the Treeview
Workbooks can also be opened through the Treeview by choosing Budget
Workbooks. This will open up the same ‘Budget to Open’ dialog box
discussed in section 5.2 – Opening Workbooks from the Plan Menu.
5.4. Exiting a Workbook
Before exiting the user should save the workbook if necessary (see section 9
– Saving the workbook). To exit from a workbook go to the Plan toolbar and
choose Plan>Exit>Home. This returns the user back to the homepage.
Alternatively, go to the Treeview on the left and choose Exit>Home.
Exit from a workbook using the
in the top right hand corner
of the workbook and the system remain attached to a ‘Global
Assumptions’ worksheet. This worksheet, whilst hidden from view,
holds essential data critical to formulae within the workbook and
13
Training Notes for Business Objects Planner
Workbook Training Manual – V3.1
cannot be shut down. The user must use the ‘Home’ action described above.
6. Workbook Navigation
6.1. Workbook worksheets
The standard reporting process will consist of a budget and four quarterly
periods. The differences between a budget workbook and a forecast
workbook are minor. Basically, during a budget process the user will be
entering data into the next financial year using a budget workbook. In a
Forecast workbook, the user will be updating forecasts for the remaining
year that has not been superseded by actual data loaded form FIS.
Each workbook will have six worksheets. These sheets are summarised
below:
Worksheet
Summary
Entry
Work Area
Comments
Instructions
Description
This worksheet gives an overview of all accounts. When the
workbook is first opened, the summary sheet will be
displayed.
This worksheet is where all of the adjustments are entered
Two blank worksheets that operate as standard excel sheets.
These can be used to carry out calculations before posting to
the ‘Entry’ worksheet. All data entered into these work areas
will be deleted once the process is complete.
This worksheet will allow users to enter comments that may
be informative to the review and vice versa. Comments
entered into this worksheet will be deleted once the process is
complete.
A brief description of how to update the templates. There is
also a link to the workbook user manual should more detail be
required.
6.2. Summary Worksheet Overview
The summary worksheet provides an overview for all of the accounts within
the workbook. The summary provides the detail of the Entry worksheet in a
columnar view and is split into two sections.
14
Training Notes for Business Objects Planner
Workbook Training Manual – V3.1
At the top there is a summary of the total activity by source. This allows
users to review the accounts quickly to ensure that all data seems reasonable
and to ensure that where necessary, any transfers return to zero (for more on
this refer to section 7.5 – Validation).
Next there is a list of all of the accounts. These accounts are displayed by
source and then by account order. Each Account name is a hyperlink that
takes the user directly to the account within the Entry worksheet. An
example of an account with a hyperlink is shown below. To activate the
hyperlink simply click the select mouse button on the account title.
6.3. Entry Worksheet Overview
The entry worksheet is the key worksheet in the workbook. Data entered
into the Entry worksheet dictates what is posted back to the database.
When the worksheet is selected, the screen should be similar to the
screenshot above showing data for each account within the
Department/Division.
The rows will vary depending on the source code of the account:
15
•
The ‘Reserve b/f’, ‘Reserve posted’ or the ‘Reserve Adjustment’s
rows will not appear on source 0 or source A accounts.
•
The ‘Allocation’ and ‘Allocation Adjustment’ rows will only
appear on selected source 0 accounts and all accounts that are
sources 1, 2, 3, B or 9.
•
The income lines displayed will be dependant on the source code
of the account. The following table shows how the income lines
are mapped to the source codes. The first row shows a list of all
available sources against which income may be posted. For each
source, a ‘*’ sign indicates the available income rows.
Training Notes for Business Objects Planner
Workbook Training Manual – V3.1
Income line/Source:
Tuition Fees - Other Fees
Research - Research Councils
Research - UK Charities
Research - UK Central Govt, local/heath auth
Research - UK industry & commerce
Research - EU government
Research - EU other
Research - Other overseas
Research - Other sources
Research - Release of deferred capital grants
Other Services Rendered
Donations and Sundry Grants
Residencies and Catering
Health Authorities
Other Income
Endowment Income
•
3
*
4
A
H
*
J
*
9
P
*
*
G
F
8
5
6
X
W
Y
*
*
*
*
*
*
*
*
*
*
*
*
*
*
*
*
*
*
*
*
*
*
*
*
*
*
A final income line will be displayed (Income Exceptions) that
captures all income already posted to the account within FIS
against an income line that should not be available for the
particular source of account. As a result, this row will be
unavailable for posting forecasts against.
The entry template will be replicated for all of the accounts within the
Department. The accounts will be grouped by Budget Manager, source code
and then in alphabetical order.
To zoom in and out of the worksheet, hold CTRL and roll the
mouse wheel forward and back.
6.4. Work Area
The work area consists of two blank worksheets that operate as standard
excel sheets. These can be used to carry out calculations before posting to
the ‘Entry’ worksheet. This will provide supporting data to assist other users
when reviewing data. In the ‘Entry’ sheet, no links can be made to external
workbooks. All data entered into these work areas will be deleted once the
process is complete.
6.5. Comments
The comments sheet allows the user to input comments that are specific to
the process. This is to assist communication between the reviewers and the
submitters. All data entered into the comments worksheet will be deleted
once the process is complete.
6.6. Materiality
The system draws out those accounts that are material to assist the user to
initially focus on the accounts that have the largest impact upon the
budget/forecast position. Materiality levels are set as the following:
16
Training Notes for Business Objects Planner
Workbook Training Manual – V3.1
•
•
•
•
Brought forward balance > £50k; or
Allocation > £50k; or
Annual Income > £20k; or
Deficit balance > £5k
There is no Materiality criteria for expenditure as this should always be
funded by one of the above.
The screen above shows a material account coloured green against a non material
account coloured grey.
In the Entry worksheet, the account titles will be highlighted in green and the
‘material’ indicator on the account title will display the word “Yes” for all
accounts that meet the criteria above.
In the Summary worksheet, again the title of the account will be highlighted
in green to show the material accounts.
17
Training Notes for Business Objects Planner
Workbook Training Manual – V3.1
6.7. Printing
To print a combination of sheets within the workbook, select Print Current
from the Plan menu or the toolbar. A dialog similar to the following
appears:
The sheets in the workbook are listed in the top left-hand window. To see
the available print styles for that sheet, click on a sheet name. The available
print styles for the selected sheet are listed in the top right-hand window.
Select the print style required. The selected print style should populate the
central window ‘Print List’. The user should select the Print Preview check
box if they wish to see the layout of the selected print style. Selecting Ok
will print the Print Style.
For Summary worksheet, the styles can be displayed as current budget,
variance 1 and variance 2. Variance 1 is the comparison between current and
last year’s budget. Variance 2 compares current budget and forecast. These
variances will be different for forecast workbooks.
‘Source’ displays only the source totals for each of the above. ‘Detail’ will
display all the accounts within each source. See Appendix A.
For the Entry Worksheet the Print Current appears as below:-
18
Training Notes for Business Objects Planner
Workbook Training Manual – V3.1
•
•
•
•
•
•
Do Not Use – this print style is used for internal workings.
Summary Detail – shows the details current actuals, last year’s budget, current
forecast, the current budget and the variance between current budget and
forecasts.
Summary Material – this is the same as Summary Detail, but restricted to
Material accounts.
Forecast – shows current budget by month and total.
Projection – displays the future 4 years annual projections.
Variance – compares the current budget and forecasts
See Appendix B for print layouts
7. Entering Data
7.1. Initial Data
When the workbook is created, it is populated by existing data held within
Business Objects Planning at the time the workbook is created. The user
will be expected to build upon this data to complete their Forecast. Data to
be populated will be:
19
•
The brought forward reserves will be the opening reserve on the
account.
•
Reserve posted will be historical movements made within the current
year.
•
The opening Allocation will initially be an allocation made by
Finance/Faculty, but during the year this will include movements.
Training Notes for Business Objects Planner
Workbook Training Manual – V3.1
•
Historical data from the previous Financial year.
•
Actual activity for the months closed on FIS.
•
Salary forecast information on salary accounts from the Finance staff
forecasting system
•
Future Projections will in most cases be entered by the user, unless
the data is under Finance control. When a new year is added to the
future projections this will be based on the previous year plus a
percentage. The user will be informed when new year data is added.
NOTE: The Future Projections do not have any validation rules
applied (see section 7.5).
7.2. Updating Data
The workbooks are designed so that only certain areas are designated as
input cells. The input cells are highlighted in yellow to indicate the cells that
can be amended by the user. All other cells should be protected to ensure
that any data saved to the database is input into the strictly controlled fields.
Also, before saving any data to the database the system will verify and
validate the data to ensure that it is acceptable to the database.
There are some cells greyed out as they should not be entered into.
However, some of these are not lockable. If the user enters data
into these cells they will on save to the database and will not form
part of the workbook calculations.
Income and Expenditure
When preparing the budget the user will be required to update the position
for all twelve months. All twelve months will be exported into FIS as the
Initial Budget once the workbook has financial approval (see section 14.2 –
Budgets Posted to FIS). When preparing a forecast the remaining monthly
cells are opened up for user input. The future projections will be exported to
FIS as a Forecast update once the workbook has financial approval (see
section 14.3 – Forecasts Posted to FIS).
Data should be entered to the nearest pound. A formula can be entered to
link the Forecast to the work area, but cannot be linked to another workbook
or external source. Both Income and Expenditure should be entered as
positive figures. When entering ‘Inter Departmental Recoveries’, these must
be entered as negative. Only relevant income lines will be displayed for an
account, depending on its source code.
The user may also update the Spread Method for Income and Expenditure
(see section 7.3 - Standard Planning Methodologies) and any comments (see
section 7.4 - Comments).
Reserves and Allocations
20
Training Notes for Business Objects Planner
Workbook Training Manual – V3.1
Reserve and allocations will only be displayed if they are relevant for the
source of the account. If users wish to make a reserve or allocation
adjustment they must update the current month on the relevant adjustment
line. To increase funds the adjustment must be positive. Once the
workbook has received final approval the adjustments will be loaded against
Total Funds in FIS (see section 14.1 – Allocation and Reserve Adjustments
Posted to FIS)
If an adjustment is required to an account outside of the workbook (e.g.
another department) then the user must request the allocation be made by
FMAs using the ‘Allocation and Reserve Adjustments Workbook’ (see
section 13 - Allocation and Reserve Adjustments). These adjustments will
automatically be loaded into the ‘Entry workbook’ once they have been
approved and processed.
The user may update any comments (see section 7.4 - Comments).
All cells are protected against entry except where entry is expected.
To minimise errors, data should be entered directly into the cell.
However, if the user drags an entry cell over the top of another
entry cell or cuts and pastes an entry cell, the system will allow it
but when saving will give the following error message.
If this occurs, contact the Administrator immediately
Format of Data Entry
To give an allocation – positive
To increase an allocation – positive
To decrease an allocation – negative
To increase a reserve – positive
To decrease a reserve - negative
To increase income – positive
To increase expenditure (except IDRs) – positive
To increase an Inter Departmental Recovery (IDR) - negative
7.3. Standard Planning Methodologies (SPMs)
A Standard Planning Methodology defines the way in which a yearly total
can be spread across the year. It allows the spreading of forecasts to be
carried out very quickly. It offers ensures a controlled method of updating a
21
Training Notes for Business Objects Planner
Workbook Training Manual – V3.1
row so that all formulae are valid and the structure and security of the
workbook is maintained. The following are the available Standard Planning
Methodologies:
SPM
Manual
Even
Previous FY
Previous 12 months
Current Forecast
Description
Each month will become highlighted in yellow and will be
available for individual input, with the exception of those
months populated with actual activity (see example below)
The system will spread the annual total (less actual months)
evenly across the remaining months
The system will spread the annual total (less actual months)
on the basis of the previous financial year
The system will spread the annual total (less actual months)
on the basis of the previous 12 months
The system will spread the annual total (less actual months),
based on the last forecast submitted, across the remaining
months. This will default to Even if there is no data in the last
forecast.
The default SPM is Current Forecast when preparing a budget and Manual
when preparing a forecast. To change an SPM, perform the following steps:
1. Right click on the row that needs
to be changed
2. Choose ADD/Update Planning
Method from the plan menu
The add/Update Planning
Methods box appears
3. Select the methodology to change the line to.
4. Change Methodology should be selected
The ‘overwrite current’ operation should be greyed out.
The ‘Option Desired’ defaults to ‘Insert new line(s)’. If this is
selected, the system will pause to assess the request, but will do
nothing.
22
Training Notes for Business Objects Planner
Workbook Training Manual – V3.1
5. Click the OK button.
6. The following prompt will appear, indicating the workbook will
replace existing formulae on the selected row.
7. Choose the Yes button. The line is updated using the methodologies of the
new SPM selected.
No amendments can be made to the actual data. In the example above, the
actual values have been loaded into August and September, hence the reason
these cells remain unavailable for entry when the ‘manual’ SPM is selected.
7.4. Comments
There are two comment fields. There is a comment field for all lines within
the account template and one for a general account comment. Certain
comment lines within the template are mandatory, e.g. reserve adjustments.
Comments are limited to a maximum of 100 Characters. This account is
retained for the following process and is also saved to FIS (see section 14.4
– Comments Posted to FIS).
23
Training Notes for Business Objects Planner
Workbook Training Manual – V3.1
The general account comment is entered in the title bar of the account as
shown in the following screenshot.
When an account comment is entered, it is automatically carried through to
the summary worksheet to assist in reviewing the accounts. This account is
retained for the following process but is not saved to FIS.
For adding comments against the whole workbook, see Stage comments
within Process Control (section 10.1 – Advancing).
7.5. Validation
There are many validation rules in the worksheet. Where possible, the
system attempts to highlight to a user that an entry is incomplete by
highlighting the cell red. For example, if a user enters a ‘reserve
adjustment’, a ‘comment’ must be entered. The comment cell is highlighted
red until the comment has been added.
The future year projections do not have any validation rules applied
to them.
24
Training Notes for Business Objects Planner
Workbook Training Manual – V3.1
Some validation rules are cell specific and some are workbook validation
rules. When the workbook is saved (see section 9 – Saving a workbook), if
there is a cell specific validation error, an error message will be produced
that directs the user to the row of the cell that is causing the problem and
gives a brief summary of what the error is. The list of errors can be printed
if necessary by selecting the Print checkbox and choosing Continue. This
will print the error message in full.
Here is a list of the cell specific validation rules:
•
•
•
•
•
All ‘reserve adjustments’ require a comment to be added
All ‘allocation adjustments’ require a comment to be added
All entries to ‘Equipment Expenditure > £25k’ require a
comment
All entries to ‘Contribution to Capital Projects’ require a
comment
If an account in surplus goes into deficit, or an account in deficit
goes into a larger deficit position, this will produce an error.
When the workbook is
saved (see section 9 –
Saving a Workbook), if
there is a workbook
validation error, an error
message will be
produced. The error
message will describe the
problem.
25
Training Notes for Business Objects Planner
Workbook Training Manual – V3.1
Here is a full list of the workbook validation rules:
•
The allocation adjustments must have a net total of ‘0’ by source
within each Department/Division.
•
The reserve adjustments must have a net total of ‘0’ by source
within each Department/Division.
All validation errors should be fixed before a workbook can receive final
approval. However, the workbook can still be saved with the validation
errors. (For more about saving see section 9.2 – Saving an Incomplete
Workbook). On the summary sheet all accounts with a validation error have
the source field highlighted in red. The summary sheet also highlights in red
the workbook validation errors.
In exceptional circumstances, Faculties can agree with Finance to approve
accounts where there is a validation error caused by the adverse movement
on reserves pushing the reserve carried forward position into a negative.
8. Adding a New Account
8.1. The Process
Before the Budget/Forecast process has commenced, it is recommended that
users set up all new accounts that they will require in advance. These will
then appear in the workbook from the start. However, if a new account is
required within the current process and has been set up in FIS, there is a
facility to bring this account into the workbook. Before doing this, the user
must email the BOP Administration team at [email protected] so that
they can assign the new accounts to the workbook.
New accounts must be entered into FIS first. There is no facility to
update BOP with new accounts that are not created in FIS.
26
Training Notes for Business Objects Planner
Workbook Training Manual – V3.1
8.2. Adding an Account to the Entry Worksheet
All new accounts in the Entry worksheet must be added to the bottom. They
will remain at the bottom for the remainder of the process. When a new
standard process is commenced these new accounts will form part of the
standard workbook structure. To add an account there is a blue bar at the
bottom containing the words ‘Insert a new account’.
At the right hand side of this bar there is a yellow box. The new account
code must be entered into this box. The system will only accept a legitimate
account. It will not add an account if it results in the account being
duplicated in the workbook and will inform the user if this occurs. If an
account is a legitimate account and is not already present in the worksheet, it
will only add the account if it has been attached to the workbook by the
Administration team. If it has not the following message will be displayed
‘Account is not mapped to workbook. Please contact your administrator’.
Once the user has contacted the BOP Administration team at
[email protected] and been advised that the account has been attached
to the workbook, the user is free to add the account.
All accounts must be created in FIS first. Once an account is
created in FIS, it will not be loaded into BOP until the following
day. The account must be in BOP before it can be mapped to a
workbook.
1. Select the ‘insert a new
account’ row indicated in
blue at the bottom of the
entry worksheet.
2. Choose ADD/Update
Planning Method from the
plan menu.
The add/Update Planning
Methods box appears.
3. There will only be a single methodology to choose from.
- budget account or forecast account – depending on which
process the user is doing.
4. Insert new line(s) should be selected
The ‘overwrite current’ operation should be greyed out.
27
Training Notes for Business Objects Planner
Workbook Training Manual – V3.1
If ‘Change Methodology’ is selected the system will display an
error message indicating that the selected methodology does not
have the correct number of lines. It will not allow for the row to be
changed.
5. Click the OK button. The new account should then be added
6. A prompt should be displayed stating that the new account has
been added and that the user
needs to press the ‘Refresh
View’ button. This should
update both the entry and
summary worksheets with the new account.
Once an account has been added the user may
use the account in the same way as all other
accounts in the workbook. All new accounts
have the word ‘NEW’ displayed in the
account title.
If the user attempts to add an account that is not available or is a duplicate,
the following message will appear.
28
Training Notes for Business Objects Planner
Workbook Training Manual – V3.1
8.3. Adding an Account to the Summary Worksheet
When an account has been added the
Summary should be updated when the
‘Refresh View’ button is selected on the
‘Entry’ worksheet. However, it will not show
the accounts individually. They will be grouped together depending on their
source. The new line will appear within the relevant source on the summary
sheet.
This line will not contain hyperlinks to the relevant accounts and will not
turn red if there are errors on the new accounts. It is simply a means of
ensuring that the overall position is captured within the summary. When a
new standard process is commenced these new accounts will form part of the
standard workbook structure.
9. Saving a Workbook
9.1. Saving a Complete Workbook
A workbook will only receive final approval if there are no validation errors,
(see section 7.5 - Validation),. However, in exceptional circumstances,
Faculties can agree with Finance to approve accounts where there is a
validation error caused by the adverse movement on reserves pushing the
reserve carried forward position into a negative. If the workbook is
incomplete it will still save and can be re-opened at the same point for
completion at a later date.
Choosing Save from the Plan menu executes a series of processes that
verifies and validates the information that is being saved back to the
database. After performing these checks, the following ‘change stage’
dialog will appear. (For more on changing the stage see section 10.1 Advancing).
29
Training Notes for Business Objects Planner
Workbook Training Manual – V3.1
Choose the Remain at Current option and then OK. The workbook will
remain assigned to the user. The updated data in the workbook is sent to the
database and the workbook is saved. The user should keep in mind that if
they select Advance or Return and they are not the owner of the next stage,
the workbook will convert to read only after the save is completed (see
section 10.2 - Returning the workbook for more information about returning
the workbook to its original stage).
The Excel save
functionality (the
top circle in red on
the picture to the
right) operates in a different way to the plan save (the darker save
icon circled in green). The excel icon will save the workbook but will not
carry out any validation checks or perform the save to database function. It
is recommended to avoid the Excel save function. The user should always
expect to see the ‘Change stage’ dialog box as an indicator that the correct
save function has been chosen.
9.2. Saving an Incomplete Workbook
At any point the workbook can be saved, even if there are validation errors.
Whilst the workbook cannot receive final approval, it will allow the
workbook to be closed and reopened at the point of the last save. It is good
30
Training Notes for Business Objects Planner
Workbook Training Manual – V3.1
practice to save the workbook regularly. To save the workbook see section
9.1 – Saving a Complete Workbook.
9.3. Save the Workbook to Your Directory
In order to take the workbook offline, the workbook can be saved to the
uesr’s directory. To save to file, select from the Plan toolbar File>Save as.
Before doing this a prompt will appear asking the user if they need to save
any changes made to the data in the workbook.
To keep workbook changes to that point select Yes. The user must then
select the directory to save the workbook to. Please be aware that once the
system saves the file it will return to the Original workbook. The saved file
does not retain the Plan functionality and is completely independent of BOP.
As a result, any changes made to the workbook copy must be rekeyed into
the original workbook in order to save to the database.
10. Process Control
Process Control allows multiple planning stages to be defined, with an
owner assigned to each stage.
The following stages are built into Business Object Planning:
•
•
•
•
Entry
Departmental Approval
Faculty Approval
Finance Approval
In some instances, not all of these stages will be applicable.
31
Training Notes for Business Objects Planner
Workbook Training Manual – V3.1
As each owner completes his or her stage, the budget workbook is passed
forward to the next stage owner, or back to the previous owner if necessary.
Dates are associated with each stage to indicate whether workbooks
remaining in that stage are past due.
10.1.
Advancing
When a workbook is ready to be passed on to the next level for approval it
must be advanced. Once advanced, the user is no longer the owner of the
stage that the workbook is being moved to. Once advance is selected, the
workbook will still be visible but is read-only.
Generally a workbook should not be advanced with validation
errors.
To advance the workbook, save the workbook. When a complete workbook
is saved, the following dialog appears.
If the user selects Advance, the Save dialog allows the user to do the
following (these options are greyed out if remain at current is selected):
•
32
Enter Stage Comments
Training Notes for Business Objects Planner
Workbook Training Manual – V3.1
Any comments entered here are saved in the workbook’s stage history log
(see section 10.3 – Workbook History Log). This allows the history of
comments to be reviewed by future users.
•
Email New Owner
If desired, the user can enter a message to be emailed to the new stage
owner. Note that this email is in addition to an email that is automatically
generated when the workbook is advanced. The following message will be
displayed to confirm to users that the workbook has been advanced and they
are no longer the owner.
10.2.
Returning a Workbook
Once the user has advanced a workbook, they no longer control the current
stage of the workbook and therefore have no control of the workbook. If the
user needs to make a change to the workbook they must request that it be
returned by the current owner of the workbook
If the current owner of a workbook wishes to return it to its previous owner
then they should choose Process Control>Change Stage from the plan
menu. The change stage dialog appears.
If the user selects Return, the Change Stage dialog allows the user to do the
following:
•
Enter Stage Comments
Any comments entered here are saved in the workbook’s stage history log.
•
Email New Owner
If desired, the user can enter a message to be emailed to the new stage
owner. Note that this email is in addition to an email that is automatically
33
Training Notes for Business Objects Planner
Workbook Training Manual – V3.1
generated when the workbook is advanced, but allows the user to highlight
key areas within the workbook.
10.3.
Workbook History Log
While in a workbook, selecting Process Control>Show History from the
Plan menu displays the history log of the current workbook, including:
•
•
•
•
Date, time and user who performs the stage change
Previous and current stage when the change was performed
User comments related to the stage change
The Business Objects Planning process used for the stage change
The Show History log only records this information when a workbook’s
stage is changed – it does not keep a log of every save performed.
10.4.
Process Control Manager
Select Plan>Process Control Management to pull up a spreadsheet showing
all workbooks. The Process Control Manager allows users to track the
progress of any workbooks. By selecting there IS user ID in the top left they
can filter the list for all workbooks where they form part of the workflow.
They can then filter this further by the stage within the workflow or to
review which workbooks are late.
34
Training Notes for Business Objects Planner
Workbook Training Manual – V3.1
11. Administration
11.1.
Advance Override
There is a facility, if required, where a workbook can be pushed on to the
next stage by the Administration team. This may be useful if a workbook
has been largely completed, but the current stage owner is unable to
advance, perhaps due to absence. For assistance with this, please contact
BOP support on the following email address [email protected].
11.2.
Changing Ownership
There is a facility, if required, where a workbook owner can be changed by
the Administration team. If a workbook has not been reviewed, perhaps as
the result of absence, this will need to be passed to another user to complete.
For assistance with this, please contact BOP support on the following email
address [email protected].
11.3.
Rebuilding a Workbook
All workbooks have strict protection applied to ensure that any updates
made are in cells that are intended to be used for saving back to the database.
Also, the save to database function runs though a number of verification and
validation checks to ensure that the format of the data being loaded is
acceptable to the database. Whilst this should ensure that workbooks are not
damaged and that no corrupted data is loaded into the database, should a
workbook become damaged or the user suspects that the data loaded to the
database was invalid, the user will need to contact the Administrator at the
[email protected] email address. The Administrator will be able to
rebuild the workbook from scratch if necessary. However, it should be
noted that this may result in loss of data entered prior to the workbook
becoming damaged. For this reason it is recommended that the budget
workbook is saved frequently.
12. In Year Adjustment Workbook (IYA Workbook)
12.1.
The Purpose of the IYA Workbook
The IYA workbook allows users to make forecast updates, reserve
adjustments and allocation adjustments outside of the controlled
budget/forecast period. When the user has made updates, they will be
advanced for approval. Once approval has been made, the updates and
movements will be written to the latest forecast in BOP and will be saved to
FIS (see section 14.1 – Allocation and Reserve Adjustments Posted to FIS).
The workbooks will then be rebuilt and returned to the user as a blank
template ready for further updates and movements as necessary. Each
month following FIS closure the workbook will be rebuilt automatically to
be updated with the latest information from FIS. All workbooks must be
35
Training Notes for Business Objects Planner
Workbook Training Manual – V3.1
approved before this date. Users will be issued deadlines to complete the
approval process by Finance.
12.2.
The Layout of the IYA Workbook
The look of the IYA workbook is very similar to the Entry workbook and
has very similar functionality, with a few subtle differences. The table
below shows a list of the main actions and whether they apply to the Entry
workbook or the IYA workbook.
Action
Validation (section 7.5)
Advancing (section 10.1)
SPMs (Section 7.3)
Printing (Section 6.6)
Comments (Section 7.4)
Materiality (Section 6.5)
IYA Workbook
Yes – slight change – see section 12.4
Yes – same process
Not used
Yes – same process
Yes – same process
Not used
When the workbook is first opened, the user is presented with two blank
accounts. The main columns show the current forecast, a forecast
adjustment to be updated by the user and the final forecast incorporating the
adjustment.
12.3.
Updating the IYA Workbook
Within the title bar there is a yellow entry box (shown in the above
example). The user must enter here the account they would like to update.
If the user enters an invalid account, the box will turn red to inform the user.
Once entered, click on the refresh view button at the top left of the
workbook to update the workbook with the chosen account.
Once the button is clicked, the account should be ready for updating. The
workbook should have updated the account with the latest forecast from the
system and the actual data loaded from FIS up to the current month. Users
36
Training Notes for Business Objects Planner
Workbook Training Manual – V3.1
can now update the forecast as desired by entering data into the relevant
months.
12.4.
IYA Validation
The validation rules for the IYA workbook are the same as those for the
Entry workbook (for the rules see section 7.5 - Validation). At the top of the
workbook there is a blue shaded section that is equivalent to the ‘Entry’
workbook summary sheet. The first section shows the summary of the
allocation adjustments for each source. The sources will highlight red if
each source in the workbook does not net to zero.
The second section shows the summary of reserve adjustments within the
workbook. The total reserve adjustment for the workbook must net to zero.
If not, the reserve adjustment will show red.
12.5.
IYA New Accounts
Inserting new accounts is exactly the same process as that of the Entry
workbook (see section 8.2 – Adding an Account to the Entry Worksheet)
except that the account code is entered after the new lines have been
inserted.
13. Allocation and Reserve (AR) Workbooks
13.1 The Purpose of AR Workbooks
Allocation and Reserve Adjustment (AR) workbooks are used to make
reserve and allocation adjustments between accounts that are not in the same
forecast workbook.
When the user has made updates, they will be advanced for approval. Once
approval has been made, the updates and movements will be written to the
latest forecast in BOP and will be saved to FIS. All active workbooks in the
system will be updated automatically.
The AR workbook will then be rebuilt and returned to the user as a blank
template ready for further adjustments as necessary.
37
Training Notes for Business Objects Planner
Workbook Training Manual – V3.1
In the top left corner of the ARAdjust worksheet there is a journal
number, which is made up from the workbook name and the
journal submission. The journal submission will increment once
the previous journal submission has been posted to FIS. This will
be unique to each journal and will show as the journal description in FIS.
13.2 Opening an AR workbook
AR Workbooks can be opened from your BOP home page by selecting the
workbook with the name format “D*** - Faculty/Division Name”.
E.g. The AR workbook for the Finance Division would be “D0012 –
Finance Division”
13.3 AR Workbook worksheets
Each AR workbook will have two worksheets. These sheets are summarised below:
Worksheet
ARAdjust
ARProcessed
Description
This worksheet is where the adjustments are made. When the
workbook is first opened, the ARAdjust sheet will be displayed.
This worksheet is where all of the previously approved
adjustments are recorded.
13.4 ARAdjust Worksheet Overview
The ARAdjust worksheet is the data entry worksheet in the workbook.
Data entered into the ARAdjust worksheet represents the adjustments the user wants
to make and is what is posted back to the database.
When the workbook is first opened, the user is presented with a number of blank
rows. When updated with the desired accounts, the workbook will display account
descriptions, source codes, current available reserves/allocations and the remaining
allocation/reserves that will be left for each account after the workbook is processed.
The contents of the columns will vary based upon the account entered.
13.5 ARProcessed Worksheet Overview
38
Training Notes for Business Objects Planner
Workbook Training Manual – V3.1
The ARProcessed worksheet keeps individual records of all previously posted
Allocation and Reserve adjustments made using the active workbook.
The ARProcessed worksheet shows details of each adjustment such as the account,
source, date and amount of the adjustment.
13.6 Updating the AR Workbook
Within the column named “Account Code” there are a number of yellow entry boxes
(shown in the above example). Here the user must enter the accounts they would like
to make adjustments to.
Once it is entered, the account should be ready for making adjustments. The
workbook should have updated the columns with the latest information from the
system, including the total allocations and reserves up to the last closed month in FIS.
13.7 Validation
There are two types of validation rule; Validation that relates to each row entered (the
account) and validation that relates to the whole workbook (journal).
Account (Row) validation
Invalid Account - If the user enters an invalid account, a closed account or an account
outside the division/faculty of the workbook, the box will turn red to inform them
that it is incorrect and the reason will be specified in the Account description
column.
Invalid Source - If a reserve adjustment is attempted from any account which does not
allow reserve adjustments, the ‘Source’ box will turn red (as shown below):
If an allocation adjustment is attempted from any account which does not allow
allocation adjustments, the ‘Source’ box will turn red.
39
Training Notes for Business Objects Planner
Workbook Training Manual – V3.1
Comments – any reserve or allocation adjustments must have a comment. This will be
the journal line description in FIS.
Allocation Deficit – any allocation adjustment made must not result in the account
having an allocation deficit (if so, the “Remaining Allocation” box will flag red).
Workbook (Journal) Validation
The journal validation rules for the AR workbook are similar as those for the Entry
workbook. At the top of the workbook there is a blue shaded section that presents a
summary of the valid adjustments in the workbook, split into allocations and reserves
(Allocations are split further by source).
The first section shows the summary of the adjustments for reserves, and the second, a
summary (by source) of the adjustments for allocations.
The “Total Reserve Adjustments” box will highlight red if the valid reserve
adjustments in the workbook do not net to zero.
In the “Total Allocation Adjustments” section, each “Source:” box will highlight red if
the valid allocation adjustments in the workbook do not net to zero within each
source.
If any part of a row is invalid (if is contains a validation error), then it will not be
included as part of the calculation of workbook adjustments until it is rectified.
In the above example, we can see how allocation adjustments do not net to zero due to
one of the accounts having an ‘allocation deficit’. Until the problem on this row is
fixed, the workbook does not consider it as a completed journal row.
40
Training Notes for Business Objects Planner
Workbook Training Manual – V3.1
Validation Summary - The following are reasons why particular boxes will flag red:
Allocation Deficit
Account
Source
All Source Summary Boxes
Total Allocation/Reserve
Comment
Allocation posted is larger than the available
allocation
Account is invalid, closed or outside workbook
permissions (specified in the Account description
column)
The adjustment is not permitted on accounts with this
source
The specified source does not net to 0
The total allocation/reserve does not net to zero
A valid comment has not been entered
If your AR workbook is set at the Divisional level, you will only be
able to make adjustments between accounts within the same division.
Adjustments between divisions will require a workbook which is set at
Faculty level. Adjustments between faculties must be performed by
Planning and Management Accounts.
Format of Data Entry
To move an allocation TO an account – positive
To move an allocation FROM an account – negative
To move a reserve TO an account – positive
To move a reserve FROM an account – negative
13.8 Processing Adjustments
As with all other BOP workbooks, adjustments made in AR
workbooks must be saved and advanced in order to be approved
and passed into FIS.
If there are any outstanding validation errors or red boxes within
the workbook, any changes you make will not be processed into FIS.
It is recommended that any adjustments across Departments be completed before the
Forecasting process begins. NOTE: If the adjustments are within the Department then the
user will be able to process these themselves using the In Year Adjustment workbook
(see section 12 - In Year Adjustment Workbook).
Once the adjustment has been processed it will be loaded into FIS as a movement of
funds (see section 15.1 - Allocation and Reserve Adjustments Posted to FIS). The
following day this will appear in any active workbooks that the user has (Entry
workbooks during a quarterly process or the IYA workbooks outside of this).
14. Transfers to FIS
All data entered into BOP will be forwarded to FIS.
41
Training Notes for Business Objects Planner
Workbook Training Manual – V3.1
14.1.
Allocation and Reserve Adjustments Posted to FIS
Allocation and Reserve adjustments are replacing what was formerly known
as a budget journal. This data will impact upon the funds available in FIS by
adjusting the College Budget field (to be renamed Total Funds). These
adjustments can be entered using three different workbooks.
For allocation and reserve adjustments that span Departments/Faculties there
is the ‘Allocations and Reserves Workbook’ that is submitted by FMAs.
Once these workbooks are approved, the data is posted to FIS that evening.
For allocation and reserve adjustments outside of the formal
Budget/Forecasting process there is the IYA workbook (see section 12 – In
Year Adjustments Workbook), which allows Departments to move funds
within the Department. Once these workbooks are approved, the data is
posted to FIS that evening.
During the formal Budget/Forecasting process, Allocation and Reserve
adjustments are entered as a net position while the budget/forecast is being
built. Once these workbooks are financially approved, the data is posted to
FIS. The formal Budget/Forecasting process is built around a timetable and
may take up to three weeks before the data receives financial approval.
14.2.
Budgets Posted to FIS
Once the main Budget has been approved as set, it will be posted to FIS.
The area in FIS where the budget is to be posted will be communicated
separately to this document. The budget in FIS will consist of only Income
and Expenditure.
14.3.
42
Forecasts Posted to FIS
Training Notes for Business Objects Planner
Workbook Training Manual – V3.1
Once the Forecast has been updated it will be posted to FIS. The area in FIS
where the forecast is to be posted will be communicated separately to this
document. For forecast adjustments outside of the formal
Budget/Forecasting process there is the IYA workbook (see section 12 – In
Year Adjustments Workbook). Once these workbooks are approved, the data
is posted to FIS that evening. During the formal Budget/Forecasting
process, forecast adjustments are entered to FIS as a net position once these
workbooks are financially approved. The formal Forecasting process is built
around a timetable and may take up to three weeks before the data receives
financial approval.
14.4.
Comments Posted to FIS
For each workbook it is important to understand which comments are sent to
FIS. For the Entry and In Year Adjustment workbooks the comment held
against the account is not sent to FIS. This represents an overview comment
against the account in BOP. Each individual line comment against each
account type will be posted back to FIS as a journal line description. For
each line item a net position will be posted back to FIS, i.e. a sum of
individual entries. For the allocation and reserves workbook an individual
journal with it’s comment will be sent to FIS for each entry.
15. Reports
To open a report, choose Plan>Plan Reports>Open. The following dialog
will open. Open the desired directory and double click the select mouse
button on the required report.
43
Training Notes for Business Objects Planner
Workbook Training Manual – V3.1
Alternatively select Plan_Reports>Open from the Treeview. Open the
desired directory and double click the select mouse button on the required
report.
A number of standard reports are available within BOP. Additional reports
will be developed over the coming months.
The current standard reports are held in the “\ SharedReports” directory.
Double click on the directory name to see the list of reports.
To view a report, double click on the report to open. The reports are
displayed in BOP in the same way as a Forecast workbook.
44
Training Notes for Business Objects Planner
Workbook Training Manual – V3.1
Populating the Report with data – When the report first opens it will be
populated with zeros. Once the report has opened, press F9 (or through the
planning toolbar use >Plan>Prepare Current) to query the database. The
report will only allow the user to see information within their
Faculty/Division/Department.
Select Report options - Within some of the reports, there are drop down
boxes to focus on different sources or to change the data being viewed.
When an option is selected the report will automatically be updated.
e.g. Funding source (All, Core Operational, Research, Other services
rendered, Other activity) or Scale (to show the financial values in millions,
thousands or pounds)
Drill down - The reports have a drill down functionality enabled that allows
the user to see the underlying data behind a figure in the report. To do this,
double click on the data to see the next level of detail behind it. Each time
you drill down a new worksheet, within the same Excel workbook, is created
with the next level of data in it. These worksheets are titled PLNDrill1-n.
This method will give the user detail right down to account balance level.
BOP does not hold transaction data. If the user requires this
information, they will need to investigate through FIS.
Printing a report – Once a report has been generated it can be printed by
selecting the print option from the normal Excel Toolbar (>File>Print)
Saving a report – a report can be saved locally for reviewing off line. This
can be done using the Excel Save As functionality >File>Save As. The
following dialogue box is displayed:
45
Training Notes for Business Objects Planner
Workbook Training Manual – V3.1
Use the Browse button to select where you want to save the report output
then press OK.
Sending/Emailing a report – You can email a report to someone by using
the standard Excel functionality. Select >File>Send To>Mail Recipient (as
Attachment).
Aborting a report – if you have started a report and wish to stop it running,
when the Calculating Worksheet message appears in the dialogue box you
can press the Escape (Esc) key and the report will terminate. WARNING:
The values shown in the report may now be corrupted or part refreshed
depending on when it was stopped.
Using the Standard Reports - The Current Standard reports setup in the
SharedReports directory in BOP are shown below together with their
anticipated audience and the level of drilldown appropriate for them.
Report
A1 Top I&E
A2 by Analysis Group
A3 Expenditure by Area
A4 Income by Area
A5 by Source
A6 by Account
46
Finance
Committee
and SMT
X
X
X
X
X
Training Notes for Business Objects Planner
Deans and Vice Heads of Academic Individual
Provost
Divisions/Departme budget
(Admin)
nts - Heads of CSS holders
Divisions
X
X
X
X
X
X
X
X
X
X
Workbook Training Manual – V3.1
Drill levels (see below)
0-3
2-5
4-7
6-7
The drill level refers to the reporting hierarchy setup in BOP and FIS. The
levels within the hierarchy are shown below:
1234567-
UCL
School
Faculty
Division
Department
Budget Manager
Account Code
Example report
For further reporting requirements, a user group will be created to assess
future report developments before the reports are created centrally.
47
Training Notes for Business Objects Planner
Workbook Training Manual – V3.1
Glossary
ADS
Advancing
- Administrative Desktop Support
- A workbook used by FMAs to process allocation and reserve
adjustments across Departments/Faculties.
Allocations
- Cash allocations initially may by Finance.
BOP
- Business Objects Planner
Brought Forward Reserve – The opening balance
Entry Workbook
- A workbook used to capture Departmental Budgets/Forecasts
across all accounts during a controlled process period.
FMA
- Faculty Management Accountant
Future Projections
- 5 year forecast
IDT
- Inter Departmental Transfer
IYA Workbook
- A workbook used by Departments ad hoc to process and
allocation and reserve adjustments within the department, or
update their forecasts.
PMA
- Planning and Management Accounts
Reserves
- Departmental accumulated funds
Reserve adjustments - Movement of departmental funds (equivalent to budget
journals).
Reserve Posted
- Reserve adjustments already committed to FIS
SPM
- Standard Planning Method used to change the spreading of a
forecast in a controlled way
Validation
- Checks to ensure data saved back is correct.
Workbook
- An excel spreadsheet used to capture budgets/forecasts
WTS
- Windows Terminal Server
48
Training Notes for Business Objects Planner
Workbook Training Manual – V3.1
Appendix A – Summary Sheet Print Styles
Source Current
Source Variance 1
Source Variance 2
49
Training Notes for Business Objects Planner
Workbook Training Manual – V3.1
Detail Current
Detail Variance 1
Detail Variance 2
50
Training Notes for Business Objects Planner
Workbook Training Manual – V3.1
Appendix B – Entry Sheet Print Styles
Do Not Use
Reserved for Internal Workings
Summary Detail
Summary Material
As above but with only ‘Material’ accounts
51
Training Notes for Business Objects Planner
Workbook Training Manual – V3.1
Forecast
Projection
Variance
52
Training Notes for Business Objects Planner