1
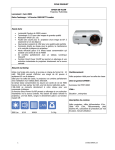
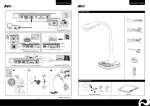
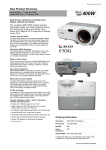
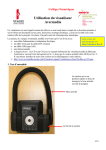
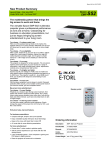
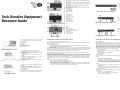
(1) (4) (5) (6) (7) (8) (9) Wireless lights: blue indicates wireless is on and amber indicates wireless is off. Power light: if the light is blinking, the computer is in standby. If it is blinking rapidly, an AC adapter with a higher power rating should be connected. Battery light: amber indicates the battery is charging and blue indicates the battery is charged. Drive light: blinking indicates the optical drive is being accessed. Caps lock light Num lock light Volume mute light Volume down light Volume up light (1) (2) (3) (4) (5) (6) (7) (8) Fingerprint reader Power button Internal display switch Info button Presentation button Wireless button Volume mute button Volume scroll zone (2) (3) HP 6730b Lights Tech Bundles Equipment Resource Guide MacBook Basic Features (1) (2) (3) (4) (5) MacBook Keyboard Features (6) (7) (8) Function (fn) key: hold down this key to activate customized actions assigned to the function keys. Brightness keys (F1, F2): Exposé key (F3): open Exposé for quick access to all your open windows. Dashboard key (F4): open Dashboard to access your widgets. Media keys(F7, F8, F9): rewind, play or pause, or fastforward a song, movie, or slideshow. Mute key (F10): mute sound Volume keys (F11, F12): Media eject key: hold down this key to eject a disc that’s not in use. (1) MagSafe power port: plug in the adapter to recharge the battery (2) Ethernet port: connect to an Ethernet network, DSL/cable modem, or another computer (3) Mini display port: connect to an external display or a projection system (4) Two USB 2.0 ports (5) Audio out port: connect headphones or external speakers. (6) Security slot: attach a lock and cable to prevent theft. MacBook Ports (3) HP 6730b Rear Components esc key fn key Windows logo key Windows applications key Embedded numeric keypad keys Function keys Volume mute button Volume scroll zone HP 6730b Keys (1) iSight Camera: videoconference, take pictures, or capture video. Indicator light glows where camera is operating. (2) Microphone (3) Stereo speakers (4) Trackpad (5) Battery (6) Sleep indicator light (7) Slot-loading SuperDrive (8) Power button (2) Network jack: connects a network (Ethernet) cable. External monitor port: connects an external monitor or a projection system. S-video-out jack: connects an S-video device, such a TV, VCR, camcorder, overhead projector, or video capture card. (1) (2) (3) (4) (5) Media card reader Two USB ports Optical drive Modem jack Security cable slot (1) (2) (3) (4) (5) Power connector: connects the AC adapter. Vent Two USB ports 1394 port: connects a camcorder. Express card slot HP 6730b Right-Side Components HP 6730b Buttons & Switches (1) (2) (3) (4) (5) (6) (7) (8) (1) HP 6730b Left-Side Components MacBook Maintenance & Troubleshooting HP 6730b Maintenance & Troubleshooting If your MacBook doesn’t respond or the pointer doesn’t move On rare occasions, an application might “freeze” on the screen. Mac OS X provides away to quit a frozen application without restarting your computer. To force an application to quit: 1. Press Command (x)-Option-Esc or choose Apple () > Force Quit from the menu bar. The Force Quit Applications dialog appears with the application selected. 2. Click Force Quit. The application quits, leaving all other applications open. If you need to, you can also restart the Finder from this dialog. Next, save your work in any open applications and restart the computer to make sure the problem is entirely cleared up. If the problem occurs frequently, choose Help > Mac Help from the menu bar at the top of the screen. Search for the word “freeze” to get help for instances when the computer freezes or doesn’t respond. Disk Defragmentation Disk defragmentation has long been the go-to cure for a sluggish computer. Disks become fragmented as files are written and deleted. Fragmentation tends to get worse over time. When you install programs on a new disk, the allocation units are written to a single, contiguous area. As you delete existing files and write new ones, free allocation units begin to appear all over the disk. Not only does this slow down the file transfer process, it also causes additional wear and tear on hard disk components, potentially shortening the life of the drive. It's better to defrag when the computer isn't in use. Every version of Windows has a built-in defragmentation utility. Using the Windows onboard defragmentation utility is simple. Defragmentation should be run no more than once a week, but no less than once per month. Here's how to launch the program: 1. Open My Computer. 2. Right-click the local disk volume (C:) you wish to defragment. 3. Click Properties. 4. On the Tools tab, click Defragment Now. 5. Click Defragment. If your MacBook freezes during startup, or you see a flashing question mark, or the screen is dark and the sleep indicator light is glowing steadily (not in sleep) The flashing question mark usually means that the computer can’t find the system software on the hard disk or any disks attached to the computer. Wait a few seconds. If the computer doesn’t start up, shut it down by holding down the power button for about 8 to 10 seconds. Disconnect all external peripherals and try restarting by pressing the power button while holding down the Option key. When your computer starts up, click the hard disk icon, and then click the right arrow. After the computer starts up, open System Preferences and click Startup Disk. Select a local Mac OS X System folder. If that doesn’t work, try using Disk Utility to repair the disk: • Insert the Mac OS X Install DVD into your computer. • Restart your computer and hold down the C key as it starts up. • When prompted, choose your preferred language. • When the next screen appears, choose Disk Utility from the Utilities menu in the menu bar. When Disk Utility opens, follow the instructions in the First Aid pane to see if Disk Utility can repair the disk. If using Disk Utility doesn’t help, you might need to reinstall your computer’s system software. Automatic Updates Stay up to date with the latest critical and security updates by using Automatic Updates. To turn on Automatic Updates: 1. Click Start, and then click Control Panel. 2. Depending on which Control Panel view you use, Classic or Category, do one of the following: a. Click System, and then click the Automatic Updates tab. b. Click Performance and Maintenance, click System, and then click the Automatic Updates tab. 3. Click the option that you want. Make sure Automatic Updates is not turned off. VirusScan 1. Click Start, then Programs, then McAfee Security Scan Plus to scan your computer for issues. 2. Click Scan Now. 3. Click Settings to set a Scan Schedule. Click the drop-down menu and select Every week. Check the box that Says Download and install updates automatically during my scheduled scan. Close Locked-up Programs If your notebook locks up or stops responding while using a program, close the stalled program to continue using other programs. 1. Press ctrl + alt + delete and click Task List... 2. Select the program that is locked up and click End Task. 3. Close the Windows Task Manager. AVerMedia CP 155 Document Camera (1) (2) (3) (4) Power: turn the camera off and on. Output LED Indicator: indicates signal is being sent to TV or RGB. Mode: toggles between text, graphics, and high frame. Shuttle Wheel: turn the wheel clockwise to zoom in and counterclockwise to zoom out. (5) Enter: make a selection in Playback mode or when using the menu. (6) Freeze: toggle to pause or resume the camera. (7) Menu: pull up and exit the main menu and sub-menus. (8) Playback: View captured images. Use arrow keys to make a selection and Enter to view full-screen. To start slideshow, press Menu, select Start, and press Enter to begin and end. (9) Camera/PC: switch between camera and PC mode. (10) Auto Focus: adjust focus automatically. (11) Auto Image: adjust and set white balance and exposure automatically. (12) Cap/Del: capture a still image in Camera mode. Epson 83V+ Data Projector AVerMedia AVer+ Document Camera Software The most current software can be downloaded from http://www.averusa.com/presentation/dl_cp155.asp AVer+ document camera software allows you to capture and insert document camera images, record video, and make annotations. (1) (2) (2) (3) (1) (11) (3) (4) (5) (4) (3) (4) (5) (6) (7) (8) (9) (10) (11) (12) (13) (14) (15) (16) (1) (8) (9) Power: turn the camera off and on. Shuttle Wheel: turn the wheel clockwise to zoom in and counterclockwise to zoom out. Enter: make a selection. Menu: pull up and exit the main menu and sub-menus. Camera/PC: switch between camera and PC mode. Auto Focus: adjust focus automatically. Cap/Del: capture a still image in Camera mode. Effect: convert and display the image in BW, negative or color. PIP: show a thumbnail size playback screen in the corner to view captured image. Presenter: select to turn off/on AverBox or AverVisor. Playback: view captured images. Auto Image: adjust and set white balance and exposure automatically. Freeze: toggle to pause or resume the camera. Reverse: rotate the image by 180°. Timer: set/start/pause/resume timer. Split Scrn: divide the screen into two parts. One side displays live image and other side displays captured image. (11) (5) (1) (2) (3) (4) (5) Menu bar: used to save projects, control window settings, insert objects move through project pages, etc. Page browser: allows you to view all slides in your project. Options panel: provides additional options for each tool chosen from the toolbar. It will change based on the tool you choose. Property panel: allows you to modify object attributes (colors, width, size, etc.) Toolbar: allows you to choose from various tools available in the software. (1) (2) (3) (4) (5) (6) (7) (8) (9) (10) (11) Power: turn projector off/on. Source Search: toggle between picture sources, either connected computers or video. Menu: adjust and customize projector features. Esc: return to previous menu or exit menu completely. Vol: +/- buttons to change sound. Color Mode: adjust to different settings based on environment. Aspect: change aspect ration of screen. Freeze: stop action in your video or computer image and keep current image on the screen. A/V Mute: press this button or close the A/V Mute slide on the projector to turn off image and sound. E-Zoom: zoom in/out on a portion of the image by clicking the +/- buttons and use arrow keys to pan. Help: on-screen help for common problems. Other Resources Cleaning the Lens Clean the lens whenever you notice dirt or dust on the surface. Use a canister of compressed air to remove dust. Use lens-cleaning paper to remove dirt or smears on the lens. You can also moisten a soft cloth and gently wipe the lens surface. Replacing the Lamp (part #V13H010L42) The lamp generally lasts for about 3000 hours of use (high brightness mode) or 4000 hours of use (low brightness mode). It is time to replace the lamp when: •The projected image gets darker or starts to deteriorate. •The lamp light is flashing orange. •The message “Replace the Lamp” appears on the screen when the lamp comes on. (2) (10) Cleaning the Projector Cleaning and Replacing the Air Filter (part #V13H134A13) Dust clogs on the air filter prevent proper ventilation and can cause overheating and damage the projector. When the filter and vent are clogged, the projector displays a warning message. To clean the air filter and vent, follow these steps: 1. Turn off the projector, allow it to cool down, and unplug the power cord. 2. Gently clean the filter and vent using a very soft brush (like a small paintbrush). Remove the filter to clean both sides. 3. If you need to clean or replace the filter, slide it off. Slide the new filter in until it clicks in place. (4) (7) (6) AVerMedia CP 155 Remote (1) (2) (3) What do the projector status lights mean? Power Light Lamp Light Temperature Light Description Green Off Off The projector is operating normally. Flashing green Off Off The projector is warming up. Wait for image to appear. Orange Off Off The projector is in standby or sleep mode. Press the Power button to turn it on. Flashing orange Off Off The projector is shutting down. Wait for the light to stop flashing and remain orange before unplugging it. Red Off Flashing orange The projector is too hot. Make sure there is space around and under the projector for ventilation. Clean the air filter and vents, if necessary. Red Off Red The projector has overheated and turned itself off. Let it cool for five minutes, then turn it back on. Red Flashing red Off The lamp is burned out, broken, or not installed correctly, or the lamp cover is open. Close the cover or replace or reseat the lamp. Orange Flashing orange Off Replace the lamp with a new one as soon as possible. Red Off Flashing red There is a problem with the fan or a sensor. Clean the air filter and vents. Red Red Red There is an internal error in the projector. Turn the projector off and unplug it. Contact the IT Service Desk to get your lamp replaced, x63375. PPS Tech Bundles Webpage http://tinyurl.com/ppstechbundles AVerVision CP 155 User Manual http://www.averusa.com/presentation/downloads/CP155_user_manual.pdf AVerVision CP 155 Quick Reference Guide http://www.averusa.com/presentation/downloads/CP_Series_Quick_Guide.pdf AVerVision CP155 Software Downloads (Windows and Mac) http://www.averusa.com/presentation/dl_cp155.asp AVer+ Software Quick Reference Guide for Windows http://www.averusa.com/presentation/downloads/AVer+_Ref_PC.pdf AVer+ Software Quick Reference Guide for Mac http://www.averusa.com/presentation/downloads/AVer+_Ref_Mac.pdf AVerMedia CP Series Document Camera Training Videos Intro http://www.youtube.com/watch?v=TArJl6kYrac What’s Included http://www.youtube.com/watch?v=OqAVucTi7r4 Getting Started http://www.youtube.com/watch?v=5yr7oz6obiw Basic Features http://www.youtube.com/watch?v=evJwwZQXCJk Remote Control http://www.youtube.com/watch?v=RNvvxhQgHxQ Image Capture and Download http://www.youtube.com/watch?v=Qv-_tiSg16A Viewing Captured Images http://www.youtube.com/watch?v=ATkEUEF2EQ0 Using the Presentation Features http://www.youtube.com/watch?v=vU-3mz0eRp0 AVer+ Software http://www.youtube.com/watch?v=3G-IMrzbXQQ Using with a Microscope http://www.youtube.com/watch?v=8oah2gbK5h0 Connecting to an Interactive Whiteboard http://www.youtube.com/watch?v=uOsCy4bjaDI Epson PowerLite 83V+ User Guide http://files.support.epson.com/pdf/pl83vpl/pl83vplug.pdf Epson PowerLite 83V+ Quick Setup Instructions http://files.support.epson.com/pdf/pl83vpl/pl83vplbb.pdf Epson 83V+ FAQs http://tinyurl.com/epson83v 100 Ideas for Data Projector and Document Camera http://www.umesd.k12.or.us/techlinks_100ideas Data Projectors in Schools http://www.zardec.net.au/keith/project.htm Classroom Use of Document Cameras http://ethemes.missouri.edu/themes/1582