1
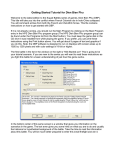
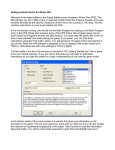
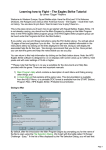
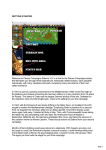
Getting Started Tutorial for Red Victory
Welcome to the latest edition to the Squad Battles series of games, Red Victory (RV). This
title covers the last half of the Eastern Front conflict where Advance of the Reich left off. You
will command armies from both the Axis and Russian forces. This file contains instructions on
how to get started with RV.
If it is not already running, you should run the Main Program by clicking on the Main Program
entry in the HPS Simulations \ Red Victory program group (The HPS Simulations \ Red
Victory program group can be found under the Programs list from the Start button). Unlike
previous titles in the series, you no longer need to keep the CD in the disk drive while playing
the game. A series of updates has been released removing this requirement from all existing
games as well. If you prefer, you can print these instructions. You will get about 11 pages of
text and graphics if you do this. Note: the RV software is designed to run on displays with
screen areas of at least 800 by 600 pixels and with color settings of 16-bit or higher.
The first battle in the list in the window on the right is "000.Started.scn" This is going to be
your tutorial scenario. If you are new to the series you will want to read these instructions as
you fight this battle for a basic understanding of just how this game works.
In the bottom center of this same screen is a window that gives you information on the
scenarios in the game. The text even gives you some hints on what you are to do and usually
the historical or hypothetical background of the battle. Take the time to read the information
about this battle. You will be better prepared to enter this battle and win it.
After reading the information we now know that we are taking the role of the Russian forces
fighting against the Axis and trying to assault our way across the Slutsk Bridge and into the
town outskirts. The mission of this scenario is to cross the bridge and take out the defending
strong points on the far side along with the objective hexes. Inflict as many casualties as
possible, but it is also always a goal to limit your own casualties.
Once you hit the enter key or click on "OK", you’ll
see another menu of choices. This is the A/I
Selection Dialog. In this menu you’ll pick which side
you will be controlling. So choose "Manual" for the
Russian A/I which means you will be controlling the
Russian side. Next, click either on "Automatic" or
"Automatic with FOW" for the Axis side. Now the
computer will control the Axis troops. "FOW" means
fog of war. If you choose it, you won’t be able to see
any enemy units until they come within the line of
sight (LOS) of one or more of your units. Playing
with FOW turned on makes the battle much more
realistic and exciting as surprise and LOS are key elements of small unit actions. If you are,
however, a first time player, it will be easier to play in "Automatic" without the Fog of War.
Notice the word "Rules" at the bottom of the dialog box. Clicking on it will allow you to turn on
or off the optional rules in the game. We’ll leave that alone for this time, but when starting
future battles you can go in and select the optional rules that you desire. For more details on
each rule click the “Help” button on that screen. After you have picked the method of play in
the A/I Selection Dialog Menu, click on "OK".
Since you are playing the Russians the Axis side will go
after us. That may not always be the case, as
sometimes the A/I player will go first. A box will appear
designating which army has the turn; this box will
appear at the beginning of each turn through out the
game. You can either left-click on it to make it go away,
and then repeat that each time, or you can right-click on
it and it will display briefly then automatically go away
each turn for the remainder of your session.
Notice a small dialog box appeared once your turn started
stating that Support exists and there is a Smoke limit of 10 for
this scenario. Remember this as we’ll come back to it in a
couple of minutes. For now just click the OK button.
Now you see the battlefield and your troops. If you wish to scroll
around the map with ease, click on the menu list at the top
called "Settings" Then click on “Auto Scroll” unless it already has a check mark. Now you can
simply run your mouse pointer to any corner of the map and the screen will move until the
edge of the map is reached.
Your forces will be in view in the upper-right segment of the map, coming in along the road.
This map is not that large, so depending on your screen resolution you shouldn’t have too
much scrolling to do. You will see three objective hexes along the edge of town to the
Southwest of your current position; these are the little boxes on the map with a number inside
them. Holding these, along with eliminating the enemy are what you need to win the battle.
The number is the points you earn when you capture the objective. Right now they all belong
to the Axis …I’ll come back to those in a minute. If you want more information on objectives,
strength or victory status, click on the “Info" menu at the top of the screen. Also, if you
depress the “Shift” key you will see the label displayed denoting the town name. If you want
the names to stay on the map press the Alt key while pressing Shift. Press Shift again to
remove them.
Notice also that you can zoom in or out on the map with the keys "1" (2D Zoom Out), "2" (2D
Zoom In), “3” (3D Zoom Out) and “4” (3D Zoom In). Using the Zoom Out option lets us survey
the map quicker and get that big picture. This allows you to be more aware of potential
dangers and opportunities. You may also use the "+" and "-" buttons on the tool bar, or make
your selection from the "View" menu.
Take a careful look at your forces. Left click on any hex containing units and then look at the
bottom of the screen. I chose the stack on hex 29,3 (you can find your hex numbers in the
bottom right hand corner of the screen), and I see that within that hex I have two tanks each
with a squad of riflemen along with an officer armed with a PPS-43.
The hex info area to the right of your units displays the type of terrain your unit is currently in,
the elevation and the visibility range currently active in the scenario. In this particular case we
also see some red arrows on the right side of the display. This lets us know there are more
units in the hex not currently being displayed. The number inside the arrow denotes that there
are 2 currently hidden.
Using this simple procedure you can see information, weapons, status and a lot more on
every one of your units. Right-clicking on the Information bar reveals other information about
your units and especially their weapons such as:
Reliability (Rel): Ranging from A (best) to F (worst)
Range (Rng): Just how far the weapon will reach in hexes
Lethality (Leth): The effectiveness of the weapon
Penetration (Pen): This refers to the weapon’s ability to penetrate an enemy’s protection
When the bar is right-clicked the info in the hex info area also changes, with the number
displayed in the center being the total number of men stacked in the hex along with any
special terrain features that might be present.
Also notice that at the bottom of the screen other pertinent information, such as the date and
time of day, number of turns and weather conditions are given to you. Knowing more about
what is going on, what your men can and cannot do, and the terrain you are in can be a big
help to you in planning your tactics. If an error occurs during play, for example you try and
give a unit a command it is not allowed to execute, then error messages will also display in
this lower bar.
In order to have proper tactics, you must know what your goals are. What are you trying to do
here? Victory depends on a point ratio. Points are acquired or lost in three ways. The first one
is capturing (or holding) the objectives on the map. Doing so gives you points. There are
other types of objectives, such as an "exit" objective. When used these will be objectives
along the edge of the map with a ? on them. The army they belong to gets extra points if they
move their forces to those hexes and then remove them from the map with the Command
Menu at the top. In other scenarios, some objectives will be of the "Capture" type. Once you
have taken them, the opponent cannot retake them.
There are three objectives in this battle, and your goal is to capture them from the Germans.
Whoever controls an objective (the last one to move into the hex) at the end of the game will
get the point value of the objective. Thus it can change hands every turn but the final count
comes at the end of the battle. You can take and then lose it sometimes shifting from one
victory level to another in a single turn. Victory conditions are usually tight in the Squad
Battles games, so each and every piece of real estate is very valuable.
The next way to get points is by destroying the enemy. You add to your final score for each
enemy eliminated. They can often add up to more than the objective points. This means that
you must create casualties on the other side in sufficient numbers to help you to get the
points you need. And finally, you win by avoiding excessive losses. Remember the points for
casualties work both ways. The computer or other human player will get points for losses that
you suffer. Thus it is very important that you try to preserve your force while taking out the
enemy. If you remain aware of these three factors you will have a better game with a better
final score. Treat your force like they are real men under your command...don't send them on
suicidal charges and you will stand a better chance of keeping your losses low!
In this game there are a series of what are called Hot Keys. These are keys that you can
press during the game that will allow you to facilitate many of the features included. Practice
using them and you’ll find that they will soon become second nature to you. A complete list of
these keys can be found in the Main Program Help File by pressing F1 in the game, or going
to the “Help” menu and making the appropriate selection.
With this information it is time to go into action. Much of what I am going to mention now is
already thoroughly covered in the User’s Manual (press F9 or go to the “Help” menu), but I’ll
help you out a bit here so the play can get underway. Let’s take stock of our force & situation
first. By clicking on the four hexes containing our force we find that we have a lead T-34/85
tank followed by some tanks with troops riding on them (denoted by the yellow plus mark on
the image) and then some half-tracks, apparently carrying more troops. We also see the town
on the other side of the river to our Southwest. There is a rail road running over a bridge into
it and no apparent other way to reach the town. So, our immediate goal is to approach the
bridge, try to discover what sort of enemy presence is in the town and start formulating our
assault plans.
But how do you move a unit? There are two ways. First make sure the
button (with the cross hairs) at the top far left is not depressed. You
depress it to fire. Go ahead. Try it. Now un-depress it so that you can
move and not waste shots firing into thin air. You may also toggle to and
from fire mode by pressing and holding the "Ctrl" key; if you just want to fire one unit and then
go on to move others.
Remember that each unit is always either in "fire" mode or "move" mode. Right now we want
to move. You can do that in two ways. You can highlight the unit (double clicking on it) or
units in a hex then right click in an adjacent hex. The highlighted unit(s) will move there. You
can keep doing that until your unit runs out of movement points (MP). The other way is to
highlight the units in the hex and then while holding down the left mouse key, go to the
desired hex and release the key (Drag-and-drop).
Try it. Look for the unit in hex 28,2 mentioned previously. That would our
lead T-34/85 tank. We are going to move it. Highlight the unit by double
clicking with the left mouse key on the hex. Notice how the background
lights up at the bottom of the screen. Now right click on hex 27,3 (to the left
from where your unit is). Remember you can left click on any hex and
nothing will happen. Doing that will help you find hex 27,3. If you do that, however, you’ll have
to go back to 28,2 and highlight the unit again. Okay, with the unit highlighted, simply right
click on hex 27,3. Notice that the arrow appears behind the unit so you see where you have
moved from and your direction.
Let’s move again, this time using the second method. Double click
on the unit in hex 27,3. This time hold down the left mouse key
after the second click. Now move your mouse over hex 24,4 (clear
hex just to the left of the trees) and release the key. Your unit will
move into the hex. This is the “drag and drop” method of
movement. In most cases you will want to move along the roads
so you expend the least amount of movement points possible for
each hex moved. Obviously that isn’t always possible, as in our
current situation – but do keep in mind that each action, be it
movement, changing facing location, or firing will cost you
movement points on your unit. Be cautious in your movements…if your forces get caught
marching down the road they can be decimated in a few short minutes. Use scouting
elements and cover as much as possible when moving from point to point. In this scenario we
have men riding on several tanks. This is great for mobility and getting someplace quickly,
but it can be deadly if the enemy spots you. You will have to make a judgment call on how far
to allow your men to ride on the tanks and when they need to hop off and walk.
So let’s take our current position, with our lead tank at hex 24,4. Go up to
the toolbar and depress the “-“sign to zoom out (or use the hot key) and
then depress the “Visible Hexes” button, or press “S”. This shades all the
hexes we do not have a line of sight (LOS) to giving us an idea of what our
tank commander can see.
We can see that the outlying buildings of the town are not yet within our
LOS and that the trees along the rail road tracks are blocking a good
portion of the terrain from seeing our approaching force. So lets go
ahead and move a few more hexes south to continue to scout, prior to
moving any of our other units. You can also press “C” (or use the button) to see the
reachable hexes, or how far your unit can move this turn with its remaining movement point
allotment. Note however that not all units can move the same distance through the same
terrain. The condition of a unit and sometimes the equipment it is carrying will impact how far
it can move.
I chose to move my tank to 21,8 which gives a decent view of the
bridge and outskirts of town. I did not draw any fire, so I am
going to assume that it is safe to move the remainder of my
column up – at least as far as the tree line I am now sitting next
to.
One element that is vital to your success is your leaders. The
unit at hex 29,3 contains a leader (when he is unloaded from his vehicle you will note the star
on his counter image). He has special qualities. His purpose is to keep the men in good order
during combat. Do not risk your leaders by putting them too far up front. Place them instead
in positions of less danger but readily available to aid the men. For example, this leader is
stacked with the 1st SMG squad. Should it be fired upon and become "pinned" or
"demoralized," it will be his responsibility to rally those troops. Without the presence in the
hex of a leader, rallying troops is more difficult and takes much longer.
Remember that dialog box we got at the beginning of the scenario about support & smoke?
Well its time to look back at that. Some scenarios offer off-map “support” for your on-map
forces. To access this we want to locate a leader that is in the same hex as a radio. For us he
is located at hex 31,3 so click once on the. Now we need to click the “Artillery/Air Support”
icon from the tool bar (or select the option from the Leader menu) and a new box will appear.
What we learn is that we have 3 entries which consist of 10x 120mm Mortars each. It will take
a minimum of 3 turns for them to become available and a max of 4…and we only get two
pass with them. Given this is a short scenario we better go ahead and call them in right away,
or at least two of them. Select the entry and then click the “Call” button at the bottom of the
screen for each you wish to call followed by the “OK” button when done.
Go ahead and move the rest of your forces into place. Take note that if you move your units
one at a time they will be able to drive along the road for a period of time, thereby expending
less movement points. However if you move an entire stack at once you do not benefit from
the road movement cost but pay the full “clear” hex cost, or whichever terrain you are moving
through.
Be sure and review all the buttons on the toolbar by simply moving your mouse slowly across
them. What each one does will be shown in a small white box. Here are a few points to keep
in mind while moving your forces:
a)
b)
c)
Take advantage of the surrounding terrain…in this case trees and later
buildings. Get into hexes that will provide you cover and make it more difficult
for the enemy to hit you.
Make sure you have good LOS so you can see the town and detect any
enemy movement that takes place. Along this same line, create overlapping
fields of fire – so no one unit is on its own in defense. You want your men to
support each other as this will give them the best chance for survival.
As much as possible, maintain a reserve…so you have reinforcements to
throw into a trouble spot…and watch your flanks! You are the attacker, so
you will determine the primary points of action, but you need men left to
exploit any advantage you gain.
End your turn by pressing on the clock (Next Turn) button at the top of the screen when you
have moved all your units. When the "Save as" screen appears give your game file a name
and then click the "Save" button. Now the Axis forces have their turn and once that is
complete your turn dialog box will again appear. Repeat this process as you move your
forces into position and begin to respond to the enemy as they reveal themselves.
Remember what I said about using covering terrain as well.
Notice that when your troops come into sight and range of the enemy their units will use what
is called "opportunity" fire. Your forces will do this too during the AI's turn. They will fire on the
enemy automatically as they have the opportunity. As you advance towards the Axis your
troops will begin to take fire from the units guarding the approaches to the town. You will note
that as your units take fire they will often go "on ground", which is the natural reaction when
someone is shooting at you! Keep this in mind when you go to move those units on your next
turn, as a unit On Ground expends MP differently than one that is walking upright.
Once you have got to the point where you will dismount (unload) your men from the vehicles,
you may want some or all of your units to "go to ground." This simply means that instead of
standing the units are in a crouched or lying down position. This can be done by selecting a
unit with a double left click and then clicking on the "toggle ground" button in the menu icon
section. This is the icon with the narrow white strip at the bottom. Once you do that, the
selected units will then have a narrow white line at the bottom of their icon indicating their
state. It will also be written on them in the unit list. You can also use the "0" key on the
number pad to perform this action. Note that no points are expended when going to ground,
however 3 MP's are required to stand back up.
Reinforcements! This is great news when they come… but for this scenario
we don’t get any. It’s an important point to cover though, so while we are
waiting for the enemy to revel their defensive positions I thought I would do so. You will be
notified at the beginning of your turn when reinforcements do arrive. You have to click them
onto the map to actually begin to use them however. To bring them on the map select the
"Arrived Units" button on the tool bar and a new box appears listing your reinforcements.
Highlight the unit and click "OK". Now they appear on the map and can be controlled like all
the rest of your forces.
In this scenario as with most SB scenarios, time is of the essence. You must continue to
move your men so that they can be in a position to accomplish the scenario objective prior to
the end of the allotted turns, so make every move count.
A note on firing...when you fire you can either select all the units in a hex and have them all
fire all their weapons at one target hex, or you can be selective and fire different weapons at
different targets, or choose not to use some weapons at all, to conserve their effectiveness. If
you wish to be selective use the Information bar to choose the weapons you want to use.
Also, some weapons allow you to choose
the type of load you fire. This is a critical
point if you are advancing with tanks
towards soft targets, such as infantry –
which, to our knowledge, we are in this
scenario. Shooting AP (Armor Piercing)
rounds at infantry is going to be useless,
so we want to switch over to HE (High
Explosive) to gain the greatest chance of
inflicting damage on the smaller dispersed
targets. To do this select the vehicle and
then go to the “Command” menu and
choose “Select Weapon Load”. You will then get a list of the options available to you for that
particular weapon, which in this case is an 85mm main gun.
As you play, you may find that some of the Axis troops are very hard to finish off with ranged
(distance) fire. In that case, try an assault. An assault occurs when you attempt to move into
a hex containing enemy troops. It is resolved automatically and winning it depends on a few
things including the morale of your units, the types of weapons you have and the condition of
the enemy units. I recommend that you initiate an assault with your troops in the prone
position, as they tend to suffer fewer casualties that way. Assaults will be a big part of this
scenario as the Axis try to hold the town and you try to take the objectives.
I recommend trying assaults only if you feel your units are superior in number and state to
those of the enemy units being attacked. Otherwise you may come out on the losing end. It
can be very effective but it can also be a disaster for you. For example I have had a whole
squad eliminated while assaulting a fortified position...a very painful loss to say the least!
Soften the target up with support fire, grenades, satchel charges, etc. before you go in when
ever possible.
Continue your advance towards the bridge and try not to suffer too many losses. You can
send some tanks on ahead to clear the way, but don’t leave them alone without infantry
support for too long, as they will not survive in close quarters without it.
Also remember that at some point that support you called for is going
to show up…so while you need to close the gap between you and the
enemy, you won’t want to be too close when this becomes available to
you or you may suffer some not-so-friendly fire! It arrived for me on
turn 4. To access it you need to find your leader & radio again, then
click on the Support button. The dialog box will appear and you need
to select the battery of mortars and then click the “Target” button.
A new “Targeting Dialog” box will appear with the
weapon image as well as a couple of drop down
boxes. The one to the left denotes the weapon, so
we leave that alone. The one on the right is for the
weapon load however. We can either leave it as the
default of HE and try to lay down some suppressing
fire on the enemy units that have revealed
themselves thus far. Or, we can choose smoke, as
we have a 10 round allotment available to us for this
scenario. With a bit of luck this can lay down a
screen between our troops and the defenders and
allow us to move some of our forces up closer
without taking return fire. Given the punishment my forces have taken thus far I am electing
to try the smoke screen.
Now you need to right-click on the map hex you wish to target and
the bombardment will commence. It is important to note that you
must use Support when it becomes available, that turn. Otherwise
you will have to redo the calling process all over again. Also, once
the targeting box is open don’t close it by clicking the red X – only by
right-clicking your target, otherwise you will loose access to it as
well. Your results from this strike will vary as with any Indirect Fire
there can be a certain amount of “scatter”.
Make no mistake; this is a difficult mission that is before you. The
chances of you suffering heavy losses before you even get to the
bridge is very high. Once across the bridge you have a variety of unknown obstacles and
forces ahead of you. The scenario is scored in such a way as it is possible for you to gain a
victory, but not so you will gain one easily. Keep the pointers mentioned above in mind as
you advance. Don’t get across the bridge and go barreling for the objective hex at 8,19
without first attempting to clear the houses around the rail road. And provide covering fire for
your units that are still trying to cross, they will need it. A knocked out vehicle on the bridge
will prevent any further vehicles from crossing, so proceed with caution.
I’m going to leave you on this battlefield now, Commander. You know how to see, move,
shoot and assault. You have the basics. You are ready to do your own fighting. The more you
play, the more adept you become as a commander. Many of the things we have mentioned
here will become second nature to you. You’ll go from a glorious victory to an ignominious
defeat on occasion, but you will be learning and improving every time you play.
When the scenario is over the Command Report will pop up with a message that the time
limit is up. Clicking OK will then bring up the Victory Dialog. This box will show you the losses
for both sides, the points awarded for Objectives captured, the Victory Values, Total Points
scored and the Outcome.
You can display the Victory Dialog at any time during the scenario from the Info/Victory menu
item. This will allow you to follow your progress, but do not be alarmed to see that your side is
losing, particularly in the early part of a scenario. Often the winning side is not determined
until the last couple of turns. When vehicles are involved in a scenario the loss of them can
radically affect the victory condition, so make sure you take care of your assets...
Feel free to save this battle and come back to it later if you want to do more exploring at this
point. Whatever battle file you save can be given a name to identify it for later play. For
example, you could name your file "first game" When you go back to the game simply click on
"Open" from the file menu at the upper left, then click on the saved file.
There are four scenarios immediately following the Getting Started scenario in the list called
Bootcamp. These were designed with common situations setup so you can work with
common battlefield problems like:
o Assaulting a fortified position
o Combined arms tactics
o Defending against an armored attack
o Defending against night attacks
By exploring these scenarios it will better prepare you for the remaining 85 scenarios in the
game. Hints are included in each scenario description, but you may also want to explore the
various articles published on the Task Force Echo 4 site dealing with many aspects of tactical
combat as it applies to this series. They can be found here:
http://tfe4.wordpress.com/supply-section/tactics-articles/article-archives/
All the members of this Red Victory design team want this to be the start of many exciting
gaming hours for you as you fight your way through the battles and campaigns included in
this game. And don't forget...while the AI is a solid player in the Squad Battles series and can
be quite a challenge, there's no substitute for a game against a real person. So adventure out
on to the web and explore the on-line resources that exist to support this and the other HPS
games when you are ready. This web page will help you get going:
http://www.hist-sdc.com/hps/opponents.htm
What's new?
For returning players to the Squad Battles series there have been a few engine
enhancements and additions to make the game series more enjoyable. They are listed
below:
1) Added Sled vehicle flag to designate such vehicles as the Russian aerosled.
2) Added Infrared Detection Devices and three uses for those:
o MP-44/StG-44 with Infrared
o PzKw V Panther with Infrared
o SdKfz 251/20 with Infrared
3) Added Demolition Vehicles SdKfz 301, 302, and 303 (See Remote Control Vehicles
under Movement section of Users Manual).
4) Added Direct Fire vehicle flag for designating aircraft with no targeting scatter (see
Support in Users Manual).
For updates, downloads and the latest information visit HPS at http://www.hpssims.com/ or
email [email protected].