1
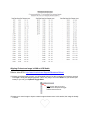
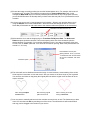
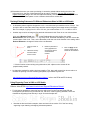
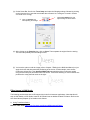
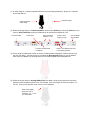
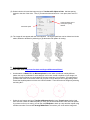
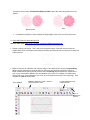
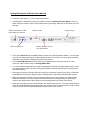
Using Your Klic-N-Kut for Rhinestone Applications1 By Sandy McCauley June 2011 Outline of Steps Used in the Rhinestone Application Process (1) Design the rhinestone pattern in KNK Studio, ACS Studio, or Make The Cut. (2) Cut a piece of rhinestone template material about an inch larger than your design. Peel off backing sheet and brayer to your cutting mat. (3) Cut out the rhinestone pattern using your Klic-N-Kut. (4) Brayer again before lifting the template from the mat. If any circles remain stuck to the template, press again on a clean area of the mat and repeat until complete weeded. (5) Press the template to a backing sheet. (6) Dust the template with a powder so no adhesive will remain exposed inside the holes. (7) Brush rhinestones into the template holes using a Shur-Line Trim and Touch-up Pad. (8) Cut a piece of rhinestone transfer tape to size and press onto the top of the rhinestones and then lift up the stones. (9) Optional - If making a window decal, design the cut pattern from your existing rhinestone pattern and cut the design from the window decal material. (10) Arrange the rhinestone transfer on the material (T-shirt, window decal material, cardstock) and then press or iron according to the directions provided. (11) All to cool and peel off rhinestone transfer tape. Supplies Needed Below is a full list of the supplies needed for rhinestone applications, their purpose, and where to find these supplies: (1) Rhinestone template material - I recommend the green material, also known as Hartco 425 sandblast mask. This is what you cut, in your Klic-N-Kut, to make a template for brushing in the stones: http://scrapbookdiecutter.com/mm5/merchant.mvc?Screen=CTGY&Store_Code=KNK&Category_Cod e=RHNGMR Alternately, some people will purchase Sticky Flock, which does not require a backing board, but is considerably more expensive. (2) Rhinestone transfer tape – I recommend the clear sticky Mylar tape which is used to lift the stones from the filled template: 1 © 2011 Sandy McCauley All Rights Reserved http://scrapbookdiecutter.com/mm5/merchant.mvc?Screen=CTGY&Store_Code=KNK&Category_Cod e=RHNTM (3) Optional – Window Decal Material - For rhinestone window decals (which can be also be applied to other solid surfaces, such as a laptop cover, vase, mug, cell phone, etc), you'll need XPEL or one of the other materials being used. I think you can buy XPEL now from my customer, Eric, listed in (8) below. Or you can buy it from another customer of mine here: http://www.decalsandbling.com/rhinestone-material.html OR... another source I recommend has a slightly different material that is a little stronger and doesn't have a paper backing. It's another kind of clear film, so it's better for marketing your decals, in my opinion. Here's the link: http://www.rhinestonedesignz.com/Product-search.html?keyword=stick (4) Rhinestones! Most people design in 10SS, 8SS, and 6SS. Accugraphic only carries 10SS and larger: http://scrapbookdiecutter.com/?page_id=78 If you are starting a business, then you'll probably want a wholesale supplier. This is a popular place for those in the business to get their stones: http://www.shineartusa.com/ (5) Shur-Line Trim and Touch-Up Pad – This is ESSENTIAL for getting those stones all brushed in and flipped up the correct way! Not any kind of brush will work as well and this is where you will easily become frustrated if you do not have the right tool: http://www.homedepot.com/h_d1/N-5yc1vZ1xg6/R-100141897/h_d2/ProductDisplay?langId=1&storeId=10051&catalogId=10053 (6) Backing material - Most of the users press their templates to foam board, which you can buy at dollar stores. They cover it in clear mailing tape first. I haven’t started doing that yet… I still use stencil board for the backing to my templates and it is also quite inexpensive. Accugraphic sells it here: http://scrapbookdiecutter.com/mm5/merchant.mvc?Screen=PROD&Store_Code=KNK&Product_Code =ASB18X2401510&Category_Code=STEN But you can use most anything that has any firmness to it. Some people buy quilter’s template plastic or those thin plastic cutting sheets at Wal-Mart. (7) Tray of some kind - Some people just use the large rectangular cake pans. Others want an actual bead tray: http://www.overstock.com/Crafts-Sewing/Tidy-Tray-Small-Large-Combo-Pack-of2/4892128/product.html (8) T-Shirts - I recommend you contact Eric at [email protected] and see what he has. Of course, you can use any T-Shirt. But if you are starting a business, you’ll want an inexpensive wholesale source. (9) Powder - A powder of some kind is used to brush into your cut template, right after applying it to the backing material. This keeps the stones from sticking to any exposed adhesive (inside the holes) and they will lift out more easily. Dust the template with baby powder, talcum powder, baking powder, facial powder... whatever you have on hand. Then use an old toothbrush to brush that powder around in the holes so that it sticks to any adhesive that might be exposed from the template material. Then tap it to remove excess powder and wipe the surface clean. (10) Bounce dryer sheets or anti-static spray - sometimes an electrical charge can build up during the brushing process. If you dab your clear transfer sheet a few times with anti-static bounce or a spray, then the stones won't “leap” when you bring the transfer sheet down to the surface to press onto the stones. (11) Heat press or home iron – used to melt the adhesive on the back of the stones onto the material (fabric or rhinestone decal material). (12) Brayer or Rolling Pin – used to press the rhinestone template material to the cutting mat. It’s important to have very good contact between the sticky template material and the sticky mat, so that weeding of the holes is automatic after cutting. (13) Thick material blade – used to cut the rhinestone template material. The blue capped blade which comes with a new KNK is the blade to use: http://scrapbookdiecutter.com/mm5/merchant.mvc?Screen=PROD&Store_Code=KNK&Product_Code =SL260&Category_Code=KNKBLDS (14) Optional - Thin material blade – used to cut the window decal material (15) Scraper – An old credit card, Pampered Chef brown scraper, or any other plastic item with a sharp edge is used to scrape the weeded circles off the mat for disposal. (16) Teflon sheets or Parchment Paper – used to protect the heat press, iron and layers of material during the heat press process. (17) Toothpicks, Wooden Skewer, Tweezers – any of these can be used to help get stubborn rhinestones into remaining holes. Preparing an Image for Rhinestone Applications In rhinestone applications, the first step is to create a pattern of circles which will be cut from a template and then will be filled with the rhinestones. The details of the actual cutting, transfer, and application process are covered in the following section: Cutting Motif Template Rubber and Setting Rhinestones. Rhinestones come in specific sizes with a minimum to maximum outside diameter. Always note the maximum diameter when selecting the sizes of your circles and calculating settings in KNK Studio. For example, a 10 SS rhinestone will have a diameter range of 2.7 – 2.9 mm. Then, when designing or modifying a pattern to cut, you will want to make the circles about 0.5 – 0.6 mm larger. Therefore, for the 10 SS rhinestones, set the diameter of the cut circles at, say, 3.4 mm. Refer to the chart below for the industry standards on rhinestone sizes. But the best course of action is to cut a pattern of circles that are various sizes from, say, 3.2 mm to 3.7 mm to see which holes are the easiest for the stones to brush into. This is because stone sizes can vary from one supplier to the next, from one color to the next. Important warning: All glass rhinestones have some lead content so keep away from children. The content is very low, however the US Government has restrictions on anything with lead content for children. At www.klic-n-kut.com, we specifically sell low lead content stones but we want our customers to be aware of the fact that there is lead in these stones. Aligning Circles to an Image in KNK or ACS Studio Refer to video RT01: http://www.iloveknk.com/Support/Rhinestone/Videos/ (1) Unless you always work in metric, you will probably want to be able to switch from inches to mm and back again, during the designing process. This is very easy to do on the Rulers on your screen (see below) or you can go to Options>Toggle Units. Right click on this icon to get a popup menu with option to toggle between inches and mm. (2) Import your vector image or import a raster image and auto-trace. In this tutorial, the image is already a vector: (3) Re-size the image according to what you want the finished pattern to be. For example, this heart will be changed to 4” in height. Then select the image and go to Arrange<Make Path. Now, in this example the Make Path step is not actually necessary because there is only a single path. However, you will ALWAYS want to do this step when you have more than one path, so it is presented here as a reminder (4) Let’s say you want to use 2.9 mm rhinestones in this design. Switch to mm and then draw a circle using the Shapes tools on the Tools toolbar. Select the circle and change the size to 3.4 on the Smart Bar (it’s advisable to add a little extra to the maximum diameter specified on the rhinestone): Diameter of circle is set to 3.4 mm (5) Select both the circle and the image and go to Transform>Fit Object to Path. The Nodes and Distance option should be checked. Then set the spacing at the size of the rhinestone plus the spacing desired. For example, if you want the rhinestones to be 1 mm apart in the design, then enter 4.4 mm. Click on Close. (Note that 1 mm would be a maximum spacing. Most of the professionals use around 0.3 – 0.5 mm.) Enter diameter of circle plus spacing desired. Thus, if you want 1 mm between each and the circles are 3.4 mm in diameter, then enter 4.4 mm. Check this option (6) The circles will now be distributed around the image. In most instances, some tweaking of the circles will be required. Just select a circle and move it with your mouse or the arrow keys on your keyboard. You can also now delete or drag away the original path line and the original circle as there will be no need to cut them. After closing Fit Object to Path window After removing original path line and circle After re-coloring to red and turning on Show Fill. (7) You may want to manually add some circles or delete excess circles, as well. The fastest way to add a circle is to hold down the Alt key and drag one of the circles. The selected circle will remain behind and copy can be dragged to the location of your choice. (8) Remember that once you create your design, it cannot be resized without altering the size of the circles and, thus, the size of rhinestone that can be used! Therefore, you may wish to keep the original vector path (drag it off to the side rather than delete), so that it will be available if you need to produce a different sized pattern or use a different sized stone at a later date. Resizing Existing Patterns to Fit Different Rhinestone Sizes in KNK or ACS Studio A rhinestone pattern might be designed to cut 2.1 mm circles and you need them to be 3.3 mm. You should be able to select the entire image and then resize using the percentage values in the Smart Bar. For example, in going from 2.1 mm to 3.3 mm, you would increase: 3.3 / 2.1 x 100% or 157%. Another way to resize an image to fit a particular rhinestone is this: Zoom in on one circle and then click on the Measure Tools icon on the Tools toolbar and pick the first icon called Measurement. Click once at the center top of the circle, hold down the Ctrl key, and click once at the center bottom of the circle. Then, on the Smart Bar, enter the new circle diameter in the setting called Desired Distance to change all circles to the new diameter: 1. 2. Click top center of circle. Hold down Ctrl key and click bottom center of circle. 3. Distance (diameter of circle) appears here. Change this value to actual diameter needed. 4. Click on Apply and all circles in pattern will be resized to new diameter. *** Word of caution: when resizing using this method, ALL objects on the screen will be proportionately resized. An alternative method for resizing involves rescaling. This, along with a tutorial on how to reduce or increase the spacing of circles in existing templates, is provided at my web site: http://www.iloveknk.com/Support/Rhinestone/Videos/ (refer to the RT09 and RT10 videos) Using Engraving Fonts in KNK or ACS Studio Refer to video RT02: http://www.iloveknk.com/Support/Rhinestone/Videos/ For rhinestone applications engraving fonts are well suited. On the Font and Clipart CD that accompanied your Klic-N-Kut, you will find over 100 fonts, in the Engraving subfolder, which are classified as engraving fonts and vary in style. Several examples are: Note that in third and fourth examples, there are interior lines used to “fill in” the font during engraving or pen drawing or designing rhinestone patterns. To use these fonts for rhinestone application, type out the text and then draw a single circle sized for the hole needed for the rhinestone plus 0.1mm. Add circle sized as needed. Type text in the engraving font of your choice. Just as shown in the previous tutorial, use Transform>Fit Object to Path to place the circles along the path lines of the title. Make modifications, as needed, to complete the pattern: Extra circle manually added Using Regular Fonts in KNK or ACS Studio Refer to video RT03: http://www.iloveknk.com/Support/Rhinestone/Videos/ There may be occasions where you want to use a regular font versus an engraving font. You have two options: A. Apply the circles to the outside border of the font: Type the font and create the appropriate sized circle. Use the same method described in our first tutorial to place the circles onto the path of the lettering: Type title and insert small circle sized for hole needed. Select title and circle and go to Transform>Fit Object to Path. Delete original lettering, leaving only the circles. Tweak the positioning of the circles, as needed. B. Center line trace the font to create single path lettering: (1) Type the title in the font of your choice: (2) Select the title and click on the Scan Tools from the Tools tool bar and select the third icon, Center Line: Click on Scan Tools Click on Center Line icon (3) On the Smart Bar, first click on Trace Setup and make the following settings, followed by clicking on the Vectorize icon (note that more details about Center Line Tracing are covered in Section 6.2 Center Line Tracing): 1. 2. Click on Vectorize icon Click Trace Settings icon and adjust settings as shown below. after adjusting the settings. (4) After clicking on the Vectorize icon, click on Close. Then separate the original from the tracing. The result will probably look something like this. (5) You have the option to edit the image (refer to Chapter 7 Editing in the KNK User Manual) or just apply the circles and then tweak the positioning of the circles. In this example, some excess nodes were deleted first. Then Arrange>Make Path was applied and the circles were added using the same steps as described in the first tutorial. Then some tweaking of circle locations was performed to create the final result on the right: Filling Images in KNK Studio The following tutorial shows how to fill images with circles for rhinestone applications. Note that this will work in KNK Studio or ACS Studio, however ACS Studio has an additional Hatch Fill feature. Refer to the ACS User Manual (Chapter 9) for details on this feature. A. Using Transform>Outline Refer to video RT04: http://www.iloveknk.com/Support/Rhinestone/Videos/ (1) A raster image of a cat was imported and traced using the steps presented in Section 6.1 of the KlicN-Kut User Manual. Vectorized image Original imported raster image (2) Select the image and go to Transform>Outline. Uncheck the Outline box, check the Inline box, then enter an Inline Thickness equal to the diameter of the rhinestone multiplied by 1.25: Uncheck Outline Enter rhinestone diameter x 1.25. Check Inline Increase until desired fill is obtained. Indent to keep original (or not) Click on Close when finished. Select a color different from that of the original trace line. (3) As you begin increasing the number of inlines, an island pattern will appear. Continue until you get the look you desire. You may choose to not indent the Keep Original setting or you can delete it after clicking on Close. The resulting image in this example appears filled with path lines: (4) Select the image and go to Arrange>Make Path. Now draw a single circle sized to the maximum diameter for the rhinestone plus 0.5 mm. For example, if you are using 6 SS, then the range is 1.9 – 2.0 mm. Thus you will want the circle to be 2.5 mm in diameter. Circle drawn slightly larger than size of rhinestone, e.g. 2.1 mm for a 6 SS stone. (5) Select both the circle and the image and go to Transform>Fit Object to Path. Add the spacing desired to the size of the circle. Thus, if you want the rhinestones to be 1 mm apart, then enter 3.5 mm: Check this option Value should be size of circles plus spacing desired. (6) The image will now appear with the circles applied. The original path lines can be deleted and circles added, deleted or tweaked in positioning to get the desire final pattern for cutting: B. Using Metamorphosis Refer to video RT05: http://www.iloveknk.com/Support/Rhinestone/Videos/ An alternative to Hatch Fill is the Metamorphosis function which provides an entirely different pattern but may be preferable for some designs. In this case, create a duplicate of your image, but resize it to be as small as you would want for the inner-most part of your pattern. You might want to go ahead and create a few circles at the size you plan to use so that you can roughly arrange them around that smallest pattern to make sure it will be suitable. Then center the two images by selecting and using Alt-7: Select the two images and go to Transform>Metamorphosis. Leave Target Layers checked and then enter the number of additional paths you think you will want between the inner and outer pattern. If you have too few or too many, you can just use Edit>Undo to back up a step and then repeat using a different number. Proceed with Arrange>Make Path. Then select your circle and the image and proceed to use the same Transform>Fit Object to Path to place the circles along the lines of the pattern. Metamorphosis Inline For additional tutorials on other methods for filling designs, refer to the end of this document. C. Using AND Weld for Horizontal Line Fills Refer to video RT08: http://www.iloveknk.com/Support/Rhinestone/Videos/ Design or import your image. Then, draw a line, along the bottom, using the first icon under the Graphic Edit Tools. To keep the line perfectly horizontal, hold down the Ctrl key while you click the two ends of the line: Make sure the line is a different color from the image. Then select the line and go to Layout>Array (A) and choose Vertical from the drop down list. Since you are performing the array on a line, it doesn’t matter which spacing choice you have. But the Spacing itself is important. It should be the size of your circle plus the distance you want between your circles. For example, for 10SS stones, spaced at 0.5 mm, you might want to use 4 mm (3.5 mm diameter circle plus 0.5 mm spacing). Then increase the Total to fill the image: Select Vertical Spacing = Diameter of Circle + Distance Distance between circles Increase Total until image is filled with lines Click on Close when finished. Go to Edit>Select None (D) to make sure nothing is selected. Then hold down Shift and click on the color of your lines from the Job Palette to select all of those lines. Then do an Arrange>Make Path (M). Then use Ctrl-B to send the lines to the back. Turn on Fill to verify the image is on top of the line pattern. Note that if your image is made up of different paths, it will also need a Make Path (M) performed. Marquee-select the line pattern and image and apply an AND Weld (second icon under the Weld tools). The result will be a line pattern in the shape of the image: Perform a Make Path on THIS pattern. And then create a circle the size you need for your design. Select it and the pattern and go to Transform>Fit Object to Path (F). Mark the Nodes and Distance (or Rhinestone Fill) box and enter the same spacing used for the Array. The circles will be added to the pattern. Move line pattern and then tweak circles to get the desired result: Cutting Motif Template Rubber and Setting Rhinestones to Fabric or Cardstock Refer to video: http://www.youtube.com/watch?v=7oknoQLXGTM (note that the black material being cut is more difficult to cut, so use the recommend force settings below for cutting the green Hartco material) (1) Open the rhinestone pattern and resize accordingly so that the circles are sized to fit the rhinestones you plan to use. You may wish to cut your image from scrap paper or cardstock to make sure you are satisfied with the overall look and the holes are appropriately sized. (2) Use a 60 degree (blue capped blade) and adjust the blade length to match the thickness of the motif template rubber or stencil board. With the motif template rubber, remove the backing sheet and press directly and firmly onto a clean sticky mat. I recommend using a brayer or rolling pin to make sure the entire surface has been evenly and firmly pressed down. Then insert the mat into the KNK. Lower the pinch wheels. (3) Make sure the blade tip is slightly above the surface of the material so that it will not scratch the material as it moves to begin cutting. This distance above the material is also important for providing the extra downward force for cutting. (4) Go to Cut>Plotting Defaults. Mark the Multi-Cut box and then set the # Passes to 2. Click on Apply. Then click on the Tool Options button in this same window. Set Overcut value to 0 so that the blade will stay down during the two passes on each circle. (5) Set the origin on the KNK and set the speed to 200. On the older KNK’s, set the force to about 300. On the original Groove, use a force setting of ~200. On the newer Groove-E and Maxx models, use a force setting of ~75. Perform a test cut (twice in the same spot) to make sure the material is cut cleanly. Increase the pressure, if necessary or adjust your blade exposure. (6) Select your image and cut. After cutting remove the mat and again, brayer firmly as this will help in weeding the cut circles. (7) Lift your cut template from the mat and remove any stray circles that may still be slightly attached to the material. If there are a lot of circles still attached, then press firmly again onto a clean part of the mat and lift. Repeat until the majority of the template is weeded. Place onto the backing material you are using. Dust with a powder so that any exposed adhesive is covered. Then tap to remove loose powder from the holes and wipe the surface of the template to remove any additional powder. (8) Place the pattern into a shallow tray and pour rhinestones over the top. Use a Shur-Line brush from the painting department of a hardware store to brush the rhinestones in a circular motion. The majority of the rhinestones should fill the holes with the adhesive side down. Brush the excess rhinestones off the pattern and then gather these unused rhinestones and repeat. A bead tray which can funnel excess rhinestones through one corner can be very useful for this process. (9) When only a few holes remain unfilled, use wooden skewer or toothpick or tweezers to nudge or flip rhinestones until every hole is filled. (10) Cut a section of rhinestone transfer tape to cover the rhinestone pattern. Remove the backing and apply over the top of the rhinestones. Press down on the tape so that the rhinestones will adhere well and can be pulled away from the template. The transfer can then be placed back onto its backing sheet OR the transfer can immediately be arranged onto the T-Shirt (or other item) for heat pressing (it is recommended that you first press/iron the shirt to flatten and remove any moisture). (11) Follow the directions on the heat press. If using a home iron, then set the iron at a hot cotton setting, but no-steam setting. You may wish to use a Teflon sheet or parchment paper between the layers of your shirt. (12) Apply direct heat for 15 seconds… do not move the iron. Then allow to cool before peeling off the transfer tape. Note that some professionals will flip the shirt inside out and press on the other side for another 10 seconds. (13) If the original design uses different colors of the same sized rhinestones, then cut each section of the pattern separately. This can be done by coloring the circles differently in the software and then using one of the methods described in Section 4.4 Cutting by Color in the KNK User Manual. Steps (8) – (10) above can be repeated for each part of the pattern, cutting a different piece of template material for each color. If there are only a few stones of a different color, then just cut one template and manually replace the stones in those holes with the other color. Also, if all of a second or third color is positioned separately, then you can try masking off those areas during the brushing of the first color. Then removing the mask and filling with another color. (14) If the original design using different sizes of rhinestones, then only one template needs to be cut. Brush the larger sized stones first since they cannot fall into the smaller holes. After the larger sized holes are filled, then brush in the smaller size. Setting Rhinestones to Window Decal Material Follow the same steps (1) – (10) to create your transfer. In KNK Studio or ACS Studio, select your pattern and go to Transform>Contour Object. Then use these settings to create a contour around and inside of your design. Note that you should be in mm for this step: Usually select this icon so that interior paths are contoured Select Round Corner Offset of contour Uncheck Group Select a different color from your original pattern Click on the Select Tool on the Tools toolbar to return to the main Sign Blank window. You may wish to move your design away from the original pattern and turn off Fill so you can more easily spot small paths that may have been created during the contour process. Go to Arrange<Break Path and then delete any tiny paths that you would not wish to cut. Then, select your entire contour and go to Arrange>Make Path. To cut the Window Decal Material, use the red capped (thin materials 45 degree blade) and try a force and speed similar to what you used for the green rhinestone template material. Only one pass should be needed however. After cutting, weed out any waste and then arrange your rhinestone transfer on top of the cut Window Decal Material. Note that you always keep the backing sheet of the Window Decal Material in place. Before pressing place a Teflon sheet or parchment paper on top of the transfer. The Window Decal Material melts easily. Follow the suppliers recommended heat and timing settings for pressing the stones to the decal material. After cooling, remove the Mylar tape from the top of the stones. When you are ready to apply to a hard surface, first clean that surface well. Then peel off the backing sheet for the Decal Material, spray lightly with a mist of water and then arrange onto the surface. Allow to dry for several hours and the decal should be firmly stuck to your surface.