1
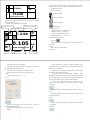
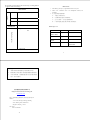
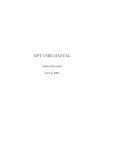
www.sunsitec.com
.
尊敬的用户:
感谢您选用了硅半导体测试仪,使用本机前敬请仔细
阅读本使用说明书,以便能得到更好的测试效果。
——————————————————————
Dear Sir or Madam:
Please read the User Manual before use the tester.
To get English User Manual(.PDF), please mail to
[email protected] or [email protected]
.使用说明书
.User Manual
硅半导体测试仪
Si Material Tester
型号(Model):SSRPT
杭州晶翔电子科技有限公司
Hangzhou Kingsun Electronic Technology Ltd
1
A.Use manual
1 Install the 9v battery in correct position and direction, and
connect the cable to the host.
3 Displayed the boot screen, until a few seconds to the test
interface.
or
4 Press
,refer to step 4~7. Be sure that the thickness value
icon
key to throw the power on.
2 Press
10 If there are deviations between measure values and actual
values, you can set the correction coefficient with the
to display the thickness icon
equals to that of the standard wafer. The default of the correction
coefficient is about 4290 (little more or less), and you need not to
calibrate it generally.
.
11 Press
,and the thickness icon
5 Press
twinkles,then you can
for about two seconds until the LED screen is dark
to power off the tester.
B Detail
set the thickness.
1 9-volt batter is applicable, and alkaline one is better.
(decrease)to make the thickness
(increase)or
6 Press
parameter values equal to that of the samples. The scope of the
thickness parameter is 0.01~4mm. If the thickness of the sample
is beyond the scope, just set the thickness parameter at 4mm.
2 Insert the four-probe line by gap alignment to the corresponding probe
interface of the host.
Hold tail to
push into the
host
again,the thickness icon
7 Press
stops twinkling,and
the value has been stored. (If the next sample has the same
thickness, the above two steps can be omitted.)
8 Press the surface of the sample with the probe, and the screen of
the host shows the value of the resistivity .
9 You can refer to step 4~7 to set the alarm threshold with the
icon
Hold ring to pull out
Don’t rotate!!!
Figure 1 Connection of cable and host
3 Turn on the tester, LED screen shows as below.
.
2
from the host
3
note:the above interface shows all the possible icons, and in
actual it shows only one in a time,more information as below.
1) parameter icons area
the icons in the area:
5.5002
VER
71220
interface is locked
WWW.SUNSITEC.COM
thickness of sample
The row above shows the version and sequence, the row below
shows the time of the production. The test is version 5.5, NO.002,
made on Dec.20th, 2007.
Seconds later, it shows the test interface.
quantity of electricity
Parameter icons area
parameter
2.00
P
N
type
0.105
VER
alarm threshold
2) parameter value
The value of the icon in the icon area.
Thickness scope is 0.01~4mm
Correction coefficient 4000~5000
Alarm threshold 0.0~1.0 Ω.cm
3) quantity of the electricity
the icon is
Ω.CM
WWW.SUNSITEC.COM
resistivity4
correction coefficient
unit
Shows the resistivity of the sample
When the value of the resistivity is in the scope 0~1,there are
three numbers after decimal point.
When the value is in the scope 1~10, there are two
When the value is in the scope 10~100, there is one
6) unit
The unit of the resistivity is Ω.cm
4 Keys
When the quantity is nearly empty, you need to change for a
new battery.
4) type
Shows P/N type of the sample.
5) resistivity
5
a) when the tester is power off ,it still has minimal power
consumption, however, when power down(without the battery),it
has no power consumption.
b) When power off, turning on again takes less time to the
test interface than when power down.
c) In power off state, the parameters (thickness, alarm
threshold for example) you have set are stored in the system, but
in power down state, you will lost all the parameters which you
have set, when turn on again, you just have the defaults.
If you will not use the tester for a long time, ten
days or more for example, you'd better power it down.
2) increase
In testing mode you can choose the parameters to display or
to set.
In setting mode, click it to increase the value, long press it to
speed-up increasing.
3) set
1) power/lock
When the tester works:press it to power off ,click it to
lock/unlock the test interface.
When the tester is power off:press it to power on.
Notes::
6
Enter or exit the setting mode. In setting mode, the parameter
icon flashes.
4) decrease
7
In test mode it is the same as the increase key, in setting mode it
is opposite to the increase key.
Guarantee
name
Guarantee
1. Since the day you buy it, we guarantee the host for one year.
2. Probe ( Pin 、 Connection wire ) are consumption material, not
Silicon resistivity tester
guarantee.
3. 有下列情形恕不免费维修:
product
type
SSRPT
sequance
1
examiner
a)
未能出示本保修卡者。
b)
用法错误或自行拆开以致损坏者。
c)
由于人为损坏、不当电压造成故障者。
d)
产品外观因使用而自然污旧不属于保修范围。
Packing List
Hangzhou Jinsun Electronic Technology
Ltd
name
quantity
Manufacture signiture
Host
(main box)
Wire
1 pcs
Four-probes
Head
instruction
1 pcs
8 Pin
1 pcs
Include
Guarantee
1 pcs
2010-06-01
8
版权信息
1. 本说明书版权为杭州晶翔电子科技有限公司所有
2. 杭州晶翔电子科技有限公司保留更改规格及价格的权利
3. 产品在不断升级,可能最终使用的产品与本说明书略有
差异,恕不另行通知。
杭州晶翔电子科技有限公司
Hangzhou Jinsun Electronic Technology Ltd
www.sunsitec.com
地址:杭州西湖区万塘路 69 号华星科技苑 A 座 417
Address:
A-417 room, Huaxing Technology Building
No.69, Wantang Road, Xihu District
Hangzhou, Zhejiang,China
TEL & Fax:
086-571-85026903
10
remark
9