1
1O8OP
FULL HD WIFI-ENABLED SPORTS/ACTION
CAMEM
USER MANUAL
Contents
Cover Pa9e........
Contents-...............
Package Con1ents ...................
Layout of the Sports Camera........_......
LJsing of Waterproof Case & Brackets.....
Operatrng the Sports Camera....
Buttons to Start Taking Video and pho1o...............
Charging the Sports Camera.....
Takrng Photos.....
Recording Videos................
Downloading the Software iSmart DV.........................
,'......'''..'1
.',,.......,, '.2
,.'''.....'''.3
......''''....,4
.. ... ... ... ..6
............5-6
WiFi Mode...... ....
.............7
Operating through phone by usjng iSmart DV...........
Recording Setting Menu Lis1.........
System Setting Menu List...............
Trouble Shooting
Resetring the Sports Camera.........
Specilications... ...
........ ...8-9
'........ '...,9
..... .....9-1 0
.,',.......10
............11
11
lntroduction
This Full HD Sports Camera comes with WiFi function and full accessories for using in surfing,
diving. mountain biking, skiing and many other outdoor activities. Enjoy and remember the
moments you may go with this Camera.
Features
\4dm:1920'1080P
WlFi enabled, can achieve remote operation through phone
Vlewing angle 140"
1.8" TFT LCD
Waterproof to 40m
APP @mpatible with both Android and iOS
Support 32GB external Micro SD card
Standard Contents:
&
w &
4
*
A
#
#tT
*C -".k.
#f"k
:,:,
.'.,.,lEb
,","#",
Optional Contents: (The below contents may not be included in the package,)
&o"r_,*_,sk
Turning the Sports Camera On
.
Short press the Power button once to turn the Camera on.
Turning the Sports Camera Off
.
.
With the Sports Camera on standby or under recording or connecting to the phone via WiFi,
press and hold the Power button until the LCD turns off.
The camera will turn off automatjcally if there is no operation within setting time.
lrodelillfiu
La3UOpm VYIFI
Itrrt/Stop
WIFI
Using the buttons on the top ofthe
Camerai
Press the Record button to record videos or oress the
power/photo
buttontotakephotos
,+
ffi
R66ord
1_:,-t=
p@e/phoro
For further advanced operations, please see below the Taking photos or Remrding Videos.
M&m__
.
.
The removable Lithium battery needs approximately 3 hours to get fully charged.
The camera can be charged either vja USB cable or a charger. While chargjng, the LED
indicator will display blue; When fully charged, the blue LED indicator will turn off.
Taking photos by pressing Power/photo button
Putting camera into waterproof case:
.
.
Make sure the sport camera is on and TF card is inserted
Under standby status, press the Power button once to take a picture. Hold the camera steady
during this period until the camera returns to standby mode.
Pluck out the buckle on the waterproof case and put the camera in,
Advanced skills to take photos:
then close the waterproof case over and fasten tightly the case.
.
.
.
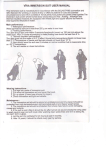
Helmet & bicycle brackets:
@.^
s*
%
@& ffiffi
.
Self-Capture photos: Press and hold the Mode/Menu button (for 2 or 3 seconds) until enter into
Re@rding Setting Menu List, using the Last or Next button to choose Self-Capture to set it.
After setting it, press Power button to exit setting.
Sequence Capture: Can capture 3 photos in a row, similar operation as setting Self_Capture.
Interyal Capture: Can choose from 10 sec. / 1 min. / 10 min. / 30 min. interuals. similar
operation as setting Self-Capture.
Choosing the resolution ofthe photos,3M/6[,4/8M/iOM pixels optional: similaroperation as
setting Self-Capture.
Recording video by pressing Record (REC) button
. Make sure the
. Under standby
Camera ls off and TF €rd inside.
status, press the Record button to start recording, press the button again to end
recording. The camera will then save the video to the inserted TF card and return to standby
status.
Checking Camera's WiFi lD# and seting WiFi password:
Advanced skills to take videos:
.
Choos ng movie size: Press and hold the l\,4ode/Menu button (for
.
into Recording Setting Menu List, using the Last or Next button to choose l\,4ovie Size and set
what you need, 1080P(30fps), 720P (60fps) & 720P(30fps) optional. After setting it, press
Power button to return.
For all other unique settings, please refer to Recording Setting Menu List.
2 or 3 seconds) until enter
.
Press and hold Mode button (for 2 or 3 seconds) until enter into Recording Setting Menu List
interface, then press Record button to change to System Setting l\,4enu List interface, then use
the Nexulast button to choose the WiFi Sei menu, press Record button again, you'll see the
WiFi lD# and password. You may reset the password upon your need-
Opening WiFi:
.
Under standby status, press and hold Lasvopen WiFi button for 3 seconds to open the
Camera's WiFi and you'll see in the LCD display the WiFi lD#(Such as ViewwiFi_9E33).
Note: When turning on the Camera's WiFi, except the Power/Photo and Nexustop WiFi buttons,
all other buttons won't work until you turn off the WiFi function.
Stopping WiFi
.
.
Under WiFi status, press the Nexvstop WiFi button once to stop WiFi on the camera.
By opening WiFi, if not any operation within 2 minutes, Camera's WiFi will be turned off
automatically.
.
&:!8"..-,.".
.
lf the Camera is connecting a smart device via WiFi, when you exit the ismart DV in your
device, the Camera's WiFi will also be ended automatically.
lf you turn off the Camera, the WiFi will surely be stopped.
@
Downloading procedure under Android system
(
---------;l
lvuwiilE
lG..""rtid-l
WLAN
Open <Play Store> APP in your Android Phone (see above photo '1 ), input "ismart DV" in the
search bar to search the APP ismart DV When find it, press "INSTALL" button (see photo 2) to
install it and click "accept and download to flnish
ru
,Orr o
Phoro 3
chrislina
Ifr
Downloading procedure under iOS system
Open the APP <App Store> iPhone, input "ismart DV" in the search bar to search for the APP
ismart DV Upon flnding it (see above photo 3), click download button and input your App Store
lD and code to download the ismart DV After downloading it, by connecting the Camera's WFi
lD# to your phone first, then click the ismart DV icon to use this APP (see above photo 4).
e-
Ao-U.ut
a
Photo 6
Photo 7
Turn on the WiFi ;n your Camera fi6t, then enter into Setting in your phone, turn on WLAN and
find your Camera's WiFi lD# (see Photo 5) and click it to input the Camera's password ( see
Photo 6, initial password is 1 2345678), ihen your phone is connected to the Camera via WiFi
(see Photo 7).
After the operation, open jsmart DV app in your phone and you can operate through your phone
now. Basically, you don't need to input the password again if you input it once.
delete the files or download the files to your phone.
Using the APP ismart DV in your Phone:
Battery Power Sl
Adtust frequencyor Formal Camera
Set Phoio Resolulion
Set Self Timer
WiF
Downloading Folder
Downloading allfiles
this icon to download all files
Press and hold Mode button for 2 or 3 sec, to enter into Recording Setting Menu
List:
Cllck to choose Phoio
Recording
a Video:
Click Video icon to switch to video mode, click on the red icon middle of the interface bottom to
start recording.
Taking a photo:
Click Photo icon to switch to camera mode, and then click the red button in the interface bottom
to take a photo.
Movie Size: Choosing between 1080P/3ofps, 720Pl60fps & 720Pl3ofps.
Seamless: Selting auto loop recording function.
Date Stamp: Adding or eliminating date information in the videos and photos
Resolution: Choosing the resolution of the photos of 3M / 6M / 8M / 1 0M pixels
Quality: Choosing the images of the photos of Super Fine, Fine & Normal
Self.Capturei Setting time-lapse for self-capture, taking a photo within 10 seconds.
Sequence Capture: Setiing sequence capture function, can achieve shooting 3 photos in a row.
lnterualCapture:Settinginterualcapturefunctionfortakingphotos,l0sec./1/10/30min.
Other operations:
Click Setting icon to set up the Camera's frequency or format SD card.
Click FHD icon to set the video resolution and see the rest recording time of the current SD card.
Battery icon: ldentify the Camera's current battery power status.
WiFi icon: ldentify the Camera's current WiFi signal strength.
Press and hold Mode button (for 2 or 3 sec.) to enter into Recording Setting Menu
List and then press Record button to change to System Setting Menu List:
WiFi Set: Check this sports camera's WiFi lD# and set password
Downloading and viewing videos & photos
Language: Set system language, choose from multiply languagesl English, Russian and
Click Downloading icon to view videos and photos stored in this camera, and you can choose to
Chinese.
Format: Used to format memory or TF card.
Date & Time: Set Year/Month/Date, use "Last'or "Next" to adjust it. Press "Power/Photo" to
confim and move to next setting option.
TV out: Selecithe NTSC system or PAL system according to the TV system.
HDMI: HDMI type supported by the television to select the default automatically: 1080P-50H2,
1080P-60H2 & 720P-50H2.
Sounds: Turn on / tum off microphone or warning tone; adjust the system volume.
Auto LCD Off: Set default time for turning off LCD screen automaticallyi press any key to wake
up LCD screen.
Power Save: Set default auto power-off when was left no operation.
Metering: Set metering mode, use this feature to select an app.opriate metering mode combing
with exposure data to improve image quality.
Sharpness: Set photo / video sharpness.
White Balance: Use this feature to improve the photo quality by choosing proper using scenes.
Exposure; ln different lighting conditions, images will have different color performance, use this
feature to select an appropriate exposure value to improve image quality.
Light Frequency: Used to select the frequency ofthe power line, ifwrong light frequencies were
chosen, image will have horizontal stripe interference.
System: Used to set default system parameter and view system version and card information.
Can't take photo or shoot
Check if TF card is full or being locked
I
Stop recording automatically while recording videos.
Because of huge HD flles, please use high-speed TF cards compatible with SDHC to improve
transmission. High-speed TF cards comes with C4, C6 or C'10 mark
I
ln cloudy, indoor lighting scenes, poor color performance.
Please adjust "white balance" depending on specific scenes.
I
There are horizontal stripes in images.
This is because light frequencies were wrongly set. Please just set it to be "50H2" or "60H2"
according to your local power frequency.
Press and hold Mode button (for 2 or 3 sec.) to enter into Recording Setting Menu List and then
press Record button to change to System Setting Menu List, choose System and enter into it to
choose whether conduct Factory Reset or not.
Built-in WiFi, AP {unction can be realized
3NrP CL4OS Sensor, 1/3" liqht-sensinq surface area
5 fixed prime Lens. aoerture 2.3i5%, focal ienqth 2.5mm
WiFi
Sensor
Lens
LCD d
{.8 inches TFT LCD 240'32oPixel
Video outpul
HDMI output.
Picture
.IPG
H.264 compressed format,
1 080P(1 920x'l 080)3ofps
Video
720P(1280x720) 60fps
720P(1280x720) 30fos
I
"File error" pops up during playback
This is because there was error when the file was saved. Please just format the TF card.
Audio
Built-in Microphone and speaker (PCM)
Memory
SPI:8M
I
(Recorded files will disappear).
No image displays on HD TV
Check if the AV and HDMI cable are connected properly, or whether the TV is set to proper AV
and HDMI status.
I
lmages and videos are blurred.
It's probably be€use there might be dust, finger print on the lens, clean the lens with lens paper
before using the @mera.
I
When shooting sky, water scenes, the images are very dark
This is be@use of strong scene contrast which will severely affect the camera's auto exposure
effects. Under these scenes, sensitivity needs to be adjusted to correct the camera's exposure
figures.
I
10
External card: SDHC (suppo( 32GB max, MicrosD card)
Shutter
Electronic shutter
White balance
Auto/DavliqhUCloudv/Tunqsten/Low
lndi@tor
Recordinq indicators
Batterv
Workino time
Removable 1050mAh 3.7V Li-ion battery
1.2 houre with WiFi on, '1.5 hours with WiFi off
Size
63.3x42.6x33mm
N€t
78.2q
Product Weiqht
anole
Waterproof
164.49
uorescence
(bare camera + waterproof case)
1400
To
fl
40m (with the wateroroof case)