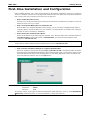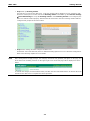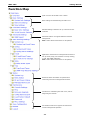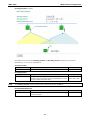
1
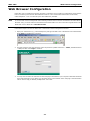
WAC-1001 User’s Manual Second Edition, May 2014 www.moxa.com/product © 2014 Moxa Inc. All rights reserved. WAC-1001 User’s Manual The software described in this manual is furnished under a license agreement and may be used only in accordance with the terms of that agreement. Copyright Notice © 2014 Moxa Inc., All rights reserved. Trademarks The MOXA logo is a registered trademark of Moxa Inc. All other trademarks or registered marks in this manual belong to their respective manufacturers. Disclaimer Information in this document is subject to change without notice and does not represent a commitment on the part of Moxa. Moxa provides this document as is, without warranty of any kind, either expressed or implied, including, but not limited to, its particular purpose. Moxa reserves the right to make improvements and/or changes to this manual, or to the products and/or the programs described in this manual, at any time. Information provided in this manual is intended to be accurate and reliable. However, Moxa assumes no responsibility for its use, or for any infringements on the rights of third parties that may result from its use. This product might include unintentional technical or typographical errors. Changes are periodically made to the information herein to correct such errors, and these changes are incorporated into new editions of the publication. Technical Support Contact Information www.moxa.com/support Moxa Americas Moxa China (Shanghai office) Toll-free: 1-888-669-2872 Toll-free: Tel: +1-714-528-6777 Tel: +86-21-5258-9955 Fax: +1-714-528-6778 Fax: +86-21-5258-5505 800-820-5036 Moxa Europe Moxa Asia-Pacific Tel: +49-89-3 70 03 99-0 Tel: +886-2-8919-1230 Fax: +49-89-3 70 03 99-99 Fax: +886-2-8919-1231 Table of Contents 1. Introduction ...................................................................................................................................... 1-1 Overview ........................................................................................................................................... 1-2 Package Checklist ............................................................................................................................... 1-2 Product Features ................................................................................................................................ 1-2 Product Specifications ......................................................................................................................... 1-3 Functional Design ............................................................................................................................... 1-4 LED Indicators ............................................................................................................................ 1-4 Beeper ....................................................................................................................................... 1-4 Reset Button............................................................................................................................... 1-4 Relay (Digital Output) .................................................................................................................. 1-5 2. Getting Started.................................................................................................................................. 2-1 First-time Installation and Configuration ................................................................................................ 2-2 Function Map ..................................................................................................................................... 2-4 3. Web Console Configuration ............................................................................................................... 3-1 Web Browser Configuration .................................................................................................................. 3-2 Overview ........................................................................................................................................... 3-3 Basic Settings .................................................................................................................................... 3-4 System Info Settings ................................................................................................................... 3-4 Network Settings......................................................................................................................... 3-4 Time Settings ............................................................................................................................. 3-5 Controller Settings....................................................................................................................... 3-6 NOTE ............................................................................................. 3-Error! Bookmark not defined. Auto Warning Settings....................................................................................................................... 3-10 System Log .............................................................................................................................. 3-11 Syslog ..................................................................................................................................... 3-12 E-mail ...................................................................................................................................... 3-13 Relay ....................................................................................................................................... 3-14 Trap ........................................................................................................................................ 3-14 Status ............................................................................................................................................. 3-15 System Log .............................................................................................................................. 3-15 Relay Status ............................................................................................................................. 3-16 DI and Power Status .................................................................................................................. 3-16 Managed Device List .................................................................................................................. 3-17 Maintenance .................................................................................................................................... 3-17 Console Settings ....................................................................................................................... 3-17 Ping ......................................................................................................................................... 3-18 Firmware Upgrade ..................................................................................................................... 3-18 Config Import Export ................................................................................................................. 3-19 Load Factory Default .................................................................................................................. 3-19 Password.................................................................................................................................. 3-19 Misc. Settings ........................................................................................................................... 3-20 Save Configuration ........................................................................................................................... 3-20 Restart ............................................................................................................................................ 3-21 Logout............................................................................................................................................. 3-21 4. Software Installation and Configuration ........................................................................................... 4-1 Overview ........................................................................................................................................... 4-2 AWK Search Utility .............................................................................................................................. 4-2 Installing AWK Search Utility ........................................................................................................ 4-2 Configuring AWK Search Utility ..................................................................................................... 4-4 5. Other Console Considerations ........................................................................................................... 5-1 RS-232 Console Configuration (115200, None, 8, 1, VT100) .................................................................... 5-2 Configuration by Telnet and SSH Consoles ............................................................................................. 5-3 Configuration by Web Browser with HTTPS/SSL ...................................................................................... 5-4 Disabling Telnet and Browser Access ..................................................................................................... 5-5 A. References ........................................................................................................................................ A-1 Roaming Domain ................................................................................................................................ A-2 Roaming Method................................................................................................................................. A-3 Compare .................................................................................................................................... A-3 B. Supporting Information .................................................................................................................... B-1 About This User’s Manual ..................................................................................................................... B-2 DoC (Declaration of Conformity) ........................................................................................................... B-3 Federal Communication Commission Interference Statement ............................................................ B-3 Firmware Recovery ............................................................................................................................. B-3 1 1. Introduction The WAC-1001 is rated to operate at temperatures ranging from 0 to 60°C for standard models and -40 to 75°C for wide temperature models, and is rugged enough for any harsh industrial environment. The following topics are covered in this chapter: Overview Package Checklist Product Features Product Specifications Functional Design LED Indicators Beeper Reset Button Relay (Digital Output) WAC-1001 Introduction Overview The WAC-1001 Wireless Access Controller which is used to enabling layer 2 controller based roaming for the RTG series. It is ideal for applications that are hard to wire, too expensive to wire, or use mobile equipment that connects to a TCP/IP network. The WAC-1001 can operate at temperatures ranging from 0 to 60°C for standard models and -40 to 75°C for extended temperature models, and is rugged enough for any harsh industrial environment. Installation is easy, with either DIN-Rail mounting or wall mounting in distribution boxes. The WAC-1001 with its wide operating temperature range, IP30-rated housing with LED indicators, and DIN-Rail/wall mount is a convenient yet reliable solution for all types of industrial wireless applications. Package Checklist Moxa’s WAC-1001 is shipped with the following items. If any of these items is missing or damaged, please contact your customer service representative for assistance. NOTE • WAC-1001 series wireless controller • 1 cable holder with 1 screw • 2 protective caps • Wall mount kit • Quick installation guide • Software CD • Warranty card The above items come with the standard WAC-1001 model, but the package contents may vary for customized versions. Product Features • Advanced Turbo Roaming Support Less-than-50 ms handover Wireless security: WPA/WPA2-Personal/Enterprise • Central Management Functions DTLS tunnel for control messages Wireless security setting • Free firmware update for more advanced functions • RS-232 console management • 2DI+1DO for on-site monitoring and warnings • Wide -40 to 75°C operating temperature range (-T model) • Redundant 24 VDC power inputs or IEEE802.3af Power over Ethernet • DIN-Rail or wall mounting • IP30-rated heavy-duty metal housing 1-2 WAC-1001 Introduction Product Specifications WLAN Interface Standards: IEEE 802.11i for Wireless Security IEEE 802.3u for 10/100BaseT(X) for Ethernet LAN IEEE 802.3af for Power-over-Ethernet Supported Models: • AWK-3121-M12-RTG • AWK-3121-SSC-RTG Security: • WPA/WPA2 Personal and Enterprise (IEEE 802.1X/RADIUS, TKIP and AES) Interface LAN Ports: 1, 10/100BaseT(X), auto negotiation speed (RJ45-type) Console for External Antenna: RS-232 (RJ45-type) LED Indicators: PWR1, PWR2, PoE, FAULT, STATE Alarm Contact: 1 relay output with current carrying capacity of 1 A @ 24 VDC Digital Inputs: 2 electrically isolated inputs • +13 to +30 V for state “1” (ON) • +3 to -30 V for state “0” (OFF) • Max. input current: 8 mA Physical Characteristics Housing: Metal, providing IP30 protection Weight: 700 g Dimensions: 53.6 x 135 x 105 mm (2.11 x 5.31 x 4.13 in) Installation: DIN-Rail mounting, wall mounting Environmental Limits Operating Temperature: Standard Models: 0 to 60°C (32 to 140°F) Wide Temp. Models: -40 to 75°C (-40 to 167°F) Storage Temperature: -40 to 85°C (-40 to 185°F) Ambient Relative Humidity: 5 to 95% (non-condensing) Power Requirements Input Voltage: 12 to 48 VDC, redundant dual DC power inputs or 48 VDC Power-over-Ethernet (IEEE 802.3af compliant) Connector: 10-pin removable terminal block Power Consumption: • 0.121 to 0.494 @ 12 to 48 VDC • 0.3 A @ 24 VDC Reverse Polarity Protection: Present Standards and Certifications Safety: UL 60950-1, EN 60950-1 EMC: FCC Part 15 Subpart B Class A, EN 55022/55024 Rail Traffic: EN 50155 (Environmental), EN 50121-1/4 (Environmental) Note: Please check Moxa’s website for the most up-to-date certification status. Warranty Warranty Period: 5 years Details: See www.moxa.com/warranty 1-3 WAC-1001 Introduction ATTENTION The WAC-1001 is NOT designed for use by the general public. A well-trained technician is required to safely deploy the WAC-1001. Functional Design LED Indicators The LEDs on the front panel of the WAC-1001 provide a quick and easy means of determining the current operational status and wireless settings. The FAULT LED indicates system failures and user-configured events. If the WAC-1001 cannot retrieve an IP address from a DHCP server, the FAULT LED will blink at one second intervals. Beeper The beeper emits two short beeps when the system is ready. Reset Button The RESET button is located on the top panel of the WAC-1001. You can reboot the WAC-1001 or reset it to the factory default settings by pressing the RESET button with a pointed object such as an unfolded paper clip. • System reboot: Press and release the RESET button • Reset to factory default: Depress the RESET button for more than 5 seconds until the STATE LED starts blinking green, and then release. 1-4 WAC-1001 Introduction Relay (Digital Output) The WAC-1001 has one relay output consisting of the 2 terminal block contacts on the top panel, as shown below. These relay contacts are used to forward system failures and user-configured events. The two wires attached to the relay contacts form an open circuit when a user-configured event is triggered. If a user-configured event does not occur, the relay circuit will remain closed. For safety reasons, the relay circuit is kept open when the WAC-1001 is not powered up. Summary of the WAC-1001’s Relay Status Power Status Event Off – Open Yes Open No Short On Relay 1-5 2 2. Getting Started This chapter explains how to install the WAC-1001 for the first time, and quickly set up your wireless network. The Function Map provides a convenient means of determining which functions you need to use. The following topics are covered in this chapter: First-time Installation and Configuration Function Map WAC-1001 Getting Started First-time Installation and Configuration Before installing the WAC-1001, make sure that all items in the Package Checklist are in the box. You will need access to a notebook computer or PC equipped with an Ethernet port. The WAC-1001 has a default IP address that must be used when connecting to the device for the first time. • Step 1: Select the power source. The WAC-1001 can be powered by a DC power input or PoE (Power over Ethernet). The WAC-1001 will use whichever power source you choose. • Step 2: Connect the WAC-1001 to a notebook or PC. Since the WAC-1001 supports MDI/MDI-X auto-sensing, you can use either a straight-through cable or crossover cable to connect the WAC-1001 to a computer. The LED indicator on the WAC-1001’s LAN port will light up when a connection is established. • Step 3: Set up the computer’s IP address. Choose an IP address on the same subnet as the WAC-1001. Since the WAC-1001’s default IP address is 192.168.127.253, and the subnet mask is 255.255.255.0, you should set the IP address of the computer to 192.168.127.xxx. NOTE After you select Maintenance Load Factory Default and click the Submit button, the WAC-1001 will be reset to factory default settings and the IP address will be reset to 192.168.127.253. • Step 4: Use the web-based manager to configure the WAC-1001 Open your computer’s web browser and type http://192.168.127.253 in the address field to access the homepage of the web-based Network Manager. Before the homepage opens, you will need to enter the user name and password as shown in the following figure. For first-time configuration, enter the default user name and password and then click on the Login button: NOTE Default user name and password: User Name: admin Password: root For security reasons, we strongly recommend changing the default password. To do so, select Maintenance Password, and then follow the on-screen instructions to change the password. 2-2 WAC-1001 • Getting Started Step 5: Set up Roaming domain The first time you log into the WAC-1001, a warning message will be displayed on your computer’s web browser to remind you to set the value of the Roaming domain. Click Yes to go to Controller Settings Basic WAC Settings to set up the Roaming domain . If the Roaming domain is not configured, the WAC-1001 will not function properly. Note that the AP and clients in the same roaming domain MUST be configured and grouped in the same subnet. • Step 6: More settings to better configure the WAC-1001 On the WAC-1001’s web-based UI, there are additional setting options for a more customized configuration. Refer to the following chapters for more details. NOTE After clicking Submit to apply changes, the web page will refresh and (Updated) will appear on the page, and at the same time a flashing reminder on the upper-right corner of the web page will be displayed as shown below: To activate the changes, click the Restart button, and then the Save and Restart button. It will take about 40 seconds for the WAC-1001 to complete the reboot procedure. 2-3 WAC-1001 Getting Started Function Map Quick overview of the WAC-1001’s status Basic settings for administering the WAC-1001 Essential settings related to set up a wireless access controller Advanced features to support additional network management Note: These advanced functions are all optional. Application-oriented device management functions to set up events, traps, and reactions via relay warning, e-mail, and SNMP notification Note: These advanced functions are all optional. Real-time status information for performance monitoring and device management functions Functions for maintaining the WAC-1001, and for diagnosing the network On-demand functions to support the web-based console management operation 2-4 3 3. Web Console Configuration In this chapter, we explain all aspects of web-based console configuration. Moxa’s easy-to-use management functions help you set up your WAC-1001. The following topics are covered in this chapter: Web Browser Configuration Overview Basic Settings System Info Settings Network Settings Time Settings Controller Settings Auto Warning Settings System Log Syslog E-mail Relay Trap Status System Log Relay Status DI and Power Status Managed Device List Maintenance Console Settings Ping Firmware Upgrade Config Import Export Load Factory Default Password Misc. Settings Save Configuration Restart Logout WAC-1001 Web Console Configuration Web Browser Configuration Moxa WAC-1001’s web browser interface provides a convenient way to modify its configuration and access the built-in monitoring and network administration functions. The recommended web browser is Microsoft® Internet Explorer 7.0 or 8.0 with JVM (Java Virtual Machine) installed. NOTE To use the WAC-1001’s management and monitoring functions from a PC host connected to the same LAN as the WAC-1001, you must make sure that the PC host and the WAC-1001 are on the same logical subnet. The Moxa WAC-1001’s default IP is 192.168.127.253. Follow these steps to access the WAC-1001’s web-based console management interface. 1. Open your web browser (e.g., Internet Explorer) and type the WAC-1001’s IP address in the address field. Press Enter to establish the connection. 2. The Web Console Login page will open. Enter the password (default Username = admin; default Password = root) and then click Login to continue. 3. You may need to wait a few moments for the web page to download to your computer. Note that the Model name and IP address of your WAC-1001 are both shown in the title bar of the web page. This information can be used to help you identify multiple WAC-1001 units. 3-2 WAC-1001 Web Console Configuration 4. Use the menu tree on the left side of the window to open the function pages to access each of the WAC-1001’s functions. In the following paragraphs, we describe each WAC-1001 management function in detail. A quick overview is available in this manual in the “Function Map” section of Chapter 2. NOTE For security reasons, you will need to log back into the WAC-1001 after a 5-minute time-out. Overview The Overview page summarizes the WAC-1001’s current status. The information is categorized into several groups: System info, Device info, and Controller info. 3-3 WAC-1001 Web Console Configuration Basic Settings The Basic Settings group includes the most commonly used settings required by administrators to maintain and control the WAC-1001. System Info Settings The System Info items, especially Device name and Device description, are displayed and included on the Overview page, in SNMP information, and in alarm emails. Setting System Info items makes it easier to identify the different WAC-1001 units connected to your network. Device name Setting Description Factory Default Max. 31 of characters This option is useful for specifying the role or application of WAC-1001_<Serial different WAC-1001 units. No. of this WAC-1001> Device location Setting Description Factory Default Max. of 31 characters Specifies the location of different WAC-1001 units. None Setting Description Factory Default Max. of 31 characters Use this space to record a more detailed description of the None Device description WAC-1001 Device contact information Setting Description Max. of 31 characters Provides information about whom to contact in order to resolve None Factory Default problems. Use this space to record contact information of the person responsible for maintaining this WAC-1001. Network Settings The Network Settings configuration panel allows you to modify the usual TCP/IP network parameters. An explanation of each configuration item is given below. 3-4 WAC-1001 Web Console Configuration IP configuration Setting Description Factory Default DHCP The WAC-1001’s IP address will be assigned automatically by Static the network’s DHCP server Static Set up the WAC-1001’s IP address manually. IP address Setting Description Factory Default WAC-1001’s IP address Identifies the WAC-1001 on a TCP/IP network. 192.168.127.253 Subnet mask Setting Description Factory Default WAC-1001’s subnet Identifies the type of network to which the WAC-1001 is 255.255.255.0 mask connected (e.g., 255.255.0.0 for a Class B network, or 255.255.255.0 for a Class C network). Gateway Setting Description Factory Default WAC-1001’s default The IP address of the router that connects the LAN to an outside None gateway network. Primary/ Secondary DNS server Setting Description IP address of the The IP address of the DNS Server used by your network. After None Factory Default Primary/Secondary entering the DNS Server’s IP address, you can input the DNS server WAC-1001’s URL (e.g., http://ap11.abc.com) in your browser’s address field instead of entering the IP address. The Secondary DNS server will be used if the Primary DNS server fails to connect. Time Settings The WAC-1001 has a time calibration function based on information from an NTP server or user specified Date and Time information. Functions such as Auto warning can add real-time information to the message. The Current local time shows the WAC-1001’s system time when you open this web page. You can click on the Set Time button to activate the updated date and time parameters. An “(Updated)” string will appear to indicate that the change is complete. Local time settings will be immediately activated in the system without running Save and Restart. 3-5 WAC-1001 NOTE Web Console Configuration The WAC-1001 has a built-in real time clock (RTC). We strongly recommend that users update the Local time for the WAC-1001 after the initial setup or a long-term shutdown, especially when the network does not have an Internet connection for accessing the NTP server or there is no NTP server on the LAN. Current local time Setting Description Factory Default User adjustable time The date and time parameters allow configuration of the local None time, with immediate activation. Use 24-hour format: yyyy/mm/dd hh:mm:ss Time zone Setting Description User selectable time The time zone setting allows conversion from GMT (Greenwich GMT (Greenwich Factory Default zone Mean Time) to local time. Mean Time) ATTENTION Because the current local time will be adjusted automatically as the time zone is being adjusted, you will need to configure the time zone prior to inputting the current local time. Daylight saving time Setting Description Factory Default Enable/ Disable Daylight saving time (also known as DST or summer time) Disable involves advancing clocks (usually 1 hour) during the summer time to provide an extra hour of daylight in the afternoon. When Daylight saving time is enabled, the following parameters will be shown: • Starts at: The date that daylight saving time begins. • Stops at: The date that daylight saving time ends. • Time offset: Indicates how many hours forward the clock should be advanced. Time server 1/2 Setting Description Factory Default IP/Name of Time IP or Domain name of the NTP time server. The 2nd NTP server None Server 1/2 will be used if the 1st NTP server fails to connect. Query period Setting Description Query period time This parameter determines how often the time is updated from 600 (seconds) Factory Default (1 to 9999 seconds) the NTP server. Controller Settings The Controller Settings group includes the most important settings, which enable administrators to set up the WAC-1001’s services. Basic WAC Settings The Roaming method and the Roaming domain’s information are displayed on the Overview page. Note: Using the Roaming method requires the input of different parameters. See below for details. 3-6 WAC-1001 Web Console Configuration Roaming method: Compare The tables below describe the Roaming method and Roaming domain’s parameters and options. Alternatively, you may refer to Appendix A. Roaming method Setting Description Factory Default Compare This option enables RSSI difference-triggered roaming. Compare Roaming domain Setting Description Factory Default 6 Hex characters This specifies the area served by the WAC-1001. All related <The Mac address controllers, APs, and clients use this as identification to work of the WAC-1001> and communicate with each other. NOTE The Roaming domain must be set at the time of initial (first time) installation. Roaming RSSI Difference Setting Description 0 to 70 Use this parameter to specify the difference needed to trigger 5 Factory Default the hand-off action. 3-7 WAC-1001 Web Console Configuration WLAN Security Settings By enabling the 802.11X, you can use the Extensible Authentication Protocol (EAP), a framework authentication protocol used by 802.1X, to provide network authentication. Such enterprise-level security modes require a back-end Remote Authentication Dial-In User Service (RADIUS) server if IEEE 802.1X functionality is enabled in WPA/WPA2. The IEEE 802.1X protocol also provides the ability possibility to carry out efficient connection authentication for a large-scale network. It is not necessary to exchange keys or passphrases. When you enable EAP, the WPA/WPA2-enterprise wireless security functions of the managed APs will be disabled. The WAC-1001 will then act as an EAP proxy or relay to support WAP/WPA2-enterprise wireless security. 802.1X/ EAP Setting Description Factory Default Enable/Disable Enables EAP proxy/relay support. The wireless security Disable functions of the managed APs will be disabled. Primary/ Secondary RADIUS server IP Setting Description Factory Default The IP address of the Specifies the delegated RADIUS server for EAP None RADIUS server Primary/ Secondary RADIUS server port Setting Description Factory Default Port number Specifies the port number of the delegated RADIUS server 1812 Primary/ Secondary RADIUS shared key NOTE Setting Description Factory Default Max. 31 characters The secret key shared between the AP and RADIUS server None The wireless security settings of all the APs that are deployed in the same roaming domain must be consistent and homogeneous. Different security settings in same-grouped APs may cause Turbo Roaming failures. Refer to the AWK-3121/4121-RS manual for detailed information about the Wireless Setting. 3-8 WAC-1001 Web Console Configuration SNMP Agent The WAC-1001 supports SNMP V1/V2c/V3. SNMP V1 and SNMP V2c use a community string match for authentication, which means that SNMP servers access all objects with read-only or read/write permissions using the community string public/private (default value). SNMP V3, which requires you to select an authentication level of MD5 or SHA, is the most secure protocol. You can also enable data encryption to enhance data security. The WAC-1001’s MIB can be found in the software CD and supports reading the attributes via SNMP. (Only get method is supported.) SNMP security modes and security levels supported by the WAC-1001 are shown in the following table. Select the security mode and level that will be used to communicate between the SNMP agent and manager. Protocol Setting on Authentication Data Version UI web page Type Encryption SNMP V1, V2c Community No Read string V1, V2c Method Use a community string match for authentication Community V1, V2c Community Write/Read string No Use a community string match for authentication Community SNMP V3 No-Auth No No Use account with admin or user to access MD5 or SHA Authentication No Provides authentication based on objects based on MD5 or HMAC-MD5, or HMAC-SHA algorithms. SHA 8-character passwords are the minimum requirement for authentication. MD5 or SHA Authentication Data Provides authentication based on HMAC-MD5 based on MD5 or encryption or HMAC-SHA algorithms, and data SHA encryption key. 8-character passwords and a key data encryption key are the minimum requirements for authentication and encryption. The following parameters can be configured on the SNMP Agent page. A more detailed explanation of each parameter is given below the following figure. Enable Setting Description Factory Default Enable Enables SNMP Agent Disable Disable Disables SNMP Agent 3-9 WAC-1001 Web Console Configuration Read community (for V1, V2c) Setting Description Factory Default V1, V2c Read Use a community string match with a maximum of 31 public Community characters for authentication. This means that the SNMP agent can access all objects with read-only permissions using this community string. Write community (for V1, V2c) Setting Description Factory Default V1, V2c Read /Write Use a community string match with a maximum of 31 private Community characters for authentication. This means that the SNMP agent can accesses all objects with read/write permissions using this community string. SNMP agent version Setting Description Factory Default V1, V2c, V3, or Select the SNMP protocol version used to manage the switch. V1, V2c V1, V2c, or V3 only Admin auth type (for V1, V2c, V3, and V3 only) Setting Description Factory Default No Auth Use admin account to access objects. No authentication No Auth MD5 Provide authentication based on the HMAC-MD5 algorithms. 8-character passwords are the minimum requirement for authentication. SHA Provides authentication based on HMAC-SHA algorithms. 8-character passwords are the minimum requirement for authentication. Admin private key (for V1, V2c, V3, and V3 only) Setting Description Factory Default Disable No data encryption Disable DES DES-based data encryption AES AES-based data encryption Private Key A data encryption key is the minimum requirement for data encryption (maximum of 63 characters) Private MIB Information Device Object ID Also known as OID. This is the WAC-1001’s enterprise value. It is fixed. Auto Warning Settings Since industrial-grade devices are often located at the endpoints of a system, these devices will not always know what is happening elsewhere on the network. This means that these devices, including wireless APs or clients, must provide system maintainers with real-time alarm messages. Even when system administrators are out of the control room for an extended period, they can still be informed of the status of devices almost instantaneously when exceptions occur. In addition to logging these events, the WAC-1001 supports different approaches to warn engineers automatically, such as SNMP trap, e-mail, and relay output. It also supports two digital inputs to integrate sensors into your system to automate alarms by email and relay output. 3-10 WAC-1001 Web Console Configuration System Log System Log Event Types Detail information for grouped events is shown in the following table. You can check the box for Enable log to enable the grouped events. All default values are enabled (checked). The log for system events can be seen in Status System Log. System-related events Event is triggered when… System restart (warm start) The WAC-1001 is rebooted, such as when its settings are changed (IP address, subnet mask, etc.). Network-related events Event is triggered when… LAN link on The LAN port is connected to a device or network. LAN link off The port is disconnected (e.g., the cable is pulled out, or the Config-related events Event is triggered when… Configuration Changed A configuration item has been changed. opposing device shuts down). Configuration file import via Web Console The configuration file is imported to the WAC-1001. Console authentication failure An incorrect password is entered. Firmware upgraded The WAC-1001’s firmware is updated. Power events Event is triggered when… Power 1/2 transition (On -> Off) The WAC-1001 is powered down in PWR1/2. PoE transition (On -> Off) The WAC-1001 is powered down in PoE. Power 1/2 transition (Off -> On) The WAC-1001 is powered via PWR1/2. PoE transition (Off -> On) The WAC-1001 is powered via PoE. DI events Event is triggered when… DI1/2 transition (On -> Off) Digital Input 1/2 is triggered by on to off transition DI1/2 transition (Off -> On) Digital Input 1/2 is triggered by off to on transition 3-11 WAC-1001 Web Console Configuration Syslog This function provides the event logs for the Syslog server. The function supports up to three configurable Syslog servers and Syslog server UDP port numbers. When an event occurs, the event will be sent as a Syslog UDP packet to the specified Syslog servers. Syslog Event Types Detail information for the grouped events is shown in the following table. You can check the box for Enable log to enable the grouped events. All default values are enabled (checked). Details for each event group can be found on the “System log Event Types” table on page 3-31. Syslog Server Settings You can configure the parameters for your Syslog servers in this page. Syslog server 1/ 2/ 3 Setting Description Factory Default IP address Enter the IP address of the 1st/ 2nd/ 3rd Syslog Server None Setting Description Factory Default Port destination Enter the UDP port of the corresponding Syslog server 514 Syslog port (1 to 65535) 3-12 WAC-1001 Web Console Configuration E-mail E-mail Event Types Check the box for Active to enable the event items. All default values are deactivated (unchecked). Details for each event item can be found on the “System log Event Types” table on page 3-31. E-mail Server Settings You can set up to 4 e-mail addresses to receive alarm emails from the WAC-1001. The following parameters can be configured on the E-mail Server Settings page. In addition, a Send Test Mail button can be used to test whether the Mail server and e-mail addresses work well. More detailed explanations about these parameters are given after the following figure. Mail server (SMTP) Setting Description Factory Default IP address The IP Address of your email server. None User name & Password Setting Description Factory Default User name and password used in the SMTP server None Setting Description Factory Default Max. 63 characters Enter the administrator’s e-mail address which will be shown in None From e-mail address the “From” field of a warning e-mail. To E-mail address 1/ 2/ 3/ 4 Setting Description Factory Default Max. 63 characters Enter the receivers’ e-mail addresses. None 3-13 WAC-1001 Web Console Configuration Relay The WAC-1001 has one relay output, which consists of 2 terminal block contacts on the WAC-1001’s top panel. These relay contacts are used to indicate user-configured events and system failure. The two wires attached to the relay contacts form an open circuit when a user-configured event is triggered. If a user-configured event does not occur, the relay circuit will remain closed. For safety reasons, the relay circuit is kept open when the WAC-1001 is not powered. Relay Event Types You can check the box for Active to enable the event items. All default values are deactivated (unchecked). Details for each event item can be found in the “System log Event Types” table on page 3-31. Trap Traps can be used to signal abnormal conditions (notifications) to a management station. This trap-driven notification can make your network more efficient. Because a management station usually takes care of a large number of devices that have a large number of objects, it will be overloading for the management station to poll or send requests to query every object on every device. It would be better if the managed device agent could notify the management station by sending a message known as a trap for the event. Trap Event Types 3-14 WAC-1001 Web Console Configuration SNMP Trap Receiver Settings SNMP traps are defined in SMIv1 MIBs (SNMPv1) and SMIv2 MIBs (SNMPv2c). The two styles are basically equivalent, and it is possible to convert between the two. You can set the parameters for SNMP trap receivers through the web page. 1st / 2nd Trap version Setting Description Factory Default V1 SNMP trap defined in SNMPv1 V1 V2 SNMP trap defined in SNMPv2 1st / 2nd Trap server IP/name Setting Description Factory Default IP address or host Enter the IP address or name of the trap server used by your None name network. 1st / 2nd Trap community Setting Description Factory Default Max. of 31 characters Use a community string match with a maximum of 31 alert characters for authentication. Status System Log Triggered events are recorded in System Log. You can export the log contents to an available viewer by clicking Export Log. You can use the Clear Log button to clear the log contents and the Refresh button to refresh the log. 3-15 WAC-1001 Web Console Configuration Relay Status The status of user-configurable events can be found under Relay Status. The status will refresh every 5 seconds if the Auto refresh box is checked. If an event is triggered, it will be noted on this list. System administrators can click Acknowledge Event when he has acknowledged the event and addressed it. DI and Power Status The status of power inputs and digital inputs is shown on this web page. The status will refresh every 5 seconds if the Auto refresh box is checked. 3-16 WAC-1001 Web Console Configuration Managed Device List The Managed Device List displays all AWK APs, which are managed by the WAC-1001; the associated clients are also displayed here. Select the Auto refresh check box to enable periodic updates. NOTE The WAC-1001 manages only the AWK-RTG devices to ensure fast roaming performance. All other devices on the network (such as routers/gateways/servers) and their performance cannot be managed by the WAC-1001. Maintenance Maintenance functions provide the administrator with tools to manage the WAC-1001 and wired/wireless networks. Console Settings You can enable or disable access permission for the following consoles: HTTP, HTTPS, Telnet and SSH connections. For more security, we recommend you only allow access to the two secured consoles, HTTPS and SSH. 3-17 WAC-1001 Web Console Configuration Ping Ping helps to diagnose the integrity of wired or wireless networks. By inputting a node’s IP address in the Destination field, you can use the ping command to make sure it exists and whether or not the access path is available. If the node and access path are available, you will see that all packets were successfully transmitted with no loss. Otherwise, some, or even all, packets may get lost, as shown in the following figure. Firmware Upgrade The WAC-1001 can be enhanced with more value-added functions by installing firmware upgrades. The latest firmware is available at Moxa’s website (http://www.moxa.com). Note that while the firmware is being upgraded, all APs controlled by the WAC-1001 will be out of service. Click the Browse button to specify the firmware image file and click Firmware Upgrade and Restart to start the firmware upgrade. After the progress bar reaches 100%, the WAC-1001 will reboot itself. When upgrading your firmware, the WAC-1001’s other functions are forbidden. ATTENTION Please make sure the power source is stable when you upgrade your firmware. An unexpected power breakup may damage your WAC-1001. 3-18 WAC-1001 Web Console Configuration Config Import Export You can back up or restore the WAC-1001’s configuration with Config Import Export. In the Config Import section, click Browse to specify the configuration file and click Config Import button to begin importing the configuration. In the Config Export section, click the Config Export button and save the configuration file onto your local storage media. The configuration file is a text file and you can view and edit it with a general text-editing tool. Load Factory Default Use this function to reset the WAC-1001 and roll all settings back to the factory default values. You can also reset the hardware by pressing the reset button on the top panel of the WAC-1001. Password You can change the administration password for each of the WAC-1001’s console managers by using the Password function. Before you set up a new password, you must input the current password and reenter the new password for confirmation. For your security, do not use the default password root, and remember to change the administration password regularly. 3-19 WAC-1001 Web Console Configuration Misc. Settings Additional settings to help you manage your WAC-1001, are available on this page. Reset button Setting Description Factory Default Always enable The WAC-1001’s Reset button works normally. Always enable Disable after 60 sec The WAC-1001’s reset to default function will be inactive 60 seconds after the WAC-1001 finishes booting up. Save Configuration The following figure shows how the WAC-1001 stores the setting changes into volatile and non-volatile memory. All data stored in volatile memory will disappear when the WAC-1001 is shutdown or rebooted unless they are saved onto the flash (non-volatile) memory. Because the WAC-1001 starts up and initializes with the settings stored in flash memory, all new changes must be saved to flash memory before restarting the WAC-1001. This also means the new changes will not work unless you run either the Save Configuration function or the Restart function. After you click on Save Configuration in the left menu box, the following screen will appear. Click Save if you wish to update the configuration settings in the flash memory at this time. Alternatively, you may choose to run other functions and put off saving the configuration until later. However, the new setting changes will remain in the non-volatile memory until you save the configurations. 3-20 WAC-1001 Web Console Configuration Restart If you submitted configuration changes, you will see a blinking alert message on the upper right corner of the screen. After making all your changes, click the Restart function in the left menu box. One of two different screens will appear. If you made changes recently but did not save, you will be given two options. Clicking the Restart button here will reboot the WAC-1001, and all setting changes will be ignored. Clicking the Save and Restart button will apply all setting changes and then reboot the WAC-1001. If you run the Restart function without changing any configurations or saving all your changes, you will see just one Restart button on your screen. You will not be able to run any of the WAC-1001’s functions while the system is rebooting. Logout Logout helps users disconnect the current HTTP or HTTPS session and go to the Login page. For security reasons, we recommend you logout before quitting the console manager. 3-21 4 4. Software Installation and Configuration The following topics are covered in this chapter: Overview AWK Search Utility Installing AWK Search Utility Configuring AWK Search Utility WAC-1001 Software Installation and Configuration Overview The Documentation & Software CD included with your WAC-1001 is designed to make the installation and configuration procedure easy and straightforward. This auto-run CD includes AWK Search Utility (to broadcast search for all WAC/AWK’s accessible over the network), the WAC-1001 User’s Manual, and Quick Installation Guide. AWK Search Utility Installing AWK Search Utility Click the INSTALL UTILITY button in the AWK Installation CD auto-run window to install AWK Search Utility. Once the program starts running, click Yes to proceed. 1. Click Next when the Welcome screen opens to proceed with the installation. 2. Click Next to install program files to the default directory, or click Browse to select an alternate location. 4-2 WAC-1001 Software Installation and Configuration 3. Click Next to create the program’s shortcut files to the default directory, or click Browse to select an alternate location. 4. Click Next to select additional tasks. 5. Click Next to proceed with the installation. The installer then displays a summary of the installation options. 4-3 WAC-1001 Software Installation and Configuration 6. Click Install to begin the installation. The setup window will report the progress of the installation. To change the installation settings, click Back and navigate to the previous screen. 7. Click Finish to complete the installation of AWK Search Utility. Configuring AWK Search Utility 1. The Broadcast Search function is used to locate all AWK APs and WAC controllers that are connected to the same LAN as your computer. After locating a WAC-1001, you will be able to change its IP address. Since the Broadcast Search function searches by TCP packet and not IP address, it does not matter if the WAC or AWK is configured as an AP or Client. In either case, APs and Clients connected to the LAN will be located, regardless of whether or not they are part of the same subnet as the host. Start the AWK Search Utility program. When the Login page appears, select the “Search AWK only” option to search for AWKs and to view each AWK’s configuration. Select the “AWK management” option to assign IPs, upgrade firmware, and locate devices. 2. Open the AWK Search Utility and then click the Search icon. 4-4 WAC-1001 Software Installation and Configuration 3. The “Searching” window indicates the progress of the search. When the search is complete, all WAC and AWK units that were located will be displayed in the AWK Search Utility window. 4. Click Locate to cause the selected device to beep. 5. The Search Utility only supports WAC configurations via the Web or telnet (other functions will be deactivated). 6. Go to Tools AWK login Options to manage and unlock additional AWKs. 7. Use the scroll down list to select the MAC addresses of those AWKs you would like to manage, and then click Add. Key in the password for the AWK device and then click OK to save. If you return to the search page and search for the AWK again, you will find that the AWK will unlock automatically. ATTENTION For security purposes, we suggest you can change the AWK search utility login password instead of using the default. 4-5 WAC-1001 Software Installation and Configuration To modify the configuration of the highlighted WAC or AWK, click on the Web icon to open the web console. This will take you to the web console, where you can make all configuration changes. Refer to Chapter 3, “Using the Web Console,” for information on how to use the web console. Click on Telnet if you would like to use telnet to configure your WACs and AWKs. Click Assign IP to change the IP setting. 4-6 WAC-1001 Software Installation and Configuration The three advanced options—Search, Connection, and Miscellaneous—are explained below: Search • Retry count (default=5): Indicates how many times the search will be retried automatically. • Retry interval (ms): The time lapse between retries. Connection • Connection timeout (secs): Use this option to set the waiting time for the Default Login, Locate, Assign IP, Upload Firmware, and Unlock to complete. • Upgrade timeout (secs): Use this option to set the waiting time for the connection to disconnect while the firmware is upgrading. Use this option to set the waiting time for the Firmware to write to flash. Misc. Search on start: Checkmark this box if you would like the search function to start searching for devices after you log in to the AWK search Utility. 4-7 5 5. Other Console Considerations This chapter explains how to access the WAC-1001 with other console connections. In addition to HTTP access, there are four ways to access WAC-1001: serial console, Telnet console, SSH console, and HTTPS console. The serial console connection method, which requires using a short serial cable to connect the WAC-1001 to a PC’s COM port, can be used if you do not know the WAC-1001’s IP address. The other consoles can be used to access the WAC-1001 over an Ethernet LAN, or over the Internet. The following topics are covered in this chapter: RS-232 Console Configuration (115200, None, 8, 1, VT100) Configuration by Telnet and SSH Consoles Configuration by Web Browser with HTTPS/SSL Disabling Telnet and Browser Access WAC-1001 Other Console Considerations RS-232 Console Configuration (115200, None, 8, 1, VT100) The serial console connection method, which requires using a short serial cable to connect the WAC-1001 to a PC’s COM port, can be used if you do not know the WAC-1001’s IP address. It is also convenient to use serial console configurations when you cannot access the WAC-1001 over Ethernet LAN, such as in the case of LAN cable disconnections or broadcast storming over the LAN. ATTENTION Do not use the RS-232 console manager when the WAC-1001 is powered at reversed voltage (ex. -48VDC), even though reverse voltage protection is supported. If you need to connect the RS-232 console at reversed voltage, Moxa’s TCC-82 isolator is your best solution. NOTE We recommend using Moxa PComm (Lite) Terminal Emulator, which can be downloaded free of charge from Moxa’s website. Before running PComm Terminal Emulator, use an RJ45 to DB9-F (or RJ45 to DB25-F) cable to connect the WAC-1001’s RS-232 console port to your PC’s COM port (generally COM1 or COM2, depending on how your system is set up). After installing PComm Terminal Emulator, take the following steps to access the RS-232 console utility. 1. From the Windows desktop, open the Start menu and start PComm Terminal Emulator in the PComm (Lite) group. 2. Select Open under Port Manager to open a new connection. 3. The Communication Parameter page of the Property window opens. Select the appropriate COM port for Console Connection, 115200 for Baud Rate, 8 for Data Bits, None for Parity, and 1 for Stop Bits. Click on the Terminal tab, and select VT100 (or ANSI) for Terminal Type. Click on OK to continue. 5-2 WAC-1001 Other Console Considerations 4. The Console login screen will appear. Log into the RS-232 console with the login name (default: admin) and password (default: root, if no new password is set). 5. The WAC-1001’s device information and Main Menu will be displayed. Please follow the description on screen and select the administration option you wish to perform. NOTE To modify the appearance of the PComm Terminal Emulator window, select Edit Font and then choose the desired formatting options. ATTENTION If you unplug the RS-232 cable or trigger DTR, a disconnection event will be evoked to enforce logout for network security. You will need to log in again to resume operation. Configuration by Telnet and SSH Consoles You may use Telnet or SSH client to access the WAC-1001 and manage the console over a network. To access the WAC-1001’s functions over the network from a PC host that is connected to the same LAN as the WAC-1001, you need to make sure that the PC host and the WAC-1001 are on the same logical subnet. To do this, check your PC host’s IP address and subnet mask. NOTE The WAC-1001’s default IP address is 192.168.127.253 and the default subnet mask is 255.255.255.0 (for a Class C network). If you do not set these values properly, please check the network settings of your PC host and then change the IP address to 192.168.127.xxx and subnet mask to 255.255.255.0. 5-3 WAC-1001 Other Console Considerations Follow the steps below to access the console utility via Telnet or SSH client. 1. From Windows Desktop, run Start Run, and then use Telnet to access the WAC-1001’s IP address from the Windows Run window (you may also issue the telnet command from the MS-DOS prompt). 2. When using SSH client (ex. PuTTY), please run the client program (ex. putty.exe) and then input the WAC-1001’s IP address, specifying 22 for the SSH connection port. 3. The Console login screen will appear. Please refer to the previous paragraph “RS-232 Console Configuration” and for login and administration. Configuration by Web Browser with HTTPS/SSL To secure your HTTP access, the WAC-1001 supports HTTPS/SSL encryption for all HTTP traffic. Perform the following steps to access the WAC-1001’s web browser interface via HTTPS/SSL. 1. Open your web browser and type https://<WAC-1001’s IP address> in the address field. Press Enter to establish the connection. 2. Warning messages will pop out to warn users that the security certificate was issued by a company they have not chosen to trust. 5-4 WAC-1001 Other Console Considerations 3. Select Yes to accept the certificate issued by Moxa IW and then enter the WAC-1001’s web browser interface secured via HTTPS/SSL. (You can see the protocol in URL is https.) Then you can use the menu tree on the left side of the window to open the function pages to access each of WAC-1001’s functions. Disabling Telnet and Browser Access If you are connecting the WAC-1001 to a public network but do not intend to use its management functions over the network, then we suggest disabling both Telnet Console and Web Configuration. Please run Maintenance Console Settings to disable them, as shown in the following figure. 5-5 A A. References This chapter provides more detailed information about wireless-related technologies. The information in this chapter can help you administer your WAC-1001s and plan your industrial wireless network better. The following topics are covered in this appendix: Roaming Domain Roaming Method Compare WAC-1001 References Roaming Domain A roaming domain defines an area where all related wireless controllers, APs, and clients work together to enable fast roaming. Such a domain is specified as six groups of two hexadecimal digits beginning with the fixed identifier, FF:90:E8. Note that the default value of a roaming domain resembles a controller’s MAC address; however, it is not necessary to take the last 3-bytes of a controller’s MAC address to form a roaming domain. You may take any six hexadecimal digits to form a unique roaming domain; this will be dissimilar enough for other roaming domains to tell themselves apart. The purpose of a roaming domain is to ensure that wireless clients roam in the same area, and do not jump onto unintended areas. For example, as illustrated above, a wireless client is disconnected from AWK AP1 and is trying to connect to the next AP. Even though AWK AP2 and AWK AP3 have the same SSID, channel, and wireless settings, the client will not roam onto AWK AP3 because it is in a different roaming domain. A roaming domain setting provides wireless clients with consistent roaming among specific APs. A-2 WAC-1001 References Roaming Method The Roaming method setting offers a strategic roaming mechanism for different applications. Two main factors used to trigger handover determinatively are: the value of RSSI and the RSSI difference. Compare The Compare method provides an aggressive roaming strategy for distributed wireless infrastructures with a smaller amount of symmetric antenna systems; the illustration below is an example. Upon the detection of a user-specified RSSI difference, handover will be triggered immediately to force the wireless client to connect to the next AP as soon as possible. A-3 B B. Supporting Information This chapter presents additional information about this manual and product. You can also learn how to contact Moxa for technical support. The following topics are covered in this appendix: About This User’s Manual DoC (Declaration of Conformity) Federal Communication Commission Interference Statement Firmware Recovery WAC-1001 Supporting Information About This User’s Manual This manual is mainly designed for, but not limited to, the following hardware and firmware for the WAC-1001: • Hardware Rev: 1.0 • Firmware Ver: 1.0 You are strongly recommended to visit Moxa’s website (http://www.moxa.com) to find the latest product datasheet, firmware, QIG (Quick Installation Guide), UM (User’s Manual), and related information. NOTE The WAC’s hardware revision number is located on a label on the side panel. The firmware version number can be seen on the Overview page, as illustrated below: B-2 WAC-1001 Supporting Information DoC (Declaration of Conformity) Federal Communication Commission Interference Statement This equipment has been tested and found to comply with the limits for a Class B digital device, pursuant to Part 15 of the FCC Rules. These limits are designed to provide reasonable protection against harmful interference in a residential installation. This equipment generates, uses and can radiate radio frequency energy and, if not installed and used in accordance with the instructions, may cause harmful interference to radio communications. However, there is no guarantee that interference will not occur in a particular installation. If this equipment does cause harmful interference to radio or television reception, which can be determined by turning the equipment off and on, the user is encouraged to try to correct the interference by one of the following measures: • Reorient or relocate the receiving antenna. • Increase the separation between the equipment and receiver. • Connect the equipment into an outlet on a circuit different from that to which the receiver is connected. • Consult the dealer or an experienced radio/TV technician for help. FCC Caution: To assure continued compliance, (example – use only shielded interface cables when connecting to computer or peripheral devices). Any changes or modifications not expressly approved by the party responsible for compliance could void the user’s authority to operate this equipment. This transmitter must not be co-located or operated in conjunction with any other antenna or transmitter. FCC Radiation Exposure Statement This equipment complies with FCC radiation exposure limits set forth for an uncontrolled environment. This equipment should be installed and operated with a minimum distance of 20 cm between the radiator & your body. This device complies with Part 15 of the FCC Rules. Operation is subject to the following two conditions: (1) This device may not cause harmful interference, and (2) this device must accept any interference received, including interference that may cause undesired operation. NOTE The availability of some specific channels and / or operational frequency bands are country dependent and are firmware programmed at the factory to match the intended destination. The firmware setting is not accessible by the end user. Firmware Recovery When the FAULT LED lights up, and blinks at one-second intervals, it means the system booting has failed. It may result from some wrong operation or uncontrollable issues, such as an unexpected shutdown during firmware update. The WAC-1001 is designed to help administrators recover such damage and resume system operation rapidly. You can refer to the following instructions to recover the firmware: Connect to the WAC-1001’s RS-232 console with 115200bps and N-8-1. You will see the following message shown on the terminal emulator every one second. B-3 WAC-1001 Supporting Information Press Ctrl - C and the following message will appear. Enter 2 to change the network setting. Specify where the WAC-1001’s firmware file on the TFTP server and press y to write the settings into flash memory. WAC-1001 restarts, and the “Press Ctrl-C to enter Firmware Recovery Process…” message will reappear. Press Ctrl-C to enter the menu and select 1 to start the firmware upgrade process. Select 0 in the sub-menu to load the firmware image via LAN, and then enter the file name of the firmware to start the firmware recovery. B-4