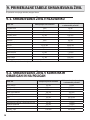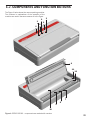
1
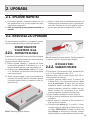
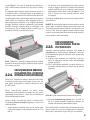
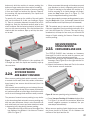
SLO STATUS SV1000 en APARAT ZA VAKUUMIRANJE IN VARJENJE / vACUUM PACKING MACHINE NAVODILA ZA UPORABO / user manual slo STATUS SV1000 APARAT ZA VAKUUMIRANJE IN VARJENJE NAVODILA ZA UPORABO 1. VARNOSTNA NAVODILA In Razlaga Delovanja Aparata 1.1. OBRATOVALNI POGOJI Maksimalna temperatura okolice pri normalni uporabi je +40 °C, povprečje temperatur v času 24 ur pa ne sme presegati +35 °C. Najnižja dovoljena temperatura okolice je -5 °C. Okoliški zrak mora biti čist, relativna vlažnost ne sme presegati 50% pri maksimalni temperaturi +40 °C. Višje relativne vlage so dovoljene pri nižji temperaturi okolice (npr. 90% pri +20 °C). 1.2. VARNOSTNA NAVODILA a.) Prostor, kjer bo aparat za vakuumiranje in varjenje postavljen, naj bo izbran skrbno. Delovna površina mora biti suha in normalno temperirana (ne vroča), ne sme biti v bližini toplotnega oddajnika (npr. grelne plošče) ali vodnega vira. b.) Preverite mrežni kabel in vtičnico, še preden priključite aparat na električni tok. c.) Aparat čistite le s suho ali minimalno navlaženo krpo. d.) Med uporabo se nikoli ne dotikajte varilnega traku (št. 7 na sliki 1), lahko je vroč in se opečete. e.) Aparat uporabljajte izključno za namene opisane v navodilih. f.) Če je priključna vrvica poškodovana, jo mora v izogib nevarnosti zamenjati proizvajalec ali njegov serviser ali podobno usposobljena oseba. g.) Aparat lahko uporabljajo otroci stari 4 8 let in starejši in osebe z zmanjšanimi fizičnimi, čutnimi ali mentalnimi sposobnostmi ali s pomanjkanjem izkušenj oz. znanjem, če so pod nadzorom ali poučeni glede uporabe aparata na varen način in da razumejo možne nevarnosti. h.) Otroci se ne smejo igrati z aparatom. Čiščenja in vzdrževanja aparata ne smejo izvajati otroci brez nadzora. i.) Garancija izgubi veljavnost, če: • aparat poskuša popravljati nepooblaščena in nestrokovna oseba, • uporabljate aparat za druge namene, kot je predvideno, • ne upoštevate varnostnih predpisov in navodil za uporabo. Proizvajalec ne prevzema nobene odgovornosti za poškodbe, ki izhajajo iz nepravilne uporabe ali so posledica neupoštevanja navodil. 1.3. ČASOVNE OPREDELITVE DELOVANJA Za pravilno delovanje aparata mora biti med posameznimi ciklusi varjenja ali vakuumiranja najmanj 20 sekund razmika. Počakajte, da se aparat ohladi (približno 30 minut), kontrolna lučka pregrevanje bo po tem času nehala svetiti in lahko normalno nadaljujete z delom. Kadar si ciklusi sledijo prehitro, se Aparata med ohlajanjem ne izključujte aparat samodejno ustavi. Prižge se iz električnega omrežja. kontrolna lučka Pregrevanje (št. 4 na sliki 1). 1.4. VZDRŽEVANJE IN ČIŠČENJE a.) Pred čiščenjem izključite vtikač d.) Pred uporabo mora biti aparat veaparata iz omrežja. dno popolnoma suh. b.) Za čiščenje aparata uporabite e.) Če tekočina slučajno pride v nomehko, suho ali navlaženo krpo. tranjost aparata, se posvetujte s Ne uporabljajte gobic, hrapavih prodajalcem ali pooblaščenim serkrp, sredstev za poliranje ali razkuviserjem. žil, ki lahko poškodujejo površino f.) Varilni trak ima teflonsko prevleko. posameznih sestavnih delov. Nikoli Morebitne ostanke vakuumske foline potopite aparata v vodo ali pod je odstranite z mehko krpo. Čiščetekočo vodo. Nikoli ne brizgajte činje teflonske prevleke je dovoljeno stilnih sredstev direktno po notranji le, ko je aparat ohlajen. V nobeniti zunanji strani aparata. nem primeru ne uporabljajte ostrih c.) Nalepka s funkcijskimi tipkami na predmetov za odstranjevanje. zgornji strani je v celoti prevlečena z zaščitno folijo in se lahko obriše s suho ali vlažno krpo. 5 1.5. SPLOŠNE INFORMACIJE Vakuumski aparat STATUS SV1000 je gospodinjski aparat namenjen dolgotrajnemu shranjevanju živil v vakuumu oz. vakuumiranju in varjenju vrečk ter vakuumskih posod. Je predstavnik nove generacije Statusovih vakuumskih aparatov, razvit, da bo uporabniku še bolj prijazen za uporabo. Razvit in narejen je v podjetju Status d.o.o. Metlika. Z izdelkom sta pakirana tudi dva kompleta že izdelanih vakuumskih vrečk ter dva kompleta folije v roli, iz katerih si dolžino vrečk glede na potrebe naredite sami. Največje prednosti shranjevanja v vakuumu so, da: • ohrani vitamine, minerale ter hranljive snovi in aromo v živilih, • ščiti živila pred širjenjem plesni in bakterij, • podaljša obstojnost živil, • preprečuje mešanje neprijetnih vonjav živil v hladilniku in zamrzovalniku. Za bolj nazorna navodila preglejte posnetek pravilne uporabe vakuumskega aparata, najdete ga na spletnem naslovu www.status.si. Za podaljševanje svežine in obstojnosti živil uporabite tudi Statusove vakuumske posode, pokrove, zamaške, zapiralnik kozarcev za vlaganje in vrč, ki jih vakuumirate z ročno ali električno vakuumsko črpalko. Vse omenjene pripomočke lahko vakuumirate tudi s STATUS SV1000, saj je poleg aparata priložena posebna cevka za vakuumiranje. Uporaba aparata je preprosta in učinkovita. Shranjevali boste popolnoma naravno, bolj zdravo, hrana bo dlje časa sveža in prihranili boste čas in denar. Prosimo, da pred prvo uporabo navodila preberete zelo natančno in jih upoštevate. Če se pojavi kakršno koli vprašanje, mnenje ali komentar, nas pokličite ali pišite. Na spletnem naslovu https://www.status.si/shop/product/vakuumski-aparat-status-sv1000/ so dostopna tudi pričujoča navodila za uporabo. 1.6. TEHNIČNI PODATKI 6 Mere dolžina: 385 mm širina: 235 mm višina: 93 mm Teža približno 3,45 kg Material ABS plastika (zunanje ohišje) Črpalka vakuumska črpalka (samomazalna – vzdrževanje ni potrebno) Vakuumska moč cca -750 mbar Motor 230V AC, 50Hz avtomatski izklop v primeru pregrevanja Maksimalno število obratov motorja 2900 obratov/min Transformator 220V AC, 50Hz/24V AC 0,8A /12V AC 0,4A Črpalni volumen 14 litrov/min Krmiljenje elektronsko Nazivna moč in napetost aparata 200 W, 230 V AC 1.7. SESTAVNI DELI IN FUNKCIJSKE TIPKE Na sliki 1 je predstavljen model vakuumskega aparata. V nadaljevanju so pri razlagi postopkov delovanja navedene številke na enak način, kot so na sliki. 2 1 4 5 3 6 8 11 12 7 8 9 10 Slika 1: STATUS SV1000 z označenimi sestavnimi deli 7 1. Varjenje Sprožitev postopka varjenja (brez vakuumiranja). To tipko uporabite, da iz folije v roli naredite vrečko. 2. Vakuumiranje vrečk Sprožitev postopka vakuumiranja in varjenja. Vrečka bo najprej vakuumirana in nato samodejno zavarjena. Postopek vakuumiranja se samodejno prekine pri podtlaku približno -700 mbar. Start Za vakuumiranje mehkejših in vlažnih živil s funkcijo ročnega vakuumiranja. Pritisk na tipko pomeni začetek vakuumiranja. Stop Za vakuumiranje mehkejših in vlažnih živil. Pritisk na tipko Stop v času vakuumiranja prekine proces vakuumiranja in avtomatsko se začne varjenje. 3. Vakuumiranje posod Vakuumiranje Statusovih vakuumskih pripomočkov (posod, pokrovov, vrča in zamaška) s pomočjo nastavka in cevke. Postopek vakuumiranja se samodejno prekine pri nastavljenem podtlaku približno -500 mbar. 4. Pregrevanje Samodejna zaščita pred pregrevanjem aparata. Lučka se prižge, če med posameznimi procesi vakuumiranja ni dovolj velikega časovnega razmaka (20 s med posameznimi ciklusi). Počakajte 30 minut, da lučka neha svetiti in potem normalno nadaljujte z delom. 5. Indikator Vklop/Izklop (indikator za varjenje) Ko aparat priklopimo, se lučka prižge. Ko aparat vari, luč sveti močneje. 6. Tekočina Lučka zasveti, kadar je aparat pri vakuumiranju povlekel tekočino iz vakuumske vrečke v vakuumski kanal. 7. Varilni trak Prekrit je s teflonsko folijo, ki je nikakor ne smete odstraniti. 8. Tesnila 9. Vakuumski kanal Med vakuumiranjem mora biti rob vrečke nastavljen do sredine vakuumskega kanala (slika 6). Pri nepravilnem postopku vakuumiranja se tukaj ustavi morebitna odvečna tekočina in zasveti lučka Tekočina. Več o tem v poglavju 2.2.3. 10. Prostor za rolo folije 11. Rezilo (gibljivi nož) za folijo 12. Priključek za vakuumiranje posod 1.8. Folije v roli in vrečke za vakuumiranje 8 Folija v roli štiriplastna folija (PA/PE) • dolžina 3000 mm x širina 200 mm • dolžina 3000 mm x širina 280 mm • dolžina 3000 mm x širina 120 mm (za salame) Vrečke štiriplastna folija (PA/PE) • dolžina 280 mm x širina 200 mm • dolžina 360 mm x širina 280 mm • dolžina 550 mm x širina 120 mm (za salame) Debelina folije 100 µm (gladek, nepregan del) /130 µm (narebren, pregan del folije) Kvaliteta folije neprepustna, dvoslojna, živilsko neoporečna, nevtralna na okus in vonj, primerna za večkratno uporabo, primerna za mikrovalovno pečico 2. UPORABA 2.1. SPLOŠNI NAPOTKI a.) Pri jemanju aparata iz embalaže preverite, če ima vse sestavne dele in če je stanje aparata ter pripadajočih delov neoporečno. b.) Pred prvo uporabo obvezno preberite navodila za uporabo. c.) Aparat je zaradi svoje funkcionalnosti primeren za shranjevanje kar na delovnem pultu, saj bo koristen vsak dan. Postavite ga na ravno, gladko površino, kjer bo dovolj prostora za vlaganje živil v vrečke. 2.2. NAVODILA ZA UPORABO Ko ste se seznanili s splošnimi in varnostnimi navodili, začnite uporabljati aparat po naslednjih navodilih: 2.2.1. Aparat vključite v elektriko IN GA PRIPRAVITE ZA DELO Preverite ali je kontrolna lučka Vklop/Izklop prižgana (št. 5 na sliki 1). Vsakič ko začnete z vakuumiranjem, najprej poženite aparat »na suho«. a.) Pokrov aparata spustite in pritisnite na vsako izmed puščic označenih s številkama 1 in 2 na skrajnih straneh pokrova, tako da zaslišite klik. b.) Pritisnite tipko Vakuumiranje vrečk (št. 2 na sliki 1). Počakajte, da kontrolna lučka Vklop/Izklop neha močno svetiti. c.) Varilni trak se je segrel in aparat je pripravljen na uporabo. Da bi odprli pokrov, pritisnite s palcem na sredino rdeče ročke in s kazalcem ročko dvignite (slika 3). Slika 2: Zapiranje pokrova aparata. Slika 3: Odpiranje pokrova aparata. S palcem pritisnite na sredino ročke in s kazalcem ročko dvignite. iz folije v roli 2.2.2. nareditE vrečko Če shranjujete v že narejeno vrečko, preskočite točko 2.2.2. in nadaljujte pri točki 2.2.3. Statusove folije v roli so v treh širinah: 200, 280 in 120 milimetrov (za salame). a.) Določite ustrezno dolžino folije. To pomeni, da k dolžini živila, ki ga želite zavakuumirati, dodate še 5 centimetrov. Za večja živila po potrebi dodajte še kakšen centimeter. Če želite vrečko ponovno uporabiti, morate že v začetni fazi upoštevati dodatnih 2,5 centimetrov ali pa vrečko ponovno uporabiti za kakšno manjše živilo. b.) Folijo odrežite s priloženim rezilom (slika 4). c.) Folijo pri varjenju položite na varilni trak do tesnila (slika 5). d.) Zaprite aparat in pritisnite na obe označeni puščici na pokrovu aparata. e.) Pritisnite tipko Varjenje (št. 1 na sliki 1). V času varjenja kontrolna lučka Vklop/Izklop sveti s polno močjo. PRIPOROČILO: Če aparat ob pritisku na tipko Varjenje ne začne takoj z varjenjem, s prstom narahlo pritisnite na sredino pokrova nad rdečo ročko. 9 NASVET: Folijo lahko tudi najprej zavarite in šele potem odrežete s priloženim nožem. Rolo folije položite v za to pripravljen prostor (št. 10 na sliki 1). Folijo povlecite čez varilni trak (št. 7 na sliki 1) in spustite pokrov. Zaklenite s pritiskom na označeni puščici na pokrovu in pritisnite tipko Varjenje. Slika 4: Folijo odrežite z vgrajenim rezilom. Slika 5: Pri varjenju nastavite vrečko na varilni trak strogo do tesnila. Preverite, da je vrečka na varilnem traku brez gub ali zavihkov. f.) Ko lučka neha svetiti s polno močjo, odprite pokrov. S palcem pritisnite na sredino rdeče ročke in s kazalcem ročko dvignite (slika 3). Preverite varilni rob na vrečki, ki mora biti po celi širini gladek in enakomeren, ne sme biti naguban. 2.2.3. ŽIVILO VSTAVITE V VREČKO IN VAKUUMIRAJTE Vrečka mora biti vedno vsaj 5 centimetrov daljša kot prostor, ki ga zavzame živilo namenjeno vakuumiranju. Pri večjih živilih naj bo še kakšen centimeter daljša. a.) Živila, ki jih želite vakuumirati, vstavite v vrečko. 10 b.) Bodite pozorni, da so notranji robovi folije (kjer bo zavarjeni rob) čisti, suhi in brez ostankov hrane.* Slika 6: Pri vakumiranju naj bo rob vrečke nastavljen do sredine vakuumskega kanala. Preverite, da je vrečka na varilnem traku brez gub ali zavihkov. c.) Napolnjeno vrečko položite na delovno površino pred aparatom in jo povlecite do sredine vakuumskega kanala med tesnila (slika 6). d.) Pazite, da je vrečka na varilnem traku in v vakuumskem prostoru ravna in brez gub. e.) Zaprite aparat in zaklenite pokrov s pritiskom na vsako izmed puščic na skrajnih straneh pokrova, tako da zaslišite klik (slika 2). Pritisnite tipko Vakuumiranje vrečke (št. 2 na sliki 1). PRIPOROČILO: Če aparat ob pritisku na tipko Vakuumiranje vrečke ne začne takoj z vakuumiranjem, s prstom narahlo pritisnite na sredino pokrova nad rdečo ročko. f.) Vrečka bo samodejno zavakuumirana in zavarjena. Zaradi visoke sesalne moči aparata bo pokrov med delovanjem v zaprti legi. V času, ko aparat vari, sveti kontrolna lučka s polno močjo (št. 5 na sliki 1). g.) Počakajte, da aparat zaključi z varjenjem, pritisnite s palcem na sredino rdeče ročke in s kazalcem ročko dvignite (slika 3). Preverite zavakuumirano vrečko – zavarjeni rob mora biti gladek in čist. *PRIPOROČILO: Pri vakuumiranju mastnih suhomesnih izdelkov (predvsem slanine) priporočamo, da robove vrečke najprej zavihate navzven, položite živilo v vrečko in nato robove spet zavihate nazaj. Tako se robovi ne bodo zamastili. KAJ STORITI, ČE ZAČNE APARAT MED VAKUUMIRANJEM IZ VREČKE VLEČI TEKOČINO IZ ŽIVILA? Če opazite, da začne aparat med vakuumiranjem iz živila vleči tekočino, postopek vakuumiranja TAKOJ prekinite s tipko Stop (št. 2 na sliki 1). Stop lahko pritisnete le v času, dokler aparat vakuumira (ko vari, Stop ne deluje več). Če postopka vakuumiranja niste pravočasno ustavili in je tekočina prišla v vakuumski kanal, se bo aparat samodejno ustavil. Zasvetila bo kontrolna lučka tekočina. Dvignite pokrov tako da pritisnete s palcem na sredino rdeče ročke in s kazalcem ročko dvignete (slika 3). Med tesniloma je posodica, ki jo dvignite naravnost navzgor. Tekočino iztočite in posodico v celoti dobro obrišite. Posodico vstavite nazaj in nadaljujte z vakuumiranjem. Če je tekočina zašla v kanal, kjer je posodica, obrišite in osušite tudi kanal. • Ko ocenite, da je izsesanega dovolj zraka (opazujte kaj se dogaja z živilom in ko začne proti aparatu polzeti tekočina ali ko bi nadaljnje vakuumiranje poškodovalo mehko živilo), pritisnite Stop (št. 2 na sliki 1). Črpalka se v tem trenutku ustavi in začne se varjenje. S pritiskom na Stop lahko vakuumiranje vedno predčasno prekinete. NASVET: Skoraj vse vrste sadja in večino zelenjave, sveže meso, gobe in podobno najlažje vakuumirate tako, da živila pred vakuumiranjem shranite v zamrzovalnik za 1 do 2 uri. Tako bodo npr. jagode povsem ohranile svojo obliko in ne bo nevarnosti, da bi tekočina med vakuumiranjem prišla v vakuumski kanal. 2.2.5. Slika 7: Kadar se v posodici znajde tekočina, dvignite posodico naravnost navzgor, tekočino izlijte in posodico dobro posušite. 2.2.4. Vakuumiranje MEHKIH IN VLAŽNIH živil (FUNKCIJA ROČNEGA VAKUUMIRANJA) VAKUUMIRANJE VAKUUMSKIH POSOD IN POKROVOV Osnovna oprema aparata vključuje tudi cevko s priključkom za vakuumiranje Statusovih vakuumskih pripomočkov (posod, pokrovov, vrča, zapiralnika in zamaškov). a.) Odprtino cevi nastavite na priključek, ki ga najdete na skrajnem desnem robu vakuumskega kanala. (slika 8) b.) Cev s priključkom potisnite na ventil izbrane vakuumske posode (ventil je okrogli del na sredini pokrova). Živila, ki so občutljiva na pritisk, vlažna živila ter živila, ki vsebujejo veliko vlage (sveže sadje, solate, kruh, peciva, gobe), shranjujemo z manjšim vakuumom (od 0 do -300 mbar). Ročno vakuumiranje pomeni, da lahko proces izsesavanja zraka prekinete, ko ocenite, da je iz vrečke izsesanega dovolj zraka oz. toliko, da ne poškodujete živila, občutljivega na pritisk. Imejte v mislih, da morate pri mehkih in vlažnih živilih še posebej pozorno spremljati dogajanje v vrečki med vakuumiranjem. • Vrečko obvezno nastavite tako, da rob vrečke zataknete med pregradi v vakuumskem kanalu (št. 9 na sliki 1). Slika 8: Prikaz vakuumiranja vakuumskih posod c.) Pritisnite Vakuumiranje posod (št. 3 na sliki 1). Ko je v posodi dosežen nastavljen podtlak, se proces vakuumiranja samodejno ustavi. Če v vakuumskih posodah vakuumirate tekoča živila (juhe, omake, ipd.), naj te ne segajo do vrha posode. Med juho in pokrovom naj bo vsaj 1,5 cm razmika. 11 3. PRAKTIÈNI NASVETI ZA VAKUUMIRANJE Shranjevanje v vakuumu ni zamenjava za zamrzovanje, gretje ali konzerviranje. Živila morajo biti kljub vakuumskem shranjevanju shranjena v hladilniku ali zamrzovalniku. Izjema so suhomesni izdelki in suho sadje za katero zadostuje shranjevanje v hladni kleti. Aparat ni primeren za vakuumiranje tekočih, vodenih živil! Vlažna živila in živila z veliko vsebnostjo vode sicer lahko vakuumirate, vendar upoštevajte sledeče: Kuhano in surovo meso (svinjina, govedina, perutnina) ter ribe: Za najboljše rezultate svetujemo, da meso in ribe 1-2 uri pred vakuumiranjem shranite v zamrzovalnik. Slednje pomaga obdržati sok in obliko ter zagotavlja boljše vakuumiranje. Če predzamrzovanje ni mogoče, postavite med meso in vrhom vrečke papirnato brisačo, vendar tako, da brisača ni na mestu varjenja. Brisača bo med procesom vakuumiranja posrkala preobsežno vlago in sokove. Brisača ne bo negativno vplivala na kvaliteto shranjenega živila, saj smo z vakuumiranjem odvzeli kisik. Opozorilo: Govedina je lahko po vakuumiranju zaradi odstranjenega kisika videti temnejša. Trdi siri: Da bi ostali sveži, svetujemo vakuumsko pakiranje po vsaki uporabi. Bodite pozorni na dolžino vrečke. Zelenjava: Pred vakuumiranjem mora biti blanširana. Proces ustavi encime, varuje pred izgubo okusa, barve ter pred spremembo strukture tkiva. Blanširamo v vreli vodi. Čas blanširanja se razlikuje – za špinačo, blitvo ali fižol je dovolj 1 do 2 minuti, 3 do 4 minute za narezane bučke, brokoli ali ostalo razvejano zelenjavo, 5 minut za korenje in 7 do 11 minut za žitarice. Po blanširanju potopite zelenjavo v hladno vodo, da se proces zaustavi. Pred vakuumiranjem jih še posušite na papirnati brisači. Za nekajdnevno shranjevanje listnate zelenjave (npr. zelene solate) svetujemo vakuumske posode z odcejalniki. Sveža in hrustljava ostane tudi do 2 tedna. Juhe, omake in tekočine: Če jih želite shraniti v vrečki, jih prej obvezno zamrznite, vendar takšno shranjevanje odsvetujemo. Tekoča živila shranjujte raje v Statusovih vakuumskih posodah. Gobice, surovi česen in surov krompir: Vakuumskega shranjevanja ne priporočamo, če pa jih želite na vsak način vakuumirati, strogo spoštujte opombe iz točke 9.3. Odmrzovanje vakuumsko pakiranih živil: Vedno od- mrzujte živila v hladilniku, saj slednje zagotavlja kakovost živil. Ne odmrzujte pokvarljivih živil na sobni temperaturi. 4. GARANCIJA Za Statusov vakuumski aparat STATUS SV1000 zagotavljamo garancijo za dve leti. Obveza velja od dneva nakupa in ne pokriva pravice do uveljavljanja garancije, če pride do okvar zaradi neupoštevanja navodil uporabe, nege in čiščenja oz. zaradi nepravilne uporabe ali uporabe za druge namene kot je predvideno. Za uveljavljanje garancije je potrebno obvezno priložiti račun. Zato račun prosimo shranite. 12 Če se pojavijo kakršna koli vprašanja glede delovanja aparata, servisa, uveljavljanja garancije ali komentarji nas prosimo kontaktirajte na: STATUS d.o.o. Metlika Ulica Belokranjskega odreda 19, 8330 Metlika Servisni telefon: 07/36 91 228 in 080 18 38 e-mail: [email protected] Več informacij najdete tudi na spletni strani www.status.si. 5. Izjava o skladnosti Aparat je usklajen z vsemi evropskimi direktivami: a.) Pravilnik o električni opremi, ki je namenjena za uporabo znotraj določenih napetostnih mej (Uradni list RS, št. 27/2004) Directive 2006/95/EC and its amendments b.) Pravilnik o elektromagnetni združljivosti (Uradni list RS, št. 132/2006) Directive 2004/108 EC and its amendments CE izjava skladnosti zagotavlja, da je naprava varna, da je bila pregledana in preizkušena ter ustreza vsem zahtevam, ki so navedene v veljavnih standardih, direktivah in predpisih. CE izjava je kot priloga priložena navodilom za uporabo. 6. NASVETI PRI MOTNJAH DELOVANJA Motnje pri delovanju: Pomoč: SV1000 ne reagira na aktiviranje tipk. • Preverite, če je električni kabel nepoškodovan in če je vtikač v vtičnici. • Preverite, če se zahtevana napetost (navedena je na tehnični nalepki spodaj) ujema z dejansko napetostjo vašega omrežja. • Preverite napetost omrežja s preizkuševalcem toka ali priključite na isto vtičnico drug električni aparat. • Aparat ima vgrajeno varnostno stikalo in se je zaradi pregrevanja sam izklopil. Zasvetila je lučka pregrevanje. Po 30 minutah bo spet pripravljen za uporabo. Upoštevajte 20 sekund razmika med posameznimi vakuumiranji. • Pritisk na funkcijsko tipko mora trajati vsaj 1 sekundo, sicer aparat ne reagira. Vrečke niso do konca zavakuumirane. • Preverite, če ste vakuumirali po pravilnem postopku. Preberite navodila še enkrat. • Prepričajte se, da je bila vrečka pri vakuumiranju v sredini vakuumskega kanala. • Preverite, če je zavarjeni rob vrečk, ki ste jih sami izdelali iz role, pravilen. • Preverite, če je vrečka neoporečna – da ni preluknjana, raztrgana ali kakorkoli drugače poškodovana. Test: Zavarite vrečko in jo potopite v vodo. Na poškodovanih mestih se bodo pojavili mehurčki zraka. • Prepričajte se, da ste pokrov pred vakuumiranjem zaklenili s pritiskom na obe puščici na skrajnem robu pokrova. Dvakrat morate zaslišati klik. Vrečka izgublja vakuum. • Preverite če je rob vrečke naguban, masten ali vlažen oz. če so na njem ostanki hrane. Odprite vrečko, jo očistite in jo ponovno zavarite. • Preverite celotno vrečko. Živila z ostrim robom (npr. kosti) obložite s papirnatimi brisačami še pred varjenjem. Vrečka se topi ali se ne da zavariti v celoti. • Preverite, če je notranja stran vrečke, kjer želite variti, čista, da ni mastna, mokra ali vlažna. • Preverite kakšna je debelina vaše vakuumske vrečke. Svetujemo, da uporabljate vakuumske vrečke debeline najmanj 100 µm (gladek, nepregan del) in 130 µm (narebren, pregan del folije) oz. debelina pregane folije mora biti obvezno nad 0,2 mm. 13 Motnje pri delovanju: Pomoč: STATUS SV1000 ne vakuumira posod oz. posode ne zadržijo vakuuma. • Preverite, če je cevka s priključkom za vakuumiranje posod pravilno pritrjena (glej točko 12 na sliki 1 in sliko 8). • Prepričajte se o pravilni legi in stanju tesnila posode. • Preverite, če je ventil posode čist in suh. Po potrebi ga ponovno razstavite, očistite in zopet vstavite. Nastale motnje se ne dajo odpraviti. Obvezno kontaktirajte navedeni naslov servisa (080 18 38). Popravila se izvajajo le v servisnem centru podjetja Status. V nasprotnem nimate pravice uveljavljati garancije in proizvajalec ne prevzema odgovornosti. Aparat vrečko zavari nekajkrat (do 5-krat) nato se zdi, da več ne vakuumira. POMEMBNO OBVESTILO GLEDE VREČK: Svetujemo, da za vakuumiranje uporabljate vakuumske vrečke debeline vsaj 100/130 µm. Na trgu jih je kar precej, vendar bodite pazljivi na kvaliteto. Če debeline želene vrečke ne morete ugotoviti, svetujemo, da uporabljate originalne Statusove vrečke in folije v roli, ki so dvoslojne z debelino 100 µm (gladek, nepregan del) in 130 µm (narebren, pregan del folije). 7. POMEN VAKUUMIRANJA Kisik na živilih sproži nezaželene kemijske reakcije, posledice pa so žaltavost, nezaželena sprememba barve, plesen in bakterijske tvorbe, izguba okusa, vitaminov in arome. Shranjevanje živil v vakuumu tovrstne nezaželene posledice upočasni in omogoča podaljševanje roka trajanja ter ohranjanje kvalitete. Le s pomočjo vakuuma, odstranjevanja kisika iz vakuumskih vrečk ali posod z ročno ali električno črpalko, dosežemo potrebno stanje za podaljševanje obstojnosti živil. Ko vakuumiramo, v posodah ali vrečkah ustvarimo podtlak. svežine namreč vedno pridejo v stik s kisikom. Posode in pokrove za shranjevanje v vakuumu uporabljamo za vakuumiranje pa tudi za shranjevanje v zamrzovalniku in segrevanje v mikrovalovni pečici (brez pokrova) ali segrevanje v vodni kopeli. Priporočamo, da so vakuumski aparat, vakuumske posode in univerzalni pokrovi sestavni del vsake kuhinje. Njihov namen je naravno shranjevanje ter podaljševanje roka trajanja surovih in kuhanih živil brez izgube kvalitete. Živila pri normalnem shranjevanju v hladilniku, v kuhinjskih omarah ali v embalaži za ohranjevanje Omeniti velja tudi varčevanje denarja. Prihranimo, ker lahko kupimo večja pakiranja živil, saj te razdelimo na manjše in jih shranimo v vakuumu. Razporedite jih lahko po obrokih in jih zavakuumirane shranite v hladilniku za daljši čas. Statusove vakuumske posode so primerne za uporabo tudi brez vakuumiranja, vendar so v takšnem primeru brez posebnosti in ne podaljšujejo svežine in trajnosti živil. 8. KORISTNI NASVETI 8.1. KAJ JE VAKUUM Vakuum oz. podtlak je odvzem kisika iz zaprtega prostora, v našem primeru iz vrečke ali vakuumske posode. Zmanjševanje količine kisika zniža nevarnost pred 14 škodljivimi oksidacijskimi reakcijami. Izsesavanje kisika (vakuumiranje) iz zaprte posode ali vrečke upočasni pokvarljivost živil. 8.2. KAJ JE OŽIG ZARADI ZAMRZNITVE Znaki ožiga so žaltavost mesa, pustost zelenjave, sadje brez svojstvenega okusa. Nastane, ko je embalaža prepustna za zrak (npr. navadne enoslojne PE vrečke) in zamrznjena hrana pride v stik s kisikom. Posledično pride do izhlapevanja tekočine iz živil in površina zamrznjenih živil se izsuši. Skozi nastale porozne razpoke prodira kisik in sproži oksidacijo. Posledica je izguba arome in svežega okusa Tudi sadje in zelenjava izgubijo okus in vitamine. Že po kratkem času imajo mastni deli mesa žaltav okus. Ker meso vsebuje velik delež tekočine, so negativne posledice ožiga še posebej dobro vidne. Spoznamo ga po belih do sivo-rjavih madežih. Kako preprečiti ožig? Pomembno je, da uporabljate pravilno embalažo. Le kakovostna embalaža zagotavlja varno in stalno zaščito pred izgubo kvalitete. Preden kupite posode ali zamrzovalne vrečke, preverite posamezne proizvode in natančno preberite navodila in opis glede namena uporabe. Obstaja namreč nevarnost, da posode ali vrečke, ki so neprimerne kvalitete pri zelo nizkih temperaturah razpokajo od mraza. Če pride do ožiga zaradi zamrznitve, morate napadena mesta izrezati in čeprav v mikrobiološkem smislu živila niso pokvarjena, izgubijo okus. 8.3. GLOBINSKO ZAMRZNJENO ALI OHLAJENO Prednost globinskega zamrzovanja je, da živila med shranjevanjem v zamrzovalniku ohranijo svoje bistvo – vitamine, minerale in okus. Poleg tega se struktura surovih živil pri temperaturah med –30 °C in –40 °C spremeni le v minimalnem obsegu (npr. meso). Živila naj bi se zamrznila čim hitreje. Razlog: Pri počasnem postopku zamrzovanja se na živilih tvorijo veliki ledeni kristali, ki prerastejo celice živil in naknadno povzročijo škodo na strukturi celic. Pri hitrem postopku zamrzovanja se tvorijo majhni ledeni kristali, ki tkivo živil manj poškodujejo. Če gre, naj bodo proizvodi zamrznjeni pri konstantni temperaturi (maksimalno –18 °C). Za zamrzovanje uporabljajmo le živila najboljše kvalitete. Pri nekaterih živilih je potrebno blaširanje (živila poparimo), da se pri zamrzovanju oz. globinskem hlajenju ne tvorijo nezaželene spremembe npr. aktiviranje encimov. Živila, ki jih blanširamo ali na drugačen način toplotno obdelamo, moramo pred zamrzovanjem obvezno ohladiti. Za shranjevanje sadja kot dodatek uporabljamo sladkor, saj tako izboljšamo obstojnost arome in barv. V zamrzovalno skrinjo zložimo živila, kolikor se da na tesno, ostalo pa shranjujemo v hladilniku. 8.4. Odmrzovanje in ponovno zamrzovanje Odmrzovanje naj bo počasno (najbolj primerno je v hladilniku) in naravno in ne »nasilno« (to je na primer z vrečko v vroči vodi ali mikrovalovni pečici). Posebej bodite pozorni pri odmrzovanju perutnin. Ko so živila enkrat odmrznjena, naj se ponovno ne zamrzujejo. Pri ponovnem zamrzovanju nastanejo mehanske poškodbe in poveča se možnost pokvarljivosti. Razgradijo se okus, barva in aroma. Mikroorganizmi (bakterije, plesen) se veliko hitreje razširijo. Ponovno zamrzovanje ne omogoča uničevanja teh posledic. 8.5. JADRANJE, KAMPIRANJE IN PIKNIKI Vakuumsko shranjevanje je primerno tudi za piknike, ladje, kampiranja. Živila, oprema in dokumenti ostanejo suhi in zaščiteni. Vakuumsko lahko shranimo tudi baterije, mobilne telefone in fotoaparate, da se ne zmočijo. Vakuumsko shranjevanje preprečuje tudi medsebojno mešanje vonjav in upočasni pokvarljivost zaradi vlage, kar je za majhne prostore še posebej pomembno. 15 9. PRIMERJALNE TABELE SHRANJEVANJA IVIL Po podatkih razvojnega oddelka podjetja Status. 9.1. SHRANJEVANJE ŽIVIL V HLADILNIKU Vrsta živil Shranjevanje brez vakuuma Kuhana živila 2 dni Sveže meso 2 dni Sveža perutnina 2 dni Kuhano meso 4-5 dni Sveže ribe 2 dni Narezek 3 dni Prekajene klobase 90 dni Trdi siri 12-15 dni Mehki siri 5-7 dni Sveža zelenjava 5 dni Sveža zelišča 2-3 dni Oprana solata 3 dni Sveže sadje 3-7 dni Sladice 5 dni Nasvet: Živila pred vakuumiranjem primerno ohladite. Vakuumsko shranjevanje v vakuumskih posodah 10 dni 6 dni 6 dni 8-10 dni 4-5 dni 6-8 dni 365 dni 50-55 dni 13-15 dni 18-20 dni 7-14 dni 6-8 dni 8-20 dni 10-15 dni 9.2. SHRANJEVANJE ŽIVIL V kuhinjskih omaricah in na policah Vrsta živil Kruh/žemlje Suho pecivo Posušena živila Surov riž/makaroni Kava/čaj Vino Brezalkoholna pijača (zaprta) Brezalkoholna pijača v vakuumskem vrču Pekarski proizvodi Lešniki, orehi … Krekerji /čips 16 Shranjevanje brez vakuuma 2-3 dni 120 dni 10-30 dni 180 dni 30-60 dni 2-3 dni 7-10 dni 2-3 dni 2-3 dni 30-60 dni 5-10 dni Vakuumsko shranjevanje v vakuumskih posodah 7-8 dni 300 dni 30-90 dni 365 dni 365 dni 20-25 dni 20-25 dni 7-10 dni 7-10 dni 120-180 dni 20-30 dni 9.3. SHRANJEVANJE ŽIVIL V ZAMRZOVALNI SKRINJI Vakuumsko shranjevanje v vakuumskih vrečkah Sveže meso 6 mesecev 18 mesecev Mleto meso 4 mesece 12 mesecev Perutnina 6 mesecev 18 mesecev Ribe 6 mesecev 18 mesecev Sveža zelenjava (glej opombo 1) 8 mesecev 24 mesecev Gobe (glej opombo 2) 8 mesecev 24 mesecev Zelišča (glej opombo 3) 3-4 mesece 8-12 mesecev Sadje 6-10 mesecev 18-30 mesecev Narezek 2 meseca 4-6 mesecev Pekarski proizvodi 6-12 mesecev 18 mesecev Kava v zrnu 6-9 mesecev 18-27 mesecev Mleta kava (glej opombo 4) 6 mesecev 12-34 mesecev Kruh/žemlje 6-12 mesecev 18-36 mesecev V preglednicah je naveden le približen čas trajanja, ker je ta odvisen od začetnega stanja (svežine) in načina priprave živil. Izhajamo iz shranjevanja živil na temparaturi +3°C / +5°C v hladilniku in –18 °C v zamrzovalniku. Vrsta živil Shranjevanje brez vakuuma (1) Blanširajte pred zamrzovanjem oz. živila operite pred shranjevanjem v hladilniku. Narezana živila, ki vsebujejo veliko vode, niso primerna za vakuumiranje (kumare, bučke in podobno). Če jih želite na vsak način vakuumirati, jih predhodno za pol ure zamrznite in potem vakuumirajte s funkcijo ročnega vakuumiranja. (2) Gobe: Močno priporočamo uporabo funkcije ročnega vakuumiranja.Za pravilno pripravo gob priporočamo, da pred uporabo preberete navodila v gobarskih knjigah. Za vakuumiranje in zamrzovanje so primerne le trdo mesnate in sveže nabrane gobe. Najprej jih očistimo na suho, nato jih cele operemo in s finim nožem narezane shranimo v manjših porcijah. Razen lisičk, jurčkov in šampinjonov je večino ostalih gob potrebno blanširati. Svetujemo, da gobe pred vakuumiranjem za dobre pol ure zamrznete. Gob pred pripravo ne odtalite, ampak jih še zamrznjene kuhajte v vreli slani vodi oz. jih zamrznjene dodajte omakam. (3) Zelišča z visokim deležem eteričnih olj, kot so žajbelj, timijan, rožmarin, meta niso primerna za zamrzovanje, temveč le za sušenje. Bazilika, pehtran, koper, peteršilj in drobnjak se ne sušijo, ampak zamrzujejo, ker v nasprotnem zgubijo preveč okusa. (4) Če želite kavo ali druga živila, ki jih je potrebno pred uporabo zmleti, pravilno vakuumsko shraniti, položite živila v originalni embalaži v Statusove vrečke. Če nimate originalne embalaže, lahko uporabite katero koli drugo vrečko, ki jo vstavite v Statusovo vrečko. Na ta način preprečite izsesavanje zrn oz. mletih živil. 17 10. Informacija za pravilno odstranjevanje izdelka v skladu z WEEE 2002/96/EC Oznaka na izdelku ali na njegovi embalaži označuje, da po koncu njegove življenjske dobe z njim ni dovoljeno ravnati kot z drugimi gospodinjskimi odpadki. Vaša dolžnost je, da izrabljeno napravo predate v odstranjevanje na posebna zbirna mesta za ločeno zbiranje odpadkov v okviru vaše lokalne skupnosti oziroma zastopniku, ki opravlja dejavnost prevzemanja odpadne EE opreme. lahko pride zaradi neustreznega odstranjevanja izdelka, poleg tega pa omogoča ponovno predelavo materiala, iz katerega je slednji izdelan in s tem prihranek energije in surovin. Za podrobnejše informacije o zbiranju, razvrščanju, ponovni uporabi in recikliranju tega izdelka se obrnite na izvajalca, ki opravlja dejavnost prevzemanja odpadne EE opreme ali na trgovino, kjer ste opremo kupili. Datum izdelave STATUS SV1000 je odtisnjen na garancijskem listu, ki ste ga dobili ob nakupu. Ločeno odstranjevanje posameznih delov EE opreme preprečuje negativne posledice onesnaževanja okolja in nastajanja nevarnosti za zdravje, do katere 11. SESTAVA KOMPLETA Komplet vključuje: • 1 STATUS SV1000 aparat za vakuumiranje in varjenje • 1 rola folije širine 200 in dolžine 3000 mm • 1 rola folije širine 280 in dolžine 3000 mm • 5 velikih vrečk, dimenzij 280 x 360 mm • 5 malih vrečk, dimenzij 200 x 280 mm • 1 priključek za vakuumiranje posod • 1 ročni nož za rezanje folije • 1 navodila za uporabo 18 EN STATUS SV1000 VACUM PACKING MACHINE USER MANUAL 1. SAFETY INSTRUCTIONS AND INTRODUCTION 1.1. OPERATING CONDITIONS Maximum ambient temperature in normal use is +40°C; the average of temperatures over a 24-hour period should not exceed +35°C. Minimum ambient temperature allowed is -5°C. Surrounding air should be clean; relative humidity should not exceed 50% at the maximum temperature of +40°C. Higher relative humidity is allowed at lower ambient temperature (e.g. 90 % at +20°C). 1.2. IMPORTANT SAFETY INSTRUCTIONS a.) Working surface must be dry, normal temperature (not hot) and clear from obstructions. b.) Check the power cable and electrical outlet before you plug in the machine. c.) Machine should be cleaned only with a dry or slightly damp cloth. d.) Never touch the Sealing Strip when using the machine (Item 7 in Figure 1) – it may be hot. e.) Use the machine only for the purposes described in the User Manual. f.) If the supply cord is damaged, it must be replaced by the manufacturer, its service agent or similarly qualified persons in order to avoid a hazard. g.) This appliance can be used by children aged from 8 years and above and persons with reduced physical, sensory or mental capabi lities or lack of experience and knowledge 20 if they have been given supervision or instruction concerning use of the appliance in a safe way and understand the hazards involved. h.) Children shall not play with the appliance. Cleaning and user maintenance shall not be made by children without supervision. i.) Warranty is invalid if: • the machine has been tampered with. • you use the machine for unintended purposes. • you do not respect safety regulations and do not follow the instructions in the User Manual. The manufacturer will not accept responsibility for any damage that may occur as a result of not following the User Manual or improper use. 1.3. TIME INTERVALS FOR USING STATUS SV1000 For the proper operation of the machine there should be at least a 20-second time interval between individual cycles of sealing or vacuum packing. Wait for the machine to cool down (approximately 30 minutes). When the Overheating indicator goes off, you can carry on using the machine as normal. When the cycles follow each other too quickly, the machine automatically While the machine is cooling down, do stops. The Overheating indicator is lit not unplug it. (Item 4 in Figure 1). 1.4. MAINTENANCE AND CLEANING a.) Unplug the machine. e.) You can only clean the Sealing b.) Use a soft, damp cloth to clean Strip when the machine has cooled the machine. Do not use anything down. Never try to clean the seawhich could scratch or damage the ling strip using a sharp object. surface. Never submerge the ma- f.) If the black foam seals become chine in water or place it under runcontaminated with grease or liquid, ning water. Never squirt detergent then you can wash them in soapy directly onto or into the machine. water, rinse and dry them before c.) Before using the machine make replacing them. This will increase sure that it is completely dry. the lifespan of the foam seals. d.) The Sealing Strip is covered with Teflon. Remove any plastic residues using a soft cloth. 21 1.5. GENERAL INFORMATION STATUS SV1000 Vacuum Sealer is a household machine intended for long term food storage in a vacuum and is designed to vacuum pack and seal bags and vacuum containers. It has been developed and manufactured by the Status d.o.o. Metlika company from Metlika, Slovenia. The most important advantages of vacuum packing: • Vitamins, minerals, nutrients and flavour are preserved. • Multiplication of moulds and bacteria is suppressed, which extends food shelf life. • Storage in vacuum prevents mixing of odours in the refrigerator or freezer. Products for extending freshness of foods also include Status' vacuum containers, lids, stoppers and a jug, which are vacuum packed with a manual or electric vacuum pump. STATUS SV1000 includes an adjustable hose for vacuum packing all of the mentioned products. Two sets of premade vacuum bags and two sets of foil rolls are packed with the product. You can determine the length of the bags according to your needs. Before using the machine for the first time, read the User Manual carefully and follow the instructions. If you have any questions, opinions or comments then please call or email us. For more detailed instructions watch the video about the correct use of a vacuum packing machine at www.status.si. STATUS SV1000 is simple to use and efficient. You will be able to store food in a completely natural and healthier way. It will stay fresh longer and you will save time and money. 1.6. TECHNICAL DATA 22 Dimensions Width: 385 mm Depth: 235 mm Height: 93 mm Weight Approx. 3,45 kg Material ABS plastic (outer casing) Pump vacuum pump (self-oiling – no maintenance necessary) Vacuum pressure cca -750 mbar Motor 230V AC, 50Hz Automatic cut-off in case of overheating. Max RPM 2900 Transformer 220V AC, 50Hz/24V AC 0,8A /12V AC 0,4A Pump volume 14 litres/min Controls Electronic Machine rated power and voltage 200 W, 230 V AC 1.7. COMPONENTS AND FUNCTION BUTTONS The Figure 1 below shows the vacuum packing machine. The numbers in explanations of the operation of the machine are used in the same manner as in the Figure. 2 1 4 5 3 6 8 11 12 7 8 9 10 Figure 1: STATUS SV1000 – components are marked with numbers 23 1. Seal Button Starts the sealing process (without vacuum packing). You can use this to seal the open end of a roll. 2. Vacuum Packing of Bags / Start / Stop Button Start of vacuum packing and sealing process. The bag will first be vacuum packed and then automatically sealed. Also for vacuum packing of softer and moister foods. Press this Button again at any time during the vacuum packing process to manually activate sealing process. 3. Vacuum Packing of Containers Button Vacuum packing of containers with Accessory Port and Hose. Vacuum packing process automatically stops when the correct vacuum is reached. 4. Overheating Automatic overheating protection. The indicator is lit if the time interval between individual processes of vacuum packing is not long enough (20 s between individual cycles). Wait 30 minutes until the indicator goes off and carry on using the machine as normal. 5. On/Off Indicator (Indicator for Sealing) When the machine is connected, the indicator is lit. As the machine is sealing, the indicator illuminates more intensely. 6. Liquid Block The indicator is lit if the machine has sucked liquid out of the vacuum bag during vacuum packing. 7. Sealing Strip The Sealing Strip is covered with a Teflon foil that should in no case be removed. 8. Vacuum Channel Gasket/Foam Seal 9. Vacuum Channel with Tray During vacuum packing, the edge of the bag must be set between both gaskets in the middle of the Vacuum Channel (Figure 6). In case of improper vacuum packing, any excess liquid is stopped here and the Liquid Block indicator is lit. You can read more about this in Chapter 2.2.3. 10. Continuous Roll Compartment 11. Roll Cutter 12. Accessory Port used for vacuum packing of containers 1.8. FOIL ROLLS AND BAGS USED FOR VACUUM PACKING 24 Foil roll 4 ply foil (PA/PE) • length 3000 mm x width 200 mm • length 3000 mm x width 280 mm • length 3000 mm x width 120 mm (for salami) Bags štiriplastna folija (PA/PE) • length 280 mm x width 200 mm • length 360 mm x width 280 mm • length 550 mm x width 120 mm (for salami) Foil thickness 100 µm (smooth, unribbed part) /130 µm (structured, ribbed, part of the foil) Foil quality Impermeable, 2 ply, germ-free, with neutral flavour and odour, can be reused, suitable for microwave and boiling. 2. USAGE 2.1. GENERAL INSTRUCTIONS a.) When taking the machine out of check that all components are undamaged. b.) Read the User Manual before machine for the first time. c.) STATUS SV1000 is a professional its packaging included and the technology and capacity adjusted to be used in households. The machine is due to its functionality suitable to be stored on the kitchen top where it can be conveniently used every day. Place it on an even, smooth surface with enough space for placing food into bags. you use the machine with 2.2. INSTRUCTIONS FOR USE Use the machine according to the following instructions: 2.2.1. Plug in the machine and prepare it for operation Check if the On / Off Indicator is lit (Item 5 in Figure 1). Each time before you begin to vacuum pack, first dry test the machine. Lower the lid of the machine. Press both arrows marked with Items 1 and 2 on the rims of the lid until you hear a click. Press the Vacuum Packing of Bags button (Item 2 in Figure 1). Wait for the On / Off Indicator to stop illuminating intensely. The Sealing Strip has warmed up and the machine is ready to be used. To lift the lid, press on the middle of the red handle with your thumb and lift it with your forefinger (Figure 3). Figure 2: Lock the machine. Press on the marked numbers 1 and 2. Figure 3: Lift the lid. Press on the middle of the red handle with your thumb and lift it with your forefinger. 2.2.2. First, make a bag from the roll When using vacuum bags skip paragraph 2.2.2. and continue with instructions in paragraph 2.2.3. a.) Determine the length needed. A bag should be about 5 cm longer than the item to be vacuum packed. To reuse the bag leave additional 2.5 cm of bag material for each time you plan to reuse it or next time use the bag for smaller items. b.) Cut off the desired length with the included cutter (Figure 4). c.) Place the roll on the Sealing Strip and extend it to the Black Gasket (Figure 5). Make sure that the edge is straight and level. d.) Lower the lid of the machine. Press both arrows marked with Items 1 and 2 on the rims of the lid until you hear a click. e.) Press the Seal button (Item 1 in Figure 1). During sealing, the light (On/Off) will be illuminated 100%. RECOMMENDATION: If the machine does not start with the sealing process right after you press the Seal button, then press gently on the 25 middle of the lid with your finger. TIP: You can seal the foil first and then cut it off with the included cutter. Set the foil roll into the space provided for it (Item 10 in Figure 1). Pull the foil over the Sealing Strip (Item 7 in Figure 1) and lower the lid. Lock with pressing on the marked arrows on the lid and then on the Seal button. Figure 6: For vacuum packing place the filled bag in the middle of the Vacuum Channel. (between black foam seals) Figure 4: Cut the roll with incorporated cutter. Figure 5: Place the roll on the Sealing Strip and extend it to the Black Gasket to seal. f.) When the indicator no longer illuminates 100%, lift the lid. Press on the middle of the red handle with your thumb and lift it with your forefinger (Figure 3). Check the sealing edge on the bag. It should be smooth and even across its width and not creased. 2.2.3. When the bag is made, place food in it and vacuum pack The bag should always be at least 5 cm longer than the space occupied by the item to be vacuum packed. a.) Place the items to be vacuum packaged in the bag. b.) Make sure that inner surfaces (for the sealing edge) are clean, dry and free from food materials.* 26 c.) Place the filled bag on the work surface in front of the machine and pull it to the middle of the Vacuum Channel (Figure 6). d.) Make sure that the bag placed on the Sealing Strip is completely smooth (not creased). e.) Close the machine and lock it with pressing on both arrows on the rims of the lid until you hear a click. Press the Vacuum Packing of Bags button (Item 2 in Figure 1). RECOMMENDATION: If the machine does not start with the process right after you press the Vacuum Packing of Bags button, then press gently on the middle of the lid with your finger. f.) The bag will be vacuum packed and sealed automatically. Due to high vacuum pressure the lid stays closed while the machine operates. g.) After the procedure (when the indicator no longer illuminates 100%), press on the middle of the red handle with your thumb and lift it with your forefinger (Figure 3). Check the vacuum packed bag. The sealing edge should be smooth and clean. * Recommendation: When vacuum packing greasy products (especially bacon) it is strongly recommended to reverse the outside edges of bag, put the item inside and reverse the edges back again. This keeps the area to be sealed free of grease. WHAT TO DO IN CASE THE MACHINE STARTS TO SUCK LIQUID OUT OF THE BAG DURING VACUUM PACKING? If you notice that the machine starts to suck liquid out of food during vacuum packing, IMMEDIATELY interrupt the process of vacuum packing by pressing the Stop button (Item 2 in Figure 1). You can press the Stop button only while the machine is vacuum packing (the button no longer works when the machine is sealing). If you haven’t stopped the process of vacuum packing in time and liquid had entered the Vacuum Channel, the machine will stop automatically. The Liquid block indicator will be lit. To open the lid, press on the middle of the red handle with your thumb and lift it with your forefinger (Figure 3). There is a container between the seals that you lift straight up. Drain the liquid and carefully wipe up the whole container. Set the container back to its place and carry on with vacuum packing. If the liquid entered the channel with the container, wipe up and dry the channel as well. • When you assess that enough air has been removed (pay attention to what is happening with the food, if liquid is starting to slip toward the machine or if further removing of air could damage soft foods), press the Stop button (Item 2 in Figure 1).). The pump is stopped and sealing is activated. You can always stop the vacuum packing process by pressing the Stop button (if you, for example, determine that the food contains more liquid than you had assessed). TIP: The easiest way to vacuum pack the majority of fruits and vegetables, fresh meat and mushrooms is to put it into the freezer for 1-2 hours. This way fruit (e.g. strawberries) will keep its form and you will avoid the danger of liquid entering the Vacuum Channel during vacuum packing. 2.2.5. Figure 7: When liquid collects in the container, lift it straight up, drain the liquid and carefully wipe up the container. 2.2.4. Vacuum packing of foods which are easily crushed When vacuum packing foods which are easily crushed or contain a lot of water (fresh fruit, salads, mushrooms, bread, pastry) less vacuum should be used (from 0 to -300 mbar). With manual vacuum packing you can interrupt the process of removing air as soon as you assess that enough air has been sucked out of the bag or that further removal of air could damage foods which are easily crushed. The process of manual vacuum packing is very similar to the above described automatic vacuum packing only with two main differences. Keep in mind that with soft and moist foods you have to pay extra attention to what is happening in the bag during vacuum packing. • Always place the bag so that you set the edge of the bag between the gaskets in the Vacuum Channel (Item 9 in Figure 1). Vacuum packing using vacuum containers and lids The STATUS SV1000 also includes an Accessory Hose and Port which can be used for vacuum packing of Status’ vacuum containers and lids. a.) Insert the opening of the Accessory Hose into the Accessory Port (Figure 8) on the right side the Vacuum Channel. b.) Attach the Accessory Hose and Port to the valve of the chosen vacuum container. Figure 8: Vacuum packing using containers c.) Press Vacuum Packing of Container button (Item 3 in Figure 1) to vacuum the container. When the correct negative pressure is reached, the process stops automatically. When vacuum packing liquid foods (soups, sauces, etc) there should be at least 1.5 cm between the surface of the liquid and the lid. 27 3. VACUUM PACKING DIFFERENT TYPES OF FOOD Vacuum packing is not a substitute for freezing or refrigeration. Despite being vacuum packed foods still have to be stored in the refrigerator or freezer or in a cool place (e.g. dried meat products in a cellar). Do not use bags or rolls for packing foods which contain a lot of liquid! Soups, sauces and liquids should be either pre-frozen before packing in a vacuum bag or vacuum packed in an acrylic container. Boiled meat, raw meat and fish: For best results we recommend you to pre-freeze meat and fish for 1-2 hours prior to vacuum packing to ensure the retention of juices and shape, and to help guarantee a good seal. If pre-freezing is not possible, place a folded paper towel between the meat and the top of the bag, avoiding the area to be sealed. Leave the paper towel in the bag when vacuum packing to absorb excess moisture and juices. Note: Beef may appear darker after vacuum packing due to the removal of oxygen. However, this does not indicate it is spoiled. Vegetables: Vegetables should be blanched prior to vacuum packing. The process of blanching stops the enzyme action and preserves flavour, colour and texture. One to two minutes in boiling water is enough for fresh leaf vegetables or beans. For chopped zucchini or broccoli and other cruciferous vegetables allow 3 to 4 minutes, for carrots allow 5 minutes and 7 to 11 minutes for cereals. After blanching, submerge the vegetables in cold water to stop the process then dry them with a paper towel prior to vacuum packing. We recommend you to store leaf vegetables in vacuum containers. They should first be washed and dried with a paper towel, and then stored in a vacuum container. This way, spinach and lettuce will stay fresh up to 2 weeks when refrigerated. Mushrooms, raw garlic and raw potatoes: We do not recommend vacuum packing. If you want to do it anyway, strictly follow the instructions in paragraph 9.3. Thawing of vacuum packaged foods: Foods should always be thawed in the refrigerator to preserve quality. 4. WARRANTY This warranty is valid for two years from the date of purchase. Evidence of original purchase is required for warranty services, so it is important to keep your sales receipt. This warranty only covers breakdown caused by electrical or mechanical failure. It does not cover damage caused by liquid entering the machine or breakdown caused by failure to follow the manufacturers instructions. 28 If you have any comments or questions concerning the functioning of the machine or warranty, please contact us: STATUS d.o.o. Metlika Ulica Belokranjskega odreda 19, 8330 Metlika e-mail: [email protected] For more information visit our website www.status.si. 5. DECLARATION OF CONFORMITY The machine complies with all European directives: a.) Directive on electrical equipment designed for use within certain voltage limits (OJ of the Republic of Slovenia, no. 27/04) Directive 73/23/EEC, 93/68 EEC and its amendments b.) Regulation on electromagnetic compatibility (OJ of the Republic of Slovenia, no. 132/2006) Directive 2004/108 EC and its amendments EC declaration of conformity guarantees that the machine is safe and has been inspected and tested to meet all the requirements specified in the applicable standards, directives and regulations. EC declaration of conformity is enclosed in the User Manual. 6. TROUBLESHOOTING PROBLEM: WHAT TO DO: SV1000 does not respond when I press the buttons. • Make sure the machine is switched on and plugged in. • If socket is on but you have no power, check the socket with another appliance that you know works. • Check the power cord for any damage – cracks or splitting. • Your machine may switch off automatically to avoid overheating. Allow it to cool down for 30 minutes and then carry on as normal. We strongly recommend you take into account 20 seconds between each vacuum packing. • Pressing a function button must last at least one second for the machine to react. Air remains in the bag. • Make sure you have fully placed open end of the bag in the middle of Vacuum Compartment. • Ensure that the bags you are using have at least 100/130 µm thickness. • Check your bag for any damage – splits, perforations or bubbles. Test: Seal bag and submerge it in water. On the places where bag is damaged, bubbles will appear. • When using continuous rolls make sure that the first sealing edge is firmly sealed. • Make sure you have pressed on both arrows on the rims of the lid tightly enough before vacuum packing. You must hear two clicks. The vacuum doesn’t hold on the bags. • Check the sealing areas of the lid are free from any dirt, grease or food particles, and that they are firmly in place. • Ensure that the bag is totally clean on the edges – thoroughly remove any food particles or liquid and ensure the bag is completely dry. • If you are sealing anything with sharp edges (e.g. bones) make sure they cannot pierce the bag during the vacuum process. • Note: cover sharp edges with a paper towel, or similar, prior to sealing. 29 PROBLEM: WHAT TO DO: Bag melts or cannot be sealed completely. • Make sure you are using bags that are at least 100/130 µm thickness and 2 ply. • Before sealing ensure that the edges of the bag are clean and dry. The vacuum doesn’t hold when using a container. • Ensure that your Hose is correctly inserted as shown in Figure 8. • Make sure your container lid is clean and dry and in the correct position. • Make certain that your container valve is clean and dry. STATUS SV1000 sealed several bags (up to 5 items) and it seems it is not working anymore. Important note about vacuum bags: • We strongly recommend vacuum bags of thickness at least 100/130 µm. There are many different types of vacuum bags available on the market so put special attention on quality. Our recommendation is to use original vacuum bags from Status, which are 2 ply and 100/130 µ thick. 7. BENEFITS OF VACUUM PACKING Oxygen provokes a chemical change on food and is an important factor in the formation of moulds and bacteria. As a consequence, grease can go rancid, food colour changes, moulds and bacteria multiply, and flavour, vitamins, aroma and minerals are lost. Vacuum packing holds up such undesired effects, prolongs shelf life and preserves food quality. Only with the help of vacuum packing, i.e. removing air from packing using manual or pump, a suitable environment required to extend food freshness can be established. The process of vacuum packing in containers or bags creates negative pressure. 30 Vacuum machine, containers and universal lids are indispensable in every kitchen. They are intended for natural storing of food and extending shelf life of raw and boiled food without losing its quality. Storing in the refrigerator, pantry or packaging that extends food freshness does not prevent the oxygen coming in contact with food. We also have to mention that Status' SV1000 helps you save money, since you can buy in bulk, repackage your purchase in portions and then vacuum package. Food can be divided into smaller serving portions, vacuum packaged and stored in the refrigerator for a longer period of time. 8. USEFUL ADVICE 8.1. What is freezer burn? Signs of freezer burn are rancid meat, rotten vegetables and tasteless fruit. Freezer burn appears, when the packaging is permeable to air (common 1 ply PE bags) and frozen food comes into contact with oxygen. Consequently, water evaporates and the surface of frozen food dries out. Oxygen penetrates through the porous cracks and initiates oxidation. As a consequence, food loses its aroma and fresh taste. We can recognize freezer burn by the white and dun stains on the food. 8.2. Deep frozen or chilled The advantage of storing deep frozen food is in preserving its essence – vitamins, minerals and taste. Besides, at temperatures between -30° C and -40° C the texture of raw food changes only to a minimum extent (e.g. meat). Freeze food as quickly as possible. Reason: When you are freezing food slowly, big ice crystals are formed on the surface. They overgrow food cells and subsequently damage their structure. When you are freezing food quickly, small ice crystals are formed, which do not damage the food to such an extent. If possible, freeze food at constant temperature (–18 °C at the most). Only food of the highest quality should be frozen. Some foods have to be blanched (scalded) in order to avoid unwanted changes when freezing or deeply refrigerating (enzyme activation, ceased germination). Blanched or in any other way heat treated foods must be chilled before freezing. Otherwise, already stored food can start thawing and become damaged or vacuum can be lost when storing food in vacuum containers. To ensure better quality of stored fruit, use sugar as additive. This also preserves aroma and colours. In the freezer, containers should be kept together as close as possible. The rest of them can be kept in the refrigerator. 8.3. Thawing Thawing should be a slow (the most suitable way of thawing is in the refrigerator) and natural process. It should not be forced (as it is when putting a bag into hot water or thawing food in the microwave). Once the food is defrosted, it should not be refrozen. When refreezing, mechanical damages occur and food can perish more quickly. Taste, colour and aroma are decomposed. Micro-organisms (bacteria, mould) multiply much faster. These consequences cannot be eliminated by refreezing. It is therefore recommended that once the foods are thawed, they should be used as soon as possible. 8.4. Sailing, camping and picnicking Vacuum packing is also suitable for picnics, sailing and camping. Food, equipment and documents stay dry and protected. Batteries, mobile phones and cameras can also be vacuum packaged to keep them from getting wet. Vacuum packing prevents mixing of odours and keeps food from perishing due to moisture. This is particularly important in small spaces. 31 9. COMPARATIVE STORAGE TABLES Source: Status' Development Dept. manufacturer 9.1. Comparative table of food storage IN THE REFRIGERATOR Type of food Boiled food Fresh meat Fresh poultry Boiled meat Regular storage 2 days 2 days 2 days 4-5 days 2 days Fresh fish Cold meats 3 days Smoked sausages 90 days Hard cheeses 12-15 days Soft cheeses 5-7 days Fresh vegetables 5 days Fresh herbs 2-3 days Washed lettuce 3 days Fresh fruit 3-7 days Desserts 5 days Tip: Before vacuum packing properly chill the food. Vacuum storage 10 days 6 days 6 days 8-10 days 4-5 days 6-8 days 365 days 50-55 days 13-15 days 18-20 days 7-14 days 6-8 days 8-20 days 10-15 days 9.2. Comparative table of food storage IN CUPBOARDS AND ON SHELVES Type of food Bread/rolls Pastry Dried food Raw rice/pasta Coffee/tea Wine Non-alcoholic drink (sealed) Non-alcoholic drink in a vacuum jar Baking goods Hazelnuts, walnuts etc. Crackers/potato chips 32 Regular storage 2-3 days 120 days 10-30 days 180 days 30-60 days 2-3 days 7-10 days 2-3 days 2-3 days 30-60 days 5-10 days Vacuum storage 7-8 days 300 days 30-90 days 365 days 365 days 20-25 days 20-25 days 7-10 days 7-10 days 120-180 days 20-30 days 9.3. Comparative table of food storage IN THE FREEZER Type of food Fresh meat Ground meat Poultry Fish Fresh vegetables (remark number 1) Mushrooms (remark number 3) Herbs (remark number 4) Fruit Cold meats Baking goods Coffee beans Ground coffee (remark number 2) Bread/rolls Regular storage 6 months 4 months 6 months 6 months 8 months 8 months 3-4 months 6-10 months 2 months 6-12 months 6-9 months 6 months 6-12 months Vacuum storage 18 months 12 months 18 months 18 months 24 months 24 months 8-12 months 18-30 months 4-6 months 18 months 18-27 months 12-34 months 18-36 months Only approximate time of duration is indicated in the tables, as it depends on the initial state (freshness) and way of preparing food. We have considered storage of food at +3 °C / +5°C in the refrigerator and at –18 °C in the freezer. (1) Blanch before freezing or wash food before storing it in the refrigerator. Chopped food containing a lot of water is not suitable for vacuum packing (cucumbers, zucchini etc.). (2) If you want to properly vacuum package coffee or other ground food with SmartVac, leave the items in their original packaging and place them into the Status' bag. If you do not have the original packaging, use a regular bag and insert it in the Status' bag. This way you can prevent beans or ground items from being sucked into the machine. (3) Mushrooms: We strongly recommend the "manual vacuum packing" function. Only hard, meaty and fresh mushrooms are suitable for vacuum packing and freezing. First wash and dry the mushrooms, then chop them with a fine knife and store them in small quantities. Almost all types of mushrooms should be blanched. We recommend that you put them in the freezer for half an hour before vacuum packing. Do not thaw the mushrooms before preparing them. Boil frozen mushrooms in hot salty water or add them to sauces. (4) Herbs containing a high portion of essential oils, such as sage, thyme, rosemary or peppermint are not suitable for vacuum packing but only for drying. Basil, tarragon, garden dill, parsley and chive should be frozen. If dried, they lose too much flavour. 33 10. Correct Disposal of your vacuum machine The symbol on the product or its packaging indicates that at the end of its life, the product may not be treated as ordinary household waste and must be disposed of in accordance with your local authority’s instructions and at properly designated sites. You can also use an official WEEE collection service provider in accordance with directive 2002/96/EC. Separate collection of individual components of EE equipment prevents negative effects of environmental pollution and minimizes danger to human health, which may occur as a result of improper product disposal. In addition, it enables reuse and recovery of the material, thus saving energy and raw materials. For detailed information on collecting, sorting, reuse and recycling of the product contact the provider of WEEE collection services or the shop where you bought the equipment. The date of manufacture can be found on the warranty sheet which you received at purchase. 11. STATUS SV1000 set The set includes: a.) 1 STATUS SV1000 machine b.) 1 Foil Roll – 200 mm (W) X 3000 mm (L) c.) 1 Foil Roll – 280 mm (W) X 3000 mm (L) d.) 5 Small Bags – 200 mm (W) x 280 mm (L) e.) 5 Large Bags – 280 mm (W) x 360 mm (L) f.) 1 Connector used for vacuum packing of containers g.) 1 Manual Cutter used for cutting foil h.) 1 User Manual 34 STATUS IZVIRNI HIŠNI PRIPOMOČKI Uporabniki ste prva in zadnja kontrolna točka, izdelke poskušamo prilagoditi vašim željam. Trudimo se, da so pripomočki z blagovno znamko Status – izvirni hišni pripomočki kakovostni, učinkoviti in enostavni za uporabo. V ponudbi najdete izdelke za shranjevanje živil v vakuumu in brez vakuuma, pripomočke za kuhanje in pripravo hrane ter izdelke za dom. Ponudbo nenehno dopolnjujemo. Vabljeni tudi v Statusovo prodajalno v Metliki, Ulica Belokranjskega odreda 19, 8330 Metlika. STATUS - KITCHEN INNOVATIONS The company Status d.o.o. Metlika (limited liability company) was founded in 1995. Since then we plan and manage the entire life cycle of our products. New products are developed on the basis of a detailed market analysis. Consumers play an important role in the development process as our products solve their daily problems. Manufacturing tools are constructed independently or in cooperation with our subcontractors. Products are assembled on the company premises under strict supervision of qualified professionals. The majority of Status products are intended for export. Approximately 75% of the products are exported to EU countries and the other part to countries all over the world. 21032013 V Statusu načrtujemo in izvajamo ves življenjski cikel izdelkov – od razvoja, izdelave, tržnega komuniciranja in prodaje do servisnega centra.