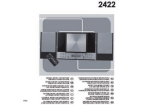
1
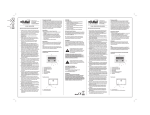
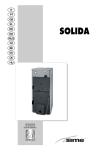
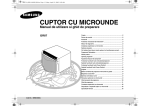
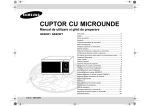
MANUAL DE UTILIZARE
Pick up profesional cu USB
MANUAL DE UTILIZARE
(NL) 01-09
13-24
Rom.
USER MANUAL
Eng.
10-18
INSTRUCTIUNI IMPORTANTE DE SIGURANTA
1. Cititi instructiunile – toate instructiunile de
siguranta si operare trebuie citite inainte de a
folosi produsul.
2. Retineti instructiunile - instructiunile de siguranta
si operare trebuie retinute pentru referinte.
3. Mesaje de avertizare – toate avertizarile de pe
obiect si din instructiunile de operare trebuie
respectate.
4. Respectati instructiunile – toate instructiunile
de operare si folosire trebuie urmarite.
5. Apa si umezeala – Obiectul nu trebuie folosit in
apropierea apei, de exemplu langa cada de
baie, chiuveta de bucatarie, intr-un beci umed
sau langa piscina.
6. Suporturi – obiectul trebuie folosit
numai cu suporturi recomandate
de producator. Un dispozitiv cu
suport trebuie miscate cu grija.
Opriri bruste, forta execesiva si
suprafete neuniforme pot cauza
dispozitivul sa se rastoarne.
7. Montarea pe perete si tavan – aparatul nu
trebuie montat pe perete sau tavan.
8. Caldura – aparatul trebuie situat departe de
sursele de caldura cum ar fi radiatoare, sobe
sau alte obiecte care produc caldura.
9. Surse de current – acest produs trebuie
alimentat numai la sursele de current indicate
pe etichetele de evaluare. Daca nu sunteti
siguri
de
sursa
de
curent
din
casa
dumneavoastra, consultati dealer-ul local sau
compania care furnizeaza curent. Pentru
produsele destinate sa opereze pe baza de
baterii,
sau
alte
surse,
referiti-va
la
instructiunile de operare.
10. Impamantarea si polarizarea – acest produs
poate fi echipat cu un stecher alimentat de
curent alternativ polarizat. Acest stecher se va
potrivi in sursa de curent numai intr-o directie.
Aceasta este o caracterstica de siguranta. Daca
nu puteti sa inserati stecherul de tot in priza,
incercati cu capatul celalalt. Daca tot nu merge,
contactati electricianul pentru a inlocui priza.
11. Protectia cablului de alimentare – Cablurile de
alimentare trebuie directionate astfel incat sa
nu fie calcate sau sa fie asezate obiecte pe ele;
aveti mare grija la corespondenta stecherului si
la punctul de unde iese din aparat.
12. Curatare – aparatul trebie curatat numai cum
recomanda producatorul. Curatati stergandu-l
cu o panza umeda. Evitati sa intre apa in
interiorul aparatului.
13. Inainte de a inapoia produsul reparat
utilizatorului, folositi un ohm-metru pentru a
masura capetele stecherelor. Rezistenta trebuie
sa fie mai mare de 100,000 de ohm.
14. Perioade de nefolosire – cablul de alimentare
trebuie scos din priza atunci cand nu folositi
aparatul o perioada mare de timp.
15. Obiecte si lichide in interiorul aparatului – aveti
mare grija ca sa nu scapati obiecte sau sa
varsati lichide in interiorul aparatului.
16. Solicitare de service in caz de defectiuni –
aparatul trebuie reparat numai de personal
calificat cand:
— cablul de alimentare sau stecherul este
stricat;
— aparatul a cazut, sau s-a varsat lichid in
interior;
— aparatul a fost expus la ploaie;
— aparatul nu functioneaza corespunzator sau
observati o schimbare in performanta
acestuia;
— aparatul v-a scapat, sau carcasa este stricata.
17. Service – utilizatorul nu trebuie sa repare
aparatul in afara de ce se mentioneaza in
manualul de instructiuni. Toate celelalte
probleme trebuie rezolvate la un service cu
personal calificat.
18. Ventilarea – sloturile si deschiderile aparatului
prevad ventilarea si pentru a asigura unei
operari bune a aparatului si pentru a-l proteja
de supraincalzire, si de aceea aceste orificii nu
trebuie acoperite sau blocate. Deschiderile nu
trebuie niciodata blocate pununand aparatul pe
pat, canapea, covor sau alte suprafete de acest
gen. Acest produs nu trebuie asezat pe un rack
pana cand ventilatia corespunzatoare nu este
mentionata in instructiunile producatorului.
19. Atasamente
–
nu
folositi
atasamente
nerecomandate de producator pentru ca pot
cauza defectiuni.
20. Accesorii – nu asezati aparatul pe un suport,
trepied, ori masa instabila. Produsul poate
cadea, provocand rani unui copil sau adult, si
defectiuni serioase produsului. Folositi numai
suporti recomandati de producator sau cele
vandute cu produsul.
21. Trasnete – pentru o mai mare protectie a
aparatului in timpul transetelor, sau cand este
nesupravegheat sau nefolosit pentru perioade
mai mari de timp, scoateti-l din priza sau
deconectati antena sau sistemul de cablu.
Acest lucru va preveni defectiunile care pot
aparea in timpul trasnetelor sau a caderilor de
tensiune.
22. Componente de inlocuire – cand sunt solicitate
piese de schimb aveti grija ca tehnicianul care
le inlocuieste sa foloseasca piese originale sau
care au aceleasi caracteristici. Inlocuirea
pieselor neautorizate poate duce la foc, socuri
electrice sau alte riscuri.
23. Verificari de siguranta – pe foaia de service sau
de repararea a produsului puneti-l pe tehnician
sa verifice bine produsul pentru a fi in conditii
de operare corespunzatoare.
1
INSTRUCTIUNI IMPORTANTE DE SIGURANTA
DO NOT OPEN
RISK OF ELECTRIC SHOCK
Atentie ! Pentru a reduce riscul electrocutarii, nu indepartati
carcasa, nu umblati in interiorul aparatului, adresati-va
personalului calificat.
Acest simbol avertizeaza in privinta existentei unor tensiuni periculoase in interiorul aparatului
care sunt suficient de puternice pentru a provoca electrocutarea.
Acest semn indica utilizatorului existenta unor operatiuni si instructioni deosebite legate de
intretinere.
ATENTIE!
Pentru reducerea riscului de electrocutare nu expuneti acest aparat la ploaie sau umezeala.
Selectarea liniei de voltaj.
Doar pentur modul de voltaj dual!
Deoarece sursele de curent variaza de la locatie la locatie am
incorporat un selector de sursa de curent
y Voltajul dorit poate fi setat de comutatorul Selectorului de
Voltaj care este localizat sub platan (folositi o surubelnita
cu capul plat).
y No fortati comutatorul Selectorului de Voltaj pentru a
evitarea daunelor.
y Daca comutatorul Selectorului de Voltaj un se misca usor, va
rugam contactati un service autorizat.
INAINTE DE FOLOSIRE
Verificati urmatoarele componente incluse in pachet cu aparatul principal:
y Platanul
y cablul USB
y cablul RCA
y cartusul
y Manualul de instructiuni
y headshell
y contra-greutatea
y acoperirea de praf
y capul de citire
y discul
y adaptorul 45 rpm
FOARTE IMPORTANT!!
Nu uitati sa atasati cureaua de cauciuc de motor pentru o functionare
corecta. Dupa punerea platanului prin axul central, miscati una din
ferestrele mari de pe platan spre coltul din dreapta sus. Atasati cureaua
de motor.
Note:
y Nu conectati aparatul la sursa de curent inainte ca asamblarea sa fie completa.
y Inainte de a porni aparatul asigurati-va inca odata ca toate conexiunile si setarile de curent sunt
corect facute. Intotdeauna opriti aparatul cand il conectati sau deconectati de la priza.
y Cititi acest manual cu atentie inainte de a folosi aparatul. Pastrati manualul intr-un loc sigur pentru
referinte viitoare.
2
ASAMBLAREA
1. Scoati aparatul din cutie si indepartati ambalajul.
2. Montati adaptorul de 45rpm.
3. Montati platanul in axul principal.
4. Puneti capul de citire pe platan.
5. Instalarea cartusului: cand instalati cartusul, faceti referire la instructiunile din manual.
a) In timpul instalarii, atasati protectia penitei pentru a apara varful acesteia.Terminalele la majoritatea
cartuselor sunt codate color. Conectati fiecare fir la terminalul
de aceeasi culoare:
ALB (L+) ------------------- Canalul din stanga +
Albastru (R-) --------------- Canalul din dreapta Rosu (R+) ------------------ Canalul din dreapta +
Verde (R-) ------------------ Canalul din dreapta –
b) Instalati cartusul la headshell si strangeti-l cu surubelnita venita cu cartusul. +
6. Inserati capul de citire in bratul de sunet, apoi rotiti piulita de blocare in inversul acelor de ceas cu
capul de citire bine strans orizontal.
7. Puneti contragreutatea pe bratul de sunet. Rasuciti usor si se va insuruba pe axul spate al bratului de
sunet.
8. Reglarea balansului orizontal “zero” si presiunea penitei:
a) Indepartati protectia penitei din headshell, nu atingeti varful penitei in timpul ajustarii.
b) Puneti parghia in cea mai joasa pozitie.
c) Da-ti drumul clemei bratului de sunet si ridicati bratul de sunet din suport.
d) Rotiti contragreutatea pana cand bratul de sunet este aproximativ balansat orizontal.
e) Puneti bratul de sunet inapoi pe suport.
f) Tineti contragreutatea nemiscata cu o mana si rotiti numai inelul de contact al penitei pentru a aduce
cifra “0” a inelului in aliniament cu linia din centru a bratului de sunet.
g) Rotiti contragreutatea inclusiv inelul de contact al penitei in inversul acelor de ceas pana cand scala
arata valoarea corespunzatoare contactului penitei folosite.
9. Puneti butonul de control al anti patinajului la aceeasi valoare ca a contactului penitei.
10. Puneti protectia de praf.
APLICAREA
y Nu puneti aparatul intr-o locatie unde va fi expus direct la soare sau langa o sursa de caldura.
y Nu punteti aparatul intr-o locatie unde este umiditatea mare sau mult praf.
y Cartusul poate aluneca si sunetul va fi distorsionat de la vibratiile boxelor care vin prin podea sau prin
aer. Gasiti o locatie care este foarte stabila si unde nu exista vibratii.
y Aparatul are picioare ajustabile. Ajustati picioarele pentru a stabiliza aparatul orizontal.
3
CONEXIUNI
Inainte sa conectati aceasta unitate este avizat sa consultati echipamentul.
IMPORTANT: Fiti sigur ca opriti echipamentul inainte de a face schimbari la diferite conexiuni.
1. Conectati cablul de alimentare din spatele aparatului la priza .
2. Conectati cablul RCA la intrarea PHONO al amplificatorului cand selectati comutatorul PHONO/LINE pe
pozitia PHONO. Puteti de asemenea folosi o intrare setand comutatorul PHONO/LINE din spatele
aparatului pe pozitia LINE.
Iesiri
Amplificator/Receptor
L (ALB)
Canal stanga
R (ROSU)
Canal dreapta
3. Conectati PC-ul via USB.
PC
Set the PHONO/LINE
switch to “LINE” .
Set the PHONO/LINE
switch to “PHONO” .
OPERATII
1. Porniti aparatul de la butonul Pornit/Oprit, indicatorul de viteza si stroboscopul se vor aprinde.
2. Puneti un disc. Cand merge la 45rpm cu o gaura mare in centru, puneti adaptorul de 45rpm in centru.
3. Setati viteza pentru a potrivi inregistrarea.
4. Indepartati protectia penitei si apoi dati drumul bratului de sunet.
5. Puneti parghia in pozitia sus.
6. Apasati butonul de Start/Stop; platanul se va roti.
7. Miscati bratul de sunet pe melodia dorita.
8. Puneti parghia in pozitia jos, bratul de sunet va cobori usor pe disc si va incepe sa cante.
9. Cand termina de cantat, ridicati bratul de sunet si puneti-l pe suport.
10. Apasati butonul de Start/Stop pentru a opri platanul si dupa opriti aparatul.
SUSPENDATI REDAREA
Setand nivelul la pozitia “UP” in timpul redarii, penita va fi ridicata de pe disc.
4
SCHIMBAREA VITEZEI
y Atata timp cat controlul de picth este in centru, placa opereaza la viteza selectata.
y Viteza poate fi marita sau micsorata cu cate 10% de la controlul de pitch.
y reglare incorecta facuta intentionat poate fi folosita pentru a roti foarte repede sau foarte incet platanul.
y Indicatorii stroboscopului sunt folositi pentru a monitoriza viteza.
INTRETINEREA
y Curatati penita periodic cu o periuta moale pentru a preveni acumularea de praf.
y Cand sunetul devine distorsionat, verificati penita. Daca penita este uzata, inlocuiti-o cu una noua.
y Periodic, protectia de praf si locul platanului trebuie curatate cu o carpa din panza.
y Materialele volatile nu trebuie folosite, cum ar fi: alcool, benzina,etc. Aceastea pot indeparta vopseaua
sau pot produce daune lustrului.
BUTOANELE DE CONTROL
20
21 22
23
19
18
1
17
16
2
15
3
14
4
13
5
6
7
8
9
10
11 12
Nota:
1. Adaptor 45 rpm: acest adaptor va permite sa
redati viniluri EP de 7'' cu gauri mari in mijloc.
Folosirea intensa a luminii fluorescente asupra
platanului
va
duce
la
stricarea
lampii
stroboscopului, si indicarea nu va mai fi corecta.
2. Platan: se conecteaza direct in axul central.
Platanul si axul central tin un vinil perfect
centrat. Platanul invarte totodata discul la o
viteza constanta.
4. Axul central: acest ax tine platanul stabil si
centrat.
3. Indicatorii stroboscopului: platanul are patru
randuri de indicatori. Acesti indicatori sunt
folositi pentru a vedea diferitele stagii ale
reglarii vitezei. Fiecare rand apare ca si stand
nemiscat la diferite viteze.
5. Lampa indicatorului stroboscopului: este o
lampa conceput special pentru a da un impuls
de lumina in indicatorii stroboscopului.
5
BUTOANELE DE CONTROL
16. aceasta clema pentru a tine in siguranta bratul
in pozitie in cazul nefolosirii sau a transportului.
6. Butonul de pornit/oprit: este un buton rotativ.
Pentru a porni rotiti in sensul acelor de ceas,
iar pentru a-l opri in sensul invers al acelor de
ceas.
17. Butonul de control anti patinare: anti patinarea
aplica o forta interioara bratului de sunet
pentru a preveni sarirea discului datorata fortei
centrifuge cauzate de rotatia platanului.
Valoarea anti patinarii trebuie sa fie egala cu
cea a presiunii contragreutatii penitei.
7. Butonul de Start/Stop: Acest buton controleaza
miscarea platanului. Cand este pornit platanul
nu incepe automat sa se invarta. Apasand
butonul inca odata motorul va incepe sa invarta
platanul, apasand din nou il va opri.
18. Inelul presiunii penitei: scala contragreutatii
trebuie sa fie indreptata spre DJ.
8. Capul de redare: este folosit pentru a conecta
penita la bratul de sunet.
19. Suport extra pentru penita: a fost conceput
pentru a sustine inca o penita.
9. Blocarea capului de redare: dupa atasarea
capului de redare la bratul de sunet, aceasta
blocare il prinde.
20. Contragreutate: Folositi contragreutatea pentru
a balansa bratul de sunet si pentru a ajusta
presiunea penitei.
10. Bratul de sunet in forma de S: bratul de sunet
este mecanismul care tine capul de redare si
penita care le permite sa gliseze pe disc.
21. Balama pentru protectia de praf.
22. USB: dupa conectarea platanului la calculator
prin USB, puteti inregistra discul pe hard disk
cu ajutorul programului Audacity software.
11. Buton de selectare a vitezei 33rpm: Implicarea
acestui buton roteste platanul la 33 de revolutii
pe minut. Un LED va lumina cand aceasta
functie va fi activata.
23. Selector PHONO/LINE: Comutatorul este folosit
pentru a schimba modul iesire PHONO sau
iesire LINE.
12. Buton de selectare a vitezei 45rpm: Implicarea
acestui buton roteste platanul la 45 de revolutii
pe minut. Un LED va lumina cand aceasta
functie va fi activata.
24. Iesirea RCA: Iesirea este capabila sa comute la
iesirea PHONO sau LINE.
De exemplu: Aceste jack-uri sunt folosite
pentru a trimite semnal de iesire de frecventa
joasa “phono” catre intrarea “phono” a unui
mixer. Platanele trebuie conectate pe intrarea
PHONO a unui mixer. Jack-ul RCA rosu
reprezinta intrarea canalului dreapta si cel alb
reprezinta intrarea canalului stanga.
13. Slider de control al vitezei: acest slider este
folosit pentru a ajusta viteza procentual.
14. Parghia bratului de sunet: aceasta parghie este
folosita pentru ridicarea in conditii de siguranta
a bratului de sunet asupra suprafetei discului
fara a pune in pericol suprafata discului.
15. Clema de repaus a bratului de sunet: folositi
6
PROGRAMUL AUDACITY
Audacity este un software gratuit, sub licenta GNU General Public License (GPL). Mai multe informatii ca
codul open source poate fi gasit pe CD-ul inclus sau pe web la adresa:
http://audacity.sourceforge.net/
Nota: Va rugam sa va asigurati ca ati instalat corect programul inainte de folosire.
Setarea PC-ului pentru a rula programul Audacity.
1. Conectati o sursa de intrare in unitate.
2. Conectati cablul USB in calculator.
3. Instalati softul de inregistrare Audacity.
4. Deschideti programul Audacity.
5. Selectati Preferences din tabul Edit.
6. Selectati tabul Audio I/O din stanga sus.
y
y
y
y
y
Sub meniul Playback, Device, selectati placa dumneavoastra de sunet.
Sub meniul Recording, Device, selectati USB Audio CODEC.
Sub meniul Recording,Channels, selectati 2 (Stereo).
Bifati casuta in care scrie Play other tracks while recording new one.
Bifati casuta in care scrie Software Playthrough.
7
PROGRAMUL AUDACITY
Inregistrarea albumelor cu programul Audacity.
1. Salvarea proiectelor.
y Audacity scrie toate schimbarile si inregistrarile audio intr-un director numit Projectname_data ,
care este localizat exact unde ati salvat proiectul in sine.
y Astfel, selectati Save project as din tabul File si alegeti locatia si numele fisierului care doriti sa il
dati proiectului.
y Va rugam sa remarcati ca atunci cand porniti Audacity prima oara, in meniu este valabil numai
optiunea Save Project As.
2. Cum inregistrati.
y Porniti aparatul sa cante melodia sau albumul care doriti sa il inregistrati.
y
Apasati pe butonul rosu pentru a incepe inregistrarea.
y Puneti bratul de sunet pe albumul sau melodia care doriti sa o inregistrati.
y
Apasati butonul albastru Pause pentru a pune pauza. Apasati din nou pentru a continua.
y
Apasati butonul galben Stop.
Puteti acum sa redati inregistrarile dumneavoastra si sa explorati capabilitatile de editare al programului
Audacity. Amintiti-va ca puteti folosi functia Undo aproape fara limite cand proiectul este deschis.
Nota: CD-urile nu pot fi scrise direct din aplicatia Audacity. Se vor folosi alte programe de scriere ale CDurilor.
8
SPECIFICATII
GENERAL
Model:
Dimensiuni:
Greutate:
Sursa de curent:
Putere consumata:
Conditii de testare:
TTA05USB
450(W) x 350(D) x 145(H)mm
4.4Kg
Voltaj dual : AC 115V~60Hz/230V~50Hz, Selectarea manuala
8W
Temperatura ambientala: 23 +/- 2 degC
Umiditate relativa: 65% +/- 5%
NOTA: Masuratorile pot fi facute intre 5 degC pana la 35 degC si 45% pana la 85% umiditate relativa.
SECTIUNEA PLATAN:
Tip
Motor
Metoda de rulare
Platan
Viteze
Wow si Flutter
S/N Ratio
Control Pitch
Timpul de start
Timpul de oprire
Timp pentru schimbarea
vitezei
Toleranta de viteza=0
Functia USB
2-viteze full manual
DC motor
Curea
332mm dia. Plastic
331/3 and 45rpm
Mai putin de 0.25% WRMS (JIS WTD) cu 331/3 rpm
Mai mult de 50dB (DIN-B)
+/- 10%
Mai putin de 1 sec la 331/3
Mai putin de 1 sec la 331/3
Mai putin de 1 sec de la 331/3 la 45 rpm
Mai putin de 1 sec de la 45 la 331/3 rpm
Intre +3%/-2%
USB
A/D, D/A
16BIT 44.1KHz or 48KHz USB SELECTABLE
Interfata calculator
USB 1.1 compliant, WINDOWS XP sau MAC OSX
Bratul de sunet:
Tip
Lungimea bratului
Eroare unghi
Applicable Cartridge Greutate
Anti patinare
Phono Output
Line Output
Frecventa
Separarea canalelor
Balans
Gama de presiune
High of cue(first track)
Descend of cue
Brat de sunet static in forma de S cu cap detasabil
220 mm
Mai mic de 3 grade
3.5~8.5g
0-4g
1.5~3.6 mV la 1KHz 5cm/sec (HP-4005)
90~216mV la 1KHz 5cm/sec (HP-4005)
20Hz-20KHz
Mai mult de 15dB
Maxim 2.5dB la 1 KHz
3~4g
8~10.5mm
1~3sec
EQ AMP
Iesire
RIAA
150mV +/-4dB (IN: 2.5 mV 1KHz)
20Hz~20KHz +1/-3dB (IN: 1.5 mV 1KHz)
ELIMINARE
Reciclarea echipamentelor electrice şi electronice uzate:
Acest simbol prezent pe produs sau pe ambalaj semnifică faptul că produsul respectiv nu
trebuie tratat ca un deşeu menajer obişnuit. Nu aruncaţi aparatul la gunoiul menajer la sfârşitul
duratei de funcţionare, ci duceţi-l la un centru de colectare autorizat pentru reciclare. În acest
fel veţi ajuta la protejarea mediului înconjurător şi veţi putea împiedica eventualele consecinţe
negative pe care le-ar avea asupra mediului şi sănătăţii umane.
Pentru a afla adresa celui mai apropiat centru de colectare:
— Contactaţi autorităţile locale;
— Accesaţi pagina de internet: www.mmediu.ro;
— Solicitaţi informaţii suplimentare de la magazinul de unde aţi achiziţionat produsul.
9
IMPORTANT SAFETY INSTRUCTIONS
14. Non-use Periods - The power cord of the
appliance should be unplugged from the outlet
when left unused for a long period of time.
15. Object and Liquid Entry-Care should be taken
so that objects do not fall and liquids are not
spilled into the enclosure through openings.
16. Damage Requiring Service-The appliance should
be serviced by qualified service personnel when:
A. The power-supply cord or the plug has been
damaged; or
B. Objects have fallen, or liquid has been spilled
into the appliance; or
C. The appliance has been exposed to rain; or
D. The appliance does not appear to operate
normally or exhibits a marked change in
performance; or
E. The appliance has been dropped, or the
enclosure damaged.
17. Servicing - The user should not attempt any
service to the appliance beyond that described in
the operating instructions. All other servicing
should be referred to qualified service personnel.
18. Ventilation – Slots and openings in the cabinet are
provided for ventilation and to ensure reliable
operation of the product and to protect it from
overheating, and these openings must not be
blocked or covered. The openings should never
be blocked by placing the product on a bed, sofa,
rug, or other similar surface. This product should
not be placed in a built-in installation such as a
bookcase or rack unless proper ventilation is the
manufacturer’s instructions have been adhered to.
19. Attachments – do not use attachments not
recommended by the product manufacturer as
they may cause hazards.
20. Accessories – Do not place this product on an
unstable cart, stand, tripod, bracket, or table. The
product may fall, causing serious injury to a child
or adult, and serious damage to the product. Use
only with a cart, stand, tripod, bracket, or table
recommended by the manufacturer, or sold with
the product. Any mounting of the product should
follow the manufacturer’s instructions, and should
use a mounting accessory recommended by the
manufacturer.
21. Lightning – For added protection for this product
during a lightning storm, or when it is left
unattended and unused for long periods of time,
unplug it from the wall outlet and disconnect the
antenna or cable system. This will prevent
damage to the product due to lightning and
power-line surges.
22. Replacement Parts – When replacement parts
are required, be sure the service technician has
used replacement parts specified by the
manufacturer or have the same characteristics as
the original part. Unauthorized substitutions may
result in fire, electric shock, or other hazards.
23. Safety Check – Upon completion of any service
or repairs to this product, ask the service
technician to perform safety checks to determine
that the product is in proper operating condition.
1. Read Instructions – All the safety and operating
instructions should be read before this product is
operated.
2. Retain Instructions - The safety and operating
instructions should be retained for future reference.
3. Heed Warnings - All warnings on the appliance
and in the operating instructions should be adhered
to.
4. Follow Instructions - All operating and use
instructions should be followed.
5. Water and Moisture - The appliance should not
be used near water - for example, near a bathtub,
washbowl, kitchen sink, laundry tub, in a wet
basement, or near a swimming pool, and the like.
6. Carts and Stands - The appliance should be used
only with a cart or stand that is recommended by the
manufacturer.
An appliance and cart combination
should be moved with care. Quick
stops, excessive force, and uneven
surfaces may cause the appliance
and cart combination to overturn.
7. Wall or Ceiling Mounting - The product should
not be mounted to a wall or ceiling.
8. Heat - The appliance should be situated away
from heat sources such as radiators, heat registers,
stoves, or other appliances (including amplifiers)
that produce heat.
9. Power Sources – This product should be operated
only from the type of power source indicated on
the rating label. If you are not sure of the type of
power supply to your home, consult your product
dealer or local power company. For products
intended to operate from battery power, or other
sources, refer the operating instructions.
10. Grounding or Polarization – This product may be
equipped with a polarized alternation-current line
plug (a plug having one blade wider than the
other). This plug will fit into the power outlet only
one way. This is a safety feature. If you are
unable to insert the plug fully into the outlet, try
reversing the plug. If the plug should still fail to fit,
contact your electrician to replace your obsolete
outlet. Do not defeat the safety purpose of the
polarized plug.
11. Power-Cord Protection - Power-supply cords
should be routed so that they are not likely to be
walked on or pinched by items placed upon or
against them, paying particular attention to the
cord in correspondence of plugs, convenience
receptacles, and the point where they exit from
the appliance.
12. Cleaning - The appliance should be cleaned only
as recommended by the manufacturer.
Clean by wiping with a cloth slightly damp with
water. Avoid getting water inside the appliance.
13. For AC line powered units - Before returning
repaired unit to user, use an ohm-meter to
measure from both AC plug blades to all exposed
metallic parts. The resistance should be more
than 100,000 ohms.
10
IMPORTANT SAFETY INSTRUCTIONS
DO NOT OPEN
RISK OF ELECTRIC SHOCK
CAUTION: To reduce the risk of electric shock, do not remove
any cover. No user-serviceable parts inside. Refer servicing to
qualified service personnel only.
The lightning flash with arrowhead symbol within the equilateral triangle is intended to alert the use
to the presence of un-insulated “dangerous voltage” within the product’s enclosure that may be of
sufficient magnitude to constitute a risk of electric shock.
The exclamation point within the equilateral triangle is intended to alert the user to the presence of
important operation and maintenance (servicing) instructions in the literature accompanying this
appliance.
CAUTION
To prevent electric shock, do not use this polarized plug with an extension cord, receptacle or other outlet
unless the blades can be fully inserted to prevent blade exposure.
*LINE VOLTAGE SELECTION
Just for dual voltage mode only!
Because power supplies vary from location to location we
have incorporated a selectable power supply.
y
y
y
The desired voltage may be set with the VOLTAGE
SELECTOR switch located under the platter. (use a
flat head screw driver).
Do not force the VOLTAGE SELECTOR switch as this
may cause damage.
If the VOLTAGE SELECTOR switch does not move
smoothly, please contact a qualified service technician.
BEFORE USE
* Check for the following parts included in the package with the main unit:
y Platter
y Cartridge
y RCA cable
y Disc
y Slipmat
y USB cable
y Counter weight
y Dust cover
y Headshell
y 45 rpm adaptor
y Instruction manual
* VERY IMPORTANT!!
Do not forget to attach rubber belt to motor for correct operation. After placing
the Turntable Platter onto the turntable through the Center Spindle, move
one of the large windows on the Platter to top right corner. Attach rubber
belt around motor. (Rubber belt is already attached to the underside of the
Turntable Platter.)
* Notes:
1) Do not connect the AC power plug before assembly has been completed.
2) Before turning the power on, make sure once again all the connections and power voltage settings are
correct. Always turn off the power when connecting or disconnecting.
3) Read this manual carefully before using the unit .Be sure to store the manual in a safe place for future
reference.
11
ASSEMBLY
1. Remove the main unit with the packing from the box and remove the packing.
2. Set the 45-rpm adaptor on the main unit.
3. Set the turntable platter onto the center spindle.
4. Set the slip mat on the platter.
5. Installation of cartridge:
When installing a cartridge, refer to the operating instructions of that cartridge.
During installation, attach the stylus protector to guard the stylus tip from damage.
(a) Connect the lead wires to the cartridge terminals. The terminals of most cartridges are color-coded.
Connect each lead wire to the terminal of the same color.
White (L+)…………………………… Left channel+
Blue
(L-) ..................... …………… Left channelRed
(R+) ......................………….. Right channel+
Green (R-) ................………………. Right channel(b) Install the cartridge to the headshell and tighten it with screws provided with the cartridge.
6. Insert the headshell into the front end of the tone arm, then turn the lock nut counterclockwise with the
headshell firmly held horizontally.
7. Slide counterweight onto tone arm. Twist it lightly and it will screw onto the rear shaft of the tone arm.
8. Adjustment of horizontal “zero” balance and stylus pressure:
(a) Remove the stylus protector from the headshell, do not touch the stylus tip during the adjustment.
(b) Set the cueing lever to the lowered position.
(c) Release the tone arm clamp and lift the tone arm from the arm rest to free it.
(d) Rotate the counterweight until the tone arm is approximately balanced horizontally (floats freely).
(e) Refasten the tone arm with the tone arm clamp.
(f) Hold the counterweight stationary with one hand and rotate only the stylus-pressure ring to bring the
number "0" of the ring into alignment with the center line on the tone arm rear shaft.
(g) Rotate the counterweight including the stylus-pressure ring counterclockwise until the scale shows the
value corresponding to the pressure of the stylus used. Should you use a separate Stylus, please
follow the manufacturer’s instructions.
9. Set the anti-skating control knob to the same value as the stylus pressure.
10. Install the dust cover to the main unit’s dust cover hinges.
PLACEMENT
• Do not place the unit in a location where it will be exposed to direct sunlight or near a heating appliance.
• Do not place the unit in a location where there is high humidity or a lot of dust.
• Cartridge may pick up slight sound pressures or vibrations of the speakers coming along the floor or through
the air resulting in feedback or “howling” sound. Find a location which is very stable and vibration free.
• The legs have functions for adjusting the height of the unit itself. Adjust the legs to stabilize the main body
horizontally.
12
CONNECTIONS
Before connecting the unit it is advised that you also consult your current equipment instruction manual.
IMPORTANT : Be sure to turn off the equipment before you make changes to the different connections.
1. Connect the power cord to an AC outlet.
2. Connect the RCA cable to the PHONO input of your AMPLIFIER when you set the PHONO/ LINE switch
to PHONO position. You can also use a line input by setting the PHONO/ LINE switch at the rear of the
turntable to LINE.
Output terminals
Amplifier (Receiver)
L (White)
L Channel
R (Red)
R Channel
3. Connect PC via USB cord.
PC
Set the PHONO/LINE
switch to “LINE” .
Set the PHONO/LINE
switch to “PHONO” .
OPERATIONS
1. Turn the On/Off Switch clockwise to turn on the power, the speed indicator and the strobe-illuminator,
which is located beneath the On/Off switch, will light up.
2. Place a record on the slip mat. When playing a 45-rpm record with a large center hole, place the 45-rpm
adapter on the center spindle.
3. Set the speed to match the record.
4. Remove the stylus protector from the Headshell Stylus and then release the Tone arm clamp.
5. Set the cueing lever to the up position.
6. Press the Start/Stop Button; the turntable platter will start to rotate.
7. Move the tone arm over the desired groove.
8. Set the cueing lever to the down position, the tone arm will descend slowly onto the record and begin
playing.
9. When play is finished, raise the cueing lever, move the tone arm onto the Tone arm clamp.
10. Press the Start/Stop Button to stop the platter from rotating. Turn the On/Off Switch counterclockwise to
turn off the power.
*SUSPEND PLAY
Set the cueing lever to “UP” position during play, the stylus tip of the cartridge will be lifted from the record.
13
CHANGING THE SPEED
y
As long as the pitch control is in center “detent” click position, the turntable is operated at selected speed.
y
The speed can be increased or decreased by 10% by the pitch control.
y
An incorrect adjustment done on purpose can also be used to have the turntable rotate extremely slow or
fast.
y
The strobe dots at the edge of the turntable are used for speed monitoring.
MAINTENANCE
y
Clean the stylus periodically with a soft brush to prevent the accumulation of dust.
y
When sound becomes distorted or noisy, check the stylus. If the stylus is worn out, replace it with a new one.
y
From time to time, the dust cover and turntable cabinet should be wiped down with a soft, dry cloth.
y
Volatile materials should not be used, such as: alcohol, thinner, benzine etc. They may remove the paint or
damage the luster.
CONTROLS OVERVIEW
20
21 22
23
19
18
1
17
16
2
15
3
14
4
13
5
6
7
8
9
10
11 12
2. Turntable Platter
This platter connects directly to the center spindle.
The platter and center spindle holds a vinyl record
perfectly center. The platter also spins the record
at a consistent speed.
1. 45-rpm Adaptor
This adapter allows you to play standard 7” EP vinyl
records with large center holes. Place the adapter
on the CENTER SPINDLE 7" records.
14
CONTROLS OVERVIEW
3. Strobe Indicators
The PLATTER has four rows of indicators. These
indicators are used to visually detail various stages
of pitch. The indicators are illuminated by the
STROBE INDICATOR PILOT LAMP. Each row
may appear to stand still at different pitch levels.
Note: The use of heavy fluorescent lighting directly
above the turntable will defeat the STROBE LAMP
PILOT LAMP affect indicator accuracy.
13. Pitch Control Slider
This slider is used to adjust the playback pitch
percentage (platter speed).
14. Tone Arm Lever
This lever is used to safely elevates the tone arm
above a record surface without endangering a
records surface.
15. Tone Arm Clamp and Rest
Use this rest to safely hold the tone arm in position
during non-use and transportation.
4. Center Spindle
This spindle holds the turntable PLATTER records
stable and centered.
5. Strobe Indicators Pilot Lamp
This is lamp specially designed to pulse a beam of
light at the STROBE INDICATORS on the turntable
PLATTER. This will give the illusion that indicators
are not spinning at certain speeds.
16. Anti-skate Knob
The anti-skate applies inward force to the tone
arm to prevent outward skipping across the record
due to the centrifugal force cause by platter rotation.
The anti-skate value should be equally to that of
the stylus counterweight pressure.
6. Power Switch
This is a rotary power switch. To turn main power
on turn the switch in a clockwise direction. To turn
main power off turn the switch in counterclockwise
direction.
17. Stylus-Pressure Ring
*The counterweight scale must face toward the
DJ.
18. Extra Stylus Holder
This cut out has been designed to safely store an
extra stylus headshell.
7. Start/Stop Button
This over sized push button controls platter motion.
When the unit is turned on the platter will not
automatically begin to spin. Pressing the button
once will engage the high torque motor and spin
the platter, pressing this again will stop the platter.
19. Counterweight
Use the counterweight to balance the tone arm and
to adjust the stylus pressure.
20. Hinge For Dust Cover
8. Headshell
The included HEADSHELL is used to connect your
stylus with the tone arm.
21. USB Socket (USB cable limit within 3m)
After connecting the Turntable to the computer via
USB, you can record your vinyl to hard disc using
the software.
9. Headshell Locking Nut
After attaching the headshell to the tone arm, this
locking nut will securely hold the headshell to the
tone arm.
22. Phono/Line Selector
This switch is used to change the mode of phono
output or line output.
10. S-Shaped Tone Arm
The tone arm is the mechanism that holds the HEADSHELL and stylus allowing it to glide across a record.
23. RCA output Jacks
The output is able to switch to PHONO output or
LINE output. For example: These jacks are used
to send a low voltage "phono" level output signal
to a mixers "phono" input jacks. Turntables should
be connected to “Phono” inputs on a mixer. The
red colored RCA jack represents the right channel
input and the white represents the left channel
input.
11. 33-RPM Speed Select Button
Engaging this button will rotate the platter at 33
revolutions per a minute (RPMs). A function LED
will glow when this function is activated.
12. 45- RPM Speed Select Button
Engaging this button will rotate the platter at 45
RPMs. A function LED will glow when this function
is activated.
15
AUDACITY SOFTWARE OVERVIEW
Audacity is free software, licensed under the GNU General Public License (GPL). More information as well as
open source code can be found on the CD included or on the web at http://audacity.sourceforge.net/
* Please ensure you have installed the software before starting.
Setting up your PC to work with Audacity
1. Connect an input source to the unit.
2. Connect the USB lead to your computer.
3. Install the Audacity recording software.
4. Open the Audacity program.
5. Select Preference from the Edit tab in the Audacity Menu.
6. Select Audio I/O tab at the top left.
y Under Playback, Device, select your internal sound card.
y Under Recording, Device, select USB Audio CODEC.
y Under Recording, Channels, select 2 (Stereo).
y Check the box marked Play other tracks while recording new one.
y Check the box marked Software Playthrough.
16
AUDACITY SOFTWARE OVERVIEW
Recording Albums with Audacity
1. Saving a project
y Audacity writes all the changed and recorded audio to a directory called Projectname_data, which is
located right where you saved the project file itself.
y Thus, select Save project as from your Audacity File tab and choose a location and filename for your
project.
y Please note that when you startup Audacity fresh, only the “Save As...” menu option is available.
2. How to record
y Set your USB turntable up to play the song or album you want to record.
y Click on the red Record button
to begin recording.
y Lower tone arm on USB turntable onto album and track you want to record.
y Click on the blue Pause button
to pause the recording. Press it again to continue.
y Click on the yellow Stop button.
That's it. You can now play around with your recording and explore the editing capabilities of Audacity.
Remember that you can use the Undo function almost without limits while the project is open.
NOTE: CD's cannot be burned directly from the Audacity application. Other CD burning applications should be
used.
17
SPECIFICATION
GENERAL
Model:
Dimensions:
Weight:
Power supply:
Power consumption:
Standard test condition:
TTA05USB Professional Belt Drive USB Turntable
450(W) x 350(D) x 145(H)mm
4.4Kg (Aluminum platter)
Dual Voltage: AC 115V~60Hz/230V~50Hz, User Selectable
8W
Ambient Temperature: 23 +/- 2 degC
Relative Humidity: 65% +/- 5%
NOTE: Measurements can be carried out between 5 degC to 35 degC and 45% to 85% relative humidity.
TURNTABLE SECTION:
Type
2-speed full manual
Motor
DC motor
Driving Method
Belt drive
Turntable Platter (Plastic)
332mm dia.
Speeds
331/3 and 45rpm
Wow and Flutter
Less than 0.25% WRMS (JIS WTD) with 331/3 rpm
S/N Ratio
More than 50dB (DIN-B)
Pitch Controls
+/- 10%
Starting Time
Less than 1 sec with 331/3
Braking Time
Less than 1 sec. with 331/3
Time for Speed Change
Less than 1 sec. from 331/3 to 45 rpm
Less than 1 sec. from 45 to 331/3 rpm
Speed tolerance at pitch=0
Within +3%/-2%
USB Function
USB rec. Function
A/D, D/A
16BIT 44.1KHz or 48KHz USB SELECTABLE
Computer interface USB 1.1 compliant, WINDOWS XP or MAC OSX
TONE ARM SECTION:
Type
Static balanced S-shaped tone arm with detachable headshell
Effective Arm Length
220 mm
Tracking Error Angle
Less than 3 degree
Applicable Cartridge Weight
3.5~8.5g
Anti-skating Range
0-4g
Phono Output Level
1.5~3.6 mV at 1KHz 5cm/sec (HP-4005)
Line Output Level
90~216mV at 1KHz 5cm/sec (HP-4005)
Frequency Response
20Hz-20KHz
Channel Separation
More than 15dB
Channel Balance
Within 2.5dB at 1KHz
Tracking Force adjustment Range 3~4g
High of cue(first track)
8~10.5mm
Descend of cue
1~3sec
EQ AMP
Output
150mV +/-4dB (IN: 2.5 mV 1KHz)
RIAA
20Hz~20KHz +1/-3dB (IN: 1.5 mV 1KHz)
DISPOSAL
Disposal of Used Electrical & Electronic Equipment
The meaning of the symbol on the product, its accessory or packaging indicates that this product shall not
be treated as household waste. Please, dispose of this equipment at your applicable collection point for
the recycling of electrical & electronic equipments waste. In the European Union and Other European
countries which there are separate collection systems for used electrical and electronic product. By
ensuring the correct disposal of this product, you will help prevent potentially hazardous to the
environment and to human health, which could otherwise be caused by unsuitable waste handling of this
product. The recycling of materials will help conserve natural resources. Please do not therefore dispose
of your old electrical and electronic equipment with your household waste. For more detailed information about recycling
of this product, please contact your local city office, your household waste disposal service or the shop where you
purchased the product.
18