1
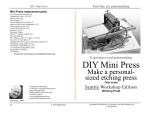
Mini Etching Press
USER
MANUAL
Assembled
Care and operation of an etching press for printing small plates
in intaglio, relief, vitreograph and monoprint/monotype printing
methods.
Mini Etching Press
USER
MANUAL
Assembled
Mini Etching Press - Model MEP6
Care and operation of an etching press for printing small-sized plates
in intaglio, relief, vitreograph and monoprint/monotype printing
methods, including type-high blocks. Shown above with removable
chase for 1/4” X 5 X 7 printing blocks.
Copyright 2014 Bill Ritchie
Ritchie’s Perfect Press
Division of Emeralda Works
500 Aloha #105
Seattle WA 98109
Press Bed
The rack-driven bed is a polycarbonate measuring 1/4” thick, 6” wide
and 14 1/2” long. To keep it like new it may be covered with thin adhesive
plastic. Fine scratches or abrasion will not affect printing.
Chase
The chase is a 1/4” PVC frame cut to hold a 5 X 7-inch printing plate
1/4” thick. Use it with linoleum mounted on 1/8” backing. It also can be used
for glass vitreography.
Bottom roller
The bottom roller (not visible in the picture) is 1 1/2” diameter and rolls
on sealed bearings that never need lubrication.
Felt Blankets included (but are not shown here)
Two felt blankets come with the Mini Etching Press. One is the 1/8”
thick woven pusher blanket and lays over the the thinner, 1/16” thick sizing
catcher. The purpose of the pusher is to reach ink in texture and lines of images. The thin sizing catcher blanket absorbs moisture and, in some papers,
sizing that is be squeezed from the damp paper under pressure.
Hood
The hood is a fitted wood covering crossing the top of the press. It conceals the synchonizing chain plus it is a convenient place to fold the blankets
back, out of the way when placing the plate and papers on the bed.
Pressure screws
Two pressure screws press the top roller down for printing, and raise the
roller to loosen them. Turn the pressure screw handles clockwise to increase
pressure. A synchronizing chain connects the two pressure screws, but use
both hands turning them tightly.
Rack-driven bed
There is a spur gear driving a rack on the underside of the bed that connect to the eight-inch driving wheel, producing the effect of a 3:1 mechanical
advantage for easier of printing.
2
Side plates (active, passive)
The side plates are made of hardwood and attach to the press with six
barrel nuts, holding the press high enough for operating the wheel.
Tie rods
Tie rods connect the two side plates and they also support the press bed
on 8 roller bearings on four long threaded screws (not visible in the photo)
conncecting the steel side plates forming a rigid casing around the rollers and
setting the precise tension on the synchronizing chain..
Rollers (Top and Bottom)
Rollers top and bottom are 1 1/2” steel on roller bearings. Synchronized
pressure screws raise and lower the top roller. The synchronizing chain keeps
the roller level, assuring uniform printing pressure across the width of the
plate.
Wheel and Wheel hub set screw
The 8” stainless steel wheel drives the gear that meshes with the bed’s
spur gear and engages the bed rack. The wheel hub has a 1/4” set screw in it
that is seated in a flat spot in the shaft. This set screw must be kept tight or
the wheel can slip. A 1/8-inch Allen wrench (hex key) is included. Never use
a worn out hex key.
Allen wrenches
New Allen wrenches (hex keys) are included are for the set screw on
the driving wheel hub (1/8”) and also for the two (5/64”) on the spur gear
and collar retainer on the shaft under the press bed. Never use a worn allen
wrench because it can render the set screws un-removeable.
Allen wrenches that are worn, with their corners rounded, must be discarded. Never
use them if you see the edges are rounded over. They slip inside the socket and then
socket’s inside will be rounded, too. Then the setscrew has to be removed with special
tools and this is costly. If in doubt, replace the allen wrench with a new one available
at all hardware stores. Be sure you buy inch, not metric Allen wrenches.
3
More notes about Allen Wrenches (hex keys)
and set screws for the Mini Etching Press
These notes are for the owner’s benefit to insure against the four important set screws loosening and allowing the driving wheel or spur gear to
slip. One is on the driving wheel and three set screws are on the driving shaft
under the press bed - two on the important spur gear and one in the collar.
They were tightened in manufacture and tested. These notes will help users
and for troubleshooting.
Allen wrenches, or hex keys, are for set screws
For the Mini Etching Press there is a simple checkup procedure you
can follow to keep set screws and socket screws tight, insuring that the spur
gears, collar and driving wheel never slip on the driving shafts.
The arrow points to a flat spot on the driving shaft, put there to give a better hold
for the 1/4-inch Allen set screw. If it is necessary to remove the wheel, be certain
when replacing the wheel that the set screw is aligned on this flat spot.
The illustration shows the larger hex
key in the set screw on the driving
wheel. The set screw is aligned with a
flat place on the shaft.
Mini Etching Press 1/8” hex key - larger one
The driving wheel set screw on the hub of the driving wheel is easy to see,
shown in the illustration with the 1/8” hex key in place. You always turn the
set screw clockwise to check tightness.
4
The left illustration shows the 5/64 hex key fitted in one of the two set screws in the
spur gear to check that the set screw has not worked loose during long usage of the
press. Check both set screws on the spur gear to be sure they are tight. The illustration on the right shows the 5/64” hex key set in the collar on the end of the shaft. It is
less likely to work loose, but it should be checked also.
Mini Etching Press 5/64” the smaller hex key
The bed must be move all the way back, or removed, to get access to
these set screws. New Allen wrenches are included to check the set screws
periodically to be sure that they have not worked loose after long use of the
press.
Two set screws on the spur gear insure there will be no slippage of the
driving shaft. The tightness of the set screws on the spur gear is very important. It is good to check them at intervals according to how long the press has
been in service.
The illustration shows one set screw in its place on the spur gear; note
that there are two set screws set in this gear. Use the smaller, 5/64” hex key
to check and tighten them. Turn clockwise to tighten. Make sure they do not
work loose.
The other end of the shaft is a collar which is held in place with one set
screw. Use the 5/64” hex key on the collar also,
Never use worn-down hex keys
Allen wrenches that are worn, with their corners rounded, must be
discarded. Never use them if you see the edges are rounded over. They slip
inside the socket and then socket’s inside will be rounded, too. Then the
setscrew has to be removed with special tools and this is costly. If in doubt,
replace the allen wrench with a new one available at all hardware stores.
5
Care of your press
Pressure settings
With practice you learn how much pressure is needed to print your
plates. The press is designed to produce prints from plates in thickness from
.028” to 1”. Thick plates present challenges.
You must never tighten the pressure screws so much that the resistence
of the wheel is so strong that it can damage the shaft or related parts. If you
think your wheel or gears are slipping or if you have any sort of difficulties,
or you have suggestions for better practices, then contact me via email or
phone, [email protected].
Sometimes when the bed moves but the blankets and plate do not, the
problem is usually too much pressure on a thick plate, and not the driving
mechanism slipping. Another cause is too little or no bevel on the plate edge.
Your plates may need more beveling, or the plate is too thick.
I put a damp piece of newsprint under the printing plate. This is a good
ideas especially if you removed the temporary plastic cover from the bed and
are using the bare, polished surface of the polycarbonate press bed. The danp
paper puts the brake on plates that want to skid.
Cleaning
The press bed may need cleaning after printing a plate if the plate had
ink or dirt on its underside when it went on the bed. The bed may become
scratched over time with repeated printing and cleaning, but this does not
affect its performance. If you want to maintain a “like new” bed, put paper,
plastic or thin metal on the bed to protect it when you print.
If you use an adhesive plastic to cover the bed, or it was covered with
an adhesive plastic when you got it and a plate wrinkles the plastic, there is
no harm except if you leave it like that an put a plate on top. It will crease the
plate--not good. Remove the plastic. Any adhesive that remains will probably
come off with odorless mineral spirits; do not use strong solvents that might
dissolve the polycarbonate bed.
Lubrication
The four bearings on each of the rollers are sealed. The bed moves on
the 8 sealed little bearings on the threaded rods. No lubrication is necessary.
The pressure screws may need a drop of oil on their threads, but rarely. The
chain should never need oil.
Wood care
The wood parts of the press’ sides are crafted in various hardwoods that
were oiled and need no care. They were oiled with teak or tung oil, and you
may apply again or use furniture polish.
Limit your leverage to reason
The Mini Etching Press is strong enough for printing normal plates.
People have been known to go to extremes, however, including putting too
much pressure on the driving wheel. Do not use so much force that you have
to use extra leverage. If you do, you may break the press or warp the wheel if
you do. Never use an extra lever, such as a bar, to force the wheel.
If you meet with strong resistance when printing or the wheel won’t
turn, or it turns but the bed does not move and it can be because the pressure
screws are too tight for your plate and paper. When the printing plate is too
thick and not well-beveled, the set screw in the hub of the driving wheel can
slip. Try using less pressure.
6
Printing with the Mini Etching Press
The Mini Etching Press is capable of printing all four printing processes,
alone or in combination, plus monoprints and monotypes, too. These presses
were designed to serve mainly as an etching press for intaglio printmaking,
and the designer made many YouTube videos to demonstrate intaglio printing
online.
Intaglio: The plate
Intaglio printing plates
are often metal, plastic, wood,
linoleum, glass, paper or a
collage of different materials (collagraph). If you have
no experience in making a
plate for printing intaglio,
look on YouTube or a book or
video about intaglio printing.
The preferred thin plate for
traditional etching is 22-gauge
copper, etched with ferric
chloride.
It is customary to ink with intaglio ink and then wipe the excess off with
paper or a non-absorbent fabric such as tarlatan, then finish with clean paper
and the heel of the hand. YouTube videos online show you how, but these
illustrations are of the steps for printing intaglio.
Felt blankets
Your press comes with
two felts. One is 1/8” thick and
has a visible woven fibre in it;
it’s called the pusher felt. The
second, which goes next to the
printing paper, is 1/16”, softer,
and is called the sizing catcher.
The felt blankets are cut to fit the
Mini Etching Press, which has a
6” wide bed.
It helps if the two felts are
stair-stepped to begin. Slip them
under the roller and tighten the
pressure screws down with two
hands. The screws are synchronized, but use your two hands as
the pressure increases. The chain
is strong steel, but you should
not stress this chain by using
only one hand one one pressure
screw.
Two felt blankets are used when printing intaglio and sometimes other printing processes.
They are almost 100% wool, so if they are
washed they must be washed in cold water.
Adjusting the pressure screws
Turn the pressure screws clock-wise to tighten.
The illustration shows the felt blankets are
under the roller when you set the pressure, and
use two hands so the chain is not stressed.
7
Adjust pressure using both
hands. Count the turns - or halfturns - so with practice you can
learn what is the best pressure
for you plate, ink, and paper.
There is no mathematical rule
to follow. The correct pressure
must be learned by experience.
See YouTube videos by Bill
Ritchie to understand this. When
on the YouTube website, input
HALFWOODPRESS and also
OMEMERALDA for examples.
The resistance during printing gives you an idea how tight to make the
pressure. You will get a feel for this with practice, and it depends on how
thick are your printing plate and paper. The thicker the plate and the paper,
the more space you need between the roller and the bed.
Pressure will also be affected by the width your printing plate. The test
plate in the illustration was made 5 inches on one dimension to make use of
all but 1/2 inch of the 6-inch Mini Etching Press bed. Compare this to a plate
two inches wide - it will feel like less pressure.
Felt Blankets and
also the paper
Put a piece of damp newsprint under the plate
first, the put the plate on this damp paper so it
will not slide.
The felt blankets and
pressure are ready, and in the
photo the paper edge is under
the roller, too, and then folded
back. to make room for the
plate.
Put a piece of damp newsprint under the printing plate.
This helps two ways: it keeps
the bed clean as there may be
ink on the back of the plate.
Also, the plate will not slip if it
is on thin, damp paper.
Good practices printing
With one end of the felts
under the roller and the pressure
screws tightened down, fold the
felts back over the hood to give
you room to place the plate and
paper.Then put the felts over the
paper and slowly turn the wheel.
You will feel resistance when the
plate reaches the roller. If it stops
and you can’t turn the wheel,
then the pressure is too great; or,
the plate has not been beveled
enough to let the roller up over
the the edge.
As you continue turning,
Examine it for tone, clean, full lines that show
you should not stop or it might
uniform, adequate pressure.
make a line. When the roller
comes to the end of the plate you’ll feel the resistance give away. When you
feel the roller drop off the end of the paper’s edge, you can gently and slowly
pull the print off the plate. This is called, “pull the proof.” For another print,
you will re-ink and wipe the plate for every print.
There is another practice to know: instead of pulling the proof after one
time through, you may run it through two times; in other words, reverse the
direction. You may even get a better print by running it through twice. Long
plates, however, such as 10 inches, will blur because damp printing paper
stretches, so it shifts if printed it twice.
Multiple plates
Multiple plate prints require registration. For example, you may have
two plates, one for each of two colors. You need a book or video to explain
and demonstrate registration - space does not allow it in this manual.
Between colors or at the end of your printing session you should clean
your plate using nontoxic solvents such as cooking oil and soy-based cleaning
products. Check the press bed for ink or dirt that might have transferred from
the backs of your plates if you did not use damp paper.
Loosen the pressure screws and remove the felts so the sizing catcher
8
can dry. Never leave the felts under the roller for a long time. If you leave
the felts under the roller and in the center, for example, the pressure will
impress a place in the blankets and interfere with even printing pressure later
on. Also, moisture in the felts will make a rusty line on the roller.
The space in this manual does not allow for other printing methods—
stencil, relief, planographic, monotypes and mono prints. There is, however
a section following on uses of the chase.
Uses of the chase
The chase that is included with the press is a plastic (PVC) 1/4” frame
with a 5” X 7” cut-out that makes it easier to print relief or surface printing
techniques.With the chase on the bed, you can print a relief block up to 5 X
7 inches for plates 1/4” thick or under.
The illustration shows a
5 X 7 X 1/4” woodcut block
set in the chase, and a relief
print being pulled. In this
illustration, one felt blanket
was in use, too. To have a flat
print (no embossing) then
the felt blanket is not used,
but instead a thin matboard
covering.
Unmounted linoleum is
available in pieces or by the
roll. It measures about 1/8thinch thick. By glueing it with
Qurter-inch plywood, or laminated wood, fits
contact cement to a 1/8” back
in the chase. SafeTKut and acrylic plates plus
- such as 1/8-inch plywood
numrous other block making materials exist,
- you have a 1/4” mounted
including collagraphs, can be used in the cahse
linoleum block that fits in the
if they are 1/4” thick.
5 X 7-inch chase.
Planographic
printing
When the printing surface is flat and the image is
made by drawing or transfer
methods, the printing process
is called planographic because
unlike intaglio, relief and
stencil printing, everything is
on one plane.
Stone lithography was the
first process invented. Metal
plates took the place of stone.
Vitreography uses either quarter-inch ground
Then the water that was part
plate glass or frosted Mylar and is waterless.
of the printing process was
eliminated and called “waterSimilar planographic techniques use polyester
less lithography.”
plates which can use a computer printer for typography and photo images, but the plate must
In waterless lithography,
be dampened all the time you print.
silicon replaced the water because, when dry, silicon resists
oil and varnish-based inks. Ground-glass, (hand ground by graining plate
glass) and Mylar are used in waterless lithography printing and, on groundglass, it is called vitreography.
Polyester plates are similar to Mylar but they require a water-base
moisture layer like old-time lithography. Popular brand names sold by art
materials stores are Pronto and Smart plates. These plates work in laser
printers, so they are popular for photos and typography because software
allows you reverse these for direct printing.
9
Stencil, or Pochoir
Pochoir (stencil)
methods plus monotypes
(and monoprints) work on
this rack-driven bed press.
Monotype can be done on a
5 X 7 X 1/4 inch material of
any kind. Plastics are popular
for this. The method is really
a transfer painting technique
but many people think it is a
printmaking method.
Monoprints, unlike
monotypes, are true prints but
there may be only one; that’s
This is an example of pochoir, where a stencil
why they are called monowith a triangle-shape was cut in a window, and
prints. the person making the
place over a roller pattern from a brayer on
monoprint chooses to use a
true printing plate, but enjoys
another plate. The color only prints through
the creativity of changing
the window.
colors and printing methods from one impression to
another. Thus, you may make many monoprints from one true printing plate,
but they may not be identical as they would be if they were for an edition of
multiples.
Type-high relief blocks
Thicker blocks up to .918-inch
(type-high) require a thicker chase
or type-high rails place alongside; a
type-high block the same size as the
bed is shown in an illustration. This
block is mounted linoleum.
Wood engraving blocks for
professionals are type-high.
If a small wood engraving
block or linocut is your printType-high means that the printing block
ing plate, then you need to put it
is the same as moveable type from
between two long narrow type-high
traditional letterpress printing. Mounted
pieces like railing on each side
linoleum is sold by companies such as
of the small block. These can be
Speedball. The illustration shows a block
wood which you have built up to be
the same height as your type-high
the same size as the press bed.
block.
The purpose of the chase is to put pressure on the sides so you don’t
have to guess what pressure to use when you begin. Wthout the railings or a
chase, the bed will move along but when the block comes under the roller, it
may stop, or tip the block, or not have the right pressure.
Most models of the Mini Etching Press can take the type-high block
with the exception of the first six Mini Etching Presses that were released
in 2013 before the modification was made so the press could take type-high
blocks.
10
Resources
Search for HALFWOODPRESS and
OMEMERALDA on YouTube search bar
For videos, go to YouTube on the Internet and enter the one-word terms
HALFWOODPRESS or OMEMERALDA in the search box. Short videos on
printmaking are there for you to see and, if you wish, ask questions too.
Replacements and options
It’s inevitable that user’s will have questions about replacing things that
came with the press, such as blankets or test plates. Send e-mail if you wish
to order one of if you have any other needs or suggestions.
Books
Halfwood Press: The Story is my account of the early days of my pressmaking venture. This is included with purchase of the press, and additional
copies are available at amazon.com.
Another publisher, Crown Point Press, published several volumes of
books with DVDSs which include extensive and detailed explanations of
printmaking techniques used in this San Francisco printing house. The DVDs
show the processes live.
Skype
My skype name is bill.h.ritchie, and in my gallery I have a computer and cam, so it is possible to have conversations. If you want to try this,
let me know the day and time so I can make my schedule accommodate this
kind of contact.
Web sites
Web sites are:
www.printmakingworld.com
www.ritchie-art.com
11
Specifications of the
Mini Etching Press
Overall dimensions:
Overall press length: 15 in.
Overall press width: 10 in.
Overall press height: 11 in..
Bed length: 14.5 in
Bed thickness: 1/4” Polycarbonate
Bed width: 6 in.
Effective Printing Width: 5 inches or up to 6 inches
Rollers Diameter: 1 1/2 in.
Clearance from Bed: 1 1/8 in.
Wheel Diameter: 8”
Mechanical advantage, approx. ratio: 3:1
Bed Support Bearings: 8
Weight (lbs): 10 lbs. approximately
Felt Blankets
Sizing catcher 5 3/4” X 12”. X 1/16” thick
Pusher blanket, 5 3/4” X 12”. X 1/8” thick woven
Allen (Hex) Wrenches: 1/8” and 5/64” with instructions
User manual
These specifications are subject to change without notice.
Note: This manual is based on similar user manuals for the
Halfwood Press Line of etching presses. The online version is in
color and may not perfectly match the content on these pages.
Examples in the photos were made of different presses and at
different times and therefore they may vary in appearance from
the owner’s press.
12
2
er Plane
Safe 202
Earth
gs
arnin
ts’ W
ientis
’s Sc
arth
ed E
ts he
Artis
t
Flow
An EarthSafe 2022 Project by Bill Ritchie
Mini Etching Press
Model MEP6
Assembled
User’s Manual
Copyright 2014 Bill Ritchie
All Rights Reserved
Perfect Press Division of
Emeralda Works - Seattle
Made in USA
13