1
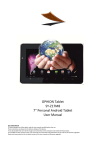
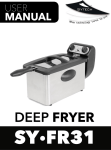
Use of the Manual To ensure proper use of the tablet, read this user manual carefully before first use. These instructions are based on the factory settings of the device. It may be possible that some of the images and screenshots in this manual do not match the final product. It is possible that the contents in this user manual do not match the final performance of the unit due to firmware upgrades. Please visit www.sytech.es for the latest version of the user manual and firmware upgrades. 1 WELCOME Sytech thanks you for buying the URANUS SY‐Z97BM8 9.7” multi touch screen display tablet which has been specially designed to fulfil your needs and allow you to experience the new portable entertainment generation with just a few touches! Thanks to the Android operating system you can gain access to the internet, check your e‐mail or even watch or listen to multimedia content anywhere at anytime. Furthermore, download and enjoy one of the thousands of applications and games available to get the most out of your URANUS SY‐Z97BM8.C CARE AND MAINTENANCE ARE AND MAINTENANCE - Do not expose your tablet to direct sunlight, humidity, high temperatures, dirt or anything that can cause its malfunction. - Do not use abrasive liquids or cleaners to clean the unit. - Always maintain the device free from dust using a soft and dry cloth. - When the battery level is low, please charge the unit avoiding it to discharge completely. - Do not service the unit by yourself, please contact Sytech Service Centre for any assistance. NOTE: Sytech recommends the use of a screen protector in order to maintain the tablet in perfect conditions. MAIN FEATURES - Portable Internet Tablet designed for Android 4.1 - Multi‐touch 5 point capacitive screen - 9.7” 16:9 TFT‐LCD (1024x768 pixels) - Amlogic 8725 MX, Arm Cortex A9, 1.5Ghz ‐ Dual Core / GPU: Mali 400x2 - 1GBB DDR3 RAM - Integrated Wi‐Fi ‐ Supports Wi‐Fi USB 3G modem ‐ Integrated Bluetooth ‐ Version 4.0 - Front and Rear camera ‐ 2MegaPixels - Integrated Omni‐directional microphone - Integrated speaker - Motion Sensor (accelerometer) - USB‐OTG – easy access to the memory of the tablet through the computer (cable included) - 8GB built in memory ‐ HDMI output version 1.4 – 2160P HD - Memory expandable via Micro SD‐HC/XC cards (up to 32GB) - 3.5mm earphone jack connector - Charger: 5V, 2A - 5900 mAh: up to 580 hours in standby mode and 6 hours in video/audio mode - Weight: ~673g - Dimensions: 187.5x242.5x9.8mm - Allows to install thousands of Applications and games available for Android operating system. - Applications installed: o Aldiko (books) o Recording o Files o Music o Google Search o Web Browser o Google Maps o YouTube o Google Latitude o Twitter o Calculator o Skype o Calendar o Slide me o Camera o Task Killer o Contacts o Gmail o Clock o Flash Player o Email o Documents to go o Gallery 2 NOTE: Some applications may not work on the URANUS tablet as they are specially created for Mobile phones PACKAGE CONTENTS ONTENTS OF PACKAGE URANUS SY‐Z97BM8 Tablet 4GB User Manual USB OTG 2.0 High speed Cable for PC connection AC/DC power adaptor – 100‐240V AC 50‐60Hz Leather pouch In Ear Earphones PARTS OF THE URANUS TABLET 1. Power button 4. Micro USB Plug 7. HDMI plug 2. Earphones jack 5. MicroSD slot 8. Home button 3. Microphone 6. Reset button 9. Front camera BASIC OPERATIONS Power on Press and hold the " " button to turn on the unit. Power off Press and hold the " " button. A pop‐up dialogue box appears on the screen with various options, select “Power off” for to shut down the unit. Sleep Shortly press the power button and the device will switch to hibernation mode. In this mode, only the screen will turn off however the unit is still working. Shortly press the power button once again to return back to the normal working mode. Use this feature mainly when you are not using the unit regularly and to save battery life. Power reset If for any unknown reason the unit begins to act in a different way, you can reset the unit by pressing the “reset” key. 3 Screen time out If you do not press any button or touch the screen during a certain amount of time, the screen will automatically turn off and enter into sleep mode. In order to resume normal use of the device, shortly press the " " button and the screen will turn back on. Note: If you want to deactivate the automatic turn off mode, enter into the [SLEEP] settings under the [display] functions and change it to “Never” Using the Micro SD card When you connect the device with the computer, two disks will appear. The first disk is the internal memory of the unit and the other is the Micro SD disk. If no card is inserted, the second disk cannot be opened. This unit supports Micro SD cards from 128MB up to 32GB. Inserting and Removing the Micro SD card Inserting: Insert the Micro SD card face up (side with words), and slightly force the card into the socket of the card. Once it has been correctly inserted, you can play the content from the Micro SD card. Removing: Slightly push towards inside the Micro SD card and it will pop out. You may now remove the Micro SD card safely. Caution: Please perform inserting and removing operation when the power of the unit is off! Otherwise, it will lead to the loss or damage to the files within the unit! If no card is inserted, the computer will be unable to perform read and write operations. Return to main interface When using the device, or while inside any menu screen, touch the " screen at any time. Return to previous interface or menu When using the device or while inside any menu screen press the " press the " " key very shortly to return to the previous menu. " icon on the touch screen to go back to the home " icon to go back to the previous menu. You can also BATTERY AND POWER MANAGEMENT The URANUS SY‐Z97BM8 tablet comes with an integrated rechargeable lithium ion battery. Before the first use of the unit, you may notice that the battery is relatively charged, however please perform a complete charge of the unit before using for the first time. In order to recharge the battery use the AC / DC 5V adaptor included. The usual time for a complete charge is around 3 – 4 hours approximately, this depends whether the unit is being charged while using or while it is turned off. There are certain settings which can be manipulated to prolong the battery life of the unit. NOTE: Sytech recommends turning off the unit always before charging in order to improve and extend the battery lifetime. GESTURES KEY Press Flick Press and Hold 4 MAIN SCREEN 1. 2. 3. 4. 5. 6. Search Applications/Widgets menu Return Home Current open tabs Print screen 7. 8. 9. 10. 11. 12. Volume down Volume up Settings/Menu Applications/Widgets on desktop Time Battery level Changing the wallpaper Press and hold anywhere on the desktop screen and a pop up message will appear asking you to choose the wallpaper. Choose the desired wallpaper and confirm to establish it as the background of the desktop. Applications and Widgets on desktop Flick the screen right or left to see which applications and widgets have been installed and placed on the desktop. For all the applications and widgets which are on the device, please access the applications and widgets menu (2). Tabs Press the button (5) to see which programs or tasks are currently running on the device. You may switch from one program to another through this option or you may choose to close the program as well. 5 GENERAL SETTINGS Set your URANUS tablets parameters to fit your needs. Enter into the settings menu and a list of options will appear. Wireless & Networks Wi‐Fi Bluetooth Data Usage More Device HDMI Sound Display Storage Battery Apps Personal Location Services Security Language & Input Backup & Reset Accounts Add Account System Date & Time Accessibility Developer Options About Tablet Turn the Wi‐Fi on or off Enable this function to connect to devices via Bluetooth Press this option to see the data usage of your URANUS tablet Press this option to see more options under the Wireless and Networks settings. Connect your tablet to a TV using this option Configure the volume levels and sound options Configure the different display settings (brightness, auto rotation, font size etc…) Check the amount of space which is available on your URANUS tablet. Check to see which application is using the most battery and check the current battery level Check to see which applications have been downloaded, where they are stored, and which ones are currently running. Manage your location settings. Manage your security information through this option. (Passwords, user information etc…) Set the device language and keyboard language through this option. Backup the data on your URANUS tablet or perform a reset of the unit. Manage your accounts through this section. You may add a new account if you do not have one already. Set the date and the time, manage the time zones, and select the formats for the time and date to be displayed. Manage the system settings through this option. Configure different options for the device when connected to a PC; configure User Interface, and configure Apps settings. Verify all the settings and hardware information of your URANUS tablet through this option. 6 WIDGETS Widgets are applications, which allow easy access to some applications. In fact, it is more than a shortcut to an application as when you place them on your home screen like icons, they can show you the time, current weather or even your e‐mail inbox without launching the application. To add widgets onto the desktop follow the steps below: 1. Press the Applications and Widgets button as shown below (1) 2. Press on the “Widgets” tab (1) which is situated on the top of the screen 3. Flick (2) through the widgets installed 4. Press and hold on the desired widget. (3) 5. After a few seconds the desktop screen will appear (Continue pressing the icon at this point) 6. Drop and place the icon in the desired position on the desktop. The icon will now appear on your desktop as shown below. Once the widget is on the desktop, you can move it around or delete it. To do this you must press and hold on the widget until it is highlighted. You may then move it around, or delete it by dragging it to the “X” icon which appears on screen. 7 SETTING UP THE WIFI NETWORK 1. Tap on the Settings icon on the main screen (1) 2. Under the “wireless and networks” section, flick the Wi‐Fi switch to “ON” (1) 8 3. Select the desired Wi‐Fi network from the list of available networks (1) and enter the password, if required Once the authentication process has been completed; the device will save the data so that the next time you turn on the device it will automatically establish connection with the network (when in range) without having to repeat the authentication process. Your URANUS SY‐Z97BM8 tablet is now ready to surf the internet! NOTE: The URANUS SY-Z97BM8 is compatible with the following security and encryption standards: WEP, WPA, WPA2, TKIP and AES. SETTING UP THE BLUETOOTH FUNCTION The URANUS SY‐Z97BM8 comes with Bluetooth function integrated. With this function you may pair any device which supports Bluetooth with the URANUS tablet. Once the pairing is complete, you may transfer music, videos, files etc. In order to pair a device with the tablet, please follow the instructions below. 1. Tap on the Settings icon on the main screen (1) 9 2. Under the “wireless and networks” section, flick the Bluetooth switch to “ON” (1) 3. Select the desired Bluetooth device from the list of available devices (1). Press “Pair” (2) to establish the connection. Some devices may require you to enter a password, please enter the password which is shown when requesting to pair the URANUS tablet to the device. Once the pairing process has been completed; the device will save the data so that the next time you turn on the device it will automatically establish connection with the device (when in range) without having to repeat the pairing process. Your URANUS SY‐Z97BM8 tablet is now ready to send and receive data through Bluetooth! NOTE: The URANUS SY-Z97BM8 can share and receive files with devices that support the A2DP function. Devices which do not support this feature will be unable to connect with the URANUS. 10 INTERNET BROWSER Your device comes with a powerful Web Browser which has already been pre‐installed. The browser will allow you to surf the internet quickly and easily. When the device is connected to a Wi‐Fi network, tap on the browser application icon (1) from the desktop or from the applications menu to begin using the internet. The default homepage will be displayed on screen; however, it is possible to modify the homepage and other parameters through the settings. Homepage 11 Browsing Tap on the address bar once (1). The current address will be highlighted and the keypad screen will appear. Type the desired webpage address and press enter (2). Tabs Press the tabs button (1) in order to view all the pages that are currently opened. You may shift from one website to another by simply pressing on any of the opened Web pages. 12 Menu Options Press the Menu Button (1) on the top right corner of the screen to access the different options as shown below. Refresh/Stop Press this button to reload the page or Stop the page from loading (option shows depending on which status the page is in) Forward Press this button to move a page forward in your browser New Tab Press this button to open a new tab New Incognito Tab Press this button to open a new tab which will not be saved in the browser history, search history and will not create any cookies. Share Page Share the page you are browsing with someone through social media or e‐mail. Find on Page Find a particular word or section within a page. Request Desktop Size Fit the page to the screen size. Save for Offline Reading Press this button in order to save the page and have later access to it even though there is no internet connection. Page Info Shows the information of the webpage that is being viewed Settings Press this button to change browser settings. 13 EMAIL SETUP The URANUS SY‐Z97BM8 is also made to send and receive e‐mails. In order to set up your e‐mail on the device, follow the steps as shown below. 1) Click on the “E‐Mail” application (1) 2) Insert your email address and the password. Once the setup process has been completed, you will begin to receive your e‐mails on your URANUS tablet. If you have a POP3, IMAP or Exchange e‐mail account, enter the email address and password and then press the “Manual Setup” button. Follow the steps which appear on screen to proceed with the e‐mail setup process. 14 Mail Box Features 1. Number of e‐mails received 2. Compose new e‐mail 3. Search 4. Refresh / Check for new e‐mails 5. E‐mail settings 6. Email address which is linked to tablet 7. Received mail (New) 8. Email Folders 9. Received mail (Read) 15 VIDEO PLAYER In the main menu, click on "Gallery" to access the video folder. Select the video which you desire and press PLAY to commence playback. You will be able to rewind, fast forward and increase/decrease the volume. Below is a preview of what you will see before starting a video. Function of keys " ": Press it to come back to the main interface " ": Press it to return to the upper interface “ / ”: Press this to increase or decrease the volume : Press this button to share the video through email or social media. Tips: 1. This player supports maximum 1080p resolution video files. 2. Subtitle display: This player supports "*.SRT" subtitle files (The user can download it from the appropriate websites). When there is any subtitle file with the same name in the video playing folder, the player will be automatically playback the corresponding subtitle file with the video. A synchronous playback will be achieved between the lyrics and video. 3. When playing back the video file, a progress bar appears where you can see the following information: ‐ Time elapsed ‐ Time remaining ‐ Play/Pause video ‐ Fast forward/Rewind video 16 AUDIO PLAYER In the main menu, select the option of "Music" to access the music folder. The following screen will appear: Function of keys : Return to main interface : Return to upper interface Slide the screen up/down to be able to see all the files Artist: Music files sorted according to the artist Album: music files sorted according to albums Songs: Displays all the music files which are saved on the device Playlist: Displays which songs are currently on the playlist Now playing: Shows which song is currently playing When playing a music file, the following screen will appear 17 Function of keys : Return to main menu : Return to previous menu / : Press and hold to rewind/Fast Forward – Press shortly to go to the next track or previous track accordingly. : Play or Pause the music playback. : Click to view the playlist : Press to select random play mode key: Press to select a repeat mode Lyric Display This player supports "*.LRC" lyric files (The user can download it from the appropriate website). When the lyrics file is named the same way as the music file, the lyrics will automatically be displayed and achieve a synchronous playback between the lyrics and music. PICTURE GALLERY In the main menu, select the option of "Gallery" to be able to access Photo folder. Tap on any picture (1) to view it in large. The image will be shown in full screen mode and. To view the next or previous image simply flick through the images (2) 18 Function of keys : Start a slideshow with all the pictures : Pictures management ‐ Select items or group them by location, time, people or tags (in thumbnails interface) – start Slideshow, Edit, Rotate left, Rotate right, Crop, Details, Set picture as and get picture details (in full screen interface). : Share the picture through social media or email. : Delete picture 19 CAMERA The URANUS tablet has two integrated cameras of 2MP which allows you to take pictures on the go and allows you to use the applications created for video chat. All the images taken with the camera will be saved in your picture folders. You may access these pictures by exiting the camera application and then going into the picture gallery. Camera 1. Front camera/Rear Camera switch 2. Shutter 3. Settings 4. Zoom 5. Panoramic Mode 6. Video Recorder Mode 7. Camera Mode Press the shutter (2) to take a picture. Once the picture has been taken, you may view it by clicking on the thumbnail which will appear on the top right, and options to Share via Email or Social Media will come into view. 20 Video Recorder When you press on the Video Camera icon, the following screen will appear and the dot on the right will turn red. Press the Record button (1) and the device will begin recording. The Time elapsed will be shown on the top left corner. During recording it is possible to zoom in and out by moving the circular icon from – to +. Panoramic View The camera also has the capability of taking pictures in panoramic mode. Press the Panoramic View Icon and the following screen will appear. Press the Green button to take a picture in this mode. 21 CONNECTING THE TABLET TO A PC CONNECTING THE TABLET TO A PC To connect the tablet to the PC, make sure the USB cable is connected to the PC ad then onto the tablet. When connecting it to the tablet, the following screen will automatically appear: Press the “Turn on USB storage” (1) button and the device is now connected to the PC. At this point, some applications which you are using will be unavailable until the device has been disconnected from the PC. To disconnect the device from the PC, press the “Turn off USB storage” button at the bottom of the screen (2) 22 CONNECTING TO THE TV The Uranus SY‐Z97BM8 can be connected to your TV set. In order to achieve this you will need an A‐C type HDMI cable (Mini HDMI to Normal HDMI). 1. Tap on the Settings icon on the main screen (1) 2. Press the HDMI button (1). Enable the “Auto Switch” Function. (2) – Important ‐ If you do not enable the auto switch function, the tablet will not be able to connect to the TV. If you would like to use the tablet on the TV and use the tablet as a mouse pad, DISABLE the “Dual Display” Function, on the contrary case, please ENABLE the “Dual Display” Function. 23 3. Once the “Auto Switch” has been enabled, proceed to connect the HDMI cable to the Tablet. Once this has been done, the tablet will automatically establish connection with the TV set. TROUBLESHOOT Below are a few problems that you may encounter during the use of your URANUS SY‐Z97BM8 tablet. Please read the following guide carefully. However if a major problem has been encountered with the device, please contact Sytech Service Centre for further assistance. The device does not turn on Make sure that the battery has some charge which is sufficient for the device to turn on. If after having the device fully charged the problem still persists, please contact Sytech Service Centre for further assistance. Some MP3 files do not work on the URANUS SY-Z97BM8. The MP3 file must respect the layer 3 rules of MPEG1, MPEG2 and MPEG 2.5. Alternatively the file must be converted using special software. Some WMA files do not work on the URANUS SY-Z97BM8. Some WMA files may be protected with DRM rights which do not permit the file to be played on the device. Some Music, Video and Image formats do not work on the device. Your URANUS SY‐Z97BM8 supports many different types of formats. However the ability to playback different formats also depends on the application being used. If for some reason one format cannot be played, please search for another application which is able to support the format required. Some Apps do not work on the device after downloading and installing. Due to the different configurations of all the hardware’s available, not all the applications will work in all the tablets. If an App doesn’t work on your tablet, please contact the application developer for further information. I connect the tablet to the PC but the PC does not recognize it. You have to disable the USB debug mode from your settings menu. The PC will then be able to detect the hardware connected to it. On the tablet you will see a screen asking if you want to turn on usb storage mode. 24 I upgraded the firmware and I want to retrieve my data back on the tablet. Sytech recommends the end user to perform a complete backup of the tablet before upgrading the firmware. If the backup has not been done and the firmware upgrade has taken place, it is not possible to retrieve all the data lost. Is it possible to use 3G modems on SYTECH TABLETS? Depending on each tablet, you may or may not use any USB 3G modems. For the tablets that have a USB HOST port, you may use any USB 3G modem with Wi‐Fi access. Make sure your Wi-Fi is working well. If the Wi‐Fi doesn’t connect for any reason to the available network, and other devices, such as your personal laptop, cell phone etc it does connect; try changing around the security and encryption standards ‐ WEP, WPA, WPA2, TKIP, and AES. One other possible problem could be the channels of the router. Change them around and configure it in different ways, however if it still does not work, you maybe having IP conflicts or experiencing a weak internet signal. Please contact your internet provider for further assistance. You will be unable to download applications or use some applications properly without a proper internet connection. Please always make sure that the Wi‐Fi is working properly. My URANUS SY-Z97BM8 battery charge level runs out very quickly / Works very slowly from the first time I got it In order to preserve the battery charge for the longest time possible, always make sure that not too many applications are running in the background. However you may end these applications using the Task Killer application which has been pre‐ installed. E‐mail also uses up a large portion of the battery level. It is recommended to change e‐mail settings so that it checks for mail once every hour instead of once every 10 minutes. When the internet is not needed, it is recommended to turn off the Wi‐Fi so that the battery charge can last longer. The same applies with the brightness, set it to a medium/low level to conserve the battery charge. Having it on 100% bright mode means that the battery charge will drain out quickly. All the above will also help your tablet to process tasks and applications quicker, therefore avoiding it to work slowly. My URANUS SY-Z97BM8 froze In order to unfreeze the device you may perform a soft reset. With the aid of a thin sharp object, insert it into the pinhole button on the back of the unit to restart it. The unit will then shut down first and restart after a few minutes. DECLARATION OF CONFORMITY Manufacturer Name: Satyatrade S. L. Address: Pol.Ind.La Raya. C/ Guadalquivir, 2. Camarma de Esteruelas, 28816 Madrid Tel: 902 430 967 Fax: 91 8864285 NIF: B83254763 Manufacturing country: China Sytech® SY‐Z97BM8‐URANUS The following product complies with the Directive 1999/5/EC of the European parliament and of the Council of 9 March 1999 ROHS standard:2002/95/EC Restriction of Hazardous Substance Signed: Ajeet Nebhwani Utamchandani Sole Administrator 25