1
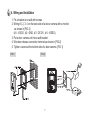
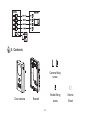
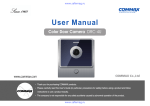
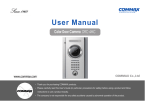
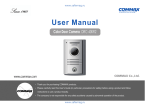
User Manual
Color Door Camera DRC-4G
• Thank you for purchasing COMMAX products.
• Please carefully read this User’s Guide (in particular, precautions for safety) before using a product and follow
instructions to use a product exactly.
• The company is not responsible for any safety accidents caused by abnormal operation of the product.
Contents
1. Introdution.......................................................................... 3
2. Important Safeguard........................................................... 4
3. Overview............................................................................. 5
4. Installation........................................................................... 7
5. Contents...............................................................................8
6. Specification....................................................................... 9
2
1. Introduction
Your unit is designed so it can be flush mounted on the or used. When flush mounted on the wall, the stand permils you to the
unit for an gular of unit view. The model number is located on the bottom and record the serial number in the space provided
below(available). Refer to these numbers whenever you call upon your COMMAX dealer regarding this product.
Model No.
Serial No.
To prevent fire or shock hazard, do not expose the unit to rain or moisture.
”within the product’s enclose that
This symbol is intended to alert the use to the presence of uninsulated“dangerous Voltage”
may be of sufficient magnitude to constitute a risk of electric shock to persons.
This symbol is intended to alert the use to the presence of important operating and maintemance(servicing) instructions in the
literature accompanying the appliance
caution
Risk of electric shock
do not open
CAUTION : To reduce the risk of electric shock, do not remove cover(or back) no user-serviceable
part inside refer servicing to qualified service personnel
3
2. Important Safeguards
▲ Damage Requiring Service : This equipment from the power source and source and refer servicing to qualified service personnel under the following conditions
ⓐ when the power is damaged.
ⓑ if liquid has been spoiled or objects have hallen into the unit
ⓒ if the equipment has been exposed to rain or water.
ⓓ if the equipment has been dropped or otherwise damaged.
ⓔ when the equipment exhibits a distinct change in performance- this indicates a need for service.
▲ Water and Moisture : Do not use this product near water, for example, near a bath tub, wash bowl, kitchen sink, or laundry
tub, in a wet basement, or near a swimming pool, and the like.
▲ Accessories : The product may fall, causing serious injury to a child or adult, and serious damage to the appliance. Any
mounting of the manufacture’s instructions, and should use a mounting accessory recommended by the manufacturer.
▲ Object and Liquid Entry : Never push objects of any kind into this product through openings as they may touch dangerous
voltage points or short-out parts that could result in a fire or electric shock. Never spill liquid of any
kind on the product.
▲ Lightning : For added protection for this product before a lightning storm, or when it is left unattached and un used for long
periods of time, unplug it from the wall outlet and disconnect the other system. This will prevent damage to the
product due to lightning and power-line surges. If you live in an ared heavily prone to lightning storms, it is recommended that you invest in power-line, telephone-line, RF cable and actuator / polarization surge protectors to protect your appliance system from possible damage
4
3. Overview
5
① White LED & illumination sensor : Offer clear image at night
② Microphone : It delivers voice from a visitor
③ Camera lens : Transferring image
It should be kept clean
④ Call button : Call a residence
⑤ Speaker : It delivers voice to a visitor
⑥ Screw Hole
⑦ Door Release connection terminal
⑧ Mointor connection terminal
⑨ Volume control (1.2~1.5mm [ - ] driver avilable)
⑩ Wall Bracket
6
4. Wiring and Installation
1. Fix a bracket on a wall with screws
2. Wiring #1, 2, 3, 4 on the back side of a dooor camera with a monitor
as shown in [FIG-2]
(#1 : VOICE, #2 : GND, #3 : DC12V, #4 : VIDEO)
3. Put a door camera unit into a wall bracket
4. Wire door release connection terminal as shown in [FIG-2]
5. Tighten a screw at the bottom side of a door camera. [FIG-1]
[FIG-1]
[FIG-2]
7
5. Contents
Camera fixing
screw
Door camera
Braket fixing
Bracket
screw
8
Volume
Sheet
6. Specification
Model No.
Rated Voltage
Wiring
Wiring
DRC-4G
DC 12V (Supplied to monitor)
4 wires (polarity) to a monitor
2 wires (non-polarity) to a electric door lock
Video Transmission Standard
NTSC or PAL STANDARD.
Sensor Type
CMOS IMAGE SENSOR
Transmission
Full duplex
Minimum Illumination
0.1 Lux (within 300mm)
LED
Embedded white LED (night working)
Effective Viewing Angle
Horizontal 75°, Vertical 55°
Angle Adjustment
Upward 13
Operating Temperature
-10℃(tested up to -40°C)~ +40℃
Weight (g)
300g
Dimension (mm)
101(W) x 142(H) x 32(D)
Installation between a door
Diameter(pie)
Ø0.5 Ø0.6 Ø0.8 Ø1
camera and a monitor(TIV Cable) Distance(meter) 28m 50m 70m 115m
9
513-11, Sangdaewon-dong, Jungwon-gu, Seongnam-si, Gyeonggi-do, Korea
Int’l Business Dept. : Tel.; +82-31-7393-540~550 Fax.; +82-31-745-2133
Web site : www.commax.com
Printed In Korea / 2013.11.105