1
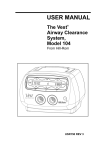
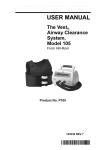
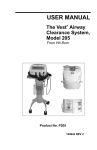
The Vest® Airway Clearance System,
Model 105 Training Booklet
How will I know how to use The Vest® System?
A training video is included with the device. In addition, a trainer will be available by phone or to come to your
home to provide training on The Vest® System.
The trainer will:
• Outline steps recommended for using The Vest® System
• Emphasize the role of airway clearance in bronchial hygiene
• Answer any questions and discuss any concerns
To prepare for your appointment, it is a good idea to unpack The Vest® Airway Clearance System and watch the
training video.
If you are able, you might want to try on your garment to verify the fit. A quick fitting guide is in this booklet;
review the user manual for additional information on fitting.
The Vest® Airway Clearance System Shipment Should Include the Following:
• Rolling Bag
• Protocol Stickers
• Air Pulse Generator
• User Manual
• Power Cord
• Welcome Folder
• Two Locking Air Hoses
• Product Introduction Kit
• Remote Control
• Garment
• Instructional DVD
If you are missing any of these items, please call us at 1-800-426-4224.
For detailed Warning and Caution statements, and operation instructions, refer to The Vest® Airway Clearance System, Model 105, User Manual (145330).
Why do I need Airway Clearance Therapy?
When a medical condition impairs the body’s ability to perform airway clearance on its own, Airway Clearance
Therapy is needed.
Airway Clearance is extremely important because mucus that accumulates in the lungs may lead to serious
complications, which can damage healthy lung tissue and make breathing more difficult.
What is The Vest® Airway Clearance System?
The Vest® Airway Clearance System is an easy-to-use medical device for children and adults who have excess
airway mucus and difficulty clearing it effectively. Designed for in-home use, The Vest® Airway Clearance
System is quiet, comfortable and portable; its features promote user independence and helps simplify
treatment routines.
How does The Vest® Airway Clearance System
work?
The device uses a technology called High Frequency Chest Wall Oscillation (HFCWO). Equipment consists of a
garment connected by Air Hoses to an Air Pulse Generator. During therapy, the garment inflates and deflates
rapidly, applying gentle pressure to the chest wall. This moves mucus toward larger airways where it can be
cleared by coughing or suctioning.
What are some advantages of having therapy
with The Vest® Airway Clearance System?
Efficiency: All lobes of the lung are treated simultaneously.
Ease of Use: Many users require no assistance; special positioning and complicated breathing techniques are
not required.
For detailed Warning and Caution statements, and operation instructions, refer to The Vest® Airway Clearance System, Model 105, User Manual (145330).
Are there any special safety instructions
for The Vest® Airway Clearance System?
Before use, make sure to review the complete list of important safeguards that are in the user manual.
• Do not plug in or use the Air Pulse Generator if it is wet or damp.
• Keep the unit and its Power Cord away from heated surfaces.
• Place the Air Pulse Generator only on a stable and level surface.
• Use The Vest® Airway Clearance System only with a properly grounded electrical outlet.
• Always unplug this product immediately after using.
• If this product has a damaged Power Cord or plug, is not working properly, or has been dropped or
damaged, do not operate it. For examination or repair, contact Hill-Rom Customer Service @ 800-426-4224.
Are there any additional safety tips regarding
my therapy?
• Close supervision throughout the treatment is necessary when this product is used by children
or patients with physical limitations or impaired cognitive abilities.
• Do not eat or drink during a therapy session. To do so could cause a choking hazard.
• Try to do your treatment with The Vest® Airway Clearance System before a meal or at least 30 minutes after a
meal to avoid the feeling of an upset stomach.
Contraindications
WARNING: If the patient conditions exist that cause the use of The Vest® Airway Clearance System, Model 105
to present a risk to the patient, do not use the unit except as directed by a physician. Death or serious
injury could occur.
The Vest® Airway Clearance System, Model 105 is contraindicated if these conditions are present:
• Head and/or neck injury that has not yet been stabilized
• Active hemorrhage with hemodynamic instability
For detailed Warning and Caution statements, and operation instructions, refer to The Vest® Airway Clearance System, Model 105, User Manual (145330).
Relative Contraindications
According to the American Association for Respiratory Care (AARC) Guidelines for Postural Drainage Therapy,
the decision to use the unit for Airway Clearance Therapy requires careful consideration and assessment of the
individual patient’s case if the following conditions exist:
• Intracranial pressure (ICP) greater than 20 mm Hg
• Recent spinal surgery or acute spinal injury
• Bronchopleural fistula
• Pulmonary edema associated with congestive heart failure
• Large pleural effusions or empyema
• Pulmonary embolism
• Rib fractures, with or without flail chest
• Surgical wound or healing tissue or recent skin grafts or flaps on the thorax
• Uncontrolled hypertension
• Distended abdomen
• Recent esophageal surgery
• Active or recent gross hemoptysis
• Uncontrolled airway at risk for aspiration such as tube feeding or a recent meal
• Subcutaneous emphysema
• Recent epidural spinal infusion or spinal anesthesia
• Burns, open wounds, and skin infections on the thorax
• Recent placement of transvenous or subcutaneous pacemaker
• Suspected pulmonary tuberculosis
• Lung contusion
• Bronchospasm
• Osteoporosis or osteomyelitis of the ribs
• Coagulopathy
• Complaint of chest wall pain
For detailed Warning and Caution statements, and operation instructions, refer to The Vest® Airway Clearance System, Model 105, User Manual (145330).
How To Fit Your Inflatable Garment
NOTE: It is recommended that a single layer of cotton clothing be worn
beneath the garment.
The Full Vest: C3® Washable Garment & Classic Full
The C3® garment will arrive to you in two pieces and ready to be assembled as follows:
1. Lay outer garment flat
4. Insert air duct pipes through outer garment
2. Unzip zipper at bottom of outer garment
5. Press studs to secure bladder
3. Insert inflatable bladder
6. Zip up outer garment
Classic Full Garment
C3® Washable Garment
The Classic full garment is one piece, therefore no assembly is required.
Put the garment on so the closures are in front; connect the closures so the garment fits loosely over the chest.
You should be able to fit a fist between the garment and body before inflating the garment. Adjust using the
buckles.
NOTE: Can also be worn with the Air Hose Ports in the back.
The garment should fit comfortably close to the under arms, and the bottom of the garment should hit at the
top of the hip bone. Adjust using the Velcro closures at the top.
NOTE: For full fitting instructions, refer to The Vest® Airway Clearance System, Model 105, User Manual (145330).
For detailed Warning and Caution statements, and operation instructions, refer to The Vest® Airway Clearance System, Model 105, User Manual (145330).
Classic Chest Vest Garment
Unfasten the back panel lower tabs from the front panel of the garment.
Slip the inflatable garment over the user’s head with the Air Hose Ports in front.
NOTE: Can also be worn with the Air Hose Ports in the back.
For the best fit, inhale deeply, and then attach both back panel tabs of the
inflatable garment to the front panel so that a flat hand can fit between the
garment and body.
NOTE: To tighten the fit at the bottom edge, angle the back panel tabs upward. To loosen the fit
at the bottom edge, angle the back panel tabs downward.
Adjust the shoulder straps so that the bottom of each arm opening of the
inflatable garment is comfortably close to the underarm.
NOTE: For full fitting instructions, refer to The Vest® Airway Clearance System, Model 105, User
Manual (145330).
Classic Wrap Vest
Wrap the garment around your body so that the upper edge of the garment
is under the arm pits and centered around the nipple line.
The Air Hose Ports can be placed anywhere around the chest that is comfortable.
Take a deep breath, and fasten the Wrap Vest making sure that the garment
fits close to the underarms, but not uncomfortable so that a flat hand can
fit between the garment and body. Connect Air Hoses to the garment Air
Hose Ports.
Get Comfortable. No Positioning Required.
Can be sitting position, lying down and even standing.
NOTE: For full fitting instructions, refer to The Vest® Airway Clearance System, Model 105, User
Manual (145330).
For detailed Warning and Caution statements, and operation instructions, refer to The Vest® Airway Clearance System, Model 105, User Manual (145330).
Setting up The Vest® System
Place the Air Pulse Generator in a stable convenient location.
Plug the power Cord in the back of the Air Pulse Generator.
Plug the Air Pulse Generator into a grounded outlet.
Locking Hose
Connect the Air Hose to the Air Hose Connector Port on the front
of the Air Pulse Generator.
Slightly twist the Air Hose into the Air Hose Connector Port to help
secure the Air Hose in position.
Align the mark on the Air Hose with the corresponding
mark on the Air Hose Connector Port on the front of the
Air Pulse Generator.
Turn the Air Hose to the locked position.
Plug the optional Remote Control into the port
on the front of the Air Pulse Generator.
Check Hour Meter Reading
Your Hour Meter Reading will come up when you first plug in your
device or you can press the ON button and then the OFF button
and the Hour Meter Reading will appear on the screen.
For detailed Warning and Caution statements, and operation instructions, refer to The Vest® Airway Clearance System, Model 105, User Manual (145330).
My Prescription From My Doctor
_____Frequency or Hertz (Hz)
_____Minutes
_____Times Per Day
Custom
To Begin Your Treatment:
1. With device plugged in, press the Up arrow above NORMAL.
2. The first number you will see in the upper left hand corner is the Frequency or Hertz (Hz). Adjust as
needed to match your prescription above by using the Up or Down arrows .
3. The middle number on the screen is the pressure. This should be set based on your garment style. It
can also be adjusted by pressing the Up or Down arrows.
NOTE: Pressures between 5 and 6 are commonly used for the C3® Washable Garment or Classic Full Vest. Pressures between 1
and 4 are commonly used for the Chest Vest and the Wrap Vest.
4. The last number on top is the time of your treatment. Adjust as needed to match your prescription
above by using the Up and Down arrows.
5. These settings will be saved as entered for your next treatment.
6. At this point you are ready to begin. Follow prompts on screen.
7. Press ON to Inflate.
8. Start Therapy Press ON.
9. To pause, press the OFF button or squeeze the Remote Control once. The unit will stop the pulsations
and the garment will deflate. To resume treatment, press the ON button or the squeeze the Remote
Control again.
10. If it is necessary to end the treatment session before it is complete, press the OFF button twice.
11. When the treatment session is complete, the pulsations will stop, the garment will deflate, and it will
read “Session Complete”.
12. Unplug the system from its power source.
NOTE: If your doctor has ordered a custom program, refer to your
clinical trainer or the USER MANUAL for instructions.
For detailed Warning and Caution statements, and operation instructions, refer to The Vest® Airway Clearance System, Model 105, User Manual (145330).
How will I know if The Vest® System is helping?
Although each person is different, by using The Vest® System regularly you will get airway clearance
which may lead to:
• Easier breathing
• Improved lung function
Will someone be following up on my progress?
As a service, we will periodically call to:
• Discuss how The Vest® System is working for you
• Answer your questions about The Vest® System
• Request the total number of hours you have used The Vest® System; which is automatically recorded
by the system
NOTE: The hour meter reading can be accessed by pressing OFF when in the NORMAL/CUSTOM screen or when you first plug in the
device. It is located in the upper right hand corner of the screen.
Insurance providers may use this data. This information may also be beneficial to your physician in assessing
treatment plans and progress.
All information is treated confidentially and is shared with your physician
and insurance provider as they require or as otherwise appropriate.
For detailed Warning and Caution statements, and operation instructions, refer to The Vest® Airway Clearance System, Model 105, User Manual (145330).
How do I care for my device and garment?
The Vest® Airway Clearance System requires minimal routine maintenance.
Periodic cleaning is required. We recommend that you wipe clean the Air Pulse Generator, Air Hoses and the
Classic inflatable garment with a mild detergent and warm water. Do not put The Vest® Airway Clearance
System in water or any solution.
Only the outer piece of the C3® Garment Line can be machine washed. The bladder is cleaned in the same
manner as the Classic garment above. Remove the bladder assembly as follows:
1. Open up the buckles and lay the garment flat on a table.
2. Open the zipper at the bottom of the garment.
3. Unfasten the snaps that secure the bladder to the outer garment.
4. Remove the two hose connections from the outer garment.
5. Remove the bladder from the outer garment
Machine wash the outer piece only as follows:
1. Fasten all buckles, zippers and hook and loop connections.
2. Machine wash, or hand wash, in cold cycle only (86° F (30° C) maximum). Non-chlorine bleach may be used
as necessary.
3. Hang dry or tumble dry on lowest temperature (120°F (49° C) maximum).
4. Cool iron (250° F (110° C) maximum) as necessary.
5. Do not iron the design.
NOTE: Do not machine wash or dry the bladder. The non-washable garments
are referred to as the Classic Line, and the washable garments are referred
to as the C3® Garment Line.
For detailed Warning and Caution statements, and operation instructions, refer to The Vest® Airway Clearance System, Model 105, User Manual (145330).
Can I travel with my device?
When traveling with your device, The Vest® System, we recommend that you review the TSA website at:
http://www.tsa.gov/travelers/airtravel/specialneeds/before_you_go.shtm
In addition, you may consider carrying a letter from your physician on their letterhead that states: your medical
condition, your medical need for the device, and that the device is necessary for your well being. Please note
that according to the TSA website this documentation is not required and will not exempt you from the
security screening process.
If you have any further questions you should contact your travel agent or airline.
Limited Lifetime Warranty*
The limited lifetime warranty covers:
• Parts and accessories
• Labor cost
• Inflatable garment replacements
*See Limited Lifetime Warranty for complete details including restrictions
My Model #_________________________________________
My Serial #_________________________________________
NOTES:
________________________________________________________________________________________
________________________________________________________________________________________
________________________________________________________________________________________
For further information refer to your user manual.
For more information on The Vest® Airway Clearance System,
contact Hill-Rom at 800-426-4224 or www.thevest.com.
Hill-Rom reserves the right to make changes without notice in design, specifications and models.
The only warranty Hill-Rom makes is the express written warrantyextended on the sale or rental of its products.
©2014 Hill-Rom Services PTE Ltd. ALL RIGHTS RESERVED.
181779 rev 2
03-SEP-2014
ENG – US
www.thevest.com | www.hill-rom.com
USA 800-426-4224 | FAX 800-870-8452