1
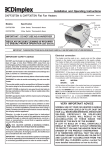
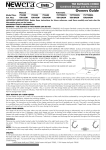
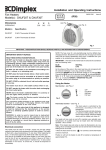
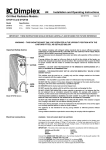
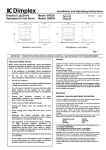
Installation and Operating Instructions
08/35194/3
DXDAI2 Flat Fan Heater
Model(s)
Specification
DXDAI2
2.0kw Switch, Thermostat & Neon
Issue 3
handle
thermostat
knob - see
Fig. 3
air inlet
heat control
knob - see
Fig. 2
mains neon
Fig. 1
air outlet
IMPORTANT : THESE INSTRUCTIONS SHOULD BE READ CAREFULLY AND RETAINED FOR FUTURE REFERENCE
IMPORTANT SAFETY ADVICE
DO NOT use the heater on deep pile carpets or the long hair
type of rugs, or less than 750mm (30") away from any
overhanging surface. Keep combustible materials such as
drapes and other furnishings clear from the front, sides
and rear of the heater. Do not use heater to dry your laundry.
DO NOT use the heater in the immediate surroundings of a
bath, a shower or a swimming pool.
DO NOT place the heater directly below a fixed socket outlet.
WARNING: In order to avoid overheating, do not cover the
heater.
The socket-outlet must be accessible at all times to enable
the mains plug to be disconnected as quickly as possible.
DO NOT COVER or obstruct in any way the air inlet slots in
the top and bottom of the heater, or the air outlet slots at the
front of the heater.
Electrical connection
This heater must be used on an ~ supply only and the voltage
marked on the heater must correspond to the supply voltage.
This heater is fitted with a rewirable plug incorporating a 13 amp
fuse. In the event of replacing the fuse in the plug supplied, a 13
amp fuse approved by ASTA to BS 1362 must be used. If any
other type of plug is used, a 15 amp fuse must be fitted in the
plug, the adaptor, or at the distribution board.
IMPORTANT : If the plug is not suitable for your socket, the 13
amp plug should be removed. Before wiring the appropriate
plug, please note that the wires in this mains lead are coloured
in accordance with the following code :
BLUE :
NEUTRAL
BROWN :
LIVE
As the colours of the wires in the mains lead may not correspond
with the coloured markings in your plug, proceed as follows :
DO NOT operate the heater with the mains lead overhanging
the front outlet grille.
Connect the BROWN wire to the terminal marked ‘L’ or coloured
RED. Connect the BLUE wire to the terminal marked ‘N’ or coloured
BLACK. Note : ‘L’ or ‘N’ wire must not be connected to the EARTH
terminal marked ‘E’ or
or coloured GREEN or GREEN AND
YELLOW. If in doubt, consult your electrician.
The heater should always be used on a flat, stable surface.
Important Operating Information
This appliance is not intended for use by children or other
persons without assistance or supervision if their physical,
sensory or mental capabilities prevent them from using it
safely. Children should be supervised to ensure that they
do not play with the appliance.
ACCUMULATION OF FLUFF AND DUST IN THE HEATER MAY
CAUSE THE ELEMENT TO OVERHEAT AND CUT OUT.
THEREFORE IT IS IMPORTANT THAT THE HEATER IS CLEANED
REGULARLY, PARTICULARLY IF THE PRODUCT IS USED OR
STORED IN AREAS WHERE HIGH LEVELS OF DUST AND/OR
FLUFF ARE PRESENT (I.E. BEDROOMS/DRESSING ROOMS)
(see section of instructions titled ‘cleaning’ for details on how
to maintain optimum performance of your heater)
Warning : In order to avoid a hazard due to inadvertent
resetting of the thermal cutout, this appliance must not be
supplied through an external switching device, such as a
timer, or connected to a circuit that is regularly switched
on and off by the utility.
THE HEATER CARRIES A WARNING SYMBOL
INDICATING THAT IT MUST NOT BE COVERED.
The instruction leaflet belongs to the appliance and must
be kept in a safe place. If changing owners, the leaflet must
be surrendered to the new owner.
IMPORTANT – If the mains lead of this appliance is damaged,
it must be replaced by the manufacturer or its service agent
or a similarly qualified person in order to avoid a hazard.
Using the heater
Safety – Overheat Protection
The mains neon (see Fig. 1) will light up to show that the heater
is connected to the mains supply.
For your safety, this appliance is fitted with a thermal cut-out. In
the event that the product overheats, the cut-out switches the
heater off automatically.
Heat control - see Fig. 2
To bring the heater back into operation, remove the cause of the
overheating, then unplug or turn off the electrical supply to the
heater for a few minutes.
The heat control positions are as follows:
O-
Off
When the heater has cooled sufficiently, re-connect and switch
on the heater.
Cool Blow *
I -
Half heat output
II -
Full heat output
Cleaning
ALWAYS DISCONNECT FROM THE POWER SUPPLY BEFORE
CLEANING THE HEATER.
Do not use detergents, abrasive cleaning powder or polish of
any kind on this heater.
Wipe with a dry cloth to remove dust and a damp cloth (not wet)
to clean off stains. Be careful not to allow moisture into the heater.
Ensure that dust or fluff does not accumulate inside the heater
as this could lead to overheating of the element. Use a vacuum
cleaner to remove any fluff which does accumulate.
Fig.2
PLEASE NOTE THERE IS AN INLET AREA ON THE UNDERSIDE OF THE
PRODUCT WHICH WILL REQUIRE CLEANING
Recycling
Thermostat control - see Fig. 3
The heat output is controlled by the thermostat, according to the
room temperature. Turn the knob to maximum setting initially.
When the room is warm enough, reduce the setting slowly until
the heater just clicks off.
The heater will now cycle on and off to maintain your selected
room temperature.
For electrical products sold within the European
Community.
At the end of the electrical products useful life it should
not be disposed of with household waste. Please
recycle where facilities exist. Check with your Local
Authority or retailer for recycling advice in your country.
After Sales Service
Your product is guaranteed for three years from the date of
purchase.
Within this period, we undertake to repair or exchange this product
free of charge (subject to availability), within the guarantee period
provided it has been operated in accordance with these
instructions.
Your rights under this guarantee are additional to your statutory
rights, which in turn are not affected by this guarantee.
Fig. 3
NOTE: If the heater does not come on when the thermostat is
set to a low number, this is normally because the room is warmer
than the thermostat setting and is not a fault.
* When the heat control is set to ‘
thermostat control to max. position.
Should you require after sales information or assistance with
this product please go to www.dimplex.co.uk where you will
find our self help guide by clicking on “After Sales” or ring our
helpdesk on 0845 600 5444 (UK) or 01 842 4833 (R.O.I.) .
Spare parts are also available on the website
www.dimplex.co.uk
Please retain your receipt as proof of purchase.
’ for Cool Blow, set the
Position ‘ ’ will turn the heater on and off to maintain a
temperature of approximately 5°C to help protect against frosty
conditions.
The product complies with the European Safety Standards EN60335-2-30 and the European Standard Electromagnetic Compatibility (EMC) EN55014,
EN60555-2 and EN60555-3 These cover the essential requirements of EEC Directives 2006/95/EC and 2004/108/EC
Dimplex UK Ltd.
Millbrook House
Grange Drive
Hedge End
Southampton
Hampshire. SO30 2DF
www.dimplex.co.uk
Republic of Ireland Tel.
01 8424833
[c] Dimplex UK Limited
All rights reserved. Material contained in this publication may not be reproduced in whole or in part, without prior permission in writing of Dimplex UK Limited.