1
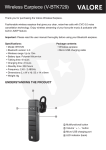
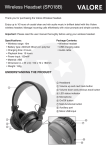
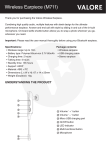
LED Wooden Alarm Clock
V-LWC169, V-LWC170, V-LWC171
Thank you for purchasing the Valore LED Wooden Alarm Clock.
Complement any room with the contemporary look and functional features of this
touch-sensitive wooden alarm clock. Tap gently or activate just by snapping your fingers or
clapping your hands. Enjoy a longer battery life with its auto-shut off feature when it detects
silence in the room.
Important: Please read the user manual thoroughly before using your wooden clock.
Specifications:
• Two display mode:
Display 1: Time and temperature (display alternately)
Display 2: Time (default display)
• Battery type: 4 x AAA (battery not included)
• Power input: DC5V
• Material: MDF+PVC
For V-LWC169
• Dimensions (L x W x H): 120 x 80 x 70mm
• Weight: 170g
For V-LWC170
• Dimensions (L x W x H): 125 x 45 x 65mm
• Weight: 160g
For V-LWC171
• Dimensions (L x W x H): 100 x 40 x 60mm
• Weight: 120g
Package contents:
• LED wooden alarm clock
• USB cable
UNDERSTANDING THE PRODUCT
V-LWC171 Wooden Alarm Clock
②③ ④
AAA
08 68
⑦
AAA
①
AAA
AAA
⑤
⑥
V-LWC170 Wooden Alarm Clock
②③ ④
AAA
08 68
AAA
①
⑦
AAA
AAA
⑤
V-LWC169 Wooden Alarm Clock
⑥
②③ ④
AAA
08 68
AAA
①
AAA
AAA
⑤
① Digital display
② Set button
③ Select ‘Up’ button
④ Select ‘Down’ button
⑥
⑤ Power input
⑥ Reset button
⑦ Battery compartment
⑦
START USING THE ALARM CLOCK
1) Setting up the alarm clock
Press and hold the ‘Set’ button for about 3 seconds to enter into setting mode.
The settings may be set in the following sequence:
Year > Month > Date > Hour > Minute > 12H/24H > AL(Alarm) > Alarm 1 > Alarm 2 > Alarm
3 > Exit setting
a) Year setting:
The ‘Year’ section will flash
Press the ‘Up’ / ‘Down’ button to select the year.
Press the ‘Set’ button to confirm and move on to set ‘Month/Date’.
Year (2000 - 2099)
20 1 4
Year (2000 - 2099)
Up
20 1 5
b) Month/Date setting:
The ‘Month/Date’ section will flash
Press the ‘Up’ / ‘Down’ button to select the month and press the ‘Set’ button to set the date.
Press the ‘Set’ button to confirm and move on to set ‘Hour/Minute’.
Month (1 - 12)
1 20 1
Set
Month (1 - 12)
Up
Date (01 - 31)
1 01
1 01
Date (01 - 31)
Up
1 02
c) Hour/Minute setting:
The ‘Hour/Minute’ section will flash
Press the ‘Up’ / ‘Down’ button to select the hour and press the ‘Set’ button to set the minute.
Press the ‘Set’ button to confirm and move on to set ‘12H/24H’.
Hour (0 - 23)
1 1 00
Set
Hour (0 - 23)
Up
Minute (00 - 59)
1 2 00
1 2 00
Minute (00 - 59)
Up
1 20 1
Note: If any part of the detail is set wrongly, skip through the rest and restart the setting process from the
‘Year’. Please note that previous setting is saved after exiting setting mode.
d) 12H/24H setting:
Press the ‘Up’ / ‘Down’ button to select the format of the display time. Press the ‘Set’ button to
confirm and move on to set ‘Alarm’.
Format (12H/24H)
2 4H
Format (12H/24H)
Up
1 2H
Note: Default setting at 24H format. Top left “LED” indicator lights up, stands for ‘PM’ and goes off stands for
‘AM’.
e) Alarm 1~3 setting:
The ‘Alarm’ section will flash
Press the ‘Up’ / ‘Down’ button to select the hour and press the ‘Set’ button to set the minute.
Press the ‘Set’ button to confirm and move on to set ‘ON/-- : A1’, etc.
e) Alarm 1~3 setting:
The ‘Alarm’ section will flash
Press the ‘Up’ / ‘Down’ button to select the hour and press the ‘Set’ button to set the minute.
Press the ‘Set’ button to confirm and move on to set ‘ON/-- : A1’, etc.
Alarm (Hour)
07 00
Set
Set
Set
Set
Set
Up
Up
Up
Up
A2
Alarm 3 (Hour)
Up
1 2 00
Alarm 3 (Minute)
Up
Alarm 3 (ON/--)
A3
1 00 1
Alarm 2 (ON/--)
Alarm 3 (Minute)
1 2 00
1 0 00
Alarm 2 (Minute)
Alarm 3 (Hour)
1 1 00
A1
Alarm 2 (Hour)
Alarm 2 (ON/--)
A2
08 0 1
Alarm (ON/--)
Alarm 2 (Minute)
1 0 00
Set
Up
Alarm 2 (Hour)
09 00
08 00
Alarm (Minute)
Alarm (ON/--)
A1
Set
Up
Alarm (Minute)
08 00
Set
Alarm (Hour)
1 20 1
Alarm 3 (ON/--)
Up
A3
2) ‘Set’ button function
Switching in-between display modes
During ‘Normal’ mode, press the ‘Set’ button once to switch to another display type.
Normal (Clock)
1 2 00
Display 2 (Time)
Set
Set
Set
Display 1
(Time/Date/Temperature)
p
1
p 2
Normal (Clock)
Set
1 2 00
3) ‘Up’ button function
a) Switching to temperature view (°C/°F)
During ‘Normal’ mode, press the ‘Up’ button once to view the temperature and press again to
switch between °C/°F format.
Normal (Clock)
1 2 00
Temperature (°C/°F)
Up
2 7C
Up
8 1F
b) Speed up selection
During ‘Setting’ mode, press and hold the ‘Up’ button to speed up the selection.
4) ‘Down’ button function
a) Switching ON or OFF sound control (ON/--)
During ‘Normal’ mode, press the ‘Down’ button once to switch the sound control ON/OFF.
Normal (Clock)
1 2 00
Sound control (ON/--)
Down
Down
Down
Down
1 2 00
b) Speed up selection
During ‘Setting’ mode, press and hold the ‘Down’ button to speed up the selection.
5) Luminance adjustment (4 level brightness: L3~0)
During ‘Normal’ mode, press and hold the ‘Up’ button for about 3 seconds to enter into
luminance adjustment setting. Once completed, press and hold the ‘Up’ button for about 3
seconds to exit setting.
Normal (Clock)
1 2 00
Luminance adjustment
Up
(3 sec)
l3
Down
l1
Down
l2
Down
l0
Up
l1
6) ‘Reset’ button function
Press the ‘Reset’ button any time to restore the alarm clock to its original state and re-set the
clock.
UNIQUE FEATURES
1) Sound control (Power saving mode)
The LED display will go off automatically after 5 seconds. When a close by sound of more
than 60 Db is produced or when being lightly tapped, the LED display will be switch on. This
feature will assist in power saving, thus prolonging battery life.
2) Luminance control (4 level brightness)
Adjust the brightness of the LED display according to your preference.
4 levels of brightness to adjust to:
L3 > L2 > L1 > L0
Note: This clock would go half-dim from 18:00 hrs - 07:00 hrs.
TECHNICAL SUPPORT & WARRANTY
• For Technical Support, email us at [email protected].
• For Warranty Registration, visit www.valore.sg.
Cautions:
Read all the instructions and warnings carefully prior to using this product.
• Do not store the alarm clock in a high temperature environment.
• Do not place the alarm clock near a fire or other excessively hot environments.
• Do not expose its alarm clock to moisture or submerge it in liquid. Keep alarm clock dry at
all times.
• Do not attempt to charge the alarm clock using any other method or connection other than
the alarm clock ’s provided charging cable.
• Do not disassemble this alarm clock or attempt to repair or modify it in any manner.
• Be cautious of excessive drops, bumps, abrasions or other impacts to this alarm clock. If
there is any damage to the alarm clock such as dents, punctures, tears, deformities or
corrosion, stop using the alarm clock and contact us immediately via email at
[email protected], or return this product to the store where you have purchased it from.
• If the product produces an abnormal smell, high temperature (low temperature during
normal use), discolours or changes shape abnormally, stop using the product and contact us
immediately via email at [email protected].
DISCLAIMER & TRADEMARKS
All information, trademarks, logos, graphics, and images (“Materials”) provided on this user manual are
copyrighted or trademarked and are the property of Valore Lifestyle Pte Ltd. Any unauthorized use of any
material contained on the instruction manual may violate copyright laws, trademark laws, laws of privacy and
communications statutes.
The trademarks, service marks and logos used and displayed in the Materials are registered and unregistered
trademarks and service marks of Valore and others. All other registered and unregistered company names,
product names and marks mentioned herein the (“Materials”) are the property of their respective owners and
may be trademarks or registered trademarks.
Inspired by Valore Singapore
For full range of Valore products visit www.valore.sg