1
ilain interface
Cai OS User manual
IHlnrtuIf,-r#.
TlErds
mtslre-Pb---.*le
Tlis&*r baFiErt,ffi.-d
rcflE*trtu
fb-b-I-b--t
r derydE{E-.rEalEITlismFrrl
(btElop.rErf dlt F#,
--ilb-Itri
ndb htE@dqdqr-Il5t_ce
-l*rELad trddE il*l-B---r.-L:
d rdbHI*bbS-3--b3lf tE drd s*?adb#--rr
iralicd Slradf
---,tsrt
the *stFddiffi-----
rr--fu-ry*d
inb 5 sdeen display. Slide
m tsail*lr
J ffiplish to flip fi le.
o hrl$-E+aps
PrEOqrHFmtE
rnain interfae will pop up
d€.Q*.r*Estrm
TIE
Main interface
Main interface
Main interface
a
.
.
Display all applications icons
Short
FFT
t:i{
press the E&4
icon to display the installed
applictions icons. Click on corresponding application icon to
access the application. ln the main menu, the system can be
set to run existing applications, install a new application, start
the touch calibration, music player, video player, web browser,
games and other operations.
Add small plugin to desktop
TI
ln the main interface, click the "L&J'icon, and then click "
WIDGETS" tab menu on upside of the screen, select a sroll
plugin to add to desktop .
Display background programs that are running
ln any interface, long press the menu button to the left ofthe
screen will pop up a list of programs that are running in the
background. Click a program icon, can switch over to the
background program. Right sliding a program icon, en close
this program.
r
fu1ain
interface
Call function
{E call loq
a
Show notice information
the main interface, click on the lower right corner of the
screen the clock display area, can open notice , notice can
show the current USB state, networking state and the battery
1
eower and other information
Delete the desktop icon
n the main interface, long press on the application of the
sterface program icon, stay icon amplification, will be selected
:c screen the icon of the mobile above a garbage can, this
con region shows orange, let go can delete.
Move desktop icon
n the main interface, long press the interface of the
appli€tion program icon, stay icon amplification, may to the
selected icon of move.
.
a
Make a call
Take one of the following methods to make a call:
1. ln phone tab: lnput the phone numbers and press the green
Send key; ln call log tab: press the contact in the list and
select the call item to call; ln contacts tab: press the contact in
the list and select the call item to call; ln favorites tab: press
the contact in the list and select the call item to call:
2. Smart Dialing: press the Smart Dialing, and direct input the
phone numbers and press the green Send key;
Answer calls
To answer a call, press the green Send key.
I
Call function
Messaging
Sottings
Hang up the phone
Press hang up key to hang up the phone
&
Settings
the Gmera.
1
Touch Attach symbol from top{ight corner of the screen;
Select one ofthe following options:
.
2.
s{hrn$s
wffi,
Pictures
Contacts
To view the contacts, touch Phone icon, and then touch tho
Contacts tab from the top of the screen. ln the contacts tab
contacb is a specilic group that can be stored by favoritos
item.
Touch to find and attach one of the existing pictures
TIP: To search a mntact, press lhe Menu key, touch the
search item in the popup menu. Then touch the input box to
open the keyboard, type the name to search, tho contact will
list below if it exists.
Mdeos
tr*$i
ft sre*
Camera picture
Touch to take a new picture to attach
tundil!.u
q
${i1rlrrlvf^itr'ilNfr
sd
w
ld
?sls
dW
,,'
q
l:#liltrtulutN,:
s
Touch to find and attach one of the exiting videos files
}ffi$
Capture video
Touch to make a new video file to attach
i} hUmSWo
,'+r'
1+,ri6n,\+rs4l:*tl *
d! 0iryl.y
Audio
#
$drw
Touch to find and attach one of the existing audio file
Record Audio
Touch to record an audio tile to attach
rr $.S-i,rrlr
r,,,ir.rr
l*,lirl+
;lr r,.ll,t:
ln the main menu, select the option of "Settings" to be able to
ac@ss the System Set fold. Directly click €n assess picture
set options interface.
Slideshow
Description of functions:
1.
Ro!d malslgeg
All tho rocelved messages are classified by @ntacts' name.
Th€ Inbox lncludes SMS and MN,ls.
WiFi
Wi-Fi: Open/close the wireless connection
I
I
Wi-Fi setting: touch the "r " i@n, can enter WlFl senior set
items
MMS
MMS stands for Multi-madia Message Seruice, it could
transmlt the message contains lVulti-media file, including
text,plcturo,sound
2.
Date usage
Display Date usage
etc.
Sond MMs
Photos tak6n by camera aro stored on the memory card.
Mako suro tho memory card has been installed before using
3.
Sound setting
Volumes: set the Notice, the media and the alarm clock
volume.
Default notification: Click to open notiflcation bell menu, select
Settings
Settings
the item is set to default notifimtion bell
Can backup, restore the machine Settings and data
Touch sounds: After checked, Touch screen will make sound
Screen lock sound: After checked, Touch screen will make
sound
10. Date & time
Set the date, time, time zone and time display format
4.
Display settings
Brightness: Set adjust brightness ofthe screen
Wallpaper: you can choose wallpaper from Super-HD player
and wallpaper
Sleep: Set offthe screen saver standby time. When the device
is in the standby screen saver, WlFl function will be closed to
save electricity purpose; When sensei player, WlFl function
GPS localization
GPS localization
ffi iffi
l0;59AM'*,*u*,
"'liii""-*-*-""d;ti*''
,";iilffiu;fiffi*"*'
i"ii hMr kvo
#
Mod€
il
^mE
1 1. About device
Check the machine software version and other information
,#!
Mm0Td
'ffi
wi
[i* k[quEg.
0
si & rhobilr
flelwrft
iiNl
will be in 10 seconds to be automatic remvery
Font size: Set shore the font size
Accelerometer coordinate system: you can set Accelerometer
w^
nu6*
srei{rlrB
coordinate system
Screen adaption: Used to adjust size of some games display
screen
5.
#
Storage
check the PMP memory and available storage
6.
Apps
Can display and management of the instiallation applications
7.
Security
Screen lock: Settings screen lock way, slide, Pattern, PlN, and
password and so on many kinds of mechanisms.
Make password visible: After the check, in the password input
box, can show the input password.
Unknown source: allow installation of non- Google Market
applimtions, the default setting is open
8.
Language & input
Setting language and area, input method etc. FunctionStorage
9.
N6ilrluttr6f,c
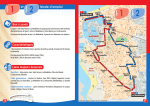
Now you can navigate anwhere in the world thanks to the
in@rporated GPS receiver. lf you want to use the GPS
function with this device, open the main menu, click the
"Settings" icon, and go to the "Location servies". Here, check
the "GPS Satellites" option. Go back to main menu and open
"aplicatie navi" application to start your navigation.
Connecting computer
This device can be connected to a personal @mputer through
USB cable for data copy or delete operation. The sp€cific
procedures are as follow.
1. Connect the device via USB cable to the PC's USB port,
and then a "USB already @nnected" noti@ option will show
up on your device.
2. Click "USB already mnnected" notice option, and choose
"open USB storage devices", and then a removable disk will
show up in your computer, you can it as a U disk for data
operation.
Backup & reset
$utLlt