1
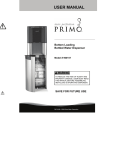
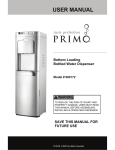
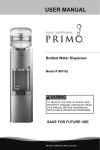
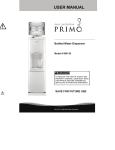
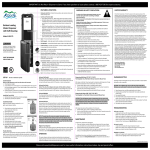
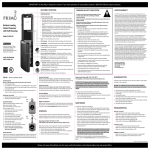
Model # 900129: Page 1
USER MANUAL
Bottom Loading
Bottled Water Dispenser
Model # 900129
TO REDUCE THE RISK OF INJURY AND
PROPERTY DAMAGE, USER MUST READ
THIS MANUAL BEFORE ASSEMBLING,
INSTALLING & OPERATING DISPENSER.
SAVE FOR FUTURE USE
PN O-009A © 2008 Primo Water Corporation
Model # 900129: Page 2
SAFETY PRECAUTIONS
To reduce risk of injury and property damage, user must read this entire
manual before assembling, installing & operating dispenser.
Failure to execute the instructions in this manual can cause personal injury
or property damage.
This product dispenses water at very high temperatures. Failure to use
properly can cause personal injury.
When operating this dispenser, always exercise basic safety precautions,
including the following:
• Prior to use, this dispenser must be properly assembled and installed in accordance with
this manual.
• This dispenser is intended for water dispensing only. Do NOT use other liquids. Do NOT
use for other purposes. Never use any other liquid in the dispenser other than known and
microbiologically safe bottled water.
• For indoor use only. Keep water dispenser in a dry place away from direct sunlight. Do NOT
use outdoors.
• Install and use only on a hard, flat and level surface.
• Do NOT place dispenser into an enclosed space or cabinet.
• Do NOT operate dispenser in the presence of explosive fumes.
• Position back of dispenser no closer than 4 inches from wall and permit free airflow
between wall and dispenser. There must be at least 4 inches clearance on the sides of the
dispenser to permit airflow.
• Use only properly grounded outlets.
• Do not use an extension cord with your water dispenser.
• Always grasp plug and pull straight out from outlet. Never unplug by pulling on power cord.
• Do NOT use dispenser if cord becomes frayed or otherwise damaged.
• To protect against electric shock, do NOT immerse cord, plug, or any other part of cooler in
water or other liquids.
• Ensure dispenser is unplugged prior to cleaning.
• Never allow children to dispense hot water without proper and direct supervision. Unplug
unit to prevent unsupervised use by children.
• Service should be performed only by a certified technician. Please contact us at
866-429-7566 for assistance.
Model # 900129: Page 3
TABLE OF CONTENTS
Safety Precautions ……………………………………………
2
Key Information for Future Use …………………………….
3
Specifications …………………………………………………
4
Parts & Features ……………………………………………..
4
Assembly ………………………………………………………
5
Installation …………………………………………………….
5
Operation ……………………………………………………..
5
Proper Care & Cleaning …………………………………….
8
Troubleshooting ……………………………………………… 10
Limited Warranty ……………………………………………… 11
KEY INFORMATION FOR FUTURE USE
Please register your dispenser immediately at
www.primowater.com.
For future support please record your serial number (located on
label on back of dispenser) and date purchased. Staple your
receipt to manual.
You will need this information to obtain warranty service.
Product
Bottom Loading
Bottled Water Dispenser
Model Number
900129
Serial ID Number
Date of Purchase
Model # 900129: Page 4
SPECIFICATIONS
Power Supply
5 AMPs
Refrigerant Type
R-134A
Cold Water Power
125 Watts
Cold Capacity / Hour
1.0 Gallons
Cold Temp Range
39!F – 59!F
Hot Water Power
425 Watts
Hot Capacity / Hour
1.0 Gallons
Hot Temp Range
149!F – 199!F
Dimensions
43.2 inches H x 12.6 inches W x 15.0
inches D
Net Weight
46.3 lbs.
PARTS & FEATURES
Front
Hot Water Control
1
Child Safety Latch
2
Cold Water Control
3
Hot Water Tap
4
LED Nightlights
5
Cold Water Tap
6
Drip Tray
7
Door
8
Bottle Tray (Inside)
9
Energy Saving Switch
10
Drain Plug
11
Carry Handle
12
Bottle Probe (Inside Cabinet)
13
Power Cord
14
1
Back
3
2
10
4
5
6
11
7
12
8
9
13
14
Model # 900129: Page 5
ASSEMBLY
Keep plastic bags away from children.
1.
Remove dispenser from packaging.
2.
Unpack drip tray and insert into dispenser.
3.
Properly dispose all of packaging.
INSTALLATION
1.
Place dispenser upright.
2.
Locate dispenser on a hard and level surface in a cool shaded location near a
grounded wall outlet.
Notice: Do NOT plug in power cord yet.
3.
Position dispenser so the back is at least 4 inches from wall and there are at least 4
inches of clearance on both sides.
4.
Level dispenser by adjusting feet. Turn clockwise to raise height and
counterclockwise to lower.
OPERATION
This unit is intended for water dispensing only. Do NOT use other liquids. Do NOT
use for other purposes.
This dispenser has been designed to use water bottles with 3 & 5 gallon capacity.
Do NOT use alternative bottles.
Model # 900129: Page 6
Initial Set Up
Notice: To prevent damage to compressor, allow unit to sit upright for at least 4 hours
prior to operating.
1. Open door.
2. If using a 5 gallon bottle use the bottle probe as it is supplied. If you desire to use a
lighter weight 3 gallon bottle, remove the bottom half of the probe by pulling it apart.
3. Slide bottle tray out and place fresh bottle on tray.
4. Clean bottle cap and neck with a soft cloth and warm soapy water.
5. Remove tamper seal from bottle cap. Do NOT remove plastic cap.
Note – If your water bottle does not have a sealed cap with a plug, use the cap
supplied with this unit. Simply snap it onto your bottle. Make sure the cap is
completely installed and there is a tight seal.
6. Insert probe into bottle by applying slight pressure
downwards until the plug inside the cap is released and
the probe housing snaps onto the bottle cap.
7. Slide tray into cabinet and close door completely.
Note – Unit will NOT operate properly with the door
open.
8. Plug cord into a properly grounded wall outlet. The unit
will come ON and start pumping air into the bottle which
will force the water from the bottle into the hot and cold
water reservoirs.
Note - If water does NOT start pumping, open the door
and make sure probe has a tight seal on the bottle.
- It will take up to 3 minutes for the reservoirs to load.
During this time the pump will run on and off. This is normal.
- Each time you dispense water from the taps, the pump will come on.
9. Turn energy saving switch on back of dispenser to ON. This switch controls the
heating of water. If you do not want hot water, turn this switch OFF.
Initial Rinsing of Water Lines
This unit has been tested and sanitized prior to packing and shipping. During transit dust
and odors can accumulate in the tank and lines. Dispense and dispose at least one
quart of water prior to drinking any water.
Model # 900129: Page 7
Dispensing Cold Water
Note: After setup, it will take 1 hour to get water to maximum cold temperature. During
this time the compressor will run continuously. This is normal.
1.
2.
3.
Position bottle, glass, pitcher or cooking pot securely below cold water tap.
– The circular shapes in the drip plate help align the flow of water. This unit
dispenses water at a fast rate. To avoid splashes, hold cup as close to the tap as
possible.
Depress cold water control downward to start flow.
Release cold water control once desired fill level is achieved.
Dispensing Hot Water
This unit dispenses water at temperatures that can cause severe burns. Avoid
direct contact with hot water. Keep children and pets away from unit while
dispensing. Never allow children to dispense hot water without proper and direct
supervision.
Note: After setup, hot water will be available in 15-20 minutes.
1.
Position bottle, glass, pitcher or cooking pot securely below hot water tap.
a.
The gray triangle below the hot water control indicates the location of the hot
water tap.
b.
The circular shapes in the drip plate help align the flow of water. This unit
dispenses water at a fast rate. To avoid splashes, hold cup as close to the tap
as possible.
2.
Push red child safety button inward and depress hot water control downward to start
flow.
3.
Release hot water control once desired fill level is achieved.
Empty Water Bottle Signal
This dispenser includes an audible and visual feature to inform you when your
water bottle is empty or the connection between the probe and bottle is not
completely sealed.
If either of these conditions occurs, you will hear a series of short beeps and the
LED nightlights will blink. This is normal.
The beeping will stop in less than a minute. The lights will stop blinking after you
replace the empty bottle, complete the bottle connection and close the door.
Model # 900129: Page 8
Replacing an Empty Bottle
1. Open door and slide bottle tray out.
2. Remove probe from bottle by pulling straight up.
3. Hang probe on inside of door so it remains clean.
4. Remove empty bottle from tray and replace it with a fresh one.
5. Remove tamper seal from cap of fresh bottle.
6. Clean bottle cap and neck with a soft cloth and warm soapy water.
7. Insert probe into bottle by applying slight pressure downwards until the plug inside
the cap is released and the probe housing snaps onto the bottle cap.
8. Once you are sure you have a complete seal, slide the tray into the cabinet and
close door completely.
PROPER CARE & CLEANING
General Cleaning
Perform: As needed
Time Required: 5 minutes.
Note: Do NOT use abrasive materials or chemical cleaners.
1.
Clean cabinet surfaces with a soft cloth and warm soapy water.
2.
Wipe dust from back of dispenser to improve efficiency.
3.
Remove drip tray assembly by sliding it forward. Remove cover. Place tray and
cover in dishwasher or wipe parts clean with a soft cloth and warm soapy water.
Cleaning Water Tanks and Lines
Perform: Every 3 months or whenever an off-taste occurs.
Time Required: 30 minutes.
Note: Best to do prior to loading a fresh bottle.
1.
2.
3.
Turn energy saving switch to OFF.
Unplug power cord from wall outlet.
Remove water bottle and place probe on hanger.
Model # 900129: Page 9
4.
Wipe probe and area around both taps with a soft cloth moistened with mixture of
one gallon tap water and 1 tablespoon of unscented household bleach.
5.
6.
Move dispenser away from wall and turn it 90! in either direction.
Place a 2 gallon or larger bucket under the drain plug
in the rear of the dispenser. Remove drain cap and
silicon plug. Cold water will immediately flow into the
bucket. Several seconds’ later hot water will
dispense.
Reminder - Place drain cap and silicon plug in a safe
location so they are not lost.
Once unit has drained, replace silicon plug and drain
cap.
Remove remaining water from cold reservoir by
dispensing from the cold tap into a pitcher.
Remove the cap from a spare empty 5 gallon bottle.
Fill the bottle with 1 gallon of tap water and 1
tablespoon of household bleach.
Place the spare bottle cap that comes with this unit onto the bottle so there is a
complete seal.
Place bottle onto tray and insert probe so it has a complete seal on the bottle cap.
Slide tray in and close door.
Plug power cord into a grounded wall outlet.
Turn energy saving switch ON.
Allow the water and bleach mixture to fill the empty reservoirs.
Wait 10 minutes then turn energy saving switch OFF and unplug the power cord.
Drain the water from the reservoirs as described in steps 6 - 8.
Repeat the flushing process again. This time with clean tap water only.
The dispenser will be clean after you have drained the tap water and replaced the
silicon plug and drain cap.
7.
8.
9.
10.
11.
12.
13.
14.
15.
16.
17.
18.
19.
20. Return the unit to its location, install a fresh water bottle, plug the power cord back
into the grounded wall outlet and turn the energy saving switch back ON.
Model # 900129: Page 10
TROUBLESHOOTING
Dispenser does not operate.
"
Make sure the power cord is properly connected to a working outlet.
Water is leaking.
"
Bottle may have a leak. Remove bottle and replace with new bottle.
"
If leak remains, remove probe from bottle and call 866-429-7566 for assistance.
No water is coming from the taps.
"
Make sure the bottle is not empty. If so replace it.
"
Make sure to push the water controls in fully.
Cold water is not cold.
"
It takes up to one hour after setup to secure cold water.
"
Make sure the back of the dispenser is at least 4 inches from a wall and there is
free airflow on all 4 sides of the dispenser.
Hot water is not hot.
"
It takes 15-20 minutes after setup to secure hot water.
"
Make sure the power cord is properly connected to a working outlet.
"
Make sure energy saving switch is ON.
Dispenser is noisy.
"
Make sure dispenser is positioned on a level surface.
Water tastes bad.
"
Drain water from reservoirs and replace bottle with a fresh one.
"
Sanitize dispenser per Proper Care & Cleaning instructions.
Nightlight Isn’t Working
"
Make sure the power cord is properly connected to a working outlet.
"
Bulb could be out. Call 866-429-7566 for assistance.
Water Isn’t Pumping
"
Make sure the power cord is properly connected to a working outlet.
"
Make sure the probe connection with the water bottle forms a complete seal.
"
Make sure the door is closed.
Model # 900129: Page 11
LIMITED WARRANTY
Primo Water Corporation, (“Vendor”) warrants to the original purchaser of this dispenser, and to no
other person, that if this dispenser is assembled and operated in accordance with the printed
instructions accompanying it, then for a period of two (2) years from the date of purchase, all parts
in such dispenser shall be free from defects in material and workmanship. Vendor may require
reasonable proof of your date of purchase from an authorized retailer or distributor. Therefore, you
should retain your sales slip or invoice. The Limited Warranty shall be limited to repair or
replacement of parts, which prove defective under normal use and service and which Vendor shall
determine in its reasonable discretion upon examination to be defective. Before returning any parts,
you should contact Vendor’s Customer Service Department using the contact information listed
below. If Vendor confirms, after examination, a defect covered by this Limited Warranty in any
returned part, and if Vendor approves claim, Vendor will replace such defective part without charge.
If you return defective parts, transportation charges must be prepaid by you. Vendor will return
replacement parts to original purchaser, freight or postage prepaid.
The Limited Warranty does not cover any failures or operating difficulties due to accident, abuse,
misuse, alteration, misapplication, improper installation or improper maintenance or service by you
or any third party, or failure to perform normal and routine maintenance on the dispenser, as set out
in the User’s Manual. In addition, the Limited Warranty does not cover damages to the finish, such
as scratches, dents, discoloration or rust after purchase.
The Limited Warranty is in lieu of all other express warranties. Vendor disclaims all warranties for
products that are purchased from seller other than authorized retailers or distributors. AFTER THE
PERIOD OF THE TWO (2) YEAR EXPRESS WARRANTY, VENDOR DISCLAIMS ANY AND ALL
IMPLIED WARRANTIES, INCLUDING WITHOUT LIMITATION THE IMPLIED WARRANTIES OF
MERCHANTABILITY AND FITNESS FOR A PARTICULAR PURPOSE. FURTHER, VENDOR
SHALL HAVE NO LIABILITY WHATSOEVER TO PURCHASER OR ANY THIRD PARTY FOR
ANY SPECIAL, INDIRECT, PUNITIVE, INCIDENTAL, OR CONSEQUENTAL DAMAGES. Vendor
assumes no responsibility for any defects caused by third parties. This Limited Warranty gives the
purchaser specific legal rights; a purchaser may have other rights depending upon where he or she
lives. Some jurisdictions do not allow exclusion or limitation of special, incidental or consequential
damages, or limitations on how long a warranty lasts, so the above exclusion and limitations may
not apply to you.
Primo Water Corporation
104 Cambridge Plaza Drive
Winston-Salem, NC 27104
866-429-7566
www.primowater.com