1
ENGLISH
INTRODUCTION
REMOTE THERMO-HYGROMETER
WITH LCD
ABOUT OREGON SCIENTIFIC
Visit our website (www.oregonscientific.com) to learn more about Oregon Scientific products such as digital cameras; MP3 players; children's electronic learning
products and games; projection clocks; health and fitness gear; weather stations;
and digital and conference phones. The website also includes contact information
for our customer care department in case you need to reach us, as well as frequently
asked questions and customer downloads.
Congratulations on your purchase of the Remote Thermo-Hygro Sensor
(THGR228N).
The THGR228N is compatible with a variety 433MHz multi-channel in-out thermohygro monitoring units. Operation is easy and no wire installation is required.
COMPATIBLE UNITS
MODEL : THGR228N
USER'S MANUAL
Note: The THGR228N is compatible with a variety of multi-channel units. If
unsure about the compatibility of this units, please consult your dealer for
further advise.
PRECAUTIONS
This product is engineered to give you years of satisfactory service if you handle it
carefully. Here are a few precautions:
1.
Do not immerse the unit in water.
2.
Do not clean the unit with abrasive or corrosive materials. They may scratch
the plastic parts and corrode the electronic circuit.
3.
Do not subject the unit to excessive force, shock, dust, temperature or humidity,
which may result in malfunction, shorter electronic life span, damaged battery
and distorted parts.
Examples of compatible units are as follows:
EMR899HGN
WMR918N
4.
Do not tamper with the unit’s internal components. Doing so will invalidate
the warranty on the unit and may cause unnecessary damage. The unit contains
no user-serviceable parts.
MAIN FEATURES
A
5.
Two-line LCD
Only use fresh batteries as specified in the user’s manual. Do not mix new and
old batteries as the old ones may leak.
Displays the current temperature and humidity monitored by the remote unit
6.
• Temperature display
B
Humidity display
•
Comfort-level indicator
°C/°F SLIDE SWITCH
Selects between Centigrade (°C) and Fahrenheit (°F)
CHANNEL SLIDE SWITCH
Designates the remote unit Channel 1, Channel 2 or Channel 3
E
RESET BUTTON
Returns all settings to default values
F
BATTERY COMPARTMENT
Accommodates two UM-4 or AAA size alkaline batteries
G
H
BATTERY DOOR
WALL-MOUNT HOLDER
REMOVABLE TABLE STAND
GETTING STARTED
Note: To ensure proper reception between the main unit and the remote sensor,
follow the instructions carefully.
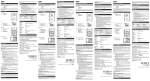
[ FIG A ]
Remove the screws on the battery door of the remote unit.
3.
Assign a different channel to each remote sensor by changing the channel
switch in the battery compartment of the remote sensor. [FIG A]
Select the units of measurement for the temperature display on the °C/°F
slide switch. [FIG B]
5.
Install 2 alkaline batteries (UM-4 or "AAA" size 1.5V) strictly according
to the polarities shown. [FIG C]
6.
Insert batteries or press the reset button of the main unit. Follow the instructions
as set out in the User's manual.
7.
Replace the battery compartment door and secure its screws.
Position the remote sensor and main unit within effective transmission
range, which in usual circumstances, is 30 meters.
Note: The effective range may be limited by building materials and the position
of either the main unit or remote sensors. Try various set-up arrangements for
best result.
[ FIG B ]
Though the sensor is weatherproof, and is meant for use outside, it should be placed
away from direct sunlight, rain, or snow.
CHANGING CHANNELS
Once a channel is assigned to a unit, you can only change it by removing the batteries
and repeating the above procedure.
LOW-BATTERY WARNING
A battery-low indicator [ ] will activate on the sensor to indicate that the batteries
are low and require changing. Low batteries for a given sensor will also be indicated
on the main unit. Replace the batteries when the low-battery indicator appears.
Note: Disposed of improperly, batteries can beharmful. Protect the
environment by taking exhausted batteries to authorized disposal stations.
[ FIG C ]
THE COMFORT-LEVEL INDICATOR
The comfort level is based on the recorded relative humidity. An indicator will be
displayed to show if the level is comfortable, wet or dry. [FIG D]
OPERATION
Once batteries are in place, the sensor will start transmitting samplings at 40-second
intervals.
[ FIG D ]
The remote sensor reading shown on the LCD of the main unit depends on which
remote sensor channel has been chosen.
HOW TO RESET THE UNIT
The reset function is required only when the unit is operating in an unfavorable way
or malfunctioning.
To access:
1.
Lift open the battery compartment door.
2.
Place a blunt stylus into the hole marked RESET and press.
3.
Replace the battery compartment door.
See the user's manual of your main unit for further information.
[ FIG E ]
THGR228N_M_8L-1
1
PRECAUZIONI
Questo strumento è studiato per offrire molti anni di funzionamento soddisfacente
a condizione che venga maneggiato con cura. Attenersi alle seguenti precauzioni:
1.
Non immergere l'unità in liquidi.
2.
Non pulire l'unità con sostanze abrasive o corrosive, poiché possono scalfire i
componenti di plastica e corrodere il circuito elettronico.
3.
Non sottoporre l'unità a forza eccessiva, urti, polvere temperature eccessive o
umidità che possano provocare mal funzionamenti, ridurre la durata dei circuiti
elettronici, danneggiare la batteria o distorcere i componenti.
Esempi di strumenti compatibili:
For international enquiries, please visit:
http://www2.oregonscientific.com/about/international/default.asp
EMR899HGN
4.
WMR918N
CARATTERISTICHE PRINCIPALI
A
EC-DECLARATION OF CONFORMITY
5.
LCD a due sezioni
Visualizza le letture di temperatura ed umidità rilevate dall’unità a distanza.
This product contains the approved transmitter module that complies with the essential requirements of Article 3 of the R&TTE 1999 / 5 / EC Directive, if used as
intended and the following standards have been applied:
• Visualizzazione della temperatura
6.
• Visualizzazione dell’umidità
B
Safety of information technology equipment
Proposed operating range
: -20.0°C to +60.0°C (-4.0°F to 140.0°F)
Temperature resolution
: 0.1°C (0.2°F)
Electromagnetic compatibility
Humidity Resolution
: 1%
(Article 3.1.b of the R&TTE Directive)
Relative humidity measurement range : 5% RH to 95% RH
Applied Standard
Non manomettere i componenti interni dell'unità. Così facendo si rende nulla
la garanzia e si possono causare danni superflui. L'unità non contiene
componenti che possono essere riparati dall'utente.
Applied Standards
Prima di mettere in funzione l'unità, leggere attentamente le istruzioni per
l'uso.
Number of channels
:3
Efficient use of radio frequency spectrum
RF Transmission Range
: Maximum 30 meters
(Article 3.2 of the R&TTE Directive)
Temperature sensing cycle
: around 40 seconds
Applied Standards
: two (2) UM-4 or “AAA” 1.5V
alkaline batteries
Weight
: 63 gm (without batteries)
Dimension
: 92 x 60 x 20 mm (H x W x D)
F
G
SPORTELLO VANO BATTERIE
H
FORO PER IL MONTAGGIO A PARETE
Additional information:
The product herewith complies with the requirements of the Low Voltage Directive
73 / 23 / EC, the EMC Directive 89 / 336 / EC and carries the CE marking accordingly.
I
INSTALLAZIONE DI BATTERIE E CANALI
COUNTRIES RTTE APPROVAL COMPLIED
and Norway
N
1.
Posizionare entrambi gli strumenti il più vicino possibile tra di essi.
2.
Togliere le viti dal vano batterie.
3.
Assegnare un canale diverso a ciascuno dei sensori remoti per mezzo del
selettore dei canali situato all’interno del compartimento batterie del sensore
remoto. [FIG A]
4.
Selezionare l'unità di visualizzazione delle temperature con il selettore °C/°F.
[FIG B]
5.
Installare due batterie alcaline (tipo UM-4 o “AAA” da 1,5V) seguendo
attentamente le polarità indicate. [FIG C]
6.
Inserire le batterie e premere il tasto di azzeramento dello strumento principale.
Seguire le istruzioni che troverete nel manuale dell’Utente.
7.
Riposizionare lo sportello del vano batterie ed avvitarlo con le relative viti.
8.
Posizionare l'unità remota e l'unità principale entro un campo di trasmissione
efficace, che in circostanze normali varia da 20 a 30 metri.
Nota: Va osservato che il campo di efficienza è notevolmente condizionato dai
materiali dell'edificio e dall'ambiente in cui sono posizionate l'unità principale
e l'unità remota. Provare diverse configurazioni per ottenere il risultato migliore.
However, there is no guarantee that interference will not occur in a particular
installation. If this equipment does cause harmful interference to radio or television
reception, which can be determined by turning the equipment off and on, the user is
encouraged to try to correct the interference by one or more of the following
measures:
•
Reorient or relocate the receiving antenna.
•
Increase the separation between the equipment and receiver.
•
Connect the equipment into an outlet on a circuit different from that to which
the receiver is connected.
•
Consult the dealer or an experienced radio / TV technician for help.
Sebbene sia resistente alle intemperie e concepito per l'impiego in ambienti esterni,
il sensore va posizionato lontano dalla luce solare diretta e al riparo da pioggia o
neve.
DECLARATION OF CONFORMITY
The information below is not to be used as contact for support or sales. Please call
our customer service number (listed on our website at www.oregonscientific.com,
or on the warranty card for this product) for all inquiries instead.
Un indicatore di esaurimento batteria [
] si attiverà sul sensore per indicare che
le batterie stanno per scaricarsi e richiedono la sostituzione. L’abbassamento di
carica per un dato sensore è anche indicata sull’unità principale. Le batterie vanno
sostituite quando appare questo indicatore.
We
Name:
Address:
Telephone No.:
Fax No.:
declare that the product
Product No.:
Product Name:
Manufacturer:
Address:
Oregon Scientific, Inc.
19861 SW 95th Place,
Tualatin, Oregon 97062 USA
1-800-853-8883
1-503-684-8883
BAR608HGA
Wireless Weather Station
IDT Technology Limited
Block C, 9/F, Kaiser Estate, Phase 1, 41 Man
Yue St., Hung Hom, Kowloon, Hong Kong
is in conformity with Part 15 of the FCC Rules. Operation is subject to the following
two conditions:
1) This device may not cause harmful interference.
2) This device must accept any interference received, including interference that
may cause undesired operation.
: 0,1°C (0,2°F)
Risoluzione umidità
•
B
: 433 MHz
Numero di canali
:3
CAMBIAMENTO DEI CANALI
Una volta che è stato assegnato ad una unità, un canale può essere modificato soltanto
togliendo le batterie e ripetendo la procedura sopra indicata.
AVVERTIMENTO DI BASSA CARICA DELLE
BATTERIE
Nota: se non smaltite correttamente, le batterie possono risultare nocive.
Per proteggere l’ambiente, portare le batterie scariche in un centro di
smaltimento autorizzato.
INDICAZIONE DI AMBIENTE
COMMUTATEUR °C / °F
C
: massimo 30 metri
E
: circa 40 secondi
: 2 batterie UM-4 o "AAA" alcaline da
1,5 V
Peso
: 63 g (senza batteria)
Dimensioni
: 92 x 60 x 20 mm (L x W x T)
F
Ne pas toucher les composants internes de l'appareil. Ceci rendra nul la garantie
et peut causer des dommages. L'appareil ne contient aucun composant pouvant
être réparé par l'utilisateur.
I
INFORMAZIONI SU OREGON SCIENTIFIC
TOUCHE DE REMISE A ZERO
Rayon de relevé de l’humidité relative : 5% RH à 95% RH
Remet tous les éléments programmés aux valeurs par défaut.
Fréquence d’émission RF
: 433 MHz
COMPARTIMENT A PILES
Nombre de canaux
:3
Accepte deux piles de type AAA
Rayon de Communication RF
: 30 mètres maximum
Cycle de sondage de température
Permet de poser la sonde sur une surface horizontale
Dimensions
: 92 x 60 x 20 mm (H x I x L)
- Le contenu de ce livret ne peut être reporduit sans l'autorisation du fabricant.
Insérez les piles ou appuyez sur le bouton réinitialisation de l'unité principale.
Suivez les instructions détaillées dans le guide de l'utilisateur.
DICHIARAZIONE DI CONFORMITÁ
7.
Remettez la trappe du logement des piles en place et resserrez les vis.
8.
Positionnez l'appareil commandé à distance et l'appareil principal dans un rayon
de transmission effective, généralement de 30 mètres.
Notez que la portée effective dépend en grande partie des matériaux de construction et de l'emplacement des appareils principaux et commandés à distance.
Bien que la sonde soit étanche et conçue pour être utilisée à l'extérieur, il est conseillé
de la placer à l'abri des rayons du soleil, de la pluie ou de la neige.
CHANGEMENT DE CANAL
EN 60950-1: 2001
Compatibilità Elettromagnetica
(Articolo 3.1.b della direttiva R&TTE)
Standard applicati
ETSI EN 301 489-1-3 (Ver.1.4.1) : 2002-08
Uso corretto delle spettro delle radiofrequenze
(Articolo 3.2 della direttiva R&TTE)
Standard applicati
ETSI EN 300 220-3 (Ver1.1.1) : 2000-09
ALARME DE PILES FAIBLES
Remarque: Des piles éliminées n’importe comment peuvent être nocives.
Protéger l’environnement en portant toutes piles épuisées dans une décharge
autorisée.
Informazioni aggiuntive:
L’apparecchio è inoltre conforme alla Direttiva sulla Bassa Tensione 73 / 23 / EC,
alla Direttiva sulla Compatibilità Elettromagnetica 89 / 336 / EC, alla Direttiva
R&TTE 1999 / 5 / EC (appendice II) e recante i rispettivi marchi CE.
NIVEAU DE CONFORT
Le niveau de confort est basé sur l’humidité relative enregistrée. Un indicateur sera
affiché pour indiquer si le niveau est confortable, humide ou sec. [FIG D]
FUNZIONAMENTO
FONCTIONNEMENT
La lecture du senseur à distance indiquée sur l’Ecran à cristaux liauides dépend de la
chaîne du senseur à distance qui aura été choisie.
COME AZZERARE LO STRUMENTO
COMMENT REINITIALISER L’APPAREIL
Zur Öffnung:
Tutti i Paesi Europei, Svizzera CH
e Norvegia
N
1.
Ouvrez la porte du compatiment à piles.
2.
Placez un objet pointu dans le trou marqué RESET et appuyez.
3.
Refermez le compartiment à piles.
Reportez-vous au livret de l'utilisateur de votre appareil principal pour de plus amples
informations.
HALTERUNG FÜR WANDAUFHÄNGUNG
Um den Aussensensor an einer Wand aufzuhängen.
ABNEHMBARER STANDBÜGEL
Anmerkung: Um einen optimalen Empfang zwischen Empfangsgerät und
Aussensensor zu gewährleisten, beachten Sie bitte die folgenden Anweisungen:
EINLEGEN DER BATTERIEN UND
KANAL-EINSTELLUNG
1.
Stellen Sie beide Geräte so nah wie möglich beieinander auf.
2.
Nehmen Sie die Batterienfachabdeckung ab.
En consultant notre site internet (www.oregonscientific.fr), vous pourrez obtenir
des informations sur les produits Oregon Scientific: photo numérique; lecteurs MP3;
produits et jeux électroniques éducatifs; réveils; sport et bien-être; stations météo;
téléphonie. Le site indique également comment joindre notre service après-vente.
3.
Wählen Sie verschiedene Kanäle für jedes Sensorgerät, indem Sie im
Batteriefach die Stellung des Kanalschalters verändern. [FIG A]
4.
Stellen Sie die Temperaturanzeige für °C/ °F mittels des entsprechenden
Wahlschalters ein. [FIG B]
Nous espérons que vous trouverez toutes les informations dont vous avez besoin
sur notre site, néanmoins, si vous souhaitez contacter le service client Oregon Scientific directement, allez sur le site www2.oregonscientific.com/service/support ou
appelez le 949-608-2848 aux US. Pour des demandes internationales, rendez vous
sur le site: www2.oregonscientific.com/about/international/default.asp
5.
Legen Sie 2 “Alkali” Batterien (UM-4 oder “AAA”-Größe 1,5V) entsprechend
der angegebenen Polaritäten ein. [FIG C]
A PROPOS D'OREGON SCIENTIFIC
DÉCLARATION DE CONFORMITE EUROPÉENNE
Cet instrument est muni du module transmetteur. Il est conforme aux conditions
requises par l'article 3 des Directives R&TTE 1999 / 5 / EC si il est utilisé à bon
escient et si la ou les norme(s) suivante(s) sont respectée(s):
Sécurité des appareils à technologie d’information
(Article 3.1.a de la Directive R&TTE)
norme(s) appliquée(s)
EN 60950-1: 2001
Compatibilité électromagnétique
(Article 3.1.b de la Directive R&TTE)
norme(s) appliquée(s)
ETSI EN 301 489-1-3 (Ver.1.4.1) : 2002-08
Utilisation efficace du spectre des fréquences radio
(Article 3.2 de la Directive R&TTE Directive)
norme(s) appliquée(s)
ETSI EN 300 220-3 (Ver1.1.1) : 2000-09
Information supplémentaire:
Par conséquent ce produit est conforme à la Directive Basse tension 73 / 23 / EC,
à la Directive EMC 89 / 336 / EC et à la Directive R&TTE 1999 / 5 / EC (annexe
II) et porte la mention CE correspondante.
6.
Legen Sie die Batterien ein oder drücken Sie den Resetknopf des
Empfangsgerätes.
7.
Setzen Sie die Batteriefach-Abdeckung wieder auf, und ziehen Sie die
Schrauben fest.
8.
Stellen Sie das Empfangsgerät und die Aussensensoren innerhalb der
Reichweite der Geräte auf, d.h. in einem Umkreis von 30 Metern.
ACHTUNG: BATTERIEN GEHÖREN NICHT IN DEN HAUSMÜLL.
BITTE GEBEN SIE DIESE AN DEN DAFÜR VORGESEHENEN
SAMMELSTELLEN AB.
Beachten Sie, daß die tatsächliche Reichweite der Geräte von den jeweils im Gebäude
verwendeten Materialien, und der Position der externen Sensoren abhängt. Testen
Sie verschiedene Aufstellungsorte, um optimale Resultate zu erzielen.
Obwohl die Aussensensoren wetterfest sind, sollten Sie diese dennoch nicht an
Orten plazieren, wo diese direkter Sonneneinstrahlung, Regen oder Schnee
ausgesetzt sind.
ÄNDERN DER KANALZUWEISUNG
Sobald Sie einem Sensor einen Kanal zugewiesen haben, können Sie diese
Einstellung nur durch Herausnehmen der Batterien ändern, und indem Sie den oben
beschriebenen Vorgang wiederholen.
BATTERIEINDIKATOR
Ein Batteriestand-Indikator [ ] erscheint an der Sensoreinheit wenn die Batterien
leer sind und ausgewechselt werden müssen. Ein entsprechender Indikator erscheint
auch am Hauptgerät, und zeigt an, für welchen Sensor die Batterien ausgewechselt
werden müssen. Wechseln Sie die Batterien aus, wenn der Batteriestand-Indikator
erscheint.
Anmerkung: Unsachgemäß entsorgte Batterien können die Umwelt
schädigen. Schützen Sie die Umwelt, und bringen Sie leere Batterien
stets zu einer offiziellen Sammelstelle.
KOMFORT-ANZEIGE
Carmelo Cubito
Agrate Brianza (MI) / Italie January 2004
Représentant du fabricant R&TTE
Die Anzeige für den Raumluft-Komfort basiert auf den gespeicherten Werten für
die relative Luftfeuchtigkeit. Ein Indikator zeigt an, ob die Raumluft “angenehm”
oder zu “feucht” ist. [FIG D]
AUFNAHME DES BETRIEBS
La fonction réinitialisation n'est requise uniquement que lorsque l'unité fonctionne
de manière incorrecte ou mauvaise.
PAESI CONFORMI ALLA DIRETTIVA R&TTE
H
Zur Aufstellung des Aussensensors auf einer ebenen Oberfläche.
Une fois que les piles sont en place, la sonde commence à émettre des échantillonnages à
intervalles de 40 secondes.
Carmelo Cubito
Agrate Brianza (MI) / Italia January 2004
Rappresentante EU del Produttore per la R&TTE
BATTERIEFACH-ABDECKUNG
- En raison des restrictions imposées par l'impression, les affichages figurant
dans ce livret peuvent différer de ceux du produit.
Une fois qu'un canal a été attribué à un appareil, vous ne pouvez le changer qu'en
ôtant les piles et en recommençant les procédures ci-dessus.
Un indicateur de pile faible [ ] activera le senseur pour indiquer que les piles sont
faibles et doivent être remplacées. Les piles faibles d’un senseur donné seront aussi
indiquées sur l’appareil principal. Remplacer les piles quand l’indicateur de pile
faible apparaît.
G
VORBEREITUNG ZUM EINSATZ
INSTALLATION DES PILES ET DES CANAUX
6.
BATTERIEFACH
ATTENTION
- Le contenu de ce livret est susceptible de modifications sans avis préalable.
Insérez deux piles alcaline (UM4 ou "AAA" de type 1.5V) en respectant
strictement les polarités indiquées. [FIG C]
F
I
Remarque: Pour assurer une réception adéquate entre l'unité principale et le
senseur à distance, suivez ces instructions avec précision.
5.
Questo prodotto contiene il modulo di trasmissione approvato ed è conforme ai
requisiti essenziali dell'articolo 3 della Direttiva 1999 / 5 / CE di R&TTE se
utilizzato per l'uso previsto e se vengono applicati i seguenti standard:
: 40 secondes environ
: 63 gm (sans piles)
Sélectionnez l'unité de relevé des températures à l'aide de l'interrupteur
coulissant °C/ °F. [FIG B]
RÜCKSETZ-TASTE (RESET)
Enthält zwei Batterien des Typs "AAA".
Poids
4.
SENDEKANAL-WAHLSCHALTER
Rücksetzung aller Einstellungen auf die Vorgabewerte.
SOCLE AMOVIBLE
Puoi trovare anche le informazioni necessarie per contattare il nostro servizio
clienti, le risposte ad alcune domande più frequenti (FAQ) o i software da
scaricare gratuitamente.
D
Weist einem Sensor Kanal 1, Kanal 2 oder Kanal 3 zu.
: utilise 2 piles alcalines 1,5V de type
UM-4 "AAA"
Assignez un canal différent à chaque senseur à distance en changeant le bouton de canal dans le compartiment à piles du senseur à distance. [FIG A]
°C/°F WAHLSCHALTER
Einstellen der Temperaturanzeige für Celsius- (°C), oder Fahrenheit-Grade
(°F).
E
Alimentation
3.
Sul nostro sito internet potrai trovare tutte le informazioni di cui hai bisogno, ma
se desideri contattare direttamente il nostro Servizio Consumatori puoi visitare il
sito www2.oregonscientific.com/service/support oppure chiamare al 949-6082848 (numero valido esclusivamente per gli USA). Per ricerche di tipo
internazionale puoi visitare invece il sito www2.oregonscientific.com/about/
international/default.asp
Blinkt während der externe Sensor eine Messung an das Empfangsgerät sendet.
: 1%
Retirez les vis du logement des piles.
LED-INDIKATOR
C
Appareil thermo-hygro à distance
: 0,1°C (0,2°F)
Rapprochez les unités le plus possible l'une de l'autre.
• Komfort-Indikator
FICHE TECHNIQUE
Précision de l’humidité
2.
• Temperaturanzeige
B
Désigne le canal utilisé par la sonde: 1, 2 ou 3.
1.
ZWEIZEILIGE LCD-ANZEIGE
• Anzeige für Luftfeuchtigkeit
: -20,0°C à +60,0°C (-4,0°F à 140,0°F)
Per avere maggiori informazioni sui nuovi prodotti Oregon Scientific, come le
fotocamere digitali, il lettori MP3, i computer didattici per ragazzi, gli orologi
con proiezione dell’ora, le stazioni barometriche, gli orologi da polso
multifunzione, gli strumenti per la cura della persona ed il fitness, ed altro
ancora, visita il nostro sito internet www.oregonscientific.com
EIGENSCHAFTEN
A
Lire soigneusement le manuel d'instructions avant de faire fonctionner
l'appareil.
Plage de fonctionnement proposée
MISE EN MARCHE
WMR918N
6.
Limite de résolution de température
SUPPORT MURAL
EMR899HGN
Anzeige der Temperatur-und Luftfeuchtigkeitswerte.
COMMUTATEUR DE CANAUX
COUVERCLE DU COMPARTIMENT A PILES
Beispiele für kompatible Empfangsgeräte:
Utiliser uniquement des piles neuves du type préconisé dans le manuel
d'utilisation. Ne pas mélanger piles neuves et piles usées afin d'éviter les fuites.
Permet de basculer entre les températures en degrés Centigrade (°C) ou degrés
Fahrenheit (°F)
H
Anmerkung: Das THGR228N ist mit verschiedenen Mehrkanalgeräten
kompatible. Bitte treten Sie mit Ihrem Fachhändler in Verbindung, für
ausführliche Beratung zur Kompatibilität dieses Gerätes.
5.
: -50,0°C à +70,0°C (-58,0°F à 158,0°F)
G
- Il contenuto di questo manuale non può essere riprodotto senza il permesso
del produttore.
2004.9.23, 2:48 PM
Ne pas exposer l'appareil aux chocs excessifs, ni aux excès de force, poussière,
chaleur, froid ou humidité qui pourraient résulter en un mauvais
fonctionnement, le raccourcissement de la vie de l'appareil, l'endommagement
des piles et la déformation des composants.
Rayon d’affichage des températures
- Per via delle limitazioni di stampa, i display mostrati in questo manuale
possono differire dai display effettivi.
COME USARE IL SUPPORTO DA TAVOLO O PER
IL MONTAGGIO A PARETE
3.
Reçoit l'unité déportée lors d'une fixation au mur
- Il contenuto di questo manuale e le specifiche tecniche di questo prodotto
sono soggetto a modifiche senza preavviso.
L’operazione é da dffettuarsi solo sei dati rilevati appaiono incoerenti o se la
comunicazione tra l’unitá remota e l’unitá principale non é attiva.
Per azzerare:
1. Aprire lo sportello del compartimento batterie.
2. Premere con un oggetto appuntito il tasto reset.
3. Riporre il coperchio del vano batterie.
Per ulteriori informazioni, vedere il manuale relativo all'unità principale.
Ne pas nettoyer l'appareil à l'aide de produits abrasifs ou corrosifs. Ces produits
peuvent rayer les parties en plastique et attaquer les circuits électroniques.
Indicateur de niveau de confort
Le indicazioni di ambiente si basano sull’umidità relativa registrata e indicano se
l’ambiente circostante è confortevole, umido o secco. [FIG D]
Una volta installate le batterie, il sensore inizierà a trasmettere rilevamenti ad
intervalli di 40 secondi.
Sull’unitá principale sará possibile monitorare la temperatura del sensore remoto.
Ne pas immerger l'appareil.
2.
4.
EINLEITUNG
Wir gratulieren Ihnen zum Kauf dieses kabellosen Thermo-Hygro-Sensors
(THGR228N).
Das THGR228N ist kompatibel mit verschiedenen 433 MHz Mehrkanal-ThermoHygro-Basisgeräten für Innen-und Außentemperaturen kompatibel. Die Bedienung
ist einfach, und keine Kabelinstallationsarbeiten müssen ausgeführt werden.
KOMPATIBLE GERÄTE
1.
TEMOIN LED
D
Requisiti essenziali sulla sicurezza dell’apparecchio
(Articolo 3.1.a della direttiva R&TTE)
Standard applicati
PRECAUTIONS
Ce produit a été conçu pour assurer un bon fonctionnement pendant plusieurs années
à condition d'en prendre soin. Certaines précautions s'imposent:
Clignote lorsque la sonde transmet des indications
: 1%
Frequenza di trasmissione RF
Cette sonde est fournie avec un support pour installation murale et un pied amovible.
Utilisez l'un ou l'autre pour maintenir l'appareil en place. [FIG E]
LCD deux lignes
Affiche la température et l’humidité actuelles relevées par l’appareil à distance.
AVVERTENZA
Carmelo Cubito
All EC countries, Switzerland CH
NOTE: This equipment has been tested and found to comply with the limits for a
Class B digital device, pursuant to Part 15 of the FCC Rules. These limits are designed
to provide reasonable protection against harmful interference in a residential
installation. This equipment generates, uses and can radiate radio frequency energy
and, if not installed and used in accordance with the instructions, may cause harmful
interference to radio communications.
SUPPORTO DI APPOGGIO RETRATTILE
Nota: Per assicurare una ricezione accurata tra lo strumento principale e il
sensore remoto, seguire queste istruzioni attentamente.
FCC STATEMENT
A
DEUTSCH
COMMENT UTILISER LE PIED DE SUPPORT OU
L'INSTALLATION MURALE
WMR918N
CARACTERISTIQUES PRINCIPALES
: da -50°C a +70°C (da -58°F a 158°F)
Risoluzione di temperatura
Alimentazione
COME INIZIARE
Manufacturer’s EU R&TTE Representative
EMR899HGN
• Affichage de l’humidité
: da -20°C a +60°C (da -4°F a 140°F)
Ciclo di rilevamento temperatura
Permette di posizionare l'unità principale su una superficie piana.
Agrate Brianza (MI) / Italy January 2004
Les exemples d'appareils compatibles sont les suivants:
• Affichage de la température
Campo di esercizio consigliato
Raggio di trasmissione RF
Permette di appendere l'unità a parete.
- Due to printing limitation, the displays shown in this manual may differ
from the actual display.
Warning: Changes or modifications to this unit not expressly approved by the
party responsible for compliance could void the user's authority to operate the
equipment.
VANO BATTERIE
Accoglie due batterie di formato AAA.
ETSI EN 300 220-3 (Ver1.1.1) : 2000-09
Remarque: Le THGR228N est compatible avec différents appareils multi-canaux.
En cas de doute quant à la compatibilité de cet appareil, s’adressercositaire.
Campo di misurazione umidità relativa : da 5% a 95% UR
PULSANTE RESET (AZZERA)
Ripristina i valori predefiniti di tutte le impostazioni.
- The content of this manual is subject to change without further notice.
This device complies with Part 15 of the FCC Rules. Operation is subject to the
following two conditions:
(1) This device may not cause harmful interference, and (2) This device must accept
any interference received, including interference that may cause undesired operation.
SELETTORE DEI CANALI
E
CAUTION
- The contents of this manual may not be reproduced without the permission
of the manufacturer.
Campo di temperatura visualizzato
Permette di designare il Canale 1, il Canale 2 o il Canale 3 dell'unità remota
ETSI EN 301 489-1-3 (Ver.1.4.1) : 2002-08
: 433 MHz
APPAREILS COMPATIBLES
DATI TECNICI
Permette di selezionare i gradi centigradi (°C) o Fahrenheit (°F)
D
INTRODUCTION
Nous vous félicitons d'avoir fait l'acquisition du Senseur Thermo-Hygro à distance
(THGR228N).
Le THGR228N est compatible avec différents appareils de relevés thermo-hygro
intérieur-extérieur multi-canaux 433 MHz. Il est très simple à utiliser et ne nécessite
aucun câblage.
Igrometro / termometro per rilevamenti a distanza
SELETTORE °C/°F
C
FRENCH
Usare solo batterie nuove, come specificato nelle istruzioni del produttore.
Non mischiare batterie nuove con batterie vecchie, poiché queste ultime
possono provocare perdite.
INDICATORE LED
Lampeggia quando l'unità remota trasmette un rilevamento.
EN 60950-1: 2001
RF Transmission Frequency
Place both units as close as possible to each other.
2.
8.
Call 949-608-2848 in the US.
(Article 3.1.a of the R&TTE Directive)
BATTERY AND CHANNEL INSTALLATION
4.
Nota: Il THGR228N è compatibile con una molteplicità di unità di
monitoraggio. Se non si è sicuri della compatibilità di questa unità, consultare
il proprio concessionario per ulteriore assistenza.
OR
: -50.0°C to +70.0°C (-58.0°F to 158.0°F)
For standing the remote unit on a flat surface
1.
STRUMENTI COMPATIBILI
We hope you will find all the information you need on our website, however if
you'd like to contact the Oregon Scientific Customer Care department directly, please
visit: www2.oregonscientific.com/service/support
Displayed temperature range
Power
Supports the remote unit in wall-mounting
I
SPECIFICATIONS
Remote thermo-hygro unit
Flashes when the remote unit transmits a reading
D
INTRODUZIONE
Complimenti per aver acquistato il Sensore Remoto per Termo-igrometro (THGR228N).
Il THGR228N è compatibile con una molteplicità di unità di monitoraggio igrotermiche
multicanale int/est. da 433 MHz. Il funzionamento non richiede nessuna cablatura.
• Indicatore di ambiente
•
LED INDICATOR
C
Always read the user’s manual thoroughly before operating the unit.
Questo sensore viene fornito con un elemento per il montaggio a parete e con un
supporto asportabile. Usare l'uno o l'altro dispositivo per tenere l'unità in posizione.
[ FIG E ]
ITALIANO
HOW TO USE THE TABLE STAND OR WALL MOUNT
This sensor comes with a wall-mount holder and a removable stand. Use either to
hold the unit in place. [ FIG E]
PAYS CONCERNES RTT&E
Tous les pays de l’UE, Suisse CH
et Norvège
N
Nachdem die Batterien in einen Aussensensor eingelegt wurden, beginnt dieser mit
der Übertragung der gemessenen Temperatur in Intervallen von 40 Sekunden.
Die auf der LCD Anzeige erscheinende Aussensensoranzeige ist von der Auswahl
des Aussensensorkansles abhängig.
SO STELLEN SIE DAS GERÄT AUF DIE
VORGABEWERTE ZURÜCK
Die RESET Funktion wird nur gebraucht, wenn das Gerät ungenau arbeitet.
Eine Rücksetzung auf die Vorgabewerte sollte nur dann erfolgen, wenn das Gerät
ungenau arbeitet.
Dazu öffnen Sie bitte das Batteriefach und führen den RESET mittels eines dünnen
Drahtes (z.B. Büroklammer) durch. Danach schließen Sie das Batteriefach wieder.
Beachten Sie bitte die Bedienungsanleitung des Empfangsgerätes für weitere
Hinweise.
DER EINSATZ DES STANDBÜGELS ODER DER
WANDAUFHÄNGUNG
ESPAÑOL
INTRODUCCION
Felicidades por su compra del Sensor remoto de temperatura y humedad (THGR228N).
El THGR228N es compatible con diversas unidades de monitorización de la
temperatura y humedad de 433 MHz, en varios canales y tanto externas e internas.
De fácil funcionamiento y sin necesidad de conexiones.
COMPATIBILIDAD CON OTROS APARATOS
Die Geräte mit einer Wandhalterung und einem abnehmbaren Standbügel
ausgeliefert. Verwenden Sie eine der beiden Möglichkeiten, um das Gerät zu
installieren. [ FIG E ]
Nota: El THGR228N es compatible con diversas unidades que dispongan de
varios canales. Si no está seguro de la compatibilidad de esta unidad, consulte
a su distribuidor.
VORSICHTSMASSNAHMEN
Dieses Gerät wird Ihnen bei schonender Behandlung viele Jahre nützlich sein.
Beachten Sie dennoch die wenigen, nachfolgenden Vorsichtsmassnahmen:
1.
Tauchen Sie das Gerät nicht in Wasser.
2.
Reinigen Sie das Gerät niemals mit scheuernden oder scharfen Reinigern. Diese
könnten die Plastikteile beschädigen, und die elektronischen Schaltkreise
korrodieren.
3.
4.
5.
Ejemplos de aparatos compatibles:
EMR899HGN
Nehmen Sie keine Änderungen an den internen Komponenten des Gerätes
vor. Dadurch erlischt die Garantie für das Gerät, und es können anderweitige
Schäden verursacht werden. Im Inneren des Gerätes befinden sich keine Teile,
die vom Benutzer selbst gewartet werden müssen.
Verwenden Sie nur neue Batterien des in der Bedienungsanleitung angegebenen
Typs. Mischen Sie niemals alte und neue Batterien, da alte Batterien auslaufen
können.
•
•
•
B
Pantalla de temperatura
Pantalla de humedad
Indicador del nivel de comodidad
BOTON LED
E
: -20,0°C bis +60,0°C (-4,0°F bis 140,0°F)
Auflösung
: 0,1°C (0,2°F)
Messbereich
F
H
: 1%
: 433 MHz
:3
Senderreichweite
: maximal 30 Meter
Meßintervalle
I
: ca. 40 Sekunden
Stromversorgung
Gewicht
Resolução da humidade
: 1%
Intervalo de medida da
humidade relativa
: 5% RH a 95% RH
Frequência de transmissão RF
: 433 MHz
COMUTADOR °C/°F
C
: -50.0° C a +70°.0° C (-58.0°F a 158.0°F)
D
COMUTADOR DE CANAIS
Designa a unidade remota CANAL 1, CANAL 2 ou CANAL 3
BOTÃO RESET (Reinicialização)
F
COMPARTIMENTO DAS PILHAS
Raio de transmissão RF
: máximo 30 metros
Utiliza duas pilhas alcalinas UM-4 ou AAA
Ciclo de leitura das temperaturas
: 40 segundos
Para repor os valores de fábrica
: 63 grs. (sem pilhas)
Dimensões
: 92 x 60 x 20 mm (A x C x P)
TAPA DEL COMPARTIMENTO DE PILAS
Peso
: 63 gramos (sin pila)
Dimensiones
: 92 x 60 x 20 mm
Nota: Para assegurar uma boa recepção entre o sensor remoto e a unidade
principal, siga estas instruções cuidadosamente.
PRECAUCION
- El contenido de este manual está sujeto a cambio sin aviso previo.
Para colocar la unidad remota en una superficie plana.
- Debido a las limitaciones de impresión, las pantallas mostradas en este
manual podrían diferir de la pantalla real.
- Se prohibe reproducir el contenido de este manual sin el permiso del
fabricante.
2.
Deslice los tornillos del compartimento de pilas.
3.
Asignar un canal diferente a cada sensor remoto mediante el interruptor que
se encuentra en el compartimento de pilas del mismo. [FIG A]
Seleccione la indicación de temperatura deseada con el BOTON °C/°F.
[FIG B]
Coloque la unidad remota y la unidad principal dentro del área de transmisión
efectiva, que, en circunstancias normales es de 20 a 30 metros.
Nota: Observe que el área efectiva queda vastamente afectada por los materiales
de construcción y del lugar donde se coloquen las unidades principal y remota. Pruebe varias ubicaciones para un mejor resultado.
Aunque el sensor está fabricado a prueba de diferentes climas y está diseñado para
ser usado en el exterior, debe colocarse lejos de la luz solar, lluvia o nieve directa.
EG-KONFORMITÄTSERKLÄRUNG
CAMBIO DE CANAL
Una vez se asigna un canal a una unidad, solo puede cambiarlo quitando las pilas y
repitiendo los procedimientos anteriores.
AVISO DE PILAS USADAS
En el detector se activará un indicador de pila baja [
] cuando se hayan gastado
las pilas y se necesite cambiarlas. En el detector, las pilas bajas también se indican
en la unidad principal. Cambie las pilas cuando este indicador aparezca..
Nota: Si se eliminan inapropiadamente, las pilas podrían ser dañinas.
Proteja al medio ambiente llevando las pilas agotadas a las estaciones
autorizadas de desecho.
NIVEL DE COMODIDAD / GRADO DE CONFORT
El nivel de comodidad se basa en la humedad relativa registrada. Aparecerá un
indicador que mostrará los niveles: cómodo, húmedo,o seco. [FIG D]
INSTALAÇÃO DAS PILHAS E DOS CANAIS
1.
2.
3.
4.
Visite nuestra página web (www.oregonscientific.com) para conocer más sobre los
productos de Oregon Scientific tales como: Reproductores MP3, juegos y productos
de aprendizaje electrónico para niños, relojes de proyección, productos para la salud
y el deporte, estaciones meteorológicas y teléfonos digitales y de conferencia. La
página web también incluye información de contacto de nuestro departamento de
Atención al Cliente, en caso de que necesite contactar con nosotros, a la vez que
Preguntas Frecuentes y Descargas de los programas y controladores necesarios para
nuestros productos.
Esperamos que encuentre toda la información que necesite en nuestra página web.
En cualquier caso, si necesita contactar con el departamento de Atención al Cliente
directamente, por favor visite www.oregonscientific.es la sección “Contáctenos” o
llame al 902 338 368.
5.
6.
7.
8.
Coloque ambas as unidades o mais perto possível.
Tire os parafusos da tampa do compartimento das pilhas.
Designe um canal diferente para cada sensor remoto mudando o comutador
de canais no compartimento das pilhas do sensor remoto. [FIG A]
Selecione as unidades de medida para visão do valor da temperatura com o
comutador de °C/°F [FIG B]
Instale duas pilhas (UM-4 ou AAA de 1.5V) respeitando as polaridades
indicadas [FIG C]
Insira as pilhas ou pressione o botão reset (reinicialização) da unidade
principal. Siga as instruções indicadas no manual do Utilizador.
Coloque a tampa do compartimento das pilhas e aperte os parafusos.
Posicione o sensor remoto e a unidade principal num raio de transmissão
efetiva que, em circunstâncias de funcionamento normal, é
aproximadamente de 30 metros.
Nota: A eficácia da transmissão pode ser diminuída por interposição de
barreiras arquitectónicas entre a unidade principal e os sensores remotos. Nesse
caso procure melhor o posicionamento das unidades.
Apesar do sensor ser à prova de variantes climáticas, evite colocá-lo à luz direta do
sol, da chuva ou de neve.
MUDANÇA DE CANAIS
EC-DECLARACIÓN DE CONFORMIDAD
Este producto contiene el módulo de transmisor aprobado que cumple con las
normas esenciales que marca el Artículo 3 de la Directiva Europea R&TTE 1999
/ 5 / EC siempre que cumpla los siguientes parámetros:
Uma vez designado um canal para cada unidade só os poderá mudar desligando as
pilhas e repetindo o procedimento referido acima.
INDICADOR DE PILHAS FRACAS
EN 60950-1: 2001
La compatibilidad electromagnética
(Artículo 3.1.b de la Directiva R&TTE)
el standard(s) aplicado
ETSI EN 301 489-1-3 (Ver.1.4.1) : 2002-08
El uso eficaz de espectro de frecuencia de radio
(Artículo 3.2 de la Directiva R&TTE)
el standard(s) aplicado
ETSI EN 300 220-3 (Ver1.1.1) : 2000-09
Información adicional:
El producto está conforme por consiguiente con la Directiva de Bajo Voltaje 73 /
23 / EC, la Directiva EMC 89 / 336 / EC y Directiva R&TTE 1999 / 5 / EC
(apéndice II) y lleva la señal de CE respectiva.
Nota: Descartar as pilhas de modo descuidado é prejudicial ao meio
ambiente. Proteja-o colocando as pilhas nos receptores de recolha
disponíveis.
INDICADOR DE NÍVEL DE CONFORTO
CLIMÁTICO
COMO REAJUSTAR EL APARATO
1. Abra a tampa do compartimento das pilhas.
2. Introduza o bico de um lápis no orifício RESET e pressione.
3. Reponha a tampa do compartimento das pilhas.
Leia o manual do Utilizador da unidade principal para mais esclarecimentos.
MONTAGEM DE PAREDE OU
SUPORTE DE MESA
Abrir la tapadera del compartimento de pilas.
2.
Colocar un bolígrafo puntiagudo en el agujero marcado RESET, presionar.
3.
Reemplazar la puerta del compartimento de pilas.
—
—
—
O conteúdo deste manual pode ser alterado sem aviso prévio.
PAÍSES BAJO LA DIRECTIVA RTTE
Todos los Países de la UE, Suiza CH
y Noruega N
BATTERIJCOMPARTIMENT
G
BATTERIJKLEPJE
H
HOUDER VOOR MUURBEVESTIGING
Devido às limitações impostas à impressão, as indicações presentes
neste manual podem diferir das indicações atuais.
I
AFNEEMBARE TAFELSTEUN
Om de afstandssensor rechtop te plaatsen op een vlakke ondergrond
HET TOESTEL KLAARMAKEN VOOR GEBRUIK
SOBRE A OREGON SCIENTIFIC
Visite nosso site (www.oregonscientific.com.br) para aprender mais sobre nossos
outros produtos, tais como Câmeras Digitais; Produtos de aprendizagem; Relógios
de Projeção; Equipamentos de Esporte e Saúde; Estações Meteorológicas. O nosso
site possúi também dados para contato com nosso SAC, assim como perguntas e
respostas mais recentes e downloads.
Esperamos que você encontre todas informações que necessitar, entretanto se você
quiser entrar em contato direto com nosso SAC, ligue para 55 11 2161-6180.
DECLARAÇÃO DE CONFORMIDADE - EC
Este produto contém um módulo transmissor aprovado que está em conformidade
com os requerimentos essenciais do artigo 3 da diretriz R&TTE 1999 / 5 / EC, se
usado para seu uso pretendido e os seguintes padrões foram aplicados:
Opmerking: Voer de instructies zorgvuldig uit. Zo zorgt u voor een optimale
ontvangst tussen het hoofdtoestel en de afstandssensor.
PLAATSEN VAN DE BATTERIJEN EN INSTELLEN
VAN DE KANALEN
1.
2.
3.
4.
Segurança do Equipamento de tecnologia de informação
(Artigo 3.1.a da diretriz R&TTE)
Padrões Aplicados
5.
EN 60950-1: 2001
6.
Compatibilidade Eletromagnética
(Artigo 3.1.b da diretriz R&TTE)
Padrões Aplicados
7.
Uso Eficiente da Freqüência de Rádio
(Artigo 3.2 da diretriz R&TTE)
Padrões Aplicados
ETSI EN 300 220-3 (Ver1.1.1) : 2000-09
Informações Adicionais:
O produtos está em conformidade com as diretrizes de Baixa Voltagem 73 / 23 /
EC, a diretriz EMC 89 / 336 / EC e diretriz R&TTE 1999 / 5 / EC (apêndice II) e
leva a marca CE respectiva.
8.
Plaats de beide toestellen zo dicht mogelijk bij elkaar.
Draai de schroeven uit het klepje van het batterijcompartiment van de
afstandssensor.
Wijs aan elke afstandssensor een afzonderlijk kanaal toe door de
kanaalschuifknop in het batterijcompartiment van de afstandssensor te wijzigen.
[FIG A ]
Selecteer de eenheid van de temperatuursweergave met behulp van de °C/°Fschuifknop. [FIG B]
Plaats 2 alkalinebatterijtjes (UM-4 of “AAA” 1,5V) en zorg ervoor dat de
polariteiten (+ en –) juist worden geplaatst. [FIG C]
Plaats de batterijen of druk op de reset-toets op het hoofdtoestel. Volg de
instructies die in de handleiding worden beschreven.
Breng het klepje van het batterijcompartiment opnieuw op zijn plaats en draai
de schroeven aan.
Plaats de afstandssensor en het hoofdtoestel in het effectieve transmissiebereik,
dat in open gebied gewoonlijk 30 meter bedraagt.
Opmerking: Het werkelijke transmissiebereik kan worden beperkt door
bouwmaterialen en de plaats van het hoofdtoestel of van de afstandssensoren.
Probeer verschillende opstellingen uit om na te gaan hoe u het beste resultaat
verkrijgt.
De afstandssensor is weersbestendig en is geschikt voor buitengebruik. Toch plaatst
u het toestel beter niet in de nabijheid van rechtstreeks zonlicht, regen of sneeuw.
KANALEN WIJZIGEN
Zodra een kanaal aan een afstandssensor werd toegewezen, kan het enkel worden
gewijzigd door de batterijen uit het toestel te halen en door de bovenvermelde
procedure te herhalen.
Carmelo Cubito
Agrate Brianza (MI) / Itália January 2004
Representante do Fabricante na Comunidade Européia
PAÍSES SUJEITOS Á NORMA R&TTE
Todos os países da União Européia,
Suíça e Noruega
Lyft upp och öppna luckan till batteriutrymmet.
2.
Placera en trubbig blyertspenna i hålet som är märkt RESET och tryck.
KOMPATIBLA ENHETER
Observera: THGR228N är kompatibel med en mängd flerkanalsenheter. Om
osäkerhet uppstår angående kompatibiliteten av dessa enheter, var vänlig
rådfråga Din handlare.
FÖRSIKTIGHETSÅTGÄRDER
Weergegeven temperatuurbereik
: -50.0°C tot +70.0°C (-58.0°F tot 158.0°F)
Ideaal werkingsbereik
: -20.0°C tot +60.0°C (-4.0°F tot 140.0°F)
Temperatuurresolutie
: 0.1°C (0.2°F)
Vochtigheidsresolutie
: 1%
Bereik relatieve vochtigheidsmeting
: 5% RH tot 95% RH
RF Transmissiefrequentie
: 433 MHz
Aantal kanalen
:3
RF Transmissiebereik
: Maximum 30 meter
Cyclus van de temperatuurmetingen
: ongeveer 40 seconden
Voeding
: twee (2) UM-4 of “AAA” 1,5V
alkalinebatterijen
Gewicht
: 63 g (zonder batterijen)
Afmetingen
: 92 x 60 x 20 mm (H x B x D)
LET OP
—
De inhoud van deze gebruikershandleiding kan worden gewijzigd zonder
voorafgaande kennisgeving.
—
De technische kenmerken van dit toestel kunnen worden gewijzigd zonder
voorafgaande kennisgeving.
—
Als gevolg van beperkingen in de druk, kunnen de displays die in deze
handleiding worden weergegeven, afwijken van de echte weergave.
—
De inhoud van deze handleiding mag niet worden overgenomen zonder
toestemming van de fabrikant.
OVER OREGON SCIENTIFIC
Bezoek onze website (www.oregonscientific.com) om meer te weten over uw
nieuwe product en andere Oregon Scientific producten zoals digitale
fototoestellen, gezondheids- en fitnessuitrusting en weerstations. Op deze website
vindt u tevens de informatie over onze klantendienst, voor het geval u ons wenst
te contacteren.
Veiligheid van informatietechnologische uitrusting
(Artikel 3.1.a van de R&TTE-richtlijnen)
Toegepasten normen:
EN 60950-1: 2001
Bijkomende informatie:
Dit product is bijgevolg conform de Richtlijn voor Laagspanning 73/23/EC, de
EMC-richtlijn 89/336/EC en de R&TTE-richtlijn 1999/5/EC (appendix II) en is
voorzien van de overeenkomstige CE-markering.
Afhankelijk van het gekozen kanaal, wordt de waarde van een afstandssensor op
het LCD-scherm weergegeven.
2004.9.23, 2:48 PM
Utsätt ej enheten för kontakt med vatten.
2.
Rengör ej enheten med slipande material eller frätande ämnen. Dessa material
kan repa materialdelarna av plast eller fräta på elektroniken.
3.
Utsätt ej enheten för våld, slag, damm, hög temperatur eller fuktighet. Det kan
förkorta livslängden, skada batteri och andra delar.
4.
Manipulera ej med enhetens inre delar. Om ingrepp göres upphör garantin och
risk för skador uppstår. Enhetens delar kan ej servas av användaren/köparen
själv.
5.
Använd endast nya batterier såsom är angivet i användarhandboken. Blanda
ej nya och gamla batterier eftersom de gamla kan läcka.
6.
Läs alltid användarhandboken noggrant före enheten sätts igång.
• Temperaturdisplay
B
•
Luftfuktighetsdisplay
•
Komfortnivåindikator
LED- (lysdiod) INDIKATOR
Blinkar när fjärrenheten överför en avläsning.
C
°C/°F OMKOPPLARE
Valjer mellan Celsius (°C) och Fahrenheit (°F).
D
KANALOMKOPPLARE
Bestämmer fjärrenhet Kanal 1, Kanal 2 eller Kanal 3.
E
Återställer alla lägen till neutrala värden.
F
Carmelo Cubito
Agrate Brianza (MI) / Italië January 2004
R&TTE-vertegenwoordiger van de fabrikant
LANDEN DIE ZIJN ONDERWORPEN AAN RTT&E
Alle EEG-landen, Zwitserland CH
en Noorwegen N
SPECIFIKATIONER
ÅTERSTÄLLNINGSKNAPP
BATTERIFACK
Trådlös thermo-hygroenhet
Mätområde temperatur
Rymmer två UM-4 eller AAA storlek på alkalinebatterier.
: -50,0 °C till +70,0 °C (-58°F till 158°F)
-20.0°C till +60.0°C (-4.0°F till 140.0°F)
G
BATTERILUCKA
Upplösning temperatur
: 0,1 °C (0,2 °F)
H
VÄGGMONTERINGSHÅLLARE
Upplösning luftfuktighet
: 1%
Hållare för fjärrenheten vid väggmontering.
Mätområde luftfuktighet
: 5% RH till 95% RH
I
FLYTTBART BORDSSTATIV
RF Sändarfrekvens
: 433 MHz
För att placera fjärrenheten på en plan yta.
Antal kanaler
: 3
RF Sändarräckvidd
: Max 30 meter
Observera: Var vänlig följ instruktionerna noggrannt för att garantera tillbörlig
mottagning mellan huvudenhet och fjärrsensor.
BATTERI- OCH KANALINSTALLATION
1.
Placera båda enheterna så nära varandra som möjligt.
2.
Lossa, och ta bort, skruvarna på batteriluckan som sitter på fjärrenheten.
3.
Ställ in en specifik kanal till varje fjärrsensor genom att ändra
kanalomkopplaren i batterifacket på fjärrsensorn. [FIG A]
4.
Välj måttenheter för temperaturdisplayen på °C/°F-omkopplaren. [FIG B]
5.
Installera de 2 alkalinebatterierna (UM-4 eller “AAA” storlek 1,5V) noggrant
enligt de indikerade polariteterna. [FIG C]
6.
Tryck på återställningsknappen. Följ instruktionerna i användarhandboken.
7.
Sätt tillbaka luckan till batteriutrymmet och återmontera skruvarna.
8.
Placera fjärrsensorn och huvudenheten inom sändningsräckvidden vilken, i
normala fall, är 30 meter.
Observera: Den effektiva räckvidden kan begränsas av byggnadsmaterial och
den aktuella placeringen av, antingen huvudenheten, eller fjärrsensorn. Pröva
olika placeringar för att nå ett tillfredsställande resultat.
Även om sensorn är vädertålig och är ämnad för utomhusbruk, så bör den placeras
skyddad för solljus, regn och snö.
Temperaturavläsningsintervall : Ca 40s
Strömförsörjning
: Två (2) UM-4 eller “AAA” 1,5V
alkalinebatterier
Vikt
: 63 g (utan batterier)
Storlek
: 92 x 60 x 20 mm (H x W x D)
VARNING
- Innehållet i denna handbok kan ändras utan förvarning.
- Displayerna som visas i denna handbok kan avvika från den verkliga
displayen beroende på begränsningar vid tryckning.
- Innehållet i denna handbok får ej reproduceras utan tillstånd från
tillverkaren.
OM OREGON SCIENTIFIC
Besök vår hemsida (www.oregonscientific.se) för att se mer av våra produkter såsom
digitalkameror; MP3 spelare; projektionsklockor; hälsoprodukter; väderstationer;
DECT-telefoner och konferenstelefoner. Hemsidan innehåller också information
för våra kunder i de fall ni behöver ta kontakt med oss eller behöver ladda ner
information. Vi hoppas du hittar all information du behöver på vår hemsida och om
du vill komma i kontakt med Oregon Scientific kundkontakt besöker du vår lokala
hemsida www.oregonscientific.se
eller
www.oregonscientific.com
för att finna telefonnummer till respektive supportavdelning.
FÖRSÄKRAN OM ÖVERENSSTÄMMELSE
KANALÄNDRING
När en kanal har ställts in till en enhet så går den endast att ändra genom att ta ur
batterierna och upprepa den just nämnda proceduren.
En indikator för låg batterinivå [
] kommer att aktiveras på sensorn för att
signalera att batterierna håller på att laddas ur och måste bytas ut. Urladdade batterier
för en specifik sensor kommer även att indikeras på huvudenheten. Byt ut batterierna
när urladdningsindikatorn visas.
Observ era: Felaktigt hanterade batterier kan vara skadliga. Skydda
miljön genom att lämna in urladdade batterier till en auktoriserad
avfallsstation.
KOMFORTNIVÅINDIKATOR
Komfortnivån är baserad på den dokumenterade, relativa, luftfuktigheten. En
indikator kommer att visa om nivån är komfortabel, fuktig eller torr. [FIG D]
BEDIENING
Zodra u de batterijen in de afstandssensor geplaatst zijn, zullen de gemeten waarden
met tussenperioden van ongeveer 40 seconden worden doorgestuurd.
1.
Visar gällande temperatur och luftfuktighet.
VARNING FÖR LÅG BATTERINIVÅ
INDICATOR VAN HET COMFORTNIVEAU
Este sensor traz um suporte de parede e um apoio extensível. Utilize o que lhe
convier para colocar o aparelho. [FIG E]
Två-raders LCD
EG-VERKLARING VAN GELIJKVORMIGHEID
Dit product bevat een goedgekeurde zendermodule en voldoet aan de essentiële
vereisten van Artikel 3 van de R&TTE-richtlijnen 1999 / 5 / EC, indien gebruikt
als aangewezen en dat volgende normen werden toegepast:
Efficiënt gebruik van het radiofrequentiespectrum
(Artikel 3.2 van de R&TTE-richtlijnen)
Toegepasten normen:
ETSI EN 300 220-3 (Ver1.1.1) : 2000-09
Het comfortniveau baseert zich op de gemeten relatieve vochtigheid. Er wordt een
indicator weergegeven die aangeeft of de weersgesteldheid comfortabel, nat of droog
is. [FIG. D]
HUVUDFUNKTIONER KÄNNETECKEN
A
STARTHJÄLP
Op de sensor wordt er een indicator [
] geactiveerd om aan te geven dat de
batterijen bijna leeg zijn en moeten worden vervangen. Indien de batterijen in een
bepaalde sensor bijna leeg zijn, dan wordt dit ook aangegeven op het hoofdtoestel.
Vervang de batterijen wanneer de daartoe voorziene indicator wordt weergegeven.
Opmerking: Sorteer de gebruikte batterijen in overeenstemming met de
wetgeving terzake. Batterijen die bij het gewoon huisvuil belanden kunnen
schadelijk zijn. Wees milieubewust: breng de lege batterijen naar de
daartoe voorziene inzamelpunten.
Till den här sensorn medföljer en väggmonteringshållare och ett flyttbart stativ.
Använd något av dem för att placera enheten på sin plats. [FIG E]
Den här produkten är konstruerad för att ge Dig många års nytta och glädje om Du
sköter den noggrant. Här följer ett antal försiktighetsåtgärder:
WAARSCHUWING DAT DE BATTERIJEN BIJNA
LEEG ZIJN
N
Exempel pa kompatibla enheter är:
ATT ANVÄNDA BORDSSTATIV ELLER
VÄGGMONTERING
Wanneer het toestel op de juiste manier wordt gebruikt, dan zal u er jaren genot van
hebben. Onder vindt u enkele tips om het product goed te onderhouden:
1. Dompel het toestel niet onder in water. Indien het toestel in contact komt met
water, droog het dan onmiddellijk af met een zachte, pluisvrije doek.
2. Gebruik nooit alcoholhoudende reinigingsmiddelen, schuurmiddelen of bijtende
stoffen om het toestel te reinigen. Schuurmiddelen kunnen de plastieken
onderdelen beschadigen en het elektrisch circuit aantasten.
3. Stel het toestel niet bloot aan: overmatige kracht, schokken, stof, hoge
temperaturen of vochtigheid. Dit zou ertoe kunnen leiden dat het toestel slecht
functioneert, dat het elektrisch circuit van het toestel minder lang meegaat, dat
de batterijen schade oplopen of dat er onderdelen worden beschadigd.
4. Raak de onderdelen binnen in het toestel niet aan. Wanneer u dat wel doet, dan
vervalt de garantie op het toestel, aangezien dit het toestel kan beschadigen.
Het toestel bevat geen onderdelen die door de gebruiker moeten worden
onderhouden.
5. Gebruik uitsluitend nieuwe batterijen, zoals vermeld in deze handleiding.
Gebruik geen oude en nieuwe batterijen samen, aangezien de oude batterijen
kunnen lekken.
6. Lees deze gebruikershandleiding zorgvuldig door voor u met het toestel aan de
slag gaat.
Elektromagnetische congruentie
(Artikel 3.1.b van de R&TTE-richtlijnen)
Toegepasten normen:
ETSI EN 301 489-1-3 (Ver.1.4.1) : 2002-08
CH
Sätt tillbaka luckan till batteriutrymmet. Titta i användarhandboken för närmare
information.
EMR899HGN WMR918N
Thermo-hygro afstandssensor
Om de afstandssensor aan een muur te bevestigen
A reprodução dos conteúdos deste manual está expressamente proibida
sem autorização do fabricante.
1.
ONDERHOUD
TECHNISCHE KENMERKEN
ATENÇÃO
För återställning:
THGR228N är kompatibel med en mängd 433MHz flerkanaliga, inne-ute,
thermohygromottagarenheter. Den är enkel att använda och det krävs ingen
kabelinstallation.
HOE GEBRUIKT U DE TAFELSTEUN OF HOE
BEVESTIGT U HET TOESTEL AAN DE MUUR?
Biedt plaats aan twee alkalinebatterijen van het type UM-4 of AAA
A leitura mostrada no visor LCD da unidade principal indicará o valor obtido no
canal escolhido.
Para aceder-lhe:
Para acceder:
RESET-TOETS
Om terug te gaan naar de standaardinstellingen
FUNCIONAMENTO
Colocadas as pilhas, o sensor iniciará a transmissão de sondagens em intervalos de
40 segundos.
A função reset deverá ser utilizada apenas em caso de mau funcionamento ou em
condições adversas.
La función de reajuste solamente es necesaria cuando el aparato no funcion
ecorrectamente.
KANAALSCHUIFKNOP (CHANNEL)
F
COMO REINICIAR O APARELHO
Carmelo Cubito
Agrate Brianza (MI) / Italia January 2004
Representante de R&TTE de fabricante
D
E
Este indicador de nível de conforto baseia-se nos registos da humidade relativa.
Um indicador mostrará se o nível é confortável, húmido ou seco [FIG D]
FUNCIONAMIENTO
Una vez las pilas están en su sitio, el sensor empezará a transmitir los registros en
intervalos de 40 segundos.
La lectura del sensor remoto mostrada en el LCD, dependerá del canal de sensor
remoto seleccionado.
°C/°F SCHUIFKNOP
Om de afstandssensor te selecteren: Kanaal 1, Kanaal 2 of Kanaal 3
: duas pilhas alcalinas UM-4 ou AAA
de 1.5V
ETSI EN 301 489-1-3 (Ver.1.4.1) : 2002-08
Um indicador de pilhas fracas[
] ativará um sensor que indicará que as pilhas
estão fracas e deverão ser substituídas. As pilhas fracas em cada sensor são indicadas
na unidade principal. Mude as pilhas quando tais avisos aparecerem.
La seguridad de equipo de tecnología de información
(Artículo 3.1.a de la Directiva R&TTE)
el standard(s) aplicado
C
Para servir de apoio em superfície plana
ADAPTADOR PARA MONTAJE EN LA PARED
Colocar ambos aparatos lo mas cerca posible uno del otro.
Energia
INICIAR O FUNCIONAMENTO
SOPORTE DE MESA
LED-INDICATOR
Om te selecteren tussen Celsius (°C) en Fahrenheit (°F)
Peso
: Utiliza 2 pilas alcalinas UM-4 o "AAA"
1.5v.
LCD-scherm met twee lijnen
• Indicator van het comfortniveau
: 3
INTRODUKTION
Återställningsfunktionen erfordras endast när enheten används på ett felaktigt sätt
eller fungerar dåligt.
Gratulerar till ditt köp av Remote (Fjärr-) Thermo-Hygro Sensor (THGR228N).
Raadpleeg de handleiding van het hoofdtoestel voor bijkomende informatie.
Deze sensor is uitgerust met een muurbevestiging en een afneembare tafelsteun.
Gebruik een van beide om het toestel op zijn plaats te houden. [FIG E]
WMR918N
Geeft de huidige temperatuur en vochtigheidsgraad weer die door de
afstandssensor werd opgemeten
B
Suporta a unidade quando montada numa parede
Energía
EMR899HGN
• Weergave van de vochtigheidsgraad
APOIO CONVERTÍVEL PARA SECRETÁRIA
1.
1.
Número de canais
Om de ‘reset’-functie te openen:
1. Schuif het klepje van het batterijcompartiment open.
2. Plaats een stompe balpen in het gaatje met de vermelding RESET en druk
erop.
3. Breng het klepje van het batterijcompartiment opnieuw op zijn plaats.
Voorbeelden van compatibele toestellen zijn de volgende:
Licht op wanneer de afstandssensor een waarde doorstuurt
E
: 1%
Límites de medición de la humedad relativa: 5% RH to 95% RH
Opmerking: De THGR228N is compatibel met een groot aantal uiteenlopende
multi-kanaalstoestellen. Indien u twijfelt of deze toestellen compatibel zijn,
vraag dan raad aan uw verdeler.
• Temperatuursweergave
I
Vuelva a colocar la tapa del compartimento de pilas y asegure los tornillos.
2
: 0.1°C (0.2°F)
: Unos 40 segundos
8.
THGR228N_M_8L-1
Resolução da temperatura
Ciclo de sensor de temperatura
7.
und Norwegen N
Cintila quando a unidade remota transmite uma leitura
SUPORTE DE PAREDE
Colocar las pilas o pulsar el botón de reajuste del aparato general.
Alle EG Staaten, die Schweiz CH
: -20.0°C a +60.0°C (-4.0°F a 140.0°F)
TAMPA DO COMPARTIMENTO DAS PILHAS
6.
KONFORM IN FOLGENDEN LÄNDERN
Intervalo de funcionamento
proposto
H
Besuchen Sie unsere Website (www.oregonscientific.de) und erfahren Sie mehr
über unsere Oregon Scientific-Produkte wie zum Beispiel Digitalkameras, MP3Player, Kinderlerncomputer und Spiele, Projektionsfunkuhren, Produkte für Gesundheit und Fitness, Wetterstationen und Digital- und Konferenztelefone. Auf der
Website finden Sie auch Informationen, wie Sie im Bedarfsfall unseren Kundendienst
erreichen und Daten herunterladen können.
Carmelo Cubito
Agrate Brianza (MI) / Italien January 2004
R&TTE Repräsentant des Herstellers
Indica o nível de conforto climático
INDICADOR LED
Seleciona entre graus centígrados ou Fahrenheit
Límites de temperatura presentados
SOBRE OREGON SCIENTIFIC
4.
•
: -50.0°C a +70.0°C (-58.0°F a 158.0°F)
G
Colocar dos pilas Alcalinas (UM-4 o “AAA” 1,5V) conforme muestran los
símbolos de polaridad. [FIG C]
Zusätzliche Information:
Damit ist das Produkt konform mit der Niederspannungsrichtlinie 73 / 23 / EG, der
Richtlinie für elektromagnetische Verträglichkeit 89 / 336 / EG und entspricht den
Anforderungen des Artikels 3 der R & TTE 1999 / 5 / EG Richtlinie und trägt die
entsprechende CE Kennzeichnung.
ESPECIFICACIONES
B
COMPATIBELE TOESTELLEN
A
Intervalo de temperatura
: Máximo 30 metros
5.
Effizienter Gebrauch des Funkfrequenzspektrums
(Artikel 3.2 der R & TTE Richtlinie)
Angewandte(r) Standard(s)
ETSI EN 300 220-3 (Ver1.1.1) : 2000-09
Lea siempre el manual del usuario por completo antes de usar la unidad.
Indica a humidade
:3
Über OREGON SCIENTIFIC:
Elektromagnetische Verträglichkeit
(Artikel 3.1.b der R & TTE Richtlinie)
Angewandte(r) Standard(s)
ETSI EN 301 489-1-3 (Ver.1.4.1) : 2002-08
6.
•
INLEIDING
ATT ÅTERSTÄLLA ENHETEN
De ‘reset’-functie hoeft u enkel te gebruiken wanneer het toestel slecht of onjuist
werkt.
VOORNAAMSTE KENMERKEN
Unidade termo-higrométrica
RF Límites de transmisión
PARA EMPEZAR
VORSICHT
Dieses Produkt enthält das genehmigte Sendemodul, welches bei
bestimmungsgemäßer Verwendung den grundlegenden Anforderungen des Artikels
3 der R & TTE 1999 / 5 / EG Richtlinie entspricht. Folgende(r) Standard(s) wurde(n)
angewandt:
Schutz der Gesundheit und Sicherheit des Benutzers
(Artikel 3.1.a der R & TTE Richtlinie)
Angewandte(r) Standard(s)
EN 60950-1: 2001
Use solo pilas nuevas como se especifica en el manual del usuario. No mezcle
pilas nuevas y viejas ya que las viejas pueden licuar.
• Indica a temperatura
SVENSKA
HET TOESTEL ‘RESETTEN’
Gefeliciteerd met uw aankoop van de Thermo-Hygro Afstandssensor (THGR228N).
De THGR228N is compatibel met een groot aantal uiteenlopende 433MHz multikanaals thermo-hygrometers voor binnen- en buiten. Het toestel is eenvoudig te
bedienen en u hoeft geen kabels te installeren.
ESPECIFICAÇÕES
Indica a temperatura e humidade monitorizadas pela unidade remota
Número de canales
INSTALACIÓN DE PILAS Y DE CANALES
Wir hoffen, dass Sie alle wichtigen Informationen auf unserer Website finden. Für
internationale Anfragen besuchen Sie bitte unsere Website:
www2.oregonscientific.com/about/international/default.asp
5.
Visor LCD de duas secções
Vuelve todos los ajustes a los valores por defecto
: 92 x 60 x 20 mm (H x B x T)
- Der Inhalt dieser Bedienungsanleitung darf nicht ohne die Zustimmung
des Herstellers vervielfältigt werden.
No juegue con los componentes internos de la unidad. El hacerlo invalidaría
la garantía en la unidad y podría causar daños innecesarios. La unidad no
contiene partes que puedan utilizarse por el usuario.
A
BOTON DE REAJUSTE (RESET)
Nota: Para asegurar una recepción adecuada entre la unidad principal y el
sensor remoto, seguir atentamente estas instrucciones.
- Aufgrund von Einschränkungen der Druckmöglichkeiten kann die
Darstellung der Anzeige in dieser Bedienungsanleitung von der
tatsächlichen Anzeige abweichen.
4.
CARACTERÍSTICAS PRINCIPAIS
: 433 MHz
: benötigt 2 Batterien des Typs UM-4 oder
"AAA"; 1,5V Alkaline-Batterien.
: 63 g (ohne Batterie)
Abmessungen
Exemplos de unidades compatíveis: EMR812HG; EMR899HG; WMR918
Se for manuseado com cuidado, este aparelho está concebido para lhe dar longos
anos de bons serviços. Eis algumas precauções:
1. Não mergulhe o aparelho na água. Se o aparelho entrar em contato com a
água, limpe-o imediatamente com um pano seco, suave e sem pêlos.
2. Não limpe o aparelho com materiais abrasivos ou corrosivos, pois pode
riscar os componentes em plástico e corroer o circuito elétrico.
3. Não sujeite o aparelho a força excessiva, choque, pó, temperatura ou
humidade, pois pode danificar o aparelho, encurtar o seu tempo de vida,
danificar a pilha e deformar os componentes
4. Não mexa nos componentes internos do aparelho. Perderá a garantia e
causará danos desnecessários. O aparelho não contém peças que o utilizador
possa substituir.
5. Use, apenas, pilhas novas, como indicado no manual. Não misture pilhas
novas e velhas porque estas podem derramar líquidos.
6. Leia este manual com muita atenção antes de utilizar o aparelho.
RF Frecuencia de Transmisión
Sujeta toda la unidad remota en la pared
Anzahl der Kanäle
No someta la unidad a fuerzas excesivas, sacudidas, polvo, temperatura o
humedad que puede causar un mal funcionamiento, acortar la duración
electrónica, dañar las pilas y distorsionar algunas partes.
3.
: -20.0° C a +60.0°C (-4.0°F a 140.0°F)
: 25% - 95%; Relative Luftfeuchtigkeit
Sendefrequenz
Não sabendo da compatibilidade destas unidades, consulte o seu vendedor para
esclarecimento.
: 0.1°C (0.2°F)
COMPARTIMENTO DE PILAS
G
Auflösung
Nota: O THGR228N é compatível com uma variedade de unidades multi-canais.
Resolución de temperatura
Acomoda dos pilas tamaño AAA
Luftfeuchtigkeit:
No lo sumerja en agua
Límite de funcionamiento propuesto
Temperatur:
Messbereich
UNIDADES COMPATÍVEIS
No limpie la unidad con materiales abrasivos o corrosivos. Puede que rayen
las partes de plástico y corroan el circuito eléctrico.
BOTON PARA SELECCIONAR ENTRE °C/°F
BOTON PARA CAMBIAR DE CANALES
Externes Thermo-Hygrometer
O THGR228N é compatível com unidades de monitorização multi-canais in-out, a
trabalhar em frequências de 433MHz. O funcionamento é fácil não sendo necessária
instalação elétrica.
2.
Resolución de la humedad
D
INTRODUÇÃO
Parabéns pela aquisição deste Sensor Termo-Higrômetro THGR228N.
1.
Selecciona entre grado Centígrado (°C) y Fahrenheit (°F)
Designa el Canal 1, Canal 2 o Canal 3 de la unidad remota
TECHNISCHE DATEN
Este producto está diseñado para ofrecerle años de servicio satisfactorio si lo maneja
cuidadosamente. Aquí hay unas pocas precauciones:
DUTCH
PRECAUÇÕES
PORTUGUÊS
Unidad remota higro-térmica
Parpadea cuando la unidad remota transmite una lectura
C
PRECAUCIONES
LCD de dos líneas
Muestra la temperatura y humedad actuales recogidas por la unidad remota
Setzen Sie das Gerät nicht irgendwelcher Gewalteinwirkung, Erschütterungen,
Staub, extremen Temperaturen oder Feuchtigkeit aus, da dadurch
Funktionsstörungen, kürzere Lebensdauer und Batterieschäden, sowie
Gehäuseverformungen verursacht werden können.
Este sensor incorpora un adaptador para su montaje en la pared y un soporte movible.
Use cualquiera de los dos para mantener la unidad en su sitio. [ FIG E ]
WMR918N
CARACTERISTICAS
A
COMO USAR EL SOPORTE DE MESA O LA
MONTURA PARA LA PARED
ANVÄNDNING
När batterierna är på plats kommer sensorn att starta sända temperatur och
luftfuktighet med 40-sekundersintervaller.
Den här produkten innefattar den godkända sändarmodulen och överensstämmer
med de viktigaste kraven i “Artikel 3 i R&TTE 1999 / 5 / EC-direktiven” om den
används för avsett bruk och följande standards har tillämpats:
Säkerhet för informationsteknologisk utrustning
(Artikel 3.1.a i R&TTE-direktivet)
Tillämpad standard
EN 60950-1: 2001
Elektromagnetisk kompatibilitet
(Artikel 3.1.b i R&TTE-direktivet)
Tillämpad standard
ETSI EN 301 489-1-3 (Ver.1.4.1) : 2002-08
Effektivt utnyttjande av spektrat för radiofrekvens
(Artikel 3.2 i R&TTE-direktivet)
Tillämpad standard
ETSI EN 300 220-3 (Ver1.1.1) : 2000-09
Ytterligare information:
Produkten är anpassad till “Low Voltage Directive 73 / 23 / EC”, “EMC Directive
89 / 336 / EC” och “R&TTE direktivet 1999 / 5 / EC (bilaga II)” och är försedd
med respektive CEmärkning.
Carmelo Cubito
Agrate Brianza (MI) / Italien January 2004
R&TTE representant för tillverkaren
LÄNDER SOM OMFATTAS RTTE-DIREKTIVET
Alla länder inom EU, Schweiz CH
och Norge N
P/N: 086-002232-124
remote unit, or on the remote unit area of the main unit.
=E==F
NOTE Do not use rechargeable batteries. Properly dispose used batteries
by taking them to an authorized disposal station.
MODEL: THGR228N
USER MANUAL
The RESET button is located in the battery compartment. Press it with the
point of a blunt object (such as a ball point pen) whenever you change the
batteries, or whenever performance is not behaving as expected (e.g.,
unable to establish radio frequency link with main unit). Refer to the main
unit User Manual for more information.
ENGLISH
ABOUT THIS GUIDE
This sensor is compatible with a wide variety of weather monitoring tools,
and can be used with most of the Oregon ScientificTM receiver units.
In this box, you will find:
Remote unit
Batteries
!"#$%&$'()
!"#$%&'()*+,-./012#lêÉÖçå=pÅáÉåíáÑáÅTM
!"#$%&'()
!"#$%&'( )*+&,-./0123456 )*
!"#$%&'()*+,-./01234
Wash the unit with a slightly damp cloth and mild detergent. Avoid dropping
the unit or placing it in a high-traffic location.
•
Do not expose the unit to direct sunlight since this may affect the accuracy
of measurements.
•
WARNINGS
Keep this manual handy as you use your new product. It contains practical
step-by-step instructions, as well as technical specifications and warnings
you should know about.
•
!"#
SAFETY AND CARE
Congratulations on your selection of the Oregon ScientificTM Wireless
Outdoor Temperature and Humidity Sensor (THGR228N).
•
!"#= lêÉÖçå= pÅáÉåíáÑáÅ qj= EqedoOOUkF
RESET SYSTEM
PRODUCT OVERVIEW
!"#$%&
!
This product is designed to give you years of service if handled properly.
Observe the following guidelines:
•
Never immerse the unit in water. This can cause electrical shock
and damage the unit.
•
Do not subject the main unit to extreme force, shock, or fluctuations
in temperature or humidity.
•
Do not tamper with the internal components.
•
Do not mix new and old batteries or batteries of different types. Do
not use rechargeable batteries with this product.
•
Remove the batteries if storing this product for a long period of time.
•
Do not scratch the LCD display.
•
Do not make any changes or modifications to this product.
Unauthorized changes may void your right to use the product.
•
The contents of this user manual are subject to change without notice.
•
Images not drawn to scale.
TROUBLESHOOTING
Check here before contacting our customer service department.
NK
OK
iba=
PK
=L=
QK
!
Check batteries
RK
!
Check location
SK
TK
UK
PROBLEM
SYMPTOM
REMEDY
Temp
Main unit
shows
Temperature is
out-of-range.
“LLL” or “HHH”
Remote
unit
DESCRIPTIONS
1.
Temperature display
2.
LED indicator
Cannot
locate main
unit
SPECIFICATIONS
°C / °F switch
4.
Reset button
5.
Channel switch
6.
Battery compartment
7.
Battery compartment lid
Unit
Range
Resolution
8.
Wall mount
Relative humidity
LxWxH
Weight
Range
Resolution
This product can be used with up to 2 remote units to transmit outdoor
temperature and humidity data to a main (indoor) unit. The measurement
unit (°C or °F) and channel number (1, 2, or 3) switches are located in the
battery compartment, and should be set prior to installation.
NOTE Additional remote units sold separately.
!"#$%=O !"#$%&'()*+),-./0
EF !"=ELF= !"=ENI=O=PF= !"#$%
!"#$%&'()
92 x 60 x 20mm
(3.6 x 2.4 x 0.8 inches)
63 grams (0.1 ounces, without batteries)
===== !"#$%&'()
°C or °F
-20 °C to 60 °C (-4 °F to 140 °F)
0.1 °C (0.2 °F)
25% to 95%
1%
1.
Place remote unit as close as possible to the main unit.
2.
Remove the battery compartment lid. (You will need a small
screwdriver.)
3.
Assign a channel number. If you are using more than
one remote unit, select a different channel number for
each unit.
2
!"#$%&'(
!"#$E
PK
!"#$%&'()*+$%&'(,-#
!"#$%&
RESET
CHANNEL
Set the measurement unit.
Insert the batteries. Match the polarity, as shown in
the battery compartment.
6.
Press RESET with the point of a blunt object (such as a ball point
pen).
7.
Replace the battery compartment lid. Secure.
8.
Mount the remote unit on a flat surface using the recess holes on
the back of the mounting unit. Insert the sensor into the mounting
unit, and gently push down to secure. For best results:
•
Place the unit out of direct
sunlight and moisture.
•
Do not place the remote unit
more than 20 – 30 meters
(60 – 90 feet) from the main
(indoor) unit.
•
Position the unit so that it faces
the main (indoor) unit. Minimize
obstructions such as doors,
walls, and furniture.
You may need to experiment with various locations to get the best
reception.
Once the batteries are in place, the sensor will transmit signals every
40 seconds.The readings shown on the main unit depend on which
remote sensor (1, 2, or 3) is selected. Refer to the main unit User
Manual for more information.
1
2
3
RESET
CHANNEL
CHANGE CHANNEL
Repeat the Set Up procedure . In Step 3, select a different channel number.
LOW BATTERY WARNING
!"#$%&'()*F
1
2
3
RESET
CHANNEL
RF frequency
Range
Transmission
433 MHz
30 meters (98 feet) with no obstructions
every 40 seconds
QK
!"#$
RK
!"#
SK
!"#=E
Channel No.
1, 2, or 3
TK
!"#$%&'()*
Unit
°C or °F
UK
Power
2 x UM-4 (AAA) 1.5V alkaline batteries
!"#$%&'()*+,-./01 !"#$
!"#$%&'()* !"#$%&'()*+
!"#
3
5.
1
OK
Visit our website (www.oregonscientific.com) to learn more about Oregon
ScientificTM products such as digital cameras; MP3 players; childrenís
electronic learning products and games; projection clocks; health and
fitness gear; weather stations; and digital and conference phones. The
website also includes contact information for our Customer Care
department in case you need to reach us, as well as frequently asked
questions and customer downloads.
We hope you will find all the information you need on our website, however
if youíre in the US and would like to contact the Oregon Scientific TM
Customer Care department directly, please visit:
www2.oregonscientific.com/service/support
1
2
3
RESET
CHANNEL
!F==obpbq=
•
!"#$%&'()*
=OM=J=PMESM=J=VMF=
!
•
VK
!$%&"'()*+,
•
ABOUT OREGON SCIENTIFIC
1
4.
Replace the batteries whenever the low battery signal (
NK
Frequency
SET UP
THGR228N_M_Shanghai_V2.p65
P/N:086-002232-110 REV 1
1/2
!"
Temperature
GETTING STARTED
9.
!
Dimensions
3.
!
!"#$%&'()*
!"#$%&'()*
!"#$%&'()*
!"#$%&'()*+,-./01
!"#$
!"#$%&'()*QM !"# !"#
!"#$%&'()*+=ENI=O=PF !"#$
!"#$
OR
Call 1-800-853-8883.
!"#$%&= !"#$%&'()*+,
!
For international inquiries, please visit:
www2.oregonscientific.com/about/international/default.asp
!"#$%& '()*+,-.=E= =F !"#$
!"
====
!"##$%&'()*+,-./012#$%
!
obpbq= !"#$%&'("#)*+,-./012)=E
!"#$%&'()F !"#$%&'=E !F=
!"#$%&'()*+,-!
!"
!"#$%&'(#)*+,-./0123456/0
!"#$%&'()*+,
) shows on the
2005.5.10, 4:24 PM
!"#$%&'()*+,-./01234+5678
=E==F
•
!"#$%&'(
)*+,-./01!"2
•
!"#$%&'()*+,-./01(
!
•
•
!"#$%&'(
•
!"#$%&'
•
!"#$%&'()*+,"#-./0
•
!"#$%&'()*+,-./012
•
!"#$%&
!"#$%&'()*+,-"./012345678
•
!"#$%&'()*+,-./012#=lêÉÖçå=pÅáÉåíáÑáÅTM
!"#$%&'()
•
!"#
!"#$%&'( )*+,-./0123456 )*+
!"#$%&'()*+,-./0123
•
!"#$%&'(
•
!"#$%&'()*+,-./
•
!"#$%&'
•
!"#$%&'()*+,"#-./0
•
!"#$%&'()*+,-./012
•
!"#$%&
!"#
!"#$%&
!
•
!
!
!
iii
eee
!"#$
!
!
!"#$
!"#$%&'(
)*+&',-.
!"#
!"#
!
!"#$%&'()*+,%-./012345678
!
iii
eee
!"#$
!
!
=ñ==ñ=
VO=ñ=SM=ñ=OM
!"#$
SP=EMKN
!"#F
!
OK
iba=
PK
=L=
=ñ==ñ=
QK
!
JOM==SM
RK
!
EJQ==NQMF
SK
TK
!"
UK
ORB==VRB
NB
QPP=jeò
!"#$%&'()*+,-./01234536789:
EF !"=ELF= !"=ENI=O=PF= !"#$%&
!"#$%&'(
!"PM=EVUF
====
QM
NI=O==P
O=ñ=rjJQ=E^^^F=NKRs !
!"
!"#$%&'()*
=lêÉÖçå=pÅáÉåíáÑáÅ
!"#=lêÉÖçå=pÅáÉåíáÑáÅ = !"#$%=jmP !
!"#$%&'()*+,-&./0.1$%&23456
!"#$%&'()*+#,-EïïïKçêÉÖçåëÅáÉåíáÑáÅK
ÅçãFlêÉÖçå=pÅáÉåíáÑáÅTM= !"#$%&'()*+,-.
!"#$%&'()*+
NK
!"#$%&'()
OK
!"#$=E !"#$%&'()*+F
PK
!"#$%&'()*+,$%&'() !"#$%&'(
QK
!"#$
RK
!"#
!$%&"
1
2
3
RESET
CHANNEL
JOM==SM
1
2
3
RESET
!"#=E
TK
!"#$%&'()*
!F==obpbq=
UK
!"#$%&'()*+,-./01 !"#$
!"#$%&'()* !"#$%&'()*
!"#$
•
•
!"#$%&'()*+
=OMJPMESMJVMF= !
•
!"#$%&'()*+
!"#$%&'()*+
MKN=EMKOF
!
ORB==VRB
NB
QPP=jeò
!"PM=EVUF
QM
!
NI=O=P
O=ñ=rjJQ=E^^^F=NKR !"#
=lêÉÖçå=pÅáÉåíáÑáÅ=
!"
CHANNEL
SK
!"#$=lêÉÖçå=pÅáÉåíáÑáÅTM !"#$%&'()*
!"#$%&'()*+,-./0=ïïïKçêÉÖçåëÅáÉåíáÑáÅK
ÅçãLëÉêîáÅÉLëìééçêí= !"#$ %NJUMMJURPJUUUP !
!"#$%&'()*+EïïïOKçêÉÖçåëÅáÉåíáÑáÅKÅçãL~ÄçìíL
áåíÉêå~íáçå~äLÇÉÑ~ìäíK~ëéF
!"#
TM
!"#F
EJQ==NQMF
MKN=EMKOF
SP=EMKN
!
VO=ñ=SM=ñ=OM
EPKS=ñ=OKQ=ñ=MKUF
!
!
NK
EPKS=ñ=OKQ=ñ=MKUF
!"#
!
)*+,-./!"0
!"#$%&'()*+,-./01(
!
!"#$%&'()*+,%-./012345678
!"#$%&'(
•
•
!"#
!"#=lêÉÖçå=pÅáÉåíáÑáÅqj= !"#$%=EqedoOOUkF
!"#$%&'()*+,-./
•
!"#
!"#$%&'(
)*+&',-.
!"#$%&'()*+,-"./012345678
!"#$%&'()*+
!"#=lêÉÖçå=pÅáÉåíáÑáÅTM=E F= !"#$%jmP
!"#$%&'()!*+,-./0!= !"#$
!"#$%&'()*+,-./0(12E ï ï ï K
çêÉÖçåëÅáÉåíáÑáÅKÅçãFlêÉÖçå=pÅáÉåíáÑáÅTM=E F= !"#
!"#$%&'()*+,-./0!"12345
!"#$=lêÉÖçå=pÅáÉåíáÑáÅTM=E F= !"#$%
!"#$%&'()*+,-./01234ï ï ï K
çêÉÖçåëÅáÉåíáÑáÅKÅçãLëÉêîáÅÉLëìééçêí= !"#$ %NJUMMJ
U R P J U U U P !"#$%&'()*+,-./E ï ï ï O K
çêÉÖçåëÅáÉåíáÑáÅKÅçãL~ÄçìíLáåíÉêå~íáçå~äLÇÉÑ~ìäíK~ëéF
!"#$%&'()*+,-./0123456789
VK
!"#$%&'()*QM !"# !"#
!"#$%&'()*+=ENI=O=PF !"#$
!"#$
!
!"#$%&= !"#$%&'()*+,
!"#
!"#$%&' ()*+,-./0=E =F !"#$
===
!"##$%&'()*+,-./01+#$%
!
obpbq= !"#$%&'("#)*+,-./012)=E
!"#$%&'()F !"#$%&'=E !F
!"#$%&'()*+,
www.oregonscientific.com
Oregon Scientific™ Inc.
Tualatin, Oregon USA
!"#$%&'
!"#$%&'()
!"#$%&'()*+,
!"#$
!"#$%&'(#)*+,-./0123456/0
!"#$%&'()*+, !"#$%&'()*+,-./01234+5678
=© OMMR=lêÉÖçå=pÅáÉåíáÑáÅK=^ää=êáÖÜí=êÉëÉêîÉÇK
mLkWMUSJMMOOPOJNNM
P/N:086-002232-110 REV 1
2/2
THGR228N_M_Shanghai_V2.p65
2
2005.5.10, 4:26 PM