1
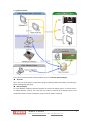
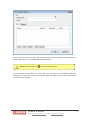
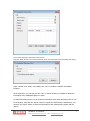
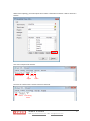
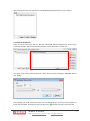
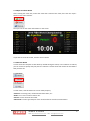
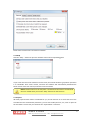
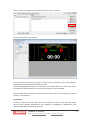
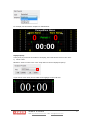
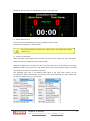
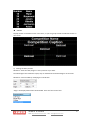
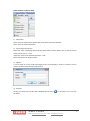
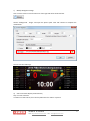
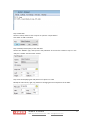
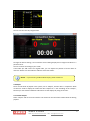
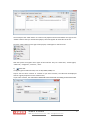
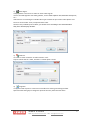
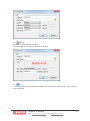
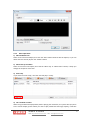
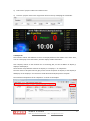
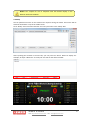
ULTRA SCORE SOFTWARE MANUAL Kazo Vision WEB: http://www.kazovision.com MAIL: [email protected] 1 Kazo Vision WEB: http://www.kazovision.com MAIL: [email protected] 2 1. Introduce This is a scoring and timing system for stadiums, which is suitable for multiple matches. Its functions include: match management, score displaying, advertisement displaying, live-video playback, reporting after match, etc. We provide the professional scoring function for multiple matches, which include all kind of ball games, the track and field, the wrestling, etc. This system has been used successfully in many sports-events held by a large number of domestic and international gymnasiums. We are now supporting following match types: Ball: basketball, soccer, volley-ball, tennis, table-tennis, badminton, handball, beach-handball, baseball, softball, futsal, cricket, rugby football, american football, aussie-rules football, hockey, netball, lawn bowls Combat: boxing, wrestling, wushu, judo, taekwondo Athletics: track, field Gymnastics: gymnastics, health-fitness Aquatic: swimming, water-polo, synchronized swimming, diving Ice: ice-hockey, bandy, ice-speed-skating, figure-skating Misc: horse riding. Kazo Vision WEB: http://www.kazovision.com MAIL: [email protected] 3 1.1 System overview This system is composed with several modules, they are: Terminal, Remote Display. Terminal: This is the core of the system, which takes charge of inputting match information, controlling the game and displaying the game. Remote Display For some stadium needing a separate computer to control the display system, or several screens to display different content, you could use this module to extend the scoreboard screen and multimedia content to other computers. (Only in network edition, optional) Kazo Vision WEB: http://www.kazovision.com MAIL: [email protected] 4 We provide three editions of this system: Standalone Edition, Network Standard Edition and Network Professional Edition. Standalone Edition: Just install the terminal module on one computer, a majority of score controlling and displaying operation can be done by it. Network Standard Edition: Besides the terminal module, you could also use the display module on another pc, to provide the scoreboard or media contents to the other video devices. Network Professional Edition: You can combine all modules freely and experience the powerful functions offered by several computers’ cooperation. 1.2 Main Functions Match information management. You can register the team and member's information into this system in advance, and you need just select the game name from the list before game beginning. Professional scoreboard. We support all kinds of game, just like ball games, track and field, wrestling, swimming and so on. The content and layout on the display not only refer to the official match rules, but also be optimized according to referee's actual using experience. Highly customization. Font, color and layout can be modified with our GUI editor, which can make it to meet the effect of your needs. Formidable multi-media functions. We can add various text, picture, flash, as well as match's live video in the media broadcasting list set up in advance. You can switch between the scoreboard and the media rapidly during the match. Convenient and quick referee operation interface. Each referee operation interface has been optimized based on the actual need. Most functions can be done by the keyboard shortcut. Exhaustive events recording. All operations will be recorded automatically during the match, which can be used for inquiring and the technical statistics. Formidable network coordination function. All modules can be chosen freely and work together in the local area network. Abundant display type. You can define each screen to show different content, such as one for the scoreboard and another for the live video. Reliability. Auto backup function will help you recover the match immediately if the computer has fault. Expansibility. It can be connected to external electronic timer and operation board according to your need. Kazo Vision WEB: http://www.kazovision.com MAIL: [email protected] 5 1.3 Installation Insert our system CD into your CD-ROM, and run the installation file. Choose the install language; click “OK” then “Next”. For network edition you will see the module choose dialog before your installation, just select the module you want to install on to current computer, and click “Next” button. After finishing the installation, you will see the software icon appearing on your desktop. You could double click on the icon to start the program: Notice: Please make sure you have plugged in the USB dongle key onto the PC before running the “Terminal” program. Kazo Vision WEB: http://www.kazovision.com MAIL: [email protected] 6 2. Quick Starting Guide Please refer to the following steps to learn the quick start of the software. We will take basketball as an example. And the other match operations are similar to the basketball. 2.1 Create the Meet Info Open the terminal and enter the main interface (you should select the language at the first time), you will see the “Match” tab first. The list box on the left of this tab will show all existing meet info. You could create a new meet info by press the “New” button below the meet list, and then there will appear the “New Match” dialog: You could select the “Ball” as type of the meet. At the same time, select the “Basketball” item at the right list and press the “OK” button, there will appear the “Basketball Match” dialog: Kazo Vision WEB: http://www.kazovision.com MAIL: [email protected] 7 The name of the meet is necessary and the date and the sponsor is optional. In this example, we set the “Meet Name” as “2010 FIBA World Championship”. Notice: All input boxes with mark are required to fill in. Press the “New” button below the “Team” tab, there will appear the “Basketball Team Info” dialog. You can also press “Import “and “Export” button to import or export the created teams’ information from text files. Kazo Vision WEB: http://www.kazovision.com MAIL: [email protected] 8 Then create all players’ information of the team: Click the “New” button in the team info dialog, then there will show you the member info dialog. Input "number" and "name" in the blank, click "OK" to complete a member information inputting. At the same time, you can also click the "edit" or "delete" buttons to modified or delete the information of the established players or team. For batch information input, you can make the information of the team and players into a *.txt file in advance, then click the "import" button to import the external files in bulk directly. You can also use "export" button to store the information of the existing team, players and the referee. Kazo Vision WEB: http://www.kazovision.com MAIL: [email protected] 9 When finish inputting, you could export the members’ information and then it will be saved as a text file. Here is the sample of the text file: Team Name Leader Region Coach The form of a referee text is similar to that of a team text. No. Name First-String Mark Kazo Vision WEB: http://www.kazovision.com MAIL: [email protected] 10 After creating the meet info, we will see “2010 FIBA World Championship” meet in the list. 2.2 Create the Match Info Select the meet name from the list. We take “2010 FIBA World Championship” that we just created as example, and then we should create the match information in match list: You could create a new match by click the “New” button. There will appear “Basketball Round Info” dialog: In this dialog, you could select team name from the dropdown list, and if you have forgotten to create the team when creating the meet, just press the “ ” button to create a new team info. Kazo Vision WEB: http://www.kazovision.com MAIL: [email protected] 11 The created match will appear in the match list. Press the “Edit” button to modify the match information, and “Delete” button to remove the match. 2.3 Open and Close the Match After creating the meet and match, you can select one match in the list, and then press the “Open” button to start the match. Press the “Open” button can start the match and the scoreboard will be shown on the screen, and if you are using the “Referee” mode, the referee control panel will show it as follows: Kazo Vision WEB: http://www.kazovision.com MAIL: [email protected] 12 If you would like to close the match, just click the “close” button. 2.4 General features 2.4.1 Match Timer For some matches, you can switch the following buttons to control the match timer. : Start the timer. : Pause the timer. : Adjust the time with one second when the timer is paused. : Stop the timer. : Advanced function for the timer. Kazo Vision WEB: http://www.kazovision.com MAIL: [email protected] 13 2.4.2 Referee The referee control panel is on the “Local Referee” tab of the Terminal. If you haven’t opened a match yet, it will show the hint that you should open the match before using it. And once you open the match, the referee control panel will be shown on this tab. For example when the basketball match is opened, this panel will be shown as follows: There is a group of buttons with the icon on the top of the referee control panel. They could help you switch between several screens on the scoreboard. For example, the basketball has 3 screens: “SCORE”, “PLAYER”, “REFEREE”, they will be shown as following: Kazo Vision WEB: http://www.kazovision.com MAIL: [email protected] 14 The “SCORE” screen: The “PLAYER” screen: The “REFEREE” screen: Kazo Vision WEB: http://www.kazovision.com MAIL: [email protected] 15 In the network edition, you also could press the button beside the screen switch button, and switch the screen for each independent remote display: If you choose the “Only Show on Display #1”, the current information can be shown on the “Display #1” and the terminal of the “Local Referee”. And if you choose the “Only Show on Display #2”, the information only can be shown on the” Display #2”. Notice: The function of “Only Show on Display #2” only can be used in Network Professional Edition. In each match, you can click “ ” or “ ” button to set the match property: “General” set timing rules, member detail information, etc… “Rules” set a match rule or make a custom rule. “Sound” set the sound of the match. “Shot Clock” set the type and port of the 24s shot clock for communication. Kazo Vision WEB: http://www.kazovision.com MAIL: [email protected] 16 The 24 seconds short clock device KS-BASH/S You will also notice that there are some numeric icons beside some buttons on the referee control panel, like: , , ... . They are marked the shortcut key for these frequently used function. You could modify each function’s shortcut key with click the “Shortcut” button at the right side of the main interface. Then the “Shortcut Option” dialog will appear: Kazo Vision WEB: http://www.kazovision.com MAIL: [email protected] 17 Now you are able to use these functions to create your own match information. And according to your personal custom, you can set the shortcut key to control the match quickly. The next chapter will show you the detail operations of the other functions. Kazo Vision WEB: http://www.kazovision.com MAIL: [email protected] 18 3. Terminal The Terminal is the core of the whole system. It includes almost all functions in the system; you could just use the Terminal to complete all works. It also could be combined with the other remote modules to make up a powerful network system. 3.1 Match Module Open the software you can see the main interface like this: You can see the meet items that have been created. Edit an existed meet by select the meet’s name from the list and press the “Edit” button. You can delete the meet info by press the “Delete” button. After creating the meet, you can use the “New”, “Edit”, “Delete” buttons in the middle of the “match” tab to create, edit and delete a match. Also you can press the “Layout” button to change the layout of the game. It’s a layout editor of the system; you can refer to the chapter 6 “Layout Editor” to get the details. 3.1.1 Create the Match Info Open / Close the match Create the meet Create the match info Please refer to section 2.1 to learn detailed steps of how to “Create the Meet Info”. Please refer to section 2.2 and 2.3 to learn detailed steps of how to “Create the Match Info”. Kazo Vision WEB: http://www.kazovision.com MAIL: [email protected] 19 3.1.2 Open and Close Match After creating the meet info, choose the meet and a match of this meet, then click the “open” button on the main interface. Then you can see the match information on the screen. If you want to close this match, click the “close” button. 3.1.3 Recover Match In some cases the computer is shut down by mistake during the match, or the software is crashed, you can recover it quickly with just press the “Recover” button which will restore the scoreboard that you have set. 3.1.4 Settings In each match, click this button to set the match property: “General”: set timing rules, member detail information, etc… “Rules”: set a rule or make a custom rule. “Sound”: set the sound of the match. “Shot Clock”: set the type and port of the 24 seconds shot clock for communication. Kazo Vision WEB: http://www.kazovision.com MAIL: [email protected] 20 Please refer to section 2.4.2 to know more details. 3.1.5 Help Click the “Help…” button to open the software manual of corresponding game. If you create one kind of the match for the first time, the manual showed is gray which represents it is unavailable. Click “View” button, and then the software will automatically download the latest version of the user manual, and save it to the local side. Notice: Please make sure the computer is connected to the Internet to download the user manual when you use the "Help" function for the first time. 3.1.6 Layout We have prepared each match’s scoreboard for you, and all contents on it will fit the size of the scoreboard screen automatically. Moreover, you can also modify the font, size, color or layout of the scoreboard. In this case you could use the “Layout Editor” to do that. Kazo Vision WEB: http://www.kazovision.com MAIL: [email protected] 21 Select a meet in the “Match” tab of Terminal, and click “Layout” button: Then you will see the “Layout Editor”: You can move the label directly by drag on it. After a label is selected, you also could modify its parameter from the parameter panel at the left side. After finishing editing the layout for a match type, you should make sure to save it, and reopen the match from the Terminal, then you will see the changes on the scoreboard. There are three kinds of property to define the layout screen. They are “File property”, “Displays property”, “Text property”. File Property It’s used to describe the match style you want to modify. And you can also select the display name from the “displays” dropdown list, like “DispScore”, “DispMember”, “DispReferee”. Then you can modify different displays respectively. Kazo Vision WEB: http://www.kazovision.com MAIL: [email protected] 22 For example, we selected the “DispScore” of Basketball: Display Property In this panel, if you choose one label on the display, there will show its name in the “Text”. 1) Select a label Method 1: select its name in the “Text” drop-down list at the “Displays Property”. If you choose a text name, then its label will be highlight on the edit area: Kazo Vision WEB: http://www.kazovision.com MAIL: [email protected] 23 Method 2: You can select the label directly by click it at the right side. 2) Add or delete a label You can create a new label into the screen and delete a custom label. The default text property is “Misc:Custom”. You cannot delete the system item. Please hide it by uncheck the “visible” property of it. 3) A label’s up and down When the labels overlap which may result that you cannot select a label, the “Up” and “Down” button can help you change the order of these labels. Attention: a label which is at the top in the “Text” drop-down list is at the bottom on the right editing area. When you use the “Up” and “Down” button, you observe a label’s order in the “Text” drop-down list to make sure it moves as you want. The following chart: Left is the default order. Right is the order after moving up the “TeamA:Score”. Now, “TeamA:Score” is at the top in the “Text” drop-down list, which means that the label of “TeamA:Score” is at the bottom. Kazo Vision WEB: http://www.kazovision.com MAIL: [email protected] 24 Text Property The most important panel of the layout editor is “Text Property”. You can see all properties of the label you selected. And you can also modify the parameters of the label to meet your needs. 1) Settings of label’s name/type “Name”: Display the system name of the selected label, it’s not modifiable. “Type”: The different displaying types for selecting: Default When the type is empty, fill in the Text. Display the text value directly: Kazo Vision WEB: http://www.kazovision.com MAIL: [email protected] 25 SCROLLTEXT Select the “SCROLLTEXT”, fill in the Text. Display the text value scrolling: TIME Display current time of system. You can use “YYYY/MM/DD” and “HH:NN:SS” to indicate both the date and the time. CPTTIMER Display the current match timer which is same as the timer on the main interface of the “Terminal” SHTTIMER Display the shot clock timer. REALMER Display time of a connected external device through RS232, Network, etc… ANALOGCPTTIMER Display the current match timer with an analog timer. SHAPE Display rectangle, round-rectangle, horizontal and vertical line. SYMBOL Display symbols like follows. Kazo Vision WEB: http://www.kazovision.com MAIL: [email protected] 26 TEXTSYMBOL Display symbols of text like follows. IMAGE Choose the “IMAGE” type, and input the image path in the “File Name” textbox. Display image files on the scoreboard. FLAG Display the national flag on the scoreboard. MEDIA Display images or videos at the specified location of scoreboard. Choose the “MEDIA” type, and fill in the full pathname of a video or a picture in the “Play List” textbox. Then, it can display images or videos at the specified location of scoreboard. Specific operations can refer to corresponding chapter of "3.1.7 Common layout applications". TABLE Display a group of item from the internal data table. Kazo Vision WEB: http://www.kazovision.com MAIL: [email protected] 27 SCREEN Display another scoreboard screen in this area, so you can group several scoreboard screens on one screen. 2) Settings of label’s position Method 1: select the label, drag on it to the position as you want. The advantage of this method is simple, easy to understand. The disadvantage is not accurate. Method 2: move the label by modifying the coordinates. “Align”: the display mode of the selected label. There are four kinds of this: Kazo Vision WEB: http://www.kazovision.com MAIL: [email protected] 28 By modifying the value of the left, right, top and bottom coordinates can determine the size and location of the label. The advantage of this method is that it can achieve precise positioning. 3) Settings of label’s text Select the label, then you can modify the font, size and color. You can also check bold and italic. Until here, the display screen can basically achieve what you want. Kazo Vision WEB: http://www.kazovision.com MAIL: [email protected] 29 Other functions of layout editor 1) Open/close Open: open the layout files of games that comes with Ultra Score software. Close: close the current layout file. 2) Import/export/revert file Export file: After completing and saving the layout editor, choose “Export File” to save it to local and the file format is “*.csb”. Import file: Import the specified layout file “*.csb”. Revert file: Revert the original layout. 3) Options It can be used to set the width and height of the screen display in order to make the screen match the actual screen display requirements 4) Emulate At last, you should save the file after modified, and press the “ the effect. ” or “emulate” to run it to see Kazo Vision WEB: http://www.kazovision.com MAIL: [email protected] 30 3.1.7 Common layout application a) Display Team Logo Ultra score contains the function of displaying team logo. Setting: When creating team info, open the team logo picture path in the “Team Logo” textbox. After re-opening the match, you can see the renderings: Kazo Vision WEB: http://www.kazovision.com MAIL: [email protected] 31 b) Display Flag Ultra score contains the function of displaying flag. Setting: When creating team info, click the icon “ ” at the end of “Region” textbox and then you can see country info. Select one country and click “Ok” button. After re-opening the match, you can see the renderings: Kazo Vision WEB: http://www.kazovision.com MAIL: [email protected] 32 c) Modify Background Image Click “Screen” button on the function bar of the right side of terminal interface. Choose “Background - Image” and open the picture path. Click “OK” button to complete the modification. You can see the renderings: d) Scores and video display simultaneously Step 1: Create a text file In each line of this text file, fill in the full pathname of a video or a picture. Kazo Vision WEB: http://www.kazovision.com MAIL: [email protected] 33 Step 2: Add label Choose a match, and then click “Layout” to open the “Layout Editor”. Click “Add” to add a new label. Step 3: Modify Text Property of the new label Choose the “MEDIA” type, and input the full pathname of the text file created in step 1 in the “Play List” textbox. And check the "visible". Step 4: Set the displaying size and position of a picture or video Modify the value of left, right, top, bottom to changing the size and position of the label. Kazo Vision WEB: http://www.kazovision.com MAIL: [email protected] 34 You can see the result by using Emulate: Through the above settings, score interface will circulating display these images and videos in a particular area. You can set these according to your needs. If the label you add covers the original label, you can adjust the position of these labels or uncheck “Visible” for some labels to hide the extra information. Notice:If you have any problem about layout, please contact us. 3.2 Playlist There are two kinds of playlist in the system, one is “Playlist”, and the other is “Playlist Ex”. Both of them are used to display the media files. But “Playlist Ex” is the extending of the “Playlist”, because you can show the different information on two displays by using its function. 3.2.1 Create Playlist Select “Playlist” tab on the main interface. The list box on the left of this tab will show all existing playlists. Kazo Vision WEB: http://www.kazovision.com MAIL: [email protected] 35 You could press the “New” button to create a new playlist and also could delete one by press the “Delete” button. After you selected the playlist, there will appear all media files in the list. Press the “New” button on the right of the playlist, it will appear a new file menu. Now the system can support seven types of the new files. They are “Video File”, “Video Signal”, “Flash File”, “Image File”, “Text File”, “Text”. 1) Video File: It supports general video formats, such as AVI, MPEG, WMV, etc. Layout: You can select “stretch” or “extend”. If you select “stretch”, the video will be displayed with its original proportion on the media screen; If you select “extend”, the video will be stretched to the full screen according to the screen size. Kazo Vision WEB: http://www.kazovision.com MAIL: [email protected] 36 2) Video Signal: It displayed the current live TV videos or other videos signals. It has to be used together with video grabbers, such as video capture card, television set-top box, etc…. Video Source: For selecting the suitable video type to match the port of the video capture card. There are three modes: Tuner, Composite and S-video. Channel: Only enabled by Tuner Mode, you should test it according to the actual situation. Stay Time: Set the play duration. 3) Flash File: It is used to create a flash file. Its suffix must be “.swf”. Layout: Just like that in a video, and there is a third option: Center 4) Image File: It supports kinds of picture. It also have much effect for entering and exiting the field. Speed: Pull the sliding key to change the speed of the entry effect and exit effect. Kazo Vision WEB: http://www.kazovision.com MAIL: [email protected] 37 5) Text File: It is used to display different text files. You can modify the font, color and size of the content. 6) Text: It is used to input any text information directly, and you can also modify its font, color, size and other properties. Kazo Vision WEB: http://www.kazovision.com MAIL: [email protected] 38 3.2.2 Other Operations 1) Edit and delete item Select an item from the Playlist, then click the ”Edit” button below to edit the caption, or you can delete the item directly by click the “Delete” button. 2) Move item up and down Select an item from the Playlist, then click the “Move Up” or “Move Down” button, it helps you change the sequence of the item. 3) Auto Loop If you check the “Auto Loop”, all of the item will play in a loop. 4) The “Preload” Function When using the Remote Display Mode, before playing the media files, the system will copy them to the remote display system. When you want to play media files with large capacity, it will take Kazo Vision WEB: http://www.kazovision.com MAIL: [email protected] 39 quite a long time to copy them at the first playing. The “Preload” Function helps you to copy these media files in advance. When using the Media Play Function during the match, the terminal will change to the screen of the media broadcasting but it won’t affect the running match, you can still score. Once the playing is stopped, the screen will return to show the current match information. 5) Play / Pause / Stop After editing the Playlist, Click the “Play” button, the content will be displayed in order. Click the “Pause” button to pause or continue playing. Click the “Stop” button to stop playing. 6) Options It is used to edit the position of media information on the screen. 1) “Scoreboard Area”: play the video only in the scoreboard area but not include clock area. Kazo Vision WEB: http://www.kazovision.com MAIL: [email protected] 40 2) “Full Screen”: play the video in the whole screen. 3) “Custom”: play the video in the any position of the screen by modifying the coordinate. 3.3 Playlist Ex This function achieve that different screens can display different information at the same time, such as one displays score information, another displays media information. Click “Display” button on the function bar. In the dialog box, set the IP address of display 1, display 2 and display 3. Check the box “Play different contents on ‘Display 2’ or ‘Display 3’ ” at “Playlist Ex”. Then the video in this panel will only play on the remote computer of ‘Display 2’ and ‘Display 3’. What play on the ‘Display 1’ and ‘Terminal’ still be determined by the panel at “Playlist”. The interface and operation of the “Playlist Ex” is similar to the Playlist. Kazo Vision WEB: http://www.kazovision.com MAIL: [email protected] 41 Notice: The “Playlist Ex” has to cooperate with the Remote Display in the Network Professional Edition. 3.4 Notify You can publish some texts on the media screen anytime during the match. These texts will be shown at the bottom or top of the media screen. Go to “Notify” tab on the main interface. You can input notice in the “Notify Text”. After inputting the contents in the text box, you can press the “Show” button to display. For example, we input “Welcome!” as notify text. You will see the effect as follow: Kazo Vision WEB: http://www.kazovision.com MAIL: [email protected] 42 Notify operation: Show: Display the notify text on the media screen. Hide: Cancel the display. Load From File: Load notify text from a text file with “.txt” suffix. Save To File: Save the input text to a text file. Options: Set the font and color, position and speed of the notify text. 3.5 Analog Clock Select “Analog Clock” tab on the main interface. 3.5.1 System Time Press the “System Time” button, and then it will show the current system time on the screen. Kazo Vision WEB: http://www.kazovision.com MAIL: [email protected] 43 3.5.2 Countdown If you want to countdown the time during the match, you should input the time that you want to countdown into the “Init Time” text box at first. This system supports two kinds of counters, they are “Minute Counter” and “Second Counter”, and they show a counting time with different precision: After the time we need to countdown ending, there will be a sound alarm. 3.5.3 Timer Adjustment You also can click the “Pause” and “Resume”, or “Increase Time” and “Decrease Time” to control the match time during the countdown process. 3.5.4 Match Timer Kazo Vision WEB: http://www.kazovision.com MAIL: [email protected] 44 If you press the “Match Timer” button, it will cause the clock to show the same time as the Referee’s Match Timer on the main interface. 3.5.5 External Timer If you press the “External Timer” button, it will cause the clock to show the same time as the external timing device. The device should be connected to the computer with RS232 or LAN. 3.5.6 Clock Option You could modify the settings of the analog clock by click the “Options” button: Position: Modify the position of the clock, or you can close it. Width (Height): Modify the width of the clock part. (Modify the height when the clock is at top or at bottom) Bound Width: Modify the width between the dial and the label below. Label Height: Modify the total height of the label part. Clock Part: You could define the accuracy of the clock. You can set the color of needle and dial and modify the size and color of the text. Label Part: Set the color and size of the text 3.6 Referee This function panel is for timing and scoring for the referee. You can use this panel after opening a match. This panel has different interface and operation for different matches, so you can refer to the match operation manual to get the details. 3.7 Other functions There are a set of function button at the right side of the interface. We will tell you these buttons’ functions and applications in the following sections. Kazo Vision WEB: http://www.kazovision.com MAIL: [email protected] 45 3.7.1 Screen Press the “Screen” button to open the “Screen Option” dialog: Here you can modify the position of the scoreboard screen and the background color, etc. If you check the “Screen window stay on the top”, the scoreboard window will not be influenced during the match. While your computer is connected to two or more screens, you should set the screen resolution of your system mode: extend Mode. Kazo Vision WEB: http://www.kazovision.com MAIL: [email protected] 46 “Background”: it is used to modify the background image. You can use “Preset” to choose a background image or choose “Image” to insert a local image. 3.7.2 Display You can set at most 3 remote display to play for the same or different content. Notice: You can use the Remote Display only in network edition of the system. Kazo Vision WEB: http://www.kazovision.com MAIL: [email protected] 47 Settings: 1) Connect the computer of console to the LAN, and set the IP address 2) Before opening a match, check the box and input the IP address. 3) Open a match. Make the appropriate settings at “Playlist”. The media information at “Playlist” will play on this console and the checked display 1. The media information at “Playlist Ex” will play on the checked display 2 and checked display 3. Please read “Playlist Ex” section of the chapter 3.3 to know more details. Notice: In standard network edition of the system, you can only use Display 1. In advanced network edition of the system, you can use Display 1-3 as you need. 3.7.3 Shortcut Click the “Shortcut” button will appear the “Shortcut Option” dialog; it includes “Match Timer”, and “Referee” parts. Kazo Vision WEB: http://www.kazovision.com MAIL: [email protected] 48 For example, if you want to modify icon’s shortcut, you can click the button beside it and then it will appear the “Get Shortcut” dialog: Entering the new shortcut you need, you will get the shortcut you need. We suppose the “A” become the new shortcut of icon. 3.7.4 Handy This software support scoring controllers according to requirement. You can choose either of them or both of them. With this function, the referee could not be limited to score on the computer. The external controller could be used to realize each referee’s scoring and timing operation. It is convenient and intuitive. Kazo Vision WEB: http://www.kazovision.com MAIL: [email protected] 49 Configure: Click the “Controller” button and then the dialog as follow: If you use only one controller, please check the “Enable Device 1”, select the correct device type and comm port, and then click the “OK” button. It’s same to use two controllers. Notice: You may contact us for the detailed information about the controllers. 3.7.5 Live Score The Live Score will provide the real time information of score, time etc. for the live video. Notice: This function must be used with the system of Live Scores. If you want to know more about the system of Live Scores, please contact us. Kazo Vision WEB: http://www.kazovision.com MAIL: [email protected] 50 3.7.6 Misc. Press the “Misc” button will appear “Misc Functions” dialog; click the “Synchronize System Time” button, you can synchronize the time of control mode, remote mode and broadcasting mode with the system time of the terminal. Kazo Vision WEB: http://www.kazovision.com MAIL: [email protected] 51 4. Remote Display You can use the remote display model in the network edition of system. With this module you can use three extra computers to show the scoreboard. It will be useful if you need some independent computers to show the scoreboard or media contents. The main interface of Display: 4.1 Configuration of using the Remote Display Before you use the remote display, you should do four steps as follows: 1) Install the “Remote Display” on the computer you want to use, the details are in chapter 1.3. 2) Connect the terminal and the display computer with network and open them. 3) Check the “Remote Display” in the “Display Option” on the terminal, and input the IP address you are using. Kazo Vision WEB: http://www.kazovision.com MAIL: [email protected] 52 Check and input the IP of display 4) Open a match from the Terminal. 4.2 Display Control and Other Settings If you want to use two displays to show different information in the system, for example, one for match score, another for media information for example .The other case is that the two displays are both used to show different media information. The details are in chapter 3.6.2. Kazo Vision WEB: http://www.kazovision.com MAIL: [email protected] 53 Kazo Vision WEB: http://www.kazovision.com MAIL: [email protected] 54 Kazo Vision WEB: http://www.kazovision.com MAIL: [email protected] 55 _____________________ Information in this publication is subject to change without notice. © 2015 Kazo Vision. Printed in China. Printed on recycled paper. 2015 – 06