1
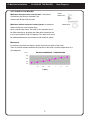
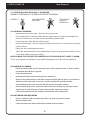
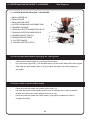
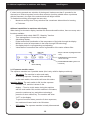
User manual
New Elegance
U / EN
...............................................................................
...............................................................................
Rev. 110223
1.Contents.
New Elegance
1. CONTENTS
page
2
2. SPECIFICATIONS
3
2.1.External components
3
2.2. Specifications
3
2.3. Boiler element
4
3. ACCESSORIES
4
4. MACHINE INSTALLATION 5
Installing instructions
5
4.1. Electrical installation
5
4.2. Connection options
6
4.3. Hydraulic installation
6
4.4. Filling up the boiler
7
5. FIRST START UP 8
5.1. First start up
8
5.2. The portafilter set
8
5.3. Coffee machine with built in grinder
9
5.4. Espresso brewing
9
5.5. Heating up liquids
9
5.6. Hot water for infusions
9
6. COFFEE MACHINE WITH BUILT-IN GRINDER
10
6.1. Coffee machine with built in grinder
10
6.2. Previous operations before starting up the coffee grinder
10
6.3. How to obtain a grinded coffee dosage
10
6.4. Adjusting the grinding degree of coffee
11
6.5. Adjusting the grinded coffee quantity per dosis
11
7. CLEANING OF THE ESPRESSO MACHINE
12
7.1. Cleaning of group
12
7.2. Cleaning of gasket and shower
13
7.3. Shower cleaning
13
8. ELECTRONIC CONTROL PANEL 14
8.1. Electronic control panel
14
8.2. Programming dosage of the control panel
15
8.3. Example of 1 short coffee programming
16
8.4. PROGRAMMING THE DOSIS FOR HOT WATER FOR INFUSIONS
17
8.5. ALARMS AND WARNINGS OF THE ELECTRONIC CONTROL
17
9. ADITIONAL CAPABILITIES IN MACHINES WITH DISPLAY
18
9.1. ESPRESSO MACHINE STATUS 18
9.2. ACCESS TO ADITIONAL MENUS
19
9.3. CLOCK ADJUST: ADJUSTING HOUR, MINUTES AND DAY
20
9.4. AUTO ON/OFF
20
9.5. DAY OFF ADJUSTMENT
21
10. POSSIBLE ANOMALIES
22
10.1. FAILURES PRODUCED BY LIME
22
10.2. PROBLEMS DUE TO GRIND SETTING
22
10.3. RECOMMENDATIONS
22
10.4. CAUTIONS
22
2.
2. Specifications New Elegance
3
2
12
1
11
1
10
5
5
10
9
8
7
6
4
9
7
8
6
4
2.1 External components
1
2
3
4
5
6
Steam Tap Display Electronic control panel Main switch Heat element light Adjustable leg 7
8
9
10 11 12 Porta Filter
Brewing group
Hot water outlet
Steam wand
Brewing switch
Boiler Manometer
2.2. Specifications
Boiler element
230 2F380+N 125
3F380+N
(mm)
50/60 50/60 Hz
Hz
Models
Groups
A
F
H
Compact 1GR 1
490
610
Compact 2GR 2
490
Compact 1GR Molino/
Grinder/Moulin
1
2 Gr 2 Gr Molino /
Grinder/Moulin
3F230
Kg
Boiler
510
36
6
2500
2000
610
510
40
6
2500
2000
460
610
690
41
6
2500
2000
2
710
610
510
54
11,5
3050
3050 4500 4500
2
710
610
690
55
11,5
3050
3050
4500
4500
3 Gr
3
1000
610
510
70
17,5
4000
4000
6000
6000
4 Gr
4
1000
610
510
82
17,5
4000
4000
6000
6000
3.
2. Specifications New Elegance
2.3. Boiler element.
(*) The machine allows different final electrical set ups:
3 Phase 380 (2Ph380+N),
3 phase 220 (3ph220 or 2ph220) &
single phase 230.
Note1: 4500/2x1200 W means that the machine does never connect simultaneously all of its
heating elements; whether it activates the 3050W heat element, or the other 2 of 1200W; but
never at the same time. So for power calculation consider the maximum heat power consumption
(4500W in this case). Take this into account in the case of the 6000/3x1200 W.
Note2: Consult the characteristics plate on your machine as to know which model the machine
belongs to.
3. Accessories.
Cleaning
Compact 1 &
2 GR
x1 x1 x1 x1
2GR
x2 x1 x1 x1
3GR x3 x1 x1 x1
4.
4. Machine installation
New Elegance
READ CAREFULLY THIS INSTRUCTION MANUAL PRIOR TO INSTALL OR
OPERATE THE ESPRESSO MACHINE.
Machine installation
When installing the machine on its cabinet, it should be as horizontal as possible
(use its adjustable foots to achieve it), so the coffee will come out evenly to the cups, through all
the spouts of each group.
4.1. Electrical installation.
Wiring of coffee machine must be done by qualified staff, always following the safety instructions:
• Before plug in the machine, make sure the voltage of the supply mains corresponds to the ratings
indicated on the nameplate featuring the appliance’s technical data.
• The wall socket must be equipped with an earth contact. Make sure the earth system is
efficient and in conformity with current safety rules. It is compulsory to earth the machine.
• You should protect the electric line of the installation with a magnetothermic switch
appropriated for the power consumption of the machine, specified on its nameplate.
• A residual current circuit breaker must be installed in accordance with the characteristics of the
installation.
• Check the characteristics & rating of the system and that the diameter of the cables are
suitable for the power absorbed by the machine.
• Do not use any extension cable or plug adapter, nor multiple wall sockets.
The manufacturer is not liable for the injuries or damages on people and/or animals, as well as
damages on equipment, caused by a improper installation of the coffee machine.
5.
4. Machine installation
New Elegance
4.2. CONNECTION OPTIONS.
Consult the nameplate on your machine as to know which is the electrical characteristics
of the machine type that you have.
Depending on it, you can connect your machine as follow:
CONNECTION OPTIONS
Machine:
230 Vac
Supply
230Vac Ph+N
Blue
230 Vac
PHASE
Supply hose
Yellow /Green
2Ph+N
Machine:
230Vac Ph+N
Brown
Black
Supply hose
Machine:
2Ph+N
Supply hose
PHASE
125 Vac
PHASE
2Ph 380Vac+N
NEUTRAL
PHASE
PHASE
Brown
Black
Supply hose
Blue
Supply hose
Machine: 380
Supply hose
Yellow/Green
2Ph 230Vac
Machine:
2Ph+N
PHASE
Supply hose
Yellow/Green
Brown
125Vac Ph+N
NEUTRAL
PHASE
Vac 3PH Supply
Blue
Brown
Grey
Black
3Ph 380Vac+N
NEUTRAL
PHASE
PHASE
PHASE
Yellow/Green
Supply
3Ph 230Vac
Blue
Brown
Black
PHASE
Supply
Yellow/Green
Supply
Blue
NEUTRAL
Supply
Blue
Brown
Black
Machine:
PHASE
Brown
2Ph+N
Brown/Green
Machine:
2Ph 230Vac
Yellow /Green
Supply
Blue
Supply
Blue
NEUTRAL
Brown
Supply hose
Machine:
Yellow/Green
PHASE
PHASE
PHASE
Machine:
220 Vac 3PH Supply
Supply hose
3Ph 230Vac
Blue
Brown
Black
PHASE
PHASE
PHASE
Yellow/Green
4.3. HYDRAULIC INSTALLATION
Using the flexible hose provided with the machine, connect it to a connection hose 3/8” male, with
closing valve. Placement of a water softener filter between the valve and the machine is
compulsory (among all the spare parts you should have another flexible hose of 50 cm in order to
connect both water softener filter and valve).
6.
4. Machine installation
FILLING UP THE BOILER
4.4. FILLING UP THE BOILER.
Machines with electronic control panel: In this kind
of machines the filling is automatic; the
New Elegance
Visual
water level
machine will fill the boiler by itself
Machines without electronic control panel: In machines
Water knob
without electronic control panel (they
have a visual water level), the boiler of the machine has to
be filled manually by pressing the water knob located at the
front of the machine under the driptray. The water level must
be maintained between the maximum and minimum marks.
Manometer
In machines that have no display, shows the pressure inside of the boiler.
There is a direct relation between the pressure in the boiler, and the temperature in it.
(see diagram).
T(ºC)
RELATION PRESSURE - TEMPERATURE
125
120
115
110
0,7
0,8
0,9
P (Bar)
7.
1
1.1
1,2
5. FIRST START UP
New Elegance
5.1. FIRST START UP
•
Open the external supply of water to the machine.
•
If the machine has visual level indicator, fill the boiler between the maximum and
minimum level.
•
Turn on the main power switch.
•
Press the brew switch, or one selection on the control panel on each group, until water
comes out continuously from each of them. This way the heat exchangers of the machine
will be correctly filled.
•
Turn on the steam knob, until steam comes out. This way we will evacuate the
remaining air that could be trapped in the boiler.
“The red pilot, shows us the machine is heating-up. Once it turns OFF, it means the machine has
reached the ideal temperature”.
5.2. THE PORTAFILTER SET
1
2
3
1.- Tension spring (Filter basket)
2.- Placement of tension spring.
3.- Placing portafilter tension spring.
Porta-filter & filter basket for 2 espresso dosis
Porta-filter & filter basket for 1 espresso dosis
Portafilter locking into the group
The porta-filter has two little wings at each side;
these ones must be aligned with the
screw slots in the group. Then turn the porta
counter-clock wise till the porta-filter handle
is perpendicular to the espresso machine.
8.
5. FIRST START UP
New Elegance
5.3. COFFEE MACHINE WITH BUILT- IN GRINDER
CORRECT POSITION OF THE PORTA-FILTER IN THE GROUP
CORRECT NOT INSERTED
ENOUGH
THE GROUP
JOINT IS
WORN OUT
5.4. ESPRESSO BREWING
•
Unlock and remove the porta - filter from the group head.
•
Fill the basket filter of the porta-filter with the right amount of coffee (it will depend on
the filter’s basket size). For best results use freshly grinded coffee.
•
Press down the coffee with the coffee tamper.
•
Insert the filled porta – filter into the group head, and lock it in; be sure that it is correctly
locked in place.
Place one /two cup beneath the spout.
•
Select the desired option from the switchboard, if yours is an electronic machine, or turn
on the brew switch (in pulser models).
KEEP ALWAYS THE PORTAFILTER INSERTED IN THE GROUPHEAD TO KEEP IT WARM.
This is very important to maintain it in an optimal temperature as to get the best espresso.
5.5. HEATING UP LIQUIDS
•
Place the steam wand over the tray and open a bit the steamer knob, in order to allow
condensed water drops be ejected.
•
Close the steam knov.
•
Immerse the steam wand in the liquid to be heated up.
•
Open up the steam knob so it will start to heat the liquid (with tap open, do not take the
wand out of the liquid until closed, you could be injured with projected water).
Once finished the process close the tap and remove the liquid container.
•
Once finished the process, orient the steam wand over the drip tray and open up the
steam knob to clean leftovers of milk or other liquids, inside the steamer.
Close the knob and clean the outside of the steamer with a damp cloth.
5.6. HOT WATER FOR INFUSIONS
•
Place a recipient under the water tap, where you want to get the hot water.
•
Open the water knob,
•
Close the water knob when reached the desired volume of water.
9.
6. COFFEE MACHINE WITH BUILT- IN GRINDER
New Elegance
6.1. COFFEE MACHINE WITH BUILT- IN GRINDER
1 BEAN HOPPER LID
2 BEAN HOPPER
3 BEAN HOPPER GATE
4 COFFEE GRINDING ADJUSTMENT DISK
5 GRINDING TRIGGER
6 GROUND COFFEE DOSAGE DEVICE LID
7 GROUND COFFEE DOSAGE DEVICE
8 GRINDER ON/OFF SWITCH
9 DOSAGE DEVICE LEVER
10 COFFEE TAMPER
11 GROUND COFFEE OUTLET
6.2. Previous operations before starting-up the coffee grinder
•
Check that the bean hopper (2) is correctly fitted in place.
•
Lift up the bean hopper lid (1), fill the bean hopper (2) with coffee beans and close it again.
•
Slide open the bean hopper gate (3) to the position that allows the coffee getting into
the grinder.
6.3. How to obtain a grinded coffee dosage
•
Place the porta filter under the grinded coffee outlet (11).
•
Pull from the ground coffee dosage device lever (9) towards you in order to obtain a
dosage and release the coffee dosage device lever free.
•
Place the porta filter under the coffee tamper (9) and push it upwards in order to
compact the coffee.
10.
6. COFFEE MACHINE WITH BUILT- IN GRINDER
New Elegance
6.4. Adjusting the grinding degree of coffee
You can adjust the grinding degrees (thinner ground coffee/coarser ground coffee) as follows:
•
If you want to obtain thinner grinded coffee: Maintain pressed the millstone trigger
(5)(models till 2009) while turning right the setting grind wheel (4), then release the trigger.
•
If you want to obtain a coarser grinded coffee:. Maintain pressed the millstone trigger (5)
(models till 2009) while turning left the setting grind wheel (4), then release the trigger.
6.5. Adjusting of the grinded coffee quantity per dosis
•
Switch OFF the grinder general switch, (8).
•
Remove ground coffee dosage device lid (6).
•
In order to get lower dosage: Turn the coffee grinding adjustment disk clockwise.
Lever
•
In order to get higher dosage: Turn the coffee grinding adjustment disk counter clockwise.
•
Re-install the ground coffee dosage device lid (6) in place.
Note; as to measure 7 grs of grinded coffee you get a measuring spoon with the machine.
•
If when brewing espresso, it comes out very fast, the grinder is set too coarse.
If when brewing espresso, it comes out very slow, the grinder is set too thin.
Espresso should come out with a slow, thin and continuous flow.
11.
7. CLEANING OF THE ESPRESSO MACHINE New Elegance
Cleaning of the espresso machine
Remember, as to get the best performance from the machine, descale and cleaning are to be
observed.
Disconnect the machine from the main supply prior to cleaning the machine.
All the body exterior can be cleaned with a damp cloth. Do not use abrasive or dissolvent products.
7.1. Cleaning of group
•
Unlock & remove the porta filter from the group head.
•
Place the blind filter membrane on the filter basket.
•
Insert a sachet of detergent into the porta filter. You must use specific detergents for this
kind of cleaning, suitable for the cleaning of the group of espresso machines.
•
Lock the porta filter into the group head.
•
If you have a Pulser machine (no keypad) press the brew switch for 10 seconds, then
release for 3 seconds; and then repeat again this action for at least five times more.
•
If the machine is of the type Control, (it has keypad), activate the auto-cleaning cycle
as follows:
Switch off the machine, then keep pressed the button “2 short coffees” and turn on the machine.
Now you can release the button; the auto-cleaning will automatically repeat a cleaning cycle.
12.
7. CLEANING OF THE ESPRESSO MACHINE New Elegance
Electronic control panel.
Important: Once finished the cleaning process, remove the porta filter and run water through the
group again to rinse out all remains. Repeat the cleaning process without detergent once more for
a perfect result.
“DO NOT MANIPULATE THE PORTA FILTER DURING THE AUTO - CLEANING PROCESS”.
•
Cleaning the groups everyday with the filter membrane but without detergent
is recommended.
•
Cleaning the groups with the filter membrane and detergent is recommended
once a week.
Detergent
Filter
basket
Blind Filter membrane
Blind Filter membrane
7.2. Cleaning of gasket & shower
When attaching the porta-filter filled with grinded coffee into the brewing group, left overs
accumulate in the closing surface. These remains if excessive can prevent a good closing
between the porta-filter an the brewing group. Moreover, these remains can even block the output
of water through the group.
The solution for this is cleaning:
•
Place on the filter basket the blind membrane filter, without detergent.
•
Place the porta-filter in the brewing group, without attempting to close it.
IT MUST BE LOOSE.
•
Connect a continuous espresso (switching or selecting).
•
Make an opening - closing movement of the porta in place, without closing it. Water will
flow around the porta filter, flowing through the closing surface, cleaning it. Be very careful,
as this water is very hot, and can cause burns.
Closing Area with
grinded coffee remains
7.3. Shower cleaning
With a scouring pad, whip the
Shower
shower’s area both interior, and
exteriorly.
13.
8. ELECTRONIC CONTROL PANEL New Elegance
8.1. Electronic control panel.
When having an electronic control panel (5 buttons per brewing group), the machine offers these
additional capabilities:
•
Volumetric control of four different espresso doses per brewing group.
•
Time-controlled hot water dose’s control. (on customer’s request).
•
Automatic filling and level control of the boiler.
•
Automatic switch off of the heating element if not enough water. (on customer’s request)
•
System´s supervision through alarms.
•
Serial connection RS-232 with data-reading devices from the control panel to the computer.
•
Brewing group auto-cleaning.
The control panel is by default programmed with 4 standard doses (these can be re-programmed
as you wish) and a continuous selection.
The first four keys (1 short espresso – 1 long espresso – 2 short espressos – 2 long
espressos) brew the programmed amount and then stop automatically; the fifth one brews
until stopped.
TEA (on customer
request)(press under
1 sec.)
CONTINUOUS
(press between
1 and 8 seconds).
1 short
espresso
1 long 2 short
espresso
espressos/
auto-cleaning
2 long
espressos
PROGRAMMING MENU
(press over 8 seconds)
The continuous button, depending on the duration of the pressing, has 3 functions:
Less than 1 sec.: Activates the hot water for infusions dosing (only in machines without a
water tap).
Between 1 and 8 secs.: Continuous espresso output; in order to stop it, we must press the
button again. Over 8 secs: Entry in the programming menu. This is explained in the next paragraph.
14.
8. ELECTRONIC CONTROL PANEL New Elegance
8.2. Programming dosage of the control panel
Here we will program the volume of the coffee doses that will be automatically brewed by each
selection on the keypad.
•
Keep pressed over 8 seconds the button of continuous coffee: all the lights in the keypad
will light, but the light of the continuous coffee will flash.
•
Within 5 seconds press the button of the coffee selection to be re-programmed
(1 short espresso - 1 long espresso – 2 short espressos – 2 long espressos).
Notice that all the lights will switch off, except the one of the option selected and the one of
continuous brewing.
•
The group begins brewing the espresso. When the desired volume of espresso brewed is
reached, press again the selection, and this volume will be stored as the programmed
dosis.
•
Repeat the process with all the other selections that need re-programming.
Whenever we have reprogrammed each selection, its corresponding light will come off.
Each dosis re-programming must be done with freshly grinded coffee, each time.
In case only one of the selections is to be reprogrammed, act as previously described,
re-programming only the one desired; remaining buttons will keep the existing
programmed dosis.
Very important:
When you re-program any dosis in the left keypad (facing to the machine),
this dosis will be stored in every other keypad.
This is: If for example we modify
the dosis of the 1 short espresso in the left keypad, automatically this newly memorized
new dosis will be stored in all the other keypads.
This only happens with the left keypad; if we modify the dosis on any other, it will not
overwrite any other.
15.
8. ELECTRONIC CONTROL PANEL New Elegance
8.3. Example of 1 short coffee programming
Unlock the porta filter from the machine and fill it with fresh ground coffee.
Lock it into the brewing group head, place one cup beneath the spout.
Press the “*” key pad and keep it pressed for over 8 seconds, until all the green lights are
simultaneously flashing.
Then press the “short coffee key” pad, and you will see all the green lights switch off, except the
option you have selected one of continuous brewing.
The machine will start brewing.
When the required coffee dose is reached, press the “short coffee key” pad.
The light of this option will turn off.
This means that programming of this option has been successful.
You can re-program again any dosis, or just wait for the electronics to come back to normal status
and the lights of the keypad to turn off.
16.
8. ELECTRONIC CONTROL PANEL New Elegance
8.4. Programming the dosis for hot water for infusions
In machines that do not have a manual tap for hot water, this option will be enabled.
Here how to adjust it:
•
Keep pressed over 8 seconds the continuous espresso key, till all the lights turn on,
except the ones of continuous espresso, that will flash.
•
Press the continuous key for less than 1 second. Water will begin to come out from the
hot water wand.
•
Press again the same key; the water will stop and the new dosis will be stored.
Different water amounts can be stored in each keypad.
8.5. Alarms and warnings of the electronic control
•
When the filling time of the boiler extends over the programmed limit (2 minutes)( lack of
water), all the lights of the keypad will flash, and the machine will stop and block.
Once solved the problem (not enough pressure of water arriving to the machine), to
unblock the machine, turn off and on the machine from the main switch.
17.
9. Aditional capabilities in machines with display New Elegance
If, when having pressed one selection of the keypad, it takes more than 5 seconds for the
electronics to receive impulses from the flow measurer (too thin grinded coffee or problems
with the flowmeter), the light of the selected dosis will begin to flash.
To disable this warning press again the same key.
•
Maximum security time: Every selection has a maximum allowed time for brewing
of 5 minutes.
Aditional capabilities in machines with display
When having an electronic display, besides the aforementioned functions, there are many extra
functions available:
•
Automatic daily switch ON/OFF; “Stand by” function.
•
Time management: Current day and time.
•
Advertising display.
•
Digital control and visualization of the temperature of the boiler through the display.
•
Maximum control of temperature in the boiler through PID technology.
•
On-display help for re-programming and adjusting.
•
Visual alarm to warn about the need of regeneration of the water softener filter.
- ON
Stand by
TEA (on customer request)(press under
1 sec.)
CONTINUOUS (press between
1 and 8 seconds).
PROGRAMMING MENU (press over
8 seconds).
- ON
- Auto cleaning
9.1. Espresso machine status
The espresso machine has 3 possible status (this is only valid for display machines):
•
ON status: The machine is active and ready
for brewing espresso. Generally when switching
on the main switch, the machine will enter this status.
stand by Status. The main switch is ON, but the espresso
machine is off, and this is shown in the
display. – To arrive to this status, being the machine
with the main switch ON, and the machine in ON status,
press the continuous key, and without releasing it,
press the 2 short coffees key. The machine will show
“OFF” on the display.
To get out from this status, press the 2 short espressos,
the machine will come back to the ON status.
•
OFF status. The espresso machine is totally disconnected.
18.
9. Aditional capabilities in machines with display New Elegance
9.2. Access to aditional menus
•
Keep pressed over 8 seconds the continuous espresso key on the left keypad.
•
(Entering programming). Now all the keypad lights
will light up continuously, but the one of continuous
erogation that will flash intermittently. At this point of
the menu, we can adjust the volumes of the
different dosis of each selection, as explained in
previous point 8.1 “Programación de las dosis en la
centralita electrónica”.
In the display will appear the message shown.
•
Now, press again the continuous button,
untill the display shows “Clock adjust” on
the display: From this point we get acces to
the different settings. – Enter this menu by
pressing the button “two short coffees” (OK).
19.
9. Aditional capabilities in machines with display New Elegance
9.3. Clock adjust: adjusting hour, minutes and day
Once pressed the button “two short coffees” (OK) while “Clock adjust” was displayed, the
adjusting of the clock begins.
•
Adjust the hour: while the hour is blinking,
increase or decrease its value by
pressing “+” (one short espresso) or “-“
(one long espresso). When the right value is
reached, accept it by pressing “OK”
(two short espressos). Then it begins with the
minutes adjusting.
•
While the minutes are blinking, we can increase or decrease its value by pressing “+”
(one short espresso) or “-“ (one long espresso). When the right value is reached, accept
it by pressing “OK” (two short espressos). Then the day of the week can be adjusted in the
very same way (“+”, “-“ & “OK”).
After having adjusted all previous values, when pressing “OK” (two short espressos) the
“Auto On” / “Auto Off” menus are shown.
9.4. Auto On/off
After accepting the adjusting made in the time & day by pressing “OK” (two short coffees),
we enter in the programming of the automatic connection and disconnection of the machine.
•
As to modify the time at which the machine
automatically gets into the “ON” status:
While the hour is blinking, , increase or decrease
its value by pressing “+” (one short espresso) or “-“
(one long espresso).
When the right value is reached, accept it by
pressing “OK” (two short espressos). Then the
minutes will blink, and will be adjustable in the
same way than the hour (“+”, “-“ & “Ok”).
•
Note: By default, this first value will be: On: - - : - - this means that the function is disabled.
As soon as we modify the value, and it become different from - - : - - the function will be
enabled. If we prefer to leave this function disabled, just accept by pressing “OK”
while the adjusted value is - - : - - .
•
Now, while the auto-disconnection time blinks, increase or
decrease its value by pressing “+” (one short espresso)
or “-“ (one long espresso). When the right value is
reached, accept it by pressing “OK” (two short espressos).
Then the minutes will blink, and will be adjustable in the
same way than the hour (“+”, “-“ & “Ok”).
With this final acceptance, we will proceed to the next
adjusting menu.
20.
9. Aditional capabilities in machines with display New Elegance
9.5. Day Off adjustment
If automatic On and Off times have been assigned, a day off can be enabled in which the machine
will not switch on: the day off.
Note that if the function of Auto On/Off was not enabled,
this menu will not appear.
To adjust the day Off, press “+” (one short espresso)
or “-“ (one long espressos, as needed, till reaching the
desired value; then accept it by pressing “OK” (two short espressos).
•
Note: By default, this setting will be: - - : - - this means that the function is disabled.
As soon as we modify the value, and it become different from - - : - - the function will be
enabled. If we prefer to leave this function disabled, just accept by pressing “OK”
(two short espressos) while the adjusted value is - - : - -
21.
10. Possible anomalies New Elegance
Possible anomalies
10.1. Failures produced by lime
The coffee does not come out at a appropriate temperature:
-
The outlet tubes of heat exchangers are clogged by lime.
Water does not come out from the groups:
-
Lime blocks the water getting through .
Ninety percent of failures are caused by scale build-up in the machine when none water
treatment operation is done. Is very easy to avoid this kind of failure by performing the
regular maintenance of the water treater.
10.2. Problems due to grind setting
Coffee comes out very fast:
-
Adjust the grinder setting, the grind is too coarse.
Coffee comes out very slow:
-
Adjust the grinder setting, the grind is too fine.
If you observe any malfunctioning in the coffee machine contact the technical service.
10.3. Recommendations
•
You should clean every day the group without soap, only with the blind membrane / filter
basket and water.
•
You should clean the group with espresso detergent (as described in this manual), at least
once a month.
•
You should regularly re-generate the water softener device.
•
Use freshly grinded coffee as to preserve the properties, aroma and flavor of the moment
the coffee is used.
•
In order to obtain a good expresso coffee, remember that both the brewing group and the
portafilter must be hot and at a constant temperature; so keep the portafilter placed in
every moment into the group.
10.4. Cautions
•
When you are brewing espresso do not attempt to take out the porta-filter. Boiling water at
high pressure could be projected and cause you burns.
•
Never manipulate the inside of the machine; this must be done only by
authorized technicians.
•
Do not insert any kind of things inside the openings & ventilation holes of the machine.
•
Check frequently the drip tray water sink .
•
Do not allow children to use or touch the machine; it has hot surfaces that could cause
them burns.
•
Do not use the machine with wet hands, wet feet or barefoot.
•
If you want to disconnect the machine from the electrical outlet, do not pull from the wire;
remove it by pulling from the electrical plug.
•
If you have any problem contact the technical service.
The manufacturer holds the rights to modify the machine without prior announcement.
22.
New Elegance
FOR SERVICE
Retail dealer
...............................................................................
...............................................................................
...............................................................................
CREM International AB
Box 10, Viksgränd 2, SE-670 40 Åmotfors, Sweden
Tel: +46 (0)570-477 00, Fax: +46 (0)570-47719
E-mail: [email protected] www.creminternational.com
Art. nr. 1730124