1
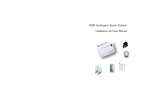
CN2HK LIMITED
LCD Display GSM & PSTN Dual Network Alarm
System (CK-AL-9951)
User Manual
Please read this manual before operating this product.
After you finish reading this manual, store it in a safe place for future reference.
ENG
Index
A main features ............................................................................................................................................................. 2
B configurations ............................................................................................................................................................ 2
C use method ................................................................................................................................................................. 3
D operation method ...................................................................................................................................................... 4
Arm and disarm ............................................................................................................................................................... 5
Arm and disarm on main unit keypad:.......................................................................................................................... 5
Store telephone numbers for receiving alarm messages ............................................................................................... 5
Setting ten seconds recording messages ......................................................................................................................... 6
Look up alarm history event ........................................................................................................................................... 6
Receiving alarm................................................................................................................................................................ 6
Remote operation ............................................................................................................................................................. 7
Short message SMS control function.............................................................................................................................. 7
Other Special Functions .................................................................................................................................................. 7
Setting wireless and wired accessories ........................................................................................................................... 9
*****Brief Command Table*****.................................................................................................................................11
A main features
Welcome you use the LCD display GSM&PSTN alarm system, its main features as
follows,
1.99 alarm zones,99 wireless zones and 6 wired zones
2.Dual network working mode, be adapt to GSM cell network and PSTN landline
telephone system at the same time
3.GSM frequency: four band 900/1800/1900/850MHz
4.LCD time and date display, automatic arming and disarming by setting time and
date
5.Two way talking ability via GSM network in alarm and remote distance operation
mode
6.Six autodial alarm phone numbers plus extra six SMS alarm phone numbers
7.Ten alarm messages can be recorded by user himself
8.Two relay output terminals can be operated by user to control alarm related
devices
9.Learning code accessories can be easily added or deleted by user
10.Four bit password for keypad protection
11. backup built-in battery for electricity power down use
12 size: 120mm(W)*180mm(L)*42mm(H), main unit weight: 0.30kg
B
configurations
1. Each standard main unit matched with two remote controllers, one PIR
detector ,one door sensor, one siren and one power adaptor, the built-in battery
can work for 20 hours when external electricity power down, please do not turn
on the battery switch before the main unit normal working to protect the battery
life time., when the external power adaptor working on, turn on the battery switch
to charge the battery at the same time.
2. The main unit initial user password is 1234, which is used for keypad setting and
remote distance operation, user can modify the password by himself but should
keep in mind the new ones.
3. Main unit working voltage: DC9V~12V, working current: idle 30mA, alarm
300mA, external power adaptor input AC voltage: 220V/AC or 110V/AC
4. All the accessories are matched well for the main unit use, the PIR detector
should turn on the battery switch, the door sensor should install the battery before
use.
2
C
use method
1.Prepare a SIM card which must be sure of valid use period, insert the SIM card into
the proper position of the main unit , the card’s metal side should be in the down
direction
2.After inserting the SIM card, plug in the external power adaptor, the main unit
begin initialization, LCD display “INIT--00 00”, the GSM signal LED blinking
rapid at first, then the GSM signal LED blinking slower after the main unit
received the GSM signal, the main unit give out one “beep” sound, and if three
“beep” sound means not received the GSM sound
Plug in the PSTN landline if available. The main unit will dial the PSTN
landline at first when alarm taking place, and send SMS out at the same time. If
no landline connected with the main unit, it will dial the alarm phone number by
GSM cell network and send SMS at the same time
3. LED display
The top LED is power indicator, the middle LED is GSM signal indicator, the
third is status indicator, which lighting up means arming, lighting off means disarming,
rapid blinking means alarm
Press the “lock ” button of remote controller to arm the main unit , the status LED
light up, Press the “unlock ” button disarming the unit , the status LED light off.
4.Store one group or several group telephone numbers to receive alarm message, and
record alarm memo messages, you can start to test the unit function( detailed
operation method showed later)
5.Use remote controller to arm the unit, turn on the PIR detector battery switch,
install the battery for door sensor, test the main unit alarm process effect before
installation
6.PIR detector is installed on indoor wall with height 2.2m or so, adjust the direction
angle to make it perpendicular to people walking direction, maximum response
coverage range is 10m. the wireless door sensor ’ s emitter part (with antenna) would
be installed on door, and the magnetic bar should be installed on door frame, the two
parts should be closed when door closed , and departed to emit signal (LED light up)
when door opened.
3
D
operation method
4
Arm and disarm
Arm by using remote controller
press arm key lock
Disarm by using remote controller:
press disarm key unlock
Bypass alarm by using remote controller:
press bypass key bell or speaker
Panic Alarm by using remote controller
press panic key lightning
Remote controller function description:
Arm:
press key “lock”, all detectors will trig alarm when received alarm signal
Bypass arm:
fast press key bypass two times, all other detectors will trig alarm
when received alarm signal apart from detectors which is set as
bypass type, for example, bypass PIR detectors is installed in indoor
use, when there are peoples at home, the bypass PIR detector will be
in disarm state, and other detectors installed outside of activity room
will in arm state.
Disarm:
press disarm key “unlock”, all detectors will not trigger alarm when
received alarm signal, except panic alarm signal
Panic button: panic button on remote controller and main unit keypad will trig alarm
in any status
Arm and disarm on main unit keypad:
Arm: Press arm key on main unit for more than 3 seconds and input password and
# and release
Disarm: Press disarm key on main unit for more than 3 seconds and input password
and #and release
Bypass arm: press bypass key on main unit for more than 3 seconds and input
password and # and release
Note : no need input password again when input password ten only seconds time and
exit setting
Store telephone numbers for receiving alarm messages
Press key “store” on main unit, input four digit password(initial value is 1234)
and #, press key “up” or “dn” to select the telephone number group number(value
from 1 to 6 total six group number is for auto dial , value from 7 to 12 is total six
group is for receiving short message SMS), press key “# ” to confirm, press key
“backspace” to clear old values, input new numbers as you expected, press key
“#” to confirm, press key “ exit ” can exit the process.
If you need to store another group telephone numbers ,then repeated the above
5
process.
You can store maximum 12 groups of numbers, and you also can left any
group numbers t blank. The alarm process will dial the first six alarm numbers
and send short messages SMS to last six group numbers one by one consecutively,
if any group numbers is void, it will
skip the blank group numbers and report
to the next group, the whole alarm process will repeat three times to dial the
alarm phone numbers from first to six if no one answer the alarm.
The last six numbers can be same or not same as first six groups numbers.
At least one group alarm telephone numbers must be stored into the main unit.
Setting ten seconds recording messages
Press key “record ” for more than three seconds, input four bit password,
Select “1” to record voice: start speaking for less than ten seconds ,press
“exit ” key to stop recording
Select “2” to playback voice: listen voice from the speaker to confirm if it is
correct
Recording content can be as follows:“alarm event from xxx
room ,xxx floor,xxx building..please handle it immediately…”
Look up alarm history event
Press key “his”, input four bit password, press key “up” or “dn” to check
most new alarm event records, maximum 99 records. Press key “bkspace” +four bit
password +# can delete records.
Receiving alarm
when your telephone machine or mobile phone receiving the alarm phone, just
connecting the alarm phone and press key on your phone to control the alarm unit
as follows:
press “1” to monitor voice
press “2” to open siren sound
press “3” to close siren sound
press “4” to arm
press “5” to disarm
press “6” to talk (in GSM mode) or speak (in landline mode )
press “7” close talking or speaking
press “0” playback recording voice
press “#” to exit
press “8” to close relay output
press “9” to open relay output(relay output current must less than 300mA)
6
Remote operation
while you are far away from the alarm machine, you can also control the
alarm machine by following method: dial the alarm unit phone number , you
will hear two “beep” sound from your phone after six ringback sound
auto-connecting on, then input four bit password(default value is 1234), if
password input wrong, you will hear three “beep” sound, if password input
correct, you will hear two “beep” sound, then input command code on your
phone as follows (same command format as receiving alarm),
press “1”
press “3”
press “5”
press “6”
press “7”
press “0”
to monitor voice
press “2” to open siren sound
to close siren sound
press “4” to arm
to disarm
to talk (in GSM mode) or speak (in landline mode )
close talking or speaking
playback recording voice
press “#” to exit
press “8” to close relay output
press “9” to open relay output(relay output current must less than 300mA)
Short message SMS control function
Send SMS
1234ARM
Send SMS
send SMS
Send SMS
Send SMS
“password+ARM” to main unit to arm the unit, for example:
“password+DISARM” to main unit to disarm the unit
“password+BYPASS” to main unit to bypass arm the unit
“password+ONSIREN” to main unit to start siren
“password+OFFSIREN” to main unit to stop siren
Other Special Functions
Below is more special function setting, it is optional setting for user.
Press
key “set”, input four bit password ,default value is 1234 , then press “#”
to confirm,(please note press key “exit” can exit setting process
from all below process):
Then
Press “1”
then press key “up” “dn” to select below function
select “1” then press key “bkspace” to set telephone line cutoff
alarm. Press key “up” “dn” to select “ON” ,then press “#” to save
line cutoff alarm function. Press key “up” “dn” to select “OFF” ,then
press “#” to save closing line cut-off
alarm function. For pure GSM
network, this function is no use
7
select “2” then press key “bkspace” , then press key “up” “dn” to
select “ON” , press “#” to save . Press key “up” “dn” to select “OFF” ,
press “#” to save closing GSM no signal alarm function.
Select “3” to check GSM signal value
Press “2” to set siren sound alert when using remote controller arm &disarm,
use key “up” “dn” to select “ON” “OFF” ,press “#” to save it. Default
is “ON”
Press “3” to set password protection for arm or disarm by keypad, press “up”
“dn”to select password protection “ON” “OFF”, press “#” to save
settings. Default is “ON”.
Press “4” to set siren acting time, press key “bkspace” ,then input 2 bit time
value, range from 00,01,02,…99 minutes), then press “#” to save the
value, default is 02 minutes.
If user need to close the siren sound, please set the above siren time
as zero “00”
Press “5” to set new password, press key “bkspace”, then input four bit new
password, press “ # ” to save , (note: if user forgot old password, please
use super-password “0755” to
enter into setting process, then setting
your new password
Press “7” the press “up” “dn” to select function
Select “1” to set remote distance dial ringback times, press key
“bkspace” then input ringback times,press “#” to confirm,
value range from 0~ 9, default is 6 times.
Select “2” then press “bkspace”, press “up” “dn” key to select “ON”
or “OFF”, press “#” to save it. “ON” means open external
power down alarm, “OFF” means close external power down
alarm.
Select “3” then press “bkspace” , press “up” “dn” key to select “ON” or
“OFF”, press “#” to save it. “ON” means open low battery alarm,
“OFF” means close low battery alarm
Press “8” setting alarm delay time and arm delay time
Press “up” or “dn” to select alarm delay time( “alarm”) or arm delay time
(“arm”)
Press key “bkspace ” then input time value , time range from 00 to 99
seconds, press “#” to confirm, press “exit ” to exit the process. Only the
accessories be set as delay type then the alarm delay time is effective.
Press
“9” to set automatic arm or disarm time. There are three group time can be
set for each day.
Press key “up” or “dn” to select one group time “arm” or “disarm”,
use key “set” to select open or close the action, when select “open ” the
action ,press key “bkspace ” to clear old value, then input new time value
( input activated day range : “x” day to “x” day , hour, minute, for
8
example: input: “ 1 7 18:30” means from Monday to Sunday 18:30 to start
arm or disarm ),press “#” to save the time value. Press “exit” to exit to
upon layer menu. Setting content including: start time, end time, etc.
Press “0” to set date , press key “bkspace” then input new year ,month, day ,
hour, minute, etc,
press “#” to confirm, press “exit” to exit setting
Press “*”
to reset , then press “#” , input four bit password again , press “#” to
reset the main unit. The “reset” command will restore all
the settings to default value.
Setting wireless and wired accessories
The wireless accessories like remote controllers, PIR detectors, door sensors
in the standard DIY kit are already learned to the main unit and can be used
directly. If user need to add extra accessories to the main unit, the extra wireless
parts must be learned to the main unit before it can be used normally according to
follows steps,
Press “learn” , then input four bit password
Input “1” to learn remote controller, input two bit zone number, press “# ” to
confirm, press a button on the remote controller to trig wireless signal
emitting to finish the learning process
Note :zone number distribution as follows:
Remote controllers: zone from 01 to 06
Wireless detectors: zone from 07 to 99
Wired detectors:
zone from 01 to 06
Input “2”
to learn PIR detector, input two bit zone number, press “# ” to
confirm, turn on the battery switch to trig wireless signal emitting to
finish the learning
Input “3” to learn door sensor detector, input two bit zone number, press “# ” to
confirm, use the magnetic bar close to the door sensor emitter then
departed away to trig door sensor to emit wireless signal to main unit
Input “4” to learn active wireless IR beam alarm , input two bit zone number,
press “# ” to confirm, power on the wireless IR beam and trig its
wireless signal to main unit to finish the learning process(note: the
IR beam is the detectors to detect people walking passing across the
IR beams to trig alarm )
Input “5” to learn wireless gas detector, input two bit zone number, press “# ” to
9
confirm, power on the gas detector and trig the gas detector to emit
wireless signal to the main unit to finish the learning
Input “6” to learn wireless smoke detector , input two bit zone number, press
“# ” to confirm, power on the wireless smoke detector and trig the
smoke detector to emit wireless signal to main unit to finish the
learning
Input “7” setting wireless detectors alarm delay time or delete detectors
Input “up” or “dn” to select the wireless detector, press “set” to select
the detectors alarm mode: delay alarm / arm / emergency(panic)
alarm/arm bypass/disarm
The “delay alarm” means when main unit received the alarm
signal, it will report alarm by a delayed time
The “arm” setting means the detector’s alarm signal is
immediately reported by main unit when the main unit is set as
effective arm
The “emergency” setting means the detector will trig immediate
alarm when received alarm signal under arm or disarm state
The “arm bypass” means the detector ’ s alarm signal will not
report to user by main unit under bypass arm state, but only report to
user under arm state.
The “disarm ” means the detector will be deactivated under any
state.
:
delete wireless detectors:
Input “up” or “dn” to select the wireless detector, press “bkspace”
then input password to delete the detector, press “exit” to exit the process
Input “8” setting remote controller emergency alarm sound or delete remote
controller
Input “up” or “dn” to select the remote controller, press “set” to set panic
with sound or panic without sound alarm,
delete remote controller:
Press “bkspace” and password to delete the remote controller
Input “9” set wired accessories function
Input “up” or “dn” to select the wired detectors, press “bkspace” to set
“ON” or “OFF”, ON means normally open, OFF means normally closed
Press “set” to set the wired detector’s trig mode: delay alarm / arm
delay / emergency(panic) alarm/arm bypass/disarm, this function is
same as wireless detectors
10
*****Brief Command Table*****
Store alarm telephone number:
Record ten seconds alarm voice:
Playback ten seconds voice:
Lockup history event:
Delete history event:
open line cutoff alarm:
close line cutoff alarm:
sto+password+#+ up/dn+bkspace+phone number+#
record 3s +password+#+1+speaking
recoed 3s +password+#+2
his+password+#+up/dn
his+password+#+up/dn+bkspace+password
set+password+#+1+up/dn+1+bkspace+up/dn( “ON”)
set+password+#+1+up/dn+1+bkspace+up/dn( “OFF”)
open arm/disarm siren sound:
close arm/disarm siren sound:
set+password+#+2+up/dn( “ON”)+#
set+password+#+2+up/dn( “OFF”)+#
open arm/disarm password protection:
close arm/disarm password protection:
set+password+#+3+ up/dn(“ON”)+#
set+password+#+3+ up/dn(“OFF”)+#
set siren active time length:
set new password:
set+password+#+4+bkspace+time(0~99s)+#
set+old password+#+5+bkspace+new password+#
set ringback times:
set+password+#+7+up/dn(“1”)+bkspace+ringback times(0~12)+#
open external power cutoff alarm:
set+password+#+7+up/dn(“2”)+bkspace+ “ON”+#
close external power cutoff alarm:
set+password+#+7+up/dn(“2”)+bkspace+ “OFF”+#
open battery low alarm:
close battery low alarm:
set arm delay time:
set alarm delay time:
set+password+#+7+up/dn (“3”)+bkspace+ “ON”+#
set+password+#+7+ up/dn (“3”)+bkspace+ “OFF”+#
set+password+8+up/dn(“arm”)+bkspace+time(0~99s)+#
set+password+8+up/dn(“alarm”)+bkspace+time(0~99s)+#
set automatic arm:
set+password+#+9+up/dn(“arm”)+set( “open” or “close”)+bkspace
+time+#
set automatic disarm: set+password+#+9+up/dn(“disarm”)+set( “open” or “close”)+bkspace
+time+#
set date and time:
set+password+#+0+bkspace+time+#
main unit reset:
set+password+#+password+#
learn remote controller:
learn PIR detector:
learn door sensor:
learn IR beam:
learn gas detector:
learn+password+#+1+two bit zone number +#+(signal)
learn+password+#+2+two bit zone number +#+(signal)
learn+password+#+3+two bit zone number +#+(signal)
learn+password+#+4+two bit zone number +#+(signal)
learn+password+#+5+two bit zone number +#+(signal)
11
learn smoke detector:
learn+password+#+6+two bit zone number +#+(signal)
set wireless detector with arm delay time: learn+password+#+7+up/dn+set+delay +#
press key “set” again to set: delay/arm/bypass/emc/disarm
delete wireless detector:
learn+password+#+7+up/dn+bkspace+password+#
set remote controller as panic with sound: learn+password+#+8+up/dn+set
+panic with sound+#
set remote controller as panic without sound: learn+password+#+8+up/dn+set
+panic without sound+#
Delete remote controller: learn+password+#+8+up/dn+bkspacet+password+#
Set wired detector as open type:
Set wired detector as close type:
learn+password+#+9+up/dn+bkspacet+ON+#
learn+password+#+9+up/dn+bkspacet+OFF+#
Set wired detector as arm delay type:
learn+password+#+9+up/dn+set+arm delay+#
press key “set” again to set: delay/arm/bypass/emc/disarm
12