1
Amplifiers
User Manual: CA2 Preamplifier
SCA2 Preamplifier
SIA2-150 Integrated Amplifier
SPA2-150 Power Amplifier
SPA2-200P Power Amplifier
M U LT I C H A N N E L
®
AC O U S T I C ENGINEERS
Electronics
Introduction
Welcome. In selecting ATC you have chosen an example of the finest audio
engineering available. ATC was founded on a principle of engineering
excellence, and that principle still defines our products today. Given the right
opportunities, ATC products will deliver exceptional audio performance, but
the opportunities will only arise from careful and thoughtful installation and
use. Please read the following manual fully. It will help you understand the
product and to realise its full potential.We are happy to answer questions and
offer advice on any issues that arise through installation or use of ATC
products. Contact details can be found at the back of this manual.
ATC was founded in London in 1974 by Australian emigre Bill Woodman, who still
Contents
heads the company today. An enthusiastic pianist and engineer he was naturally
drawn to loudspeaker design and after a period working at Goodmans, where many
Page 2
Page 3
of the names that went on to found British loudspeaker companies began their
CA2 Preamplifier
Section 1.1
Description
Section 1.2
Installation
Section 1.3
Mains Connection
careers, he struck out on his own.The premise on which ATC began is a simple one,
Page 4
Section 1.4
Inputs
speakers tend to express the opposite character. ATC products were designed from
Page 5
Section 1.5
Section 1.6
Outputs
Operation
the outset to offer the best of both. It’s an easy concept to describe, but surprisingly
Page 6
Section 1.7
Section 1.8
Section 1.9
Remote Handset
Care and Maintenance
Warranty and Contact
Specifications
Page 7
and one that in many respects is still true today: hi-fi loudspeakers tend to be
detailed and accurate but of limited dynamic range, while professional monitor
difficult to engineer.
The difficulty inherent in designing such loudspeakers is one of scale. Hi-fi levels of
accuracy and detail call for lightweight moving parts and delicate engineering.
SCA2 Preamplifier
Section 2.1
Description
Section 2.2
Installation
Section 2.3
Mains Connection
Professional monitor levels of performance however demand far more robust
Page 8
Section 2.4
Inputs
and scale more often associated with aerospace or motorsport. But the results are
Page 9
Section 2.5
Section 2.6
Outputs
Operation
worth the effort and the cost. ATC loudspeakers, with their unique in-house
Page 10
Section 2.7
Remote Handset
Page 11
Section 2.8
Section 2.9
Care and Maintenance
Warranty and Contact
Specifications
Page 12
SIA2-150 Integrated Amplifier
Section 3.1
Description
Section 3.2
Installation
Section 3.3
Mains Connection
Section 3.4
Inputs
Page 13
Section 3.5
Section 3.6
Section 3.7
Outputs
Operation
Remote Handset
Page 14
Section 3.8
Section 3.9
Care and Maintenance
Warranty and Contact
Specifications
Page 15
2
Introduction
SPA2-150 & SPA2-200P
Power Amplifiers
Section 4.1
Description
Section 4.2
Installation
Section 4.3
Mains Connection
Section 4.4
Inputs
components engineered to survive the rigours of high level use for extended
periods.The only way to combine the two is through precision engineering of a class
designed drivers, combine the best of hi-fi and professional to devastating effect.
ATC has become synonymous with active systems. Choosing to offer active
loudspeakers (where the passive crossover network is replaced by active filters and
multiple power amplifiers) is simply a result of the uncompromising attitude to
loudspeaker design.While passive systems still have their place, and ATC engineering
skills can still bring remarkable results from them,“active” is a fundamentally better
solution to the problems posed by accurate, high level music reproduction.The ATC
instinct is always for the better solution. Not cheaper, not quicker, but better.
It was the development of active loudspeakers that first brought ATC into
electronics design and engineering. Active speakers demand multiple power
amplifiers so ATC from the mid 1980s became not just a loudspeaker manufacturing
company but an electronics manufacturer too.The further step from electronics for
active speakers to a range of stand-alone amplifier products was natural and now
means that ATC engineering is available from the recording desk or CD player
output to the ears.
Page 16
Section 4.5
Section 4.6
Section 4.7
Signal Cable Options
Outputs
Operation
From modest beginnings ATC has grown to become one of the very few
Page 17
Section 4.8
Remote Operation
ATC you join a group of music lovers, professional audio engineers, studios and
Page 18
Section 4.9
Section 4.10
Care and Maintenance
Warranty and Contact
Specifications
musicians across the World that understand and value the engineering that goes into
manufacturers successful across both domestic and professional audio. By selecting
an ATC product - and the sound that comes out.
Power Amplifiers
4.1 Description
SPA2-150/200P
The mains cable is specifically supplied to comply
with local statutory safety approvals and
The SPA2-150 and SPA2-200P are high quality power amplifiers designed to partner
alternatives should not be substituted. If you
ATC passive monitors and other loudspeaker systems. They are both capable of
intend to use your power amplifier in an
output power considerably in excess of specification. Both also incorporate the same
alternative territory please contact ATC for
gain reduction and loudspeaker protection circuits as ATC’s active monitors. This
advice. The mains connection must always be
ensures that even when working at very high levels the amplifiers are held back from
earthed.
clipping so improving the subjective performance and protecting the loudspeakers
from damage.
A power supply fuse is fitted to the rear panels of
the power amplifiers. The fuse is 20mm “Type T
The SPA2-200P features a stereo pair of balanced inputs on XLR sockets while the
anti-surge”. Should a unit fail to switch on when
SPA2-150 incorporates switch selectable balanced and unbalanced signal inputs on
the power switch is operated the fuse should be
XLR and RCA phono sockets respectively. Loudspeaker output connections on both
inspected. Lift out the fuse holder cover using a
power amplifiers are made through two pairs of WBT connectors.
small flat-blade screwdriver, remove the fuse and
The SPA2-200P includes a multi-pin connector on the rear panel that provides wired
inspect it for damage. The fuse rating is 3.15A for
remote control interface facilities while the SPA2-150 can be switched into and out of
200V - 250V mains voltage and 6.3A for 100V -
Standby mode by either ATC remote handset.
120V. Fuses most often fail only because of a
serious electrical fault. If this is the case then
Both power amplifiers incorporate comprehensive performance monitoring and
feedback through a front panel display.
simply replacing the fuse will only result in another
fuse failure. The power amplifier should be
returned to ATC for service if a second fuse fails.
4.2 Installation
The SPA2-200P and SPA2-150 are designed to be free standing. The power
dissipation of the amplifiers is considerable and makes them warm to touch.
Temperature stability will be reached after approximately three hours from mains
switch-on but full audio performance is available immediately and is not influenced
by temperatures within the amplifiers’ normal operating range. Care must be taken
4.4 Inputs
The SPA2-150 is fitted with both unbalanced RCA
Phono and balanced XLR inputs. A switch on the
rear panel selects between the two. The SPA2200P incorporates only balanced XLR inputs.
not to obscure the ventilation holes in the top and bottom covers. Please contact
ATC for advice if the amplifier is required to be mounted in an enclosed area.
Note: Do not attempt to connect both balanced
and unbalanced inputs at the same time. The
The SPA2-150 is an aesthetic match for the SCA2 preamplifier and it is quite in
order to sit the SCA2 on top of the SPA2-150.A general recommendation regarding
the layout of the system is that the distance between the power amplifier and
loudspeakers should be minimised. Reducing the length of speaker cables improves
selector switch is not a toggle between the two
inputs. The XLR and RCA input connectors are
wired in parallel and the switch merely arranges
for either balanced or unbalanced input.
the control of amplifier over the loudspeaker system through the reduced
resistance of the loudspeaker leads. It may therefore be appropriate to locate the
The signal is present on the centre conductor of
power amplifiers close to the loudspeakers.
an unbalanced RCA Phono style input and the
signal return is made via the screened outer. If
There is no general benefit from reducing the length of the interconnect from the
an ATC preamplifier to the power amplifier, especially when balanced connections
are used. However, non ATC preamplifiers may not be capable of driving cables of
more than a few metres.
there is any hum present on the inputs this must
be traced to its source and not suppressed by the
removal of screens or earths. Removal of the
screen on an unbalanced input is likely to result in
uncontrollably loud hum.
4.3 Mains Connection
The SPA2-150 and SPA2-200P can be used with mains voltages from 100V to 240V,
50/60Hz. Mains voltage is factory set and should only be adjusted by ATC or your
local dealer or distributor. It is wise to ensure that the local mains voltage matches
that specified on the rear panel before applying mains power.
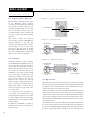
All signal cables and plugs should be of a good
quality. Poor cable and plug quality will
compromise the performance of your system.The
signal input pin configuration for XLR sockets is
illustrated in Diagram 1 while Diagram 2 illustrates
a balanced cable.
15
SPA2-150/200P
Power Amplifiers
I n s t a l l a t i o n c o n t ’d
4.5 Signal Cable Options
Diagram 1 - input connection pins
Balanced cables are always the preferred option,
for
the
SPA2-150P
however
unbalanced
connection is possible. Diagrams 2 and 3 illustrate
the signal cable connections required for each
option. Balanced (XLR to XLR) connection offers
Pin 2, Signal (hot)
Pin 1, Screen
Pin 3, Signal (return)
lower noise and better immunity to “hum” pickup. Unbalanced (XLR to Phono or Two Pole Jack)
connection carries risk of hum caused by multiple
signal earths.
Hum
problems
resulting
from
unbalanced
connection may be reduced by making ONE of the
Diagram 2 - balanced cable
following modifications to the signal cable
connections: If the driving preamplifier (or desk) is
3 Pin Male XLR
Connector
“double insulated” (i.e. has no mains earth),
disconnect the signal cable screen at the RCA
Phono plug end. Alternatively, disconnect the signal
3 Pin Female XLR
Connector
Two Core Screened Cable
2
Hot
Return
2
1
Screen
1
3
cable screen at the XLR end.This second option will
make the source the reference signal earth.
4.6 Outputs
To Power Amplifier
Input
3
To Source Output
Diagram 3 - unbalanced cable
Loudspeaker connections are made to the SPA2150 and SPA2-200P through WBT connectors on
the rear panels. The left and right channels are
3 Pin Male XLR
Connector
clearly marked. The loudspeaker terminals are
labelled positive and negative. The wire used for
the connections to the monitors will have some
identification for the positive conductor. Usually
this is red, but may be a moulded stripe on the
Phono (RCA)
Connector
Two Core Screened Cable
2
Hot
Return
1
Screen
3
To Power Amplifier
Input
To Source Output
insulation. The terminals will accept either bare
wire up to 5.7mm diameter or 4mm male plugs.
When bare wire connections are made the
insulation should be carefully removed to expose
12mm of conductor. The conductors should be
tightly twisted together and inserted into the
connector ensuring that no stray strands of wire
cause a short circuit.
It is important that both loudspeakers are
connected with the same polarity. That is; both
positive loudspeaker terminals are connected back
to positive amplifier terminals and both negative
loudspeaker terminals connected back to negative
amplifier terminals.
The SPA2-150 and SPA2-200P are suitable for
loudspeaker systems with a nominal impedance of
4 Ohms or greater.
16
4.7 Operation
Once connected to mains power and powered-up from the rear panel mains switch,
the front panel Standby button (or ATC remote handset Standby button) will switch
the SPA2-150 between standby and active modes. The SPA2-200P can only be
operated remotely by a custom wired remote system
With the power switch on, the front panel Standby indicator will illuminate. The unit
will then respond to control either from the front panel or, in the case of the SPA2-150
an ATC remote handset.The Standby button on the front panel will switch the amplifier
between active and standby modes. The rear panel power switch should be used to
isolate the SPA2-150 and SPA2-200P from the mains supply if the units are to be unused
for any significant period.
When switched into active mode the unit will go into an initialisation sequence under
the control of the internal microprocessor.The standby indicator will extinguish and
be replaced by the LED display displaying
0 followed by a flashing decimal point.
At
this time it is quite possible that the loudspeakers will emit a mild thump as the
SPA2-150/200P
O p e r a t i o n c o n t ’d
amplifier powers up and the initialisation routine is
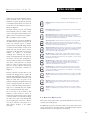
Diagram 4 - Display legends
carried out. When, after a few seconds, the
initialisation is complete, the figure 0 is replaced by
a constantly lit decimal point.The unit is now in the
Initialisation:The decimal point flashes to show initialisation is in
progress.
normal active mode. The initialisation sequence is
illustrated in Diagram 4.
An indicator adjacent to the left of the Standby
Normal Operation:The decimal point illuminates to show the amplifier
is powered-up and is healthy.
button illuminates when the amplifier receives
remote control signals. It will also illuminate if the
signals received are not intended for the amplifier CD or preamplifier controls for example.
At all times during the operation of the SPA2-150
and SPA2-200P their internal microcomputer will
monitor the important aspects of amplifier
Over Temperature: Indicates that the temperature is over 90ºC in the
left amplifier channel.This condition will shut down the amplifier.
Pressing the Standby button will restore the amplifier to normal only if
the temperature has dropped significantly.
Over Temperature: Indicates that the temperature is over 90ºC in the
right amplifier channel.This condition will shut down the amplifier.
Pressing the Standby button will restore the amplifier to normal only if
the temperature has dropped significantly.
operation.Their front panel LED displays will warn
of overdrive and fault conditions on either or both
channels. The units will shut down if excessive
temperature or DC offset faults arise but, as the
amplifiers
are
designed
to
accommodate
overdriving abuse indefinitely, they will keep
running. Sound quality will however be impaired by
Over Temperature: Indicates that the temperature is over 90ºC in both
amplifier channels.This condition will shut down the amplifier. Pressing
the Standby button will restore the amplifier to normal only if the
temperature has dropped significantly.
DC Offset: Indicates a DC voltage of greater than 1V present on the
output of the left amplifier.This condition will shut down the amplifier.
Pressing the Standby button will restore the amplifier to normal only if
the fault has been cleared.
the operation of the protection circuitry. There is
also the possibility of damage to the loudspeakers
when driven at such high levels. It is therefore
prudent to reduce the system volume level to
below the overdrive indication threshold. The
display and its interpretation is illustrated in
Diagram 4.
DC Offset: Indicates a DC voltage of greater than 1V present on the
output of the right amplifier.This condition will shut down the
amplifier. Pressing the Standby button will restore the amplifier to
normal only if the fault has been cleared.
DC Offset: Indicates a DC voltage of greater than 1V present on the
output of both amplifiers.This condition will shut down the amplifier.
Pressing the Standby button will restore the amplifier to normal only if
the fault has been cleared.
Excessive temperature and DC offset are both
potentially very damaging and the amplifier will
shutdown whilst displaying the fault condition that
Overdrive: Indicates that maximum drive has been reached on the left
amplifier and that the gain reduction circuits are operating to prevent
clipping.
caused the problem. Excessive temperature is only
likely if the output load is too great or if the
ventilation is inadequate.The amplifier will not reset
until the operating temperature has had time to
Overdrive: Indicates that maximum drive has been reached on the
right amplifier and that the gain reduction circuits are operating to
prevent clipping.
return to normal. DC offsets generally indicate a
faulty source or preamplifier. The power amplifier
will not reset until the fault has been cleared.
Overdrive: Indicates that maximum drive has been reached on both
amplifiers and that the gain reduction circuits are operating to prevent
clipping.
Due to the nature of the electronics in ATC
amplifiers it is quite normal for a sound to be
heard from the speaker when the power is applied
or disconnected.The noise heard will not damage
4.8 Remote Operation
the speaker and is quite normal. Although ATC
uses the highest-grade components, a different
ATC remote control handsets may be used with the SPA2-150 to provide remote
noise may be heard from each speaker due to
operation of the standby function.
slight tolarance variations in the amplifier
components.
The SPA2-200P incorporates a rear panel multipin connector that enables custom
remote control systems to be developed. Please contact ATC directly for technical
information and advice on the development of such systems.
17
SPA2-150/200P
Specifications
SPA2-150
4.9 Care and Maintenance
SPA2-200P
Output Power
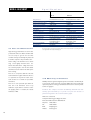
150 Watts/Channel into 8 Ohms
200 Watts/Channel into 8 Ohms
Balanced Input Sensitivity
1V
1V
Balanced Input Impedance
10 kilohms
10 kilohms
Balanced Input C.M.R.R
-90dB @ 1kHz
-90dB @ 1kHz
Unbalanced Input Sensitivity
2V
2V
Unbalanced Input Impedance
10 kilohms
10 kilohms
Signal/Noise
>110dB
>110dB
Amplitude Response
5Hz - 200kHz ±0.1dB
5Hz - 200kHz ±0.1dB
Crosstalk
<-105dB
<-105dB
Distortion (at rated power)
<-95dB
<-95dB
Power Requirements:
100, 115, 230V factory set, 50/60Hz
Power Consumption
10 VA (Standby minimum)
180 VA (Nominal)
600 VA (Rated Output)
Dimensions (HxWxD)
146 x 440 x 426mm
130 x 428 x 325
Overall Weight
26kg (57.3lb)
22kg (48.5lb)
100, 115, 230V factory set, 50/60Hz
10 VA (Standby minimum)
180 VA (Nominal)
600 VA (Rated Output)
ATC reserves the right to vary products and specifications without prior notice. Acoustic Transducer Co. is a trading name and ATC
is the registered trade mark of Loudspeaker Technology Ltd.
High technology metal finishes are used in these
products.The surfaces are durable and with a little
care can be kept as good as new even under
conditions of heavy use. Normally a dry duster will
be all that is required to keep the finishes clean.
Heavier soiling of the aluminium can be cleaned
using a cloth slightly moistened with a nonabrasive household cleaner - taking extreme care
not to allow any liquid to enter the units. Switch
off and disconnect the units from the mains power
before cleaning.
There are no components within the units that
would benefit from regular maintenance. There is
no requirement for any kind of routine service
4 . 1 0 Wa r r a n t y a n d C o n t a c t
work and there is no schedule for preventative
maintenance.
There are no user replaceable parts within the
units and in the unfortunate event of any
malfunction, repair should be referred to either
All ATC products are guaranteed against any defect in materials or workmanship for
a period of two years from the date of purchase.Within this period we will supply
replacement parts free of charge provided that the failure was not caused by misuse,
accident or negligence.
the supplying dealer or consultant, the relevant
Purchasers who complete and return the Warranty Card will have their
distributor, or ATC.
warranty period extended up to a period of six years from the date of
purchase.This guarantee does not limit statutory rights.
ATC can be contacted at:
Loudspeaker Technology Ltd, Gypsy Lane, Aston
Down, Stroud, Gloucestershire GL6 8HR, UK.
18
Telephone:
01285 760561
Fax:
01285 760683
Email:
[email protected]
Website:
www.atc.gb.net
®
AC O U S T I C ENGINEERS
Loudspeaker Technology Ltd, Gypsy Lane, Aston Down, Stroud, Gloucestershire GL6 8HR United Kingdom
Telephone 01285 760561 Fax 01285 760683
Email: [email protected] Website: www.atc.gb.net