1
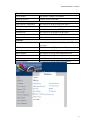
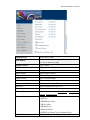
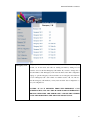
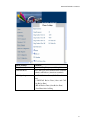
User Manual
821200-ATA-PAK
821200-ATA-PAK User Manual
IMPORTANT SAFETY INSTRUCTIONS
==================================================
When using your telephone equipment, basic safety precautions should always be followed to
reduce the risk of fire, electric shock and injury to persons, including the following:
1. Do not use this product near water places such as bath tub, wash bowl, kitchen sink, laundry
tub, wet basement, swimming pool, etc.
2. Avoid using a telephone (other than the cordless type) in stormy weather. There may be a
remote risk of electric shock from lightning.
3. Do not use the telephone to report a gas leak in the vicinity of the leak.
4. Use the power cord and batteries only indicated in this manual. Do not dispose batteries in a
fire, which may cause explosion. Check with local codes for the possible special disposal
instructions.
5. Plug the power adaptor into a power outlet which is near the equipment and easily accessed.
1
821200-ATA-PAK User Manual
SAVE THESE INSTRUCTIONS
==================================================
FCC PART 15
Warning: Changes or modifications to this unit not expressly approved by the party responsible for
compliance could void the user's authority to operate the equipment.
Note: This equipment has been tested and found to comply with the limits for a Class B digital device,
pursuant to Part 15 of the FCC Rules. These limits are designed to provide reasonable protection
against harmful interference in a residential installation. This equipment generates uses and can
radiate radio frequency energy and, if not installed or not used in accordance with the instructions,
may cause harmful interference to radio communications.
However, there is no guarantee that interference will not occur in a particular installation. If this
equipment does cause harmful interference to radio or television reception, which can be determined
by turning the equipment off and on, the user is encouraged to try to correct the interference by
taking one or more of the following measures:
Reorient or relocate the receiving antenna.
Increase the separation between the equipment and receiver.
Connect the equipment to an outlet on a circuit different from that to which the receiver is
connected.
Consult the dealer or an experienced radio/TV technician for help.
Notes: This device complies with Part 15 of the FCC Rules. Operation is subject to the following two
conditions: (1) The device may not cause harmful interference, and (2) This device must accept any
interference received, including interference that may cause undesired operation.
Model: Analog Telephone Adaptor - 821200-ATA-PAK
The responsible party: Cortelco 1703 Sawyer Road, Corinth, MS 38834 Tel: (662) 287 5281
2
821200-ATA-PAK User Manual
Consumer Information:
a) This equipment complies with Part 68 of the FCC rules and the requirements
adopted by the ACTA. On the bottom of this equipment is a label that contains,
among other information, a product identifier in the format as US:AAAEQ##TXXXX.
If requested, this number must be provided to the telephone company.
b) An applicable certification jacks Universal Service Order Codes (USOC) for the
equipment is provided (i.e., RJ11C) in the packaging with each piece of approved
terminal equipment.
c) A plug and jack used to connect this equipment to the premises wiring and
telephone network must comply with the applicable FCC Part 68 rules and
requirements adopted by the ACTA. A compliant telephone cord and modular plug
is provided with this product. It is designed to be connected to a compatible modular
jack that is also compliant. See installation instructions for details.
d) The REN is used to determine the number of devices that may be connected to a
telephone line. Excessive RENs on a telephone line may result in the devices not
ringing in response to an incoming call. In most but not all areas, the sum of RENs
should not exceed five (5.0). To be certain of the number of devices that may be
connected to a line, as determined by the total RENs, contact the local telephone
company. [For products approved after July 23, 2001, the REN for this product is
part of the product identifier that has the format as US:AAAEQ##TXXXX. The digits
represented by ## are the REN without a decimal point (e.g., 03 is a REN of 0.3).
For earlier products, the REN is separately shown on the label.]
e) If this equipment (Analog Telephone Adaptor) causes harm to the telephone
network, the telephone company will notify you in advance that temporary
discontinuance of service may be required. But if advance notice isn't practical, the
telephone company will notify the customer as soon as possible. Also, you will be
advised of your right to file a complaint with the FCC if you believe it is necessary.
f) The telephone company may make changes in its facilities, equipment, operations
or procedures that could affect the operation of the equipment. If this happens, the
telephone company will provide advance notice in order for you to make necessary
modifications to maintain uninterrupted service.
3
821200-ATA-PAK User Manual
g) Should you experience trouble with this equipment, please contact Cortelco 1703
Sawyer Road, Corinth, MS 38834, USA Tel No. (662) 287 5281 for repair or
warranty information. If the equipment is causing harm to the telephone network,
the telephone company may request that you disconnect the equipment until the
problem is resolved.
h) Please follow instructions for repairing if any (e.g. battery replacement section);
otherwise do not alternate or repair any parts of device except specified ones.
i) Connection to party line service is subject to state tariffs. Contact the state public
utility commission, public service commission or corporation commission for
information.
j) Notice: If your home has specially wired alarm equipment connected to the
telephone line, ensure the installation of this Analog Telephone Adaptor does not
disable your alarm equipment. If you have questions about what will disable alarm
equipment, consult your telephone company or a qualified installer.
Notice: According to telephone company reports, AC electrical surges, typically
resulting from lightning strikes, are very destructive to telephone equipment connected
to AC power sources. To minimize damage from these types of surges, a surge
arrestor is recommended.
Applicable for Coin or Pay Phone Only
To comply with state tariffs, the telephone company must be given notification prior to
connection for customer-owned coin or credit card phone. In some states, the state
public utility commission, public service commission or corporation commission must
give prior approval of connection.
4
821200-ATA-PAK User Manual
Table of Contents
Section 1 Installation ............................................................................................................... 6
Section 2 What are Included in the Package............................................................................. 7
Section 3 Wall Mount instructions ........................................................................................... 8
Section 4 Product Overview .................................................................................................... 9
4.1 Key Features.............................................................................................................. 9
4.2 Hardware Specification............................................................................................ 10
Section 5 Basic Operations .....................................................................................................11
5.1 Star Command ..........................................................................................................11
5.1.1 Star Commands for Phone Setup ....................................................................11
5.1.2 Star Commands for Phone Operation..............................................................11
5.2 Set up .......................................................................................................................11
5.3 Make Phone Calls .................................................................................................... 12
5.3.1 Using Star (*) Commands for Phone Operations............................................ 12
5.3.2 Placing a call................................................................................................. 12
5.3.3 Other Functions Available during a Call ........................................................ 12
5.3.3.1 Call Waiting/Flash .............................................................................. 12
5.3.3.2 Call Hold ............................................................................................ 12
5.3.3.3 Call Transfer....................................................................................... 12
5.3.3.4 Call Forward....................................................................................... 13
5.3.4 Send and Receive PSTN Calls....................................................................... 13
5.3.5 Send and Receive VoIP Calls......................................................................... 13
5.3.6 Make an Emergency Call .............................................................................. 13
5.4 LED Light Pattern Indication ................................................................................... 13
Section 6 Configuration Guide .............................................................................................. 15
6.1 Configuring 821200-ATA-PAK LAN IP through Voice Prompt ................................ 15
6.1.1 Get Network Port IP Address......................................................................... 15
6.2 Configuring 821200-ATA-PAK through Web Browser ............................................. 15
6.2.1 Access the Web Configuration Menu............................................................. 15
6.2.2 Administration Configuration ........................................................................ 15
6.2.3 Saving the Configuration Changes................................................................. 24
6.2.4 Reset Configuration....................................................................................... 25
Section 7 Software Upgrade .................................................................................................. 26
5
821200-ATA-PAK User Manual
Section 1 Installation
The 821200-ATA-PAK is an all-in-one VoIP integrated device designed to be a total solution
for networks providing VoIP services.
This ATA functions are available via a regular analog telephone.
The following photo illustrates the appearance of the 821200-ATA-PAK.
Interconnection Diagram of the 821200-ATA-PAK.:
6
821200-ATA-PAK User Manual
The 821200-ATA-PAK has two PHONE ports, one LINE IN port, one NETWORK port, one
PC port, and one power port. The PHONE ports can register to the same SIP account or two
different SIP accounts.
Please follow the following steps to install an 821200-ATA-PAK:
1.
2.
Connect a standard touch-tone analog telephone to the PHONE port.
Insert a standard RJ11 telephone cable into the LINE IN port and connect the other end of
the telephone cable to a wall jack.
3.
Insert an Ethernet cable into the NETWORK port and connect the other end of the
Ethernet cable to an uplink port (a router or a modem, etc.)
4. Connect a PC to the PC port of the ATA.
5. Insert the power adapter into the power port and connect it to a wall outlet.
Section 2 What is Included in the Package
The 821200-ATA-PAK package includes:
1) One 821200-ATA-PAK Unit
2) One Ethernet Cable (3m)
3) One Line Cord (2m)
4) One Power Adaptor (DC12 V, 1.5A)
7
821200-ATA-PAK User Manual
Section 3 Wall Mount instructions
Wall Mount Measurements
The 821200-ATA-PAK has two wall-mount slots on its back panel. Instructions for wall
mounting are given below.
1. Determine the mounting location for the 821200-ATA-PAK.
2. Decide to mount the 821200-ATA-PAK vertically or horizontally, those slots are
100.00 mm (3.9 inches) apart.
3. Drill two holes into the wall. Make sure the holes are 100 mm (3.9 inches) apart.
4. Insert a screw into each hole, and leave 5 mm (0.2 inches) of its head exposed.
5. Maneuver the 821200-ATA-PAK so the appropriate slots line up with the two screws.
6. Place the wall-mount slots over the screws and slide the 821200-ATA-PAK down until the
screws fit snugly into the wall-mount slots.
8
821200-ATA-PAK User Manual
Section 4 Product Overview
4.1 Key Features
• Supports SIP 2.0(RFC 3261), TCP/UDP/IP, RTP/RTCP, HTTP, ICMP, ARP, DNS, DHCP
(both client and server), NTP, PPPoE, STUN, TFTP, etc.
• Powerful digital signal processing (DSP) to ensure superb audio quality; advanced adaptive
jitter control and packet loss concealment technology
• Supports various codecs including G.711 (a-law and u-law), G.723.1 (5.3K/6.3K), and
G.729A/B
• Supports out-of-band DTMF via RTP (RFC2833) or SIP INFO.
• Supports Silence Suppression, VAD (Voice Activity Detection), CNG (Comfort Noise
Generation), Line Echo Cancellation (G.168), and AGC (Automatic Gain Control)
• Supports Caller ID/Name display.
• Supports Call Hold, Call Waiting/Flash, Call Transfer, and Call Forward.
• Supports automated NAT traversal without manual manipulation of firewall/NAT
• Built-in router/NAT function
• Supports for Layer 2 (802.1Q VLAN, 802.1p) and Layer 3 QoS (ToS, DiffServ)
• Supports device configuration via built-in IVR, Web browser or central configuration file
through TFTP or HTTP
• Supports firmware upgrade via TFTP or HTTP with encrypted configuration files.
9
821200-ATA-PAK User Manual
4.2 Hardware Specification
The table below lists the hardware specification of the 821200-ATA-PAK
NETWORK interface
1xRJ45 100Base-T
PC interface
1xRJ45 100Base-T
FXS telephone port
2xRJ11
PSTN port
1xRJ11
LED
ATA Status, Network, PC, PHONE 1, PHONE2,
LINE IN (All 6 LEDs are in red color while
working.)
Universal Switching
Input: 90-264V 0.6A 47-63 Hz
Power Adaptor
Output: +12VDC, 1500mA,
UL certified
Dimension
1360mm (W)
930mm (D)
30mm (H)
Weight
0.6lbs (0.3kg)
Temperature
Operating temperature
Storage temperature
0 oC to 40 oC
-20 oC to 70 oC
Humidity
Operating Humidity
Storage Humidity
10% to 85%
5% to 95%
10
821200-ATA-PAK User Manual
Section 5 Basic Operations
5.1 Star Command
There are two types of Star Commands. One is factory predefined. These are used for setup
information. The other is used for operation. The first digit of a command must be “*” and the
rest must be natural numbers from 0 to 9. There are also some commands with operands.
5.1.1 Star Commands for Phone Setup
The star commands for phone setup may contain three digits or more. These commands are
shown in the table below. Note: These commands are factory preset and cannot be
modified.
Star(*) Command
Function
*01
Read Network Port IP
*02
Read PC Port IP
*03
Set Network Port IP. Pick up the handset,
press *03, and then follow the instruction
of the phone to set the IP address.
*04
Set PC Port IP. Pick up the handset, press
*04, and then follow the instruction of the
phone to set the IP address.
*09987456
Reset IP:
Network Port IP: 192.168.0.1
PC Port IP: 192.168.5.1
*11983185922
Reset system configuration. Return to the
default configuration.
5.1.2 Star Commands for Phone Operation
The star commands for phone operation are 3-digits long as shown in the table below.
Star(*) Command
Function
*12
Switch to VOIP line
*21
Switch to PSTN line
*42
Hold the current call / Release the Hold call
*41
Call Transfer to another VoIP Number
5.2 Set up
11
821200-ATA-PAK User Manual
The setup of the 821200-ATA-PAK can be done via auto-provisioning if the service provider
supports this feature. Local setup is supported via built-in web pages. To access the web pages,
the NETWORK or PC port IP address is required. The 821200-ATA-PAK is equipped with
voice prompts to read NETWORK port and PC port IP addresses via the PHONE 1 or PHONE
2 port.
5.3 Make Phone Calls
5.3.1 Using Star (*) Commands for Phone Operations
Please refer to the table in section 5.1.2 for detailed operation information.
5.3.2 Placing a call
a) Dial the number and wait for 5 seconds. Or
b) Dial the number and press “#”
5.3.3 Other Functions Available during a Call
During a call, the following functions are available: call-waiting/flash, call hold, call-transfer,
and call-forward.
5.3.3.1 Call Waiting/Flash
When you are talking on the phone and another call comes in on your phone extension, a short
tone sounds in your handset. You can then either take the call or ignore it.
5.3.3.2 Call Hold
Call Hold lets you put a caller on hold for a certain period of time. There are two kinds of call
hold:
1) When you are in the conversation with a party, you can press “*42” on the phone keypad to place the
first party on hold. You will hear a dial tone. Enter a new phone number to make another call. After
finishing the second call, you can press “*42” again to return to the former call on hold.
2) When you are talking on the phone and another call comes in, press *42 and you will temporarily put
the first caller on hold and answer the new incoming call. Press *42 again to return to the former call.
5.3.3.3 Call Transfer
If A and B are in the process of a call, A can transfer A-B call to B-C call. There are two kinds
of transfer - attended transfer and unattended transfer.
12
821200-ATA-PAK User Manual
A. Attended Transfer
When a call is in progress, press *41. When you hear dial tone, dial another phone number to
announce a transfer. If the third party agrees, hang up your phone.
B. Unattended Transfer
When a call is in progress, press *41. When you hear dial tone, dial another phone number.
When you hear ring tone, just hang up your phone and the call will be transferred.
5.3.3.4 Call Forward
This function is set in the configuration page. Please refer to “Call Settings” in section 6.2.2 for
the detailed configuration method.
5.3.4 Send and Receive PSTN Calls
Users can send and receive calls from the PSTN. To receive PSTN calls, just take the phone off
hook when it rings. To make a PSTN call, if the default connect of FXS MODE in the
configuration web is VoIP, press *21 (or your own PSTN Access Code). Wait for the PSTN dial
tone and dial the PSTN number. If the default connect of FXS MODE in the configuration web
is PSTN, just dial the phone number.
5.3.5 Send and Receive VoIP Calls
Users can send and receive calls from the VoIP. To receive VoIP calls, just take the phone off
hook when it rings. To make a VoIP call, if the default connect is VoIP, just dial the number. If
the default connect is PSTN, press *12, wait for VoIP dial tone, and then dial the number.
5.3.6 Make an Emergency Call
Emergency calls (i.e. 911) are always dialed out to the PSTN regardless of the default dialing
method. No special codes are necessary. Just dial the number.
5.4 LED Light Pattern Indication
The following table shows the LED light pattern indication.
LED
DESCRIPTION
13
821200-ATA-PAK User Manual
ATA
1. When the device is booting up, the LED
will flash 100ms ON and 100ms OFF.
2. When the device is connected with the
server, the LED will flash 1S ON and 1S
OFF.
3. If the ATA does not boot up, the LED
will not flash.
4. Normal boot up and connecting time is
approximately 30 seconds.
NETWORK
1.
2.
When the NETWORK receptacle is
connecting with the network, the
NETWORK LED will light up
continuously. ( The LED will not light
up if the network connection is
unavailable )
If there is data transmitting through the
ATA, the NETWORK LED will blink.
(Example: During a VoIP call, the LED
will keep blinking.)
PC
1. When the PC receptacle is connecting
with the network, the PC LED will light
up continuously. (The LED will not light
up if the network connection is
unavailable.)
2. If there is any data transmitting through
this receptacle, the PC LED will keep
blinking.
PHONE 1
1.
2.
PHONE 2
PHONE 1 LED will be off when the
phone is on hook.
PHONE 1 LED will be on when the
phone is off hook.
1. PHONE 2 LED will be off when the
phone is on hook.
2. PHONE 2 LED will be on when the
phone is off hook.
14
821200-ATA-PAK User Manual
Section 6 Configuration Guide
6.1 Configuring 821200-ATA-PAK LAN IP through Voice Prompt
6.1.1 Get Network Port IP Address
Follow section 5.1 with voice menu to get Network Port IP address.
6.2 Configuring 821200-ATA-PAK through Web Browser
821200-ATA-PAK has an embedded Web server that will respond to HTTP GET/POST
requests. It also has embedded HTML pages that allow users to configure the
821200-ATA-PAK through a Web browser.
6.2.1 Access the Web Configuration Menu
The 821200-ATA-PAK HTML configuration menu can be accessed via Network or PC port:
With the Network Port access is enabled, get the Network Port IP address of the
821200-ATA-PAK as described in section 6.1.1. The 821200-ATA-PAK’s Web Configuration
page can then be accessed by entering the URL into a web browser.
6.2.2 Administration Configuration
Once this HTTP request is entered and sent from a Web browser, the 821200-ATA-PAK will
respond with the following login screen:
15
821200-ATA-PAK User Manual
The password is case sensitive. The factory default login name for Administration is “admin”
and the default password is “dbl#admin”.
Administration configuration includes not only the end user configuration, but also advanced
configuration such as SIP configuration, Codec selection, and other miscellaneous
configuration. The advanced configuration page is shown on the following page.
16
821200-ATA-PAK User Manual
17
821200-ATA-PAK User Manual
Phone Info
Serial Number
Each ATA has a unique serial number.
Firmware Version
Software version of the ATA.
Network Info
Network Port Configuration
This field shows the Network Port IP address.
PC Port Configuration
This field shows the PC port IP address.
Dial Up
This field shows the status of PPPoE.
Default Route
This field shows the default route IP address.
Name Server
This field shows the DNS server IP address.
Reboot the Device
Click on this field to reboot the device.
PHONE 1
State
This field shows the state of Line 1’s SIP server
connection.
SIP Proxy
This field shows the SIP proxy server IP address.
SIP Registrar Server
This field shows the SIP registrar server IP address.
Phone Number
This field shows the SIP client authentication ID.
Display Name
This field shows the SIP client display name.
Home Domain
This field shows the IP address of the home domain.
Forward Number
This field shows the SIP client forward number.
18
821200-ATA-PAK User Manual
Language
Select web provisioning language as English.
User Password
Change user password.
Administrator Password
Change administrator password.
Time Zone
This parameter controls how the displayed date/time will
be adjusted according to the specified time zone.
Auto Dial Time
Set the wait time before auto dialing after a telephone
number is entered. The default value is 5.
AUTO CONFIG
Allow central provisioning of ATA.
Network Tones
You may choose from the following tones:
China / Hong Kong / Japan / United Kingdom / United
States /Germany
Gain Settings
This field is used to adjust the volume of the phone within
the range of 0-4.
19
821200-ATA-PAK User Manual
Endpoint Type
Choose H.323 or SIP.
FXS MODE
Two lines in the same config.
Two lines in different configs.
Default Connect
VoIP or PSTN
SIP Proxy
SIP proxy server IP address
SIP Registrar Server
SIP registrar server IP address
Phone Number
SIP client phone number
Display Name
SIP client display name
Home Domain
Home domain IP address
SIP Outbound Proxy
SIP outbound proxy IP address
Authentication ID
SIP client authentication ID
Password
SIP client authentication password
Forward Number
SIP client forward number
Forward Type
Select forward method: Not Forward ,Unconditional
Forward , Forward on busy
Advance Settings
1) RTP Port
2) DTMF Payload Type
3) SIP Local Port
4) SIP Stun Server
5) Enable Call Wait
6) DTMF Type: Inband Type and Outband Type
Codec Preference
Choose the order of voice codec.
20
821200-ATA-PAK User Manual
Three modes: None; Port-forwarding Support; Relay
Nat Traversal
Proxy.
User Command
Default
Number
Comment
Start VOIP Dial
*12
If the line is default PSTN, switch to VOIP
Switch to PSTN
*21
If the line is default VOIP, switch to PSTN
Hold Key
*42
Put a call on hold.
Transfer Key
*41
Transfer a call.
Star Command
Timeout
Input 60
Input the command within a preset period of
time. The default is 60 seconds.
21
821200-ATA-PAK User Manual
Emergency Call
Emergency call refers to very important calls in circumstances such as fire, burglary,
accident, etc. In the USA, such calls are usually performed by dialing 911. 911
should be stored as the first Emergency Call number. If you need to change this or
add other number, click “Emergency Call” in the left menu of the ATA configuration
webpage to open the emergency call screen. There are ten emergency calls which can
be set in “Emergency Call”, with a limit of 3 numbers such as 110, 119, 120, etc..
Enter the emergency calls numbers you may need and click “Save Configuration” to
save your configurations.
CAUTION: IF 911 IS REMOVED FROM THE EMERGENCY CALL
NUMBER LISTING, YOU MAY NOT BE ABLE TO REACH EMERGENCY
SERVICES WHEN THEY ARE NEEDED. ONLY CHANGE THIS NUMBER
IF YOU ARE ABSOLUTELY SURE THAT YOU DO NOT USE 911.
22
821200-ATA-PAK User Manual
Phone Settings
Comment
Ring Parameters
It includes Ring Frequency and Ring Cadence.
CID FSK Mode
ETSI (European Telecommunications Standard
Institute) and Bellcore (American standard).
CID Signaling
1) DT-AS Before Data (CAS Tone Before
Data)
2) LR-DT-AS Before Data (Alert and CAS
Tone Before Data)
3) RP-AS Before Data (Alert Before Data)
4) Send Data After 1st Ring
23
821200-ATA-PAK User Manual
Network Port Configurations
s
Obtain an IP Address Automatically
Get Network Port IP address from DHCP server
Specify an IP Address Manually
Network Port is static. User will set the IP address,
Subnet mask and Default route
PPPOE
Network Port is dialed up via PPPOE.
user name and password.
Advance
Hardware Address and Broadcast Address.
User will set
PC Port Configuration
Bridge Mode
Bridge mode
Specify an IP Address Manually
Static IP address – User will set IP address, Subnet
mask and enable / disable DHCP server at Network
Port.
Advance
Hardware Address and Broadcast Address.
DNS
Primary or secondary DNS IP address
Time Server
NTP server IP address
6.2.3 Saving the Configuration Changes
Once a change is made, users should click on the “Save Configuration” button in the
Configuration page. The ATA will then display the following information to confirm that the
changes have been saved. Also it will ask you whether to reboot the device as some parameters
24
821200-ATA-PAK User Manual
will not take effect after a device reboot. If you click “Yes”, the screen will display
“REBOOTING…” If you click “No”, the screen will return to the default status.
The ATA power should be cycled after saving the configuration.
6.2.4 Reset Configuration
Click “Reset Configuration” in the left menu of the configuration page to reset the ATA. The
screen will warn you “Are you sure?” If you click “Yes”, the screen will display
“Configuration Reset Completed” shown as below. If you click “No”, the screen will return to
the default status.
25
821200-ATA-PAK User Manual
Section 7 Software Upgrade
WARNING! Performing an online upgrade is for experienced users or administrators
only!
Click “Online Upgrade”. Enter the IP address or domain name of the upgrade server and
26
821200-ATA-PAK User Manual
package name: For example, http:// 192.168.2.1/update/A31HS-3.09-DEV.pkg.
Then click “Start”.
27