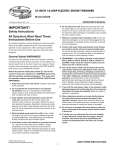
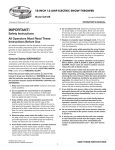
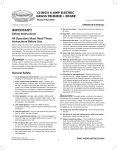
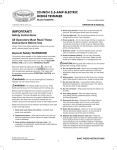
1
Electric Lawn Mower
Form No. SJ-MJ401E-880E
Model No. MJ401E
A Division of Snow Joe, LLC
OPERATOR’S MANUAL
parts. Ensure all covers and guards are securely in place
before use.
IMPORTANT!
Safety Instructions
Hot surfaces (i.e.: motor) may ignite flammables or
combustibles and cause a fire or explosion resulting in
serious injury. Keep the mower away from flammables or
combustibles until hot surfaces have completely cooled.
Do not store mower near flammables or combustibles.
All Operators Must Read These
Instructions Before Use
Always follow these safety guidelines. Failure to do so
may result in serious bodily injury or death.
A damaged blade or worn blade nut may break off from
the mower assembly and cause serious injury. Replace
the damaged blade or blade nut before using the mower.
General Safety WARNINGS!
FOR ALL LAWN MOWERS
“When using electric lawn mowers, basic safety precautions
should always be followed to reduce the risk of fire, electric
shock, and personal injury, including the following: "
Warning: Risk of injury could occur if the lawn mower is
operated without the catcher assembly attached.
Warning: The use of any other accessory or attachment might
increase the risk of injury.
Warning: To reduce the risk of injury, inspect catcher
assembly frequently and replace with recommended
replacement if these are signs of wear or deterioration.
Before using the mower, take the time to familiarize yourself
with the controls, especially how to stop the mower in an
emergency. Only allow responsible individuals who have a
thorough understanding of these instructions to operate the
mower. Never allow children to operate the mower.
1.
Avoid dangerous environment – Don’t use lawn mowers
in damp or wet locations.
2.
Don’t use in rain.
3.
Keep children away – All visitors should be kept at a
safe distance from work area.
4.
Dress properly – Do not wear loose clothing or jewelry.
They can be caught in moving parts. Use of rubber
gloves and footwear is recommended when working
outdoor.
5.
Use safety glasses – Always use face or dust mask if
operation is dusty.
6.
Use right appliance – Do not use lawn mower for any
job except that for which it is intended.
7.
Ground fault circuit interrupter (GFCI) protection
should be provided on the circuit(s) or outlet(s) to be
used for the lawn mower. Receptacles are available
having built-in GFCI protection and may be used for
this measure of safety.
8.
Warning – To prevent electric shock use only with an
extension cord suitable for outdoor use, such as SW,
SOW, STW,STOW,SJTW, or SJTOW.
Retain this manual future reference and reread it at the
start of each mowing session.
FOR DOUBLE-INSULATED LAWN MOWERS
1.
Replacement Parts – When servicing use only identical
replacement parts.
2.
Polarized Appliance Connections To reduce the risk of
electric shock, this appliance has a polarized plug (one
blade is wider than the other) and will require the use of
a polarized extension cord. The appliance plug will fit
into a polarized extension cord only one way. If the plug
does not fit fully into the extension cord, reverse the
plug. If the plug still does not fit, obtain a correct
polarized extension cord. Apolarized extension cord
will require the use of a polarized wall outlet. This plug
will fit into the polarized wall outlet only one way. If the
plug does not fit fully into the wall outlet, reverse the
plug. If the plug still does not fit, contact a qualified
electrician to install the proper wall outlet. Do not
change the equipment plug, extension cord receptacle,
or extension cord plug in anyway.
EXCEPTION: This warning does not apply to a battery
operated lawn mower.
9.
Extension cord – Make sure your extension cord set is
in good condition. When using an extension cord, be
sure to use one heavy enough to carry the current your
product will draw. For lengths less than 100 feet, No. 14
AWG extension cord should be used. An undersized
cord will cause a drop will cause a drop in line voltage
resulting in loss of power and overheating.
Length and name
To reduce the likelihood of disconnection of lawn
mower cord set during operating:
i) Make a knot as shown in Figure 1, or
ii) Use one of the plug-receptacle retaining straps or
connectors described in this manual.
m Contact with moving parts may cause entanglement,
dismemberment or other serious bodily injury. Always
keep body parts (i.e.: hands, feet) away from moving
© 2011 by Snow Joe, LLC
All rights reserved. Original instructions.
Save These Instructions
1
20. Objects struck by the lawn mower blade can cause
severe injuries to persons. The lawn should always be
carefully examined and cleared of all objects prior to
each mowing.
Method of securing cord set
Cord set
Appliance cord
21. If lawn mower strikes a foreign object, follow these steps:
i) Stop lawn mower. Release the switch.
ii) Unplug power cord.
iii) Inspect for damage.
iv) Repair any damage before restarting and operating
the lawn mower.
(A) Tie cord as shown
22. Use identical replacement blades only.
IMPORTANT!
Safety Instructions for
Walk-Behind Mowers
(B) Connect plug and receptacle
GENERAL OPERATION
Figure 1
1.
Read, understand, and follow all instructions on the
machine and in the manual(s) before starting.
2.
Do not put hands or feet near or under the machine.
Keep clear of the discharge opening at all times.
EXCEPTION: This statement does not apply to a cordless
battery-operated lawn mower.
3.
Only allow responsible adults, who are familiar with the
instructions, to operate this machine.
11. Don’t force lawn mower – It will do the job better and safer
at the rate for which it was designed.
4.
12. Don’t overreach – Keep proper footing and balance at
all times.
Clear the area of objects such as rocks, wire, toys, etc.,
which could be thrown by the blade. Stay behind the
handle when the engine (motor) is running.
5.
13. Stay alert – Watch what you are doing. Use common
sense. Do not operate lawn mower when you are tired.
Be sure the area is clear of bystanders before operating.
Stop machine if anyone enters the area.
10. Don’t abuse cord – Never pull lawn mower by cord or
yank it to disconnect from receptacle. Keep cord from
heat, oil, and sharp edges.
6.
14. Disconnect lawn mower – Disconnect the lawn mower
from he power supply when not in use, before servicing,
when changing accessories such as blades, and the like.
Do not operate machine barefooted or while wearing
sandals. Always wear substantial footwear.
7.
15. Store ldle lawn mower indoors – When not in use, lawn
mower should be stored in an indoor dry locked-up
place – out of reach of children.
Do not pull machine backward unless absolutely
necessary. Always look down and behind before and
while moving backward.
8.
Never direct discharged material toward anyone. Avoid
discharging material against a wall or obstruction.
16. Maintain lawn mower with care – Keep cutting edges
sharp and clean for best and safest performance.
9.
Do not operate machine without the entire grass catcher,
discharge guard, rear guard, or other safety protective
devices in place and working.
Following instructions for lubricating and changing
accessories.
10. Never leave a running machine unattended.
Inspect lawn mower cord periodically and if damaged,
have it repaired by an authorized service facility. Inspect
extension cords periodically and replace if damaged. Keep
handles dry, clean, and free from oil and grease.
11. Stop the engine (motor) and wait until the blade comes
to a complete stop before cleaning the machine, removing
grass catcher, or unclogging the discharge guard.
12. Operate machine only in daylight or good artificial light.
17. Keep guards in place and in working order.
13. Do not operate machine while under the influence of
alcohol or drugs.
18. Keep blades sharp.
19. Keep hands and feet away from cutting area.
14. Never operate mower in wet grass. Always be sure of
your footing; walk; never run.
2
15. Disengage the drive system, if so equipped, before
starting the engine (motor).
6.
Always unplug electric mowers before adjusting, cleaning,
or repairing.
16. If the machine should start to vibrate abnormally, stop
the engine (motor) and check for the cause immediately.
Vibration is generally a warning of troble.
7.
Check grass catcher components and the discharge
guard frequently and replace with manufacturer’s
recommended parts, when necessary.
17. Always wear eye protection when operating machine.
8.
18. Only allow responsible adults, who are familiar with the
instructions, to operate this machine.
Mower blades are sharp. Wrap the blade or wear
gloves, and use extra caution when servicing them.
9.
Maintain or replace safety and instruction labels, as
necessary.
SLOPE OPERATION
SYMBOLS
Slopes are a major factor related to slip and fall accidents,
which can result in severe injury. Operation on all slopes
requires extra caution. If you feel uneasy on a slope, do not
mow it.
1.
Mow across the face of slopes; never up and down.
Exercise extreme caution when changing direction
on slope.
2.
Watch for holes, ruts, bumps, rocks, or other hidden
objects. Uneven terrain could cause a slip and fall
accidents. Tall grass can hide obstacles.
3.
Do not mow on wet grass or excessively steep slopes.
Poor footing could cause a slip and fall accident.
4.
Do not mow near drop-offs, ditches, or embankments.
You could lose your footing or balance.
CPSC Danger label
Severing of toes or fingers-rotary mower blade.
Thrown object from mower deck.
CHILDREN
Tragic accidents can occur if the operator is not alert to the
presence of children. Children are often attracted to the machine
and the mowing activity. Never assume that children will remain
where you last saw them.
1.
Keep children out of the mowing area and under the
watchful care of a responsible adult other than the
operator.
2.
Be alert and turn mower off if a child enters the area.
3.
Never allow children to operate the machine.
4.
Use extra care when approaching blind corners, shrubs,
trees, or other objects that may block your view of a child.
Keep bystanders/children away.
Safety alert
SERVICE
Slip on slope
GENERAL SERVICE
1.
Keep all nuts and bolts tight to be sure the equipment
is in safe working condition.
2.
Never tamper with safety devices. Check their proper
operation regularly.
3.
Keep machine free of grass, leaves, or other debris
build-up.
4.
If you strike a foreign object, stop and inspect the
machine. Repair, if necessary, before starting.
5.
Never make any adjustments or repairs with the engine
(motor) running.
Read the operator’s manual
Double insulation
3
Safety and Instruction Decals
m
m WARNING
l
l
l
l
l
l
l
l
l
l
l
l
l
l
l
l
l
l
l
l
l
l
l
l
l
l
l
l
l
l
l
l
l
l
AVOID SERIOUS INJURY OR DEATH
R
SUN JOE MOW JOE MJ401E
120 VAC 60 HZ 12 A, NO:3500/MIN, 360 MM
Made in China
SUN JOE MOW JOE MJ401E
120 VAC 60 HZ 12 A, NO:3500/MIN, 360 MM
Hecho en China
SUN JOE MOW JOE MJ401E
120 VCA 60 HZ 12 A, NO:3500/MIN, 360 MM
Fabriqué en Chine
EVITE LESIONES GRAVES O LA MUERTE
Lea el manual del operador.
Vaya a través de los desniveles, nunca de arriba abajo.
No corte cuando haya niños u otras personas alrededor.
Mire hacia abajo y hacia atrás antes y mientras se mueve hacia atrás.
Quite objetos que pudieran ser arrojados por la cuchilla.
Mantenga los dispositivos de seguridad (protectores, cubiertas, interruptores, etc.) en su lugar
y funcionando.
Riesgo de choque eléctrico. No exponga al agua – reemplace el cable dañado inmediatamente.
DOBLE AISLAMIENTO – al prestar servicio, use sólo piezas de repuesto iguales.
Para reducir el riesgo de lesión, no opere sin protectores en su lugar.
Para reducir el riesgo de lesión, inspeccione frecuentemente el ensamble del depósito para el
césped y reemplace como se recomienda si hay señales de desgaste o deterioro.
Peligro para dedos o pies - cuchilla rotativa de cortadora.
Mantenga alejados a espectadores/niños.
m AVERTISSEMENT
l
MJ401E-2134
Read the operator’s manual.
Go across slopes, not up and down.
Do not mow when children or others are around.
Look down and behind before and while moving.
Remove objects that could be thrown by the blade.
Keep safetydevices (guards, shields, switches, etc.) in place and working.
Risk of electric shock. Do not expose to water – replace damaged cord immediately.
DOUBLE INSULATION – when serving, use only identical replacement parts.
To reduce the risk of injury, do not operate without guards in place.
To reduce the risk of injury, inspect catcher assembly frequently and replace with
recommended replacement if there are signs of wear or deterioration.
Severing of toes or fingers-rotary mower blade.
Keep bystanders/children away.
m ADVERTENCIA
l
Safety decals and instructions are easily visible
to the operator and are located near areas of
potential danger. Lost or damaged decals should
be replaced.
3174208
CONFORMS TO UL STD.1447
DE CONFORMIDAD CON LA NORMA UL 1447
CONFORME À LA NORME UL 1447
DANGER DE BLESSURES GRAVES OU
MORTELLES
Lire le manuel d’utilisation.
Tondre pentes et talus en diagonale, et non à la verticale.
Ne pas utiliser la tondeuse à proximité d’enfants ou autres personnes.
Scruter attentivement le sol si vous devez reculer avec la machine.
Débarrasser la zone de travail de tout objet risquant d’être projeté.
S’assurer que les dispositifs de sécurité (carters, écrans, interrupteurs,etc.) sont
bien en place et fonctionnels.
Risque de choc électrique. Ne pas exposer à l’eau – remplacer immédiatement
tout cordon endommagé.
DOUBLE ISOLATION – N’utiliser que des pièces de remplacement identiques.
Afin de réduire le risque de blessures, ne pas utiliser la machine si les dispositifs
de protection ne sont pas en place.
Afin de réduire le risque de blessures, inspecter régulièrement l’ensemble trémie de
collecte/bac à herbe et remplacer les pièces usées ou détériorées par des pièces
recommandées.
Risque de mutilation des doigts ou des orteils.
Garder enfants et autres personnes à distance.
Replacement manual available by sending model and serial numbers to:
Snow Joe, LLC, 86 Executive Avenue, Edison, NJ 08817, or visit www.snowjoe.com
El manual de reemplazo está disponible al enviar los números de modelo y serie a:
Snow Joe, LLC, 86 Executive Avenue, Edison, NJ 08817, o visite www.snowjoe.com
Pour obtenir un autre exemplaire du Manuel d’utilisation, faire parvenir les numéros de
modèle et de série de votre machine à l’adresse suivante :
Snow Joe, LLC, 86 Executive Avenue, Edison, NJ 08817, ou consulter notre site Internet
à l’adresse www.snowjoe.com
SN
MJ401E-2135
! CAUTION !
When starting the MOW JOE lawn mower in
grass, move the mower to a previously cut
region or apply downward pressure to the
handle to lift the front wheels slightly off the
ground. In the event of circuit failure, reset the
circuit after one minute by depressing the circuit
breaker reset button.
¡CUIDADO!
Al arrancar la cortadora de césped MOW
JOE en hierba, mueva la cortadora a un
área previamente cortada o aplique presión
hacia abajo a la agarradera para levantar
ligeramente las ruedas delanteras. En caso de
presentarse una falla en el circuito, vuelva a
arrancar el circuito después de un minuto
oprimiendo el botón de reposición del
cortacircuitos.
AT T E N T I O N !
Pour procéder à la mise en marche de la tondeuse
MOW JOE, placer la machine sur une portion de
pelouse préalablement coupée ou exercer une faible
pression sur le guidon afin de soulever légèrement
les roues avant de la tondeuse. En cas de
déclenchement du circuit électrique, attendre une
minute et réenclencher le circuit en actionnant le
disjoncteur.
MJ401E-2136
AVOID SERIOUS INJURY OR DEATH
•
•
•
•
•
•
READ THE OPERATOR’S MANUAL.
GO ACROSS SLOPE, NOT UP AND DOWN.
DO NOT MOW WHEN CHILDREN OR OTHER ARE AROUND.
LOOK DOWN AND BEHIND BEFORE AND WHILE MOVING BACKWARDS.
REMOVE OBJECTS THAT COULD BE THROWN BY THE BLADE.
KEEP SAFETY DEVICES (GUARDS, SHIELDS, SWITCHES, ETC.) IN
PLACE AND WORKING.
MJ401E-2137
4
Know Your Lawn Mower
A
A. Switch lever
B. Safety lock-off button
B
C. Cable relief
D. Cable clip
C
E. Upper handle
J
F. Tighten knob
G. Lower handle
E
H. Flap
I
I. Power cable
J. Reset button of over-load switch
F
K. Grassbox
H
L. Mower deck
D
G
M. Wheel/Wheel cover
N. Top cover
K
N
L
M
Figure 2
Technical Data
1. Power – 12A
4. Voltage – 120V/60Hz
2. Performance – Cut up to 14" (36cm) wide in one pass.
5. Rotating Speed – 3500rmp
3. Control – Adjust cutting height up to 2.4" (6.1cm) deep.
6. Weight – 13kg
5
Assembly
m
2. Slide the wire management ‘Clip’ (C) onto the upper handle (D).
m
CAUTION
3. Join the upper handle (D) to the lower handle (E) by means
of the knob (F), plastic washer (G), and bolts (H) provided.
Inspect wiring, which, if damaged during shipping,
may cause serious bodily injury during equipment
use. If any damage is seen or suspected, do not
assemble. Instead, contact Sun Joe customer service
(1-866-766-9563) for assistance.
C
Handle with care during assembly so that electrical
wiring does not become damaged.
Before using the mower, follow these
instructions to assemble the Handle and
Grassbox.
Handle Assembly
1. Fit the lower handle into the two holes in the machine
body (A) and fasten them with the screws (B) provided.
D
.
H
G
E
F
A
B
Figure 4
C. Cable relief
D. Upper handle
E. Lower handle
F. Tighten knob
Figure 3
A. Machine body
G. Plastic washer
H. Bolts
B. Screw
6
3. Raise the spring loaded rear door (C) and move the basket
up to the mower body. Fasten it onto the coupling hooks (D).
Grassbox Assembly & Fitting
1. Fit the support rod (A) into the holes in the plastic cover.
The bend of the support rod should face the rear of the
machine.
C
D
A
Figure 7
Figure 5
C. Rear door
D. Coupling hooks
A. Support rod
4. Release the rear door to secure the basket in position.
2. Place the protective plastic profiles (B) onto the “U” rod.
B
Figure 6
B. Protective plastic profile
Figure 8
7
Features
Grassbox (C): Used to collect mowed clippings.
Safety Lock-off Button (A): Used to engage the switch.
START
C
STOP
Figure 11
A
C. Grassbox
Operation
Figure 9
After conducting all safety checks and necessary
preparations, follow these steps to operate the mower:
A. Safety lock-off button
1. Push the loop of the electric extension cord through the slot
from the opposite side of the restraint hook. Position the
loop over the hook and pull the cable back through the slot.
Switch Lever (B): Used to start and stop the mower.
A
B
B
START
STOP
Figure 12
A. Cable relief
B. Extension cord
Figure 10
B. Switch lever
Note: Use a waterproof electrical extension cord rated
14AWG. H05VV-F and H05RN-F in US.
8
B
2
3
1
START
4
STOP
Figure 13
A
2. Place the bulk of the extension cord on the lawn close to
the starting point.
Figure 15
Note: The directional method of operation is recommended
to obtain the maximum cutting performance and reduce
the risk of the electrical extension cord entering the
cutting path.
A. Safety lock-off button
B. Switch lever
6. Lower the mower down into the cutting position.
3. Hold the handle assembly with both hands.
7. Follow these instructions to mow the cutting area:
A. Proceed to cut as shown in Fig 13, working from
position 1 towards position 2.
B. At position 2, turn right and proceed to position 3.
C. Continue to the end of the cutting area, turn left and
proceed to position 4.
D. Proceed as shown in Figure 13, always working away
from the electric extension cable.
4. Tilt the handle downwards to slightly raise the front of
the mower. This will reduce the risk of lawn damage
during start-up.
5. Depress the Safety lock-off button (A) and pull the Switch
lever (B) towards you.
8. Release the Switch lever to stop the mower.
Important: The mower blade will continue to rotate as
you are pulling the Switch lever. Do not reach inside the
blade housing or attempt to lift the mower until the blade
has completely stopped and the electrical supply to the
mower has been disconnected.
START
STOP
A
Figure 14
A. Safety lock-off button
9
Adjusting the Cutting Height
Maintenance and Care
Follow these instructions to adjust the cutting height of the
lawnmower.
General
• Always keep the mower clean and free of grass clippings.
• After each cutting session, scrap or blast with water the built
up grass from the underside of the blade housing.
• Clean plastic parts with a damp cloth. Do not use solvents or
cleaning fluids on plastic components.
• Check all nuts, bolts and screws before each use.
• Store the mower in a dry area.
m WARNING
DO NOT make these adjustments when the mower is running
or plugged in. Doing so can cause serious injury or death. Also,
we recommend wearing gloves due to the close proximity of the
cutting blade.
ALWAYS FOLLOW ALL SAFETY PRECATIONS AND
RECOMMENDATIONS LISTED PREVIOUSLY IN THIS
MANUAL.
1.
2.
3.
Blade Maintenance
The steel blade is designed to provide a fine cut in long or tough
grass. Deterioration in the quality of cut indicates blade wear
or damage. Follow these steps to determine if the blade needs to
be repaired or replaced:
Power down and unplug the lawnmower.
Remove and empty the grass box.
Place the lawnmower on one of its sides. (See Fig.16)
1. Disconnect the electrical supply to the mower.
2. Turn the mower on its side so the underside of the
blade housing is exposed.
3. Check the blade.
a. If the blade is blunt or has minor wear,
then re-sharpen.
b. If the blade has major wear or damage
(i.e.: gouged, bent), replace. Please call Sun
Joe customer service (1-866-766-9563)
for assistance.
High Setting
Blade Replacement
Important: Only use original replacement parts specified for
this mower.
A
B
Medium Setting
Low Setting
Rod Axel
Figure 16
4.
The wheel axels can be places into 3 different
cutting heights: Low (will cut grass the shortest),
medium, and high.
5.
Move all four wheels to the desired cutting height. Simply
pull back on the rod axel and set your desired wheel
height. Make sure all four wheels are the same height.
6.
Place the lawnmower back on to its wheels and re-attach
the grass box.
7.
Plug back in your mower and resume normal use.
Figure 17
A. Blade
10
B. Spanner
Service and Support
1. Disconnect the electrical supply to the mower.
2. Turn the mower on its side so the underside of the
bladehousing is exposed.
3. Use a cloth to grip the blade or wear heavy-duty gloves.
4. Using the spanner provided, turn the nut counterclockwise to loosen and remove the nut from the
motor spindle.
5. Fit the blade and the special Belleville washer back
on in the correct direction.
If your Mow Joe Electric Lawn Mower requires service or
maintenance, please call 1-866-766-9563 for assistance.
Model and Serial Numbers
When contacting the company or reordering parts, you will
need to provide the model and serial numbers of your product.
These are found on the decal affixed to the housing or handle of
your mower. Copy these numbers into the space provided below.
Record the following numbers from the housing or handle of your
new product:
Model #:
M J 4 0 1 E
A
Serial #:
B
Figure 18
A. Nut
B. Blade
11
A Two-Year Full Warranty
for residential use
in the United States and Canada
General Conditions:
Snow Joe, LLC warrants this product to the original purchaser for two years against defects in material or workmanship when used for
normal residential purposes. Snow Joe, LLC will repair any defect in material or workmanship, and repair or replace any defective
part, subject to the conditions, limitations, and exclusions set forth herein. Such repair or parts replacement will be free from charge to the
original purchaser except noted below.
The duration of the warranty applies only if the product is put to personal use around the household or residence. If the product is put
to any business use, commercial or industrial, then the duration of this warranty is 90 days from the date of original purchase. If any product
is rented or leased, the duration of the warranty is 90 days from the date of original purchase.
It is the owner’s responsibility to perform correctly all maintenance, and minor adjustments explained in the owner’s manual.
Electric Products:
To obtain a replacement electric powered unit or repair the existing electric powered unit, you must return the complete unit and
postage prepaid to: Snow Joe Return Center, 86 Executive Avenue, Edison, NJ 08817
Gasoline / Battery Products:
Limitations
l
Batteries are warranted only for the period of 12 months after the date of purchase on a prorated basis. Rechargeable batteries
will be replaced free from charge during the first 90 days. After the initial 90 days, batteries will be replaced at prorated
cost to the customer
l
Idlers, cables, and electrical components are warranted to the original purchaser for use at household or residence for a period
of two years
Exclusions
l
Snow Joe brand engines are covered under this warranty. All other engines and engine accessories are covered only by
the engine manufacturer’s warranty and are not covered by this warranty
l
Parts used that are not genuine Snow Joe parts are not covered by this warranty
l
Damages resulting from misuse, alteration, improper assembly, improper adjustment, neglect, or accident which requires repair
is not covered under this warranty
l
Belts, augers, and tines are not covered under warranty – belts, augers, and tines wear out and can be purchased at
www.snowjoe.com or by calling 1-866-766-9563
Snow Joe, LLC may from time to time change the design of its products. Nothing contained in this warranty shall be construed as
obligating Snow Joe, LLC to incorporate such design changes into previously manufactured products, nor shall such changes be
construed as an admission that previous designs were defective.
This warranty is intended to cover product defects only. Snow Joe, LLC is not liable for indirect, incidental, or consequential damages
in connection with the use of the Snow Joe Products covered by this warranty. This warranty does not cover any cost or expense
incurred by the purchaser in providing substitute equipment or service during reasonable periods of malfunction or non-use of this
product, while waiting for completion of repairs under this warranty. Some states do not allow exclusions of incidental or consequential
damages, so the above exclusions may not apply in all states. This warranty may give you specific legal rights in your state.
If you wish to contact Snow Joe, please direct inquiries to the:
Customer Service Department
Snow Joe Center
86 Executive Avenue
Edison, NJ 08817
Customers who have purchased Snow Joe products exported from the United States and Canada should contact their Snow Joe
Distributor (Dealer) to obtain information applicable for your country, province, or state. If for any reason, you are not satisfied with the
distributor’s service, or if you have difficulty obtaining warranty information, contact your Snow Joe seller. If in the event your efforts
are unsatisfactory, please write to the Snow Joe Center at the above address.
If you have any questions about your product warranty, please call 1-866-SNOW-JOE or visit us online at www.snowjoe.com.
12