1
Devine Machine
OSR User Manual -
2
Thanks for Purchasing OSR !
This tool will help you in many ways by letting you concentrate on sound rather than
on tedious editing, slicing and sorting operations.
In this manual you will find everything about OSR functions and some tips regarding
how some of those functions can be used.
We are confident that OSR will help you save time and enhance your workflow.
Nicolas Lacoumette
Efflam Le Bivic
Devine Machine
Devine Machine
OSR User Manual - Table of contents
3
Table of contents
Table of contents....................................................................................3
Recording................................................................................................4
1 - Route your audio through OSR. .........................................................................4
2 - MagicSens mode.................................................................................................4
When to use MagicSens ?........................................................................................4
3 – Set recording settings *.......................................................................................5
4 - Tresholds.............................................................................................................5
5 – Slot selection ......................................................................................................5
6 – Record !...............................................................................................................5
7 – Check clipping.....................................................................................................6
8 – Repeat the same process over and over............................................................6
An alternative recording method: Force Record ......................................................7
Performance............................................................................................8
Sample playback.......................................................................................................8
Mono or stereo playback...........................................................................................8
Using a MIDI keyboard..............................................................................................8
Performance ideas ...................................................................................................9
Functions...............................................................................................10
Selecting a slot........................................................................................................10
Individual sample selection ....................................................................................10
SELECT buttons......................................................................................................10
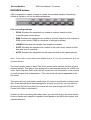
REORDER buttons ................................................................................................11
FUNCTION buttons.................................................................................................12
RESET ALL button..................................................................................................12
Exporting audio....................................................................................13
Export options.........................................................................................................13
Mono / Stereo export...............................................................................................13
Batch export............................................................................................................13
For the curious......................................................................................14
Devine Machine
OSR User Manual - Recording
4
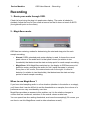
Recording
1 - Route your audio through OSR.
Check its level using the plug-in's peak meter display. The meter is labeled in
decibels. Adjust the level of your audio at source so that it does not reach 0 dB FS
(the rightmost point on the meter).
2 - MagicSens mode.
OSR has two metering modes for determining the start and stop point for each
sample recording:
•
Normal: OSR's standard peak meter display is used. It shows the current
peak volume of the audio and it is that peak volume (in relation to two
thresholds) that determines the start and stop point for each sample recording.
•
MagicSens: With MagicSens switched on, the display in OSR becomes a hit
detection meter, analysing the audio for 'hits' (rapid increases in volume).
Every time a 'hit' occurs, the meter shoots over to the right. It is this hit
detector (in relation to two thresholds), that determines the start and stop
points for each sample recording.
When to use MagicSens ?
If you have tried sampling audio in a live situation (whether in the studio or on stage),
you'll know that it can be difficult to set the thresholds on a sampler; the volume of a
performance can vary considerably over time.
MagicSens provides an answer to this problem, as it is the relative changes in
volume that are monitored, variations in the overall volume matter less.
You can spend less time setting thresholds, and more time sampling! (Of course, you
are free to use this MagicSens mode in other situations as well.)
Devine Machine
OSR User Manual - Recording
3 – Set recording settings *
•
When recording in mono, it is the left channel of the audio that is recorded.
•
You can choose later to export in mono any samples that were recorded in
stereo.
•
You can also change this setting while recording is under way.
4 - Tresholds
Once recording begins, each sample recording starts when the meter level exceeds
the RECORD TRIG threshold, and stops when the meter level falls back below the
RECORD GATE threshold.
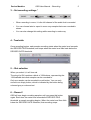
5 – Slot selection
When you select it, it will turn red.
The plug-in's GUI contains a block of 128 buttons, representing the
128 available slots that samples can be recorded to.
Only one sample can be recorded to each button. You can only
record to an empty button, which is indicated by the button being
coloured grey or coloured red.
6 – Record !
OSR will now begin recording samples until you press this button
again. Each time the meter level exceeds the RECORD TRIG
threshold, a sample recording begins. When the meter level then falls
below the RECORD GATE threshold, that recording stops.
5
Devine Machine
OSR User Manual - Recording
6
This process repeats for as long as the Record button is lit, and there is still space for
new samples.
You can adjust the two thresholds while the recording process is under way.
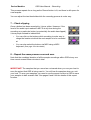
7 – Check clipping
Once a button has been recorded to, it turns yellow. However, if the
level of the audio input reached 0 dB FS at any time during the
recording on a particular button (so potentially the audio has clipped),
it turns purple instead to indicate this.
•
You can click on the buttons while recording is under way to
chnge the location at which the next sample is to be recorded
at.
•
You can also select the buttons via MIDI using a MIDI
keyboard. (See page 6 for the details)
8 – Repeat the same process over and over.
Note that the combined duration of all the sample recordings within OSR at any one
time cannot exceed fifteen minutes in total.
IMPORTANT! The samples that you record are not saved when you use your host to
save the project that OSR is being used in. You will lose the samples when you exit
your host. To save your samples, you need to use the export function in OSR to save
your samples to disk as audio files. See pages 8 and 9 for the details of this export
function.
Devine Machine
OSR User Manual - Recording
An alternative recording method: Force
Record
You may want to manually control when each sample
recording begins and ends, as opposed to letting OSR do this
automatically for you. You can achieve this by controlling two
'switches' called 'Use Force Record' and 'Force Record'. These
switches are accessed via two VST parameters (called 'Use
Force Record' and 'Force Record') or via two MIDI Control
Change assignments (MIDI CC #64 is 'Use Force Record' and
MIDI CC #65 is 'Force Record').
The 'Use Force Record' switch is used to turn the force record
ability on and off. When it's on, you can then use the 'Force
Record' switch to actually start and stop a sample recording.
If you want to use the two MIDI CC values, then you have to be
able to route MIDI data to OSR. (See page 6 for the details.)
Alternatively, to use the two VST parameters, your host has to
be able to generate automation data.
Here's an example of force recording via the two VST
parameters. To the left is a screenshot of an example of force
recording in Cubase SX version 3. The idea here was to play a
single bar of a sequence (in this example, bar nine), and to
sample separately the first beat and the third beat of that bar.
Two automation lanes were created, one for each of the two
VST parameters. The upper lane was for the 'Use Force
Record' parameter, and was set to turn the force record ability
on for the duration of this single bar.
The lower lane was for the 'Force Record' parameter, to switch
recording on during beats one and three of the bar. All that was
then required was to click on the Record button in OSR and
start playback within Cubase.
7
Devine Machine
OSR User Manual - Performance
8
Performance
Sample playback
You can click on a recorded sample button to play back its sample. Only one sample
can be played at a time. Clicking on a sample button when a sample is already being
played will cleanly silence that previous sample.
Mono or stereo playback
•
If you play a stereo sample in mono, it is the left channel of the stereo sample
that is played.
•
If you play a mono sample in stereo, that mono sample is simply duplicated on
both the left and right channels.
•
You can use this facility to hear what the exported version of each sample will
sound like, if you were to export with this same mono/stereo setting.
Using a MIDI keyboard
To control OSR with a MIDI keyboard, your host audio application has to be able to route
MIDI to the VST audio effect plug-ins. If you are unsure as to how to do this, please check
your host's documentation, or read the Devine Machine OSR forum.
The block of 128 buttons in the OSR user interface corresponds to the 128 notes of
the MIDI note range; playing a note on an attached MIDI keyboard will select one of
those sample buttons. As an example, the button labelled '060' can be selected by
playing the note C3 ('middle C') on your MIDI keyboard.
In addition, OSR responds to seven MIDI controller numbers:
MIDI CC #060: RECORD GATE
adjusts this threshold
MIDI CC #061: RECORD TRIG
adjusts this threshold
MIDI CC #062: RECORD
button Record on/off
MIDI CC #063: MAGICSENS
button MagicSens on/off
MIDI CC #064: USE FORCE RECORD see page 5
MIDI CC #065: FORCE RECORD
see page 5
MIDI CC #127: RESET ALL
button use with caution!
Devine Machine
OSR User Manual - Performance
Performance ideas
MIDI control of OSR makes it very easy to automate
the sampling of synthesisers and other MIDI-controlled audio
sources. You can create a MIDI sequence that starts OSR
recording, plays the desired series of MIDI notes (each possibly
at various velocities) and then switches recording off.
Try the following:
Create a 1-bar sequencer pattern consisting of 16 16th notes
that trigger the first 16 OSR sample buttons. Play some audio
into OSR and record a sample to each of those 16 slots. Now
start the 1-bar sequence playing and route those MIDI notes to
OSR. Those samples will now be played, but because OSR can
only play one sample at a time, the result is not a disaster - it's
great! Try making a bass line with several programs from a
synthesiser this way, changing programs on the fly as you
record the samples.
9
Devine Machine
OSR User Manual - Functions
Functions
Selecting a slot
A sample is selected when its slot button is coloured in green.
Selecting a sample is useful for marking it (for your information) as
being good, but it is also an important step when using some of the
functions in OSR, to indicate the samples that you want a function to
act upon.
Individual sample selection
You can select an individual sample by:
+ click or
+ click on the button.
•
SHIFT
•
Right-click on the button (PC only).
CTRL
SELECT buttons
You can also select samples using the three SELECT buttons.
•
ALL: All the slots with samples are selected.
•
NONE: Any selected slots are unselected.
•
INVERSE: The inverse of the current selection.
10
Devine Machine
OSR User Manual - Functions
11
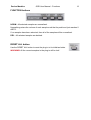
REORDER buttons
OSR incorporates a variety of ways to reorder the recorded samples. Reordering
affects all samples, not just the selected samples.
Five reordering methods
•
PEAK: Reorders the samples from loudest to quietest, based on their
individual peak volume levels.
•
RMS: Reorders the samples from loudest to quietest, based on their individual
RMS volume levels. (RMS is a measure of average loudness.)
•
LENGTH: Reorders the samples from longest to shortest.
•
DATE: Reorders the samples from earliest to the most recent, based on their
date and time of recording.
•
NOTE: Reorders the samples from the lowest pitched to the highest pitched.
Note : There is also an extra button here labeled Inverse. If it's lit, the reordering will be in the
opposite direction.
The 'Note' reorder option in detail The 'Note' reorder option detects the pitch of each
selected sample. That pitch is then displayed on each sample's button as a MIDI note
value. When exported, each audio file will contain this note information, to be used by
an audio program that understands it. (The note name will also be appended to the
file name.)
This option will only yield useful results when it's used on sounds with a distinct pitch.
Also, if the detected pitch that's displayed for a button is incorrect, you can edit it by
Alt-left click (PC)/Alt-click (Mac) to increase the note and Alt-right click (PC)/AltControl-click (Mac) to decrease it.
Another tip: Once reordering has taken place, you can shift-click on the Note reorder
button to cause each sample to reposition itself based on the MIDI note number that
was detected for it.
Devine Machine
OSR User Manual - Functions
12
FUNCTION buttons
NORM - All selected samples are normalised.
Normalising raises the volume of each sample such that its peak level just reaches 0
dB FS.
If no samples have been selected, then all of the samples will be normalised.
DEL - All selected samples are deleted.
RESET ALL button
Use the RESET ALL button to reset the plug-in to its initialised state.
WARNING! All the current samples in the plug-in will be lost!
Devine Machine
OSR User Manual - Exporting audio
13
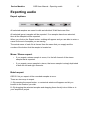
Exporting audio
Export options
All selected samples are saved to disk as individual 32-bit float wave files.
All selected (green) samples will be exported. If no samples have been selected,
then all the samples will be exported.
When you click on the Export button, a dialog will appear and you are able to enter a
name for the set of samples you are saving.
The actual name of each file is formed from the name that you supply and the
number of the button that the sample is located on.
Mono / Stereo export.
•
If you export a stereo sample in mono, it is the left channel of the stereo
sample that is exported.
•
If you export a mono sample in stereo, that mono sample is simply duplicated
to both the left and right channels.
Batch export
OSR 2.0 let you export all the recorded samples at once.
There are two ways to export.
1 - By pressing the export button : a contextual window will appear and let you
browse to the location you wish.
2 - By dragging the selected samples and dropping them directly into a folder or in
your sequencer project.
Devine Machine
OSR User Manual - For the curious
14
For the curious
...you may be interested to know how OSR edits each sample recording:
OSR examines the waveform at the start of each sample recording in order to best
preserve the audio around that point.
If it can, it will adjust the sample start point to an appropriate zero crossing point in
the immediate vicinity. For example, when sampling a single drum hit, OSR will try to
preserve the full attack transient of that hit by - if necessary - shifting the sample start
point slightly back in time. (If no appropriate zero crossing point can be located, OSR
will apply a very short fade-in to the start of the sample.)
And to prevent a click occurring at the end of a sample, a very small fade-out is
applied. (Clicks would particularly occur if the audio being sampled was noisy or if the
RECORD GATE threshold was set quite high.)
Devine Machine
OSR User Manual -
15
If you have any question regarding this products or if you simply want communicate
with us, you can do it through our forum at :
www.devine-machine.com
Or contact us at :
[email protected]
Copyright (c) 2005. Devine Machine Ltd. All rights reserved.
VST Plugin technology by Steinberg
VST is a trademark of Steinberg Media Technologies GmbH All other copyrighted trademarks belong to their
respective owners.
Audio Units is a trademark of Apple Inc.
This program is compatible with Pro Tools/HD(r) as RTAS. Pro Tools and Digidesign are registered trademarks of
Digidesign, a division of Avid Technology, Inc.
The information contained in this document is subject to change without notice. In no event shall Devine Machine
Ltd. or the author of this document be liable for any damages arising out of or related to this document or the
information contained within it. No part of this document may be reproduced or transmitted in any form or for any
purpose without the express written consent of Devine Machine Ltd.