1
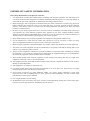
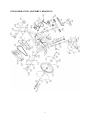
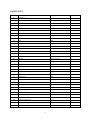
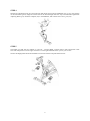
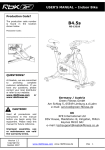
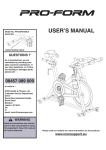
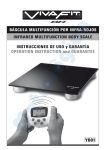
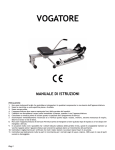
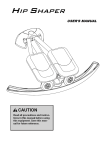
USER MANUAL – EN
IN 4422 Spinning Bike inSPORTline Jota
1
CONTENTS
IMPORTANT SAFETY INFORMATION............................................................................................................. 3
EXERCISE MONITOR INSTRUCTION MANUAL ............................................................................................ 4
EXPLODED-VIEW ASSEMBLY DRAWING ..................................................................................................... 5
PARTS LIST ........................................................................................................................................................... 6
ASSEMBLY INSTRUCTIONS.............................................................................................................................. 8
TERMS AND CONDITIONS OF WARRANTY, WARRANTY CLAIMS ....................................................... 10
2
IMPORTANT SAFETY INFORMATION
Please keep this manual in a safe place for reference.
1. It is important to read this entire manual before assembling and using the equipment. Safe and efficient use
can only be achieved if the equipment is assembled, maintained and used properly. It is your responsibility to
ensure that all users of the equipment are informed of all warnings and precautions.
2. Before starting any exercise program you should consult your doctor to determine if you have any physical or
health conditions that could create a risk to your health and safety, or prevent you from using the equipment
properly. Your doctor's advice is essential if you are taking medication that affects your heart rate, blood
pressure or cholesterol level.
3. Be aware of your body's signals. Incorrect or excessive exercise can damage your health. Stop exercising if
you experience any of the following symptoms: Pain, tightness in your chest, irregular heartbeat, extreme
shortness of breath, feeling light headed, dizzy or nauseous. If you do experience any of these conditions you
should consult your doctor before continuing with your exercise program.
4. Keep children and pets away from the equipment. The equipment is designed for adult use only.
5. Use the equipment on a solid, flat level surface with a protective cover for your floor or carpet. For safety
space, the equipment should have at least 0.5 meter of free space all around it.
6. Before using the equipment, check the handlebar, seat, pedals, and the nuts and bolts are securely tightened.
7. The safety level of the equipment can only be maintained if it is regularly examined for damage and/or wear
and tear. (E.g. handle bar, pedals, and seat…..)
8. Always use the equipment as indicated. If you find any defective components while assembling or checking
the equipment, or if you hear any unusual noises coming from the equipment during use, stop immediately.
Do not use the equipment until the problem has been rectified.
9. Wear suitable clothing while using the equipment. Avoid wearing loose clothing that may get caught in the
equipment or that may restrict or prevent movement.
10. The equipment has been tested and certified to EN957 under class HC, suitable for domestic, home use only.
Braking is speed independent.
11. The equipment is not suitable for therapeutic use.
12. Care must be taken when lifting or moving the equipment so as not to injure your back. Always use proper
lifting techniques and/or seek assistance if necessary.
13. All moveable accessories (eg. pedal, handlebar, saddle....etc.) require weekly maintenance. Check them
before use every time. If anything broken or loose, please fix them immediately. You may continue using
bike after they return to good conditions.
14. User weight should not exceed 120 kg.
15. WARNING! A hart rate monitor may not be accurate. Overloading during training may cause serious injury
or death. If you feel any discomfort, immediately stop the exercise!
3
EXERCISE MONITOR INSTRUCTION MANUAL
SPECIFICATIONS
TIME
00:00-99:59
SPEED (SPD)
0-99.9KM/H(ML/H)
DISTANCE (DIST)
0-999.9KM(ML)
CALORIE (CAL)
0-9999KCAL
ODOMETER (ODO)
0-999.9KM(ML)
PULSE (PUL)
40-240BPM
KEY FUNCTIONS
MODE (SELECT/RESET): This key lets you to select and lock on to a particular function you want.
OPERATION PROCEDURES
1. AUTO ON/OFF
The system turns on when any key is pressed or when it sensor an input from the speed sensor.
The system turns off automatically when the speed has no signal input or on key are pressed for
approximately 4 minutes.
2. RESET
The unit can be reset by either changing battery or pressing the MODE key for 3 seconds.
3. MODE
To choose the SCAN or LOCK if you do not want the scan mode, press the MODE key when the pointer on
the function on you want which begins blinking.
FUNCTIONS
1. TIME: Press the MODE key until pointer lock on to TIME. The total working me will be shown when
starting exercise.
2. SPEED: Press the MODE key until the pointer advanced to SPEED. The current speed will be shown.
3. DISTANCE: Press the MODE key until the pointer advanced to DISTANCE. The distance of each workout
will be displayed.
4. CALORIE: Press the MODE key until pointer lock on to CALORIE. The calorie burned will be displayed
when displayed will be shown.
5. ODOMETER (IF HAVE): Press the MODE key until the pointer advanced to ODEMETER. The total
accumulated distance will be shown.
6. PULSE (IF HAVE): Press the MODE key until the pointer advanced to PULSE. User’s current heart rate
will be displayed in beats per minute. Place the palms of your hands on both of the contact pads(or put earclip to ear),and wait for 30 seconds for the most accurate reading.
SCAN: Automatically display changes every 4 seconds.
BATTERY: If improper display on monitor, please reinstall the batteries to have a good result.
4
EXPLODED-VIEW ASSEMBLY DRAWING
5
PARTS LIST
NO.
NAME
SPECIFICATION
QUANTITY
1
Handle bar
1
2
Adjusting knob
M16
3
3
Bottle Bracket
Black
1
4
Washer
φ4
2
5
Screw
M4*15
2
6
Washer
Φ4
2
7
Domed nut
M6
1
8
Latex Washer
Black
1
9
Brake Bracket
Steel
1
10
Nut
M8
2
11
Brake Seat
ABS
1
12
Bolt
M8*50
2
13
Inertia Wheel
Φ450*13KG
1
14
Small Sprocket wheel
16
1
15
Bearing
16
Washer
Φ10 (Plastic)
2
17
Sheath
φ14*φ10.5*25
1
18
Spacing tube
M10*P1.0
1
19
Washer
Φ10
2
20
Flange Nut
M10*P1.0
2
21
front stabilizer pad (Right/Left)
40*80
2
22
Front stabilizer
40*80**1.5T*400L
1
23
Washer
Φ8*1.5T
4
24
Domed nut
M8
4
25
Screw
φ14*φ10.5*10
4
26
Carriage Bolt
M8*50
4
27
Hull (Right/Left)
ABS
1
28
Screw
ST4.2*19
5
29
Pedal (Right/Left )
1
30
Crank Cover
2
31
Crank (Right/Left)
32
Chain
33
Big Sprocket wheel
52
1
34
Rear stabilizer pad
40*80
2
35
Screw
ST4.2*16
3
1
165L
1
1
6
36
Rear stabilizer
1
37
Circlip
2
38
Bush
39
Vertical seat post
40
Tube Plug
41
Horizontal seat post
1
42
Saddle
1
43
Tension Control Pole
1
44
Brake Top
M24
1
45
Round spacer
M8
1
46
Spring
47
Bushing
48
Main frame
49
Pulse sensor
M6*20
4
50
Bearing
6004Z
2
51
Square spacer
52
Flywheel Axle
M12
1
53
Nut
M5
2
54
Bolt
M5*30
2
55
Washer
Φ5
2
56
Flywheel cover
57
Wire protecting plug
58
Computer
1
59
Sensor wire
1
60
Sensor wire connector
1
61
Bushing
1
No. 23 Washer (Φ 8)
38*38
1
1
38*38
1
1
45*45
2
1
1
2
Φ6
4
No. 24 Domed nut (M8)
No. 26 Carriage bolt (M8*55)
No. 2 Adjusting knob (M16)
Spanner
No. 29 L / R Pedal
7
ASSEMBLY INSTRUCTIONS
STEP 1
Attach the Rear Stabilizer (pt.36) to the Main Frame (pt.48) using two sets of Domed Nuts (pt. 24), Washers
(pt.23 ) and Carriage Bolt(pt.26 ) (M8*55).
STEP 2
Attach the Front Stabilizer (pt.22) to the Main Frame (pt.48) using two sets of Domed Nuts (pt. 24), Washers (pt.
23) and Carriage Bolt (pt. 26).
STEP 3
Fix the Seat (pt.42) to the Horizontal Seat Post (pt.41) as shown, and tighten the bolts around the screws under
the seat. Slide the Horizontal Seat Post (pt.41) into the Vertical Seat Post (pt.39).You will have to slacken the
knurled section of the Round Knob (pt.61) and pull the knob back and then select and align holes for the desired
height. Release the knob and retighten the knurled portion.
8
STEP 4
Slacken the Adjusting Knob (pt.2) and pull back both knobs and locate the handlebar post (pt.1) in the housing
on the main frame (pt.48). Align the correct holes at the desired height until the “stop” mark and then tighten the
Adjusting Knob (pt.2). Slide the computer (58) to the handlebar, and connect sensor wire (pt.59, 60)
STEP 5
The Pedals (pt. 29R 29L) are marked "L" and "R" – Left and Right. Connect them to their appropriate crank
arms with the spanner tool. The right crank arm is on the right-hand side of the cycle as you sit on it.
NOTE: The Right pedal should be threaded on clockwise and the Left pedal anticlockwise.
9
TERMS AND CONDITIONS OF WARRANTY, WARRANTY CLAIMS
General Conditions of Warranty and Definition of Terms
All Warranty Conditions stated hereunder determine Warranty Coverage and Warranty Claim Procedure.
Conditions of Warranty and Warranty Claims are governed by Act No. 40/1964 Coll. Civil Code, Act No.
513/1991 Coll., Commercial Code, and Act No. 634/1992 Coll., Consumer Protection Act, as amended, also in
cases that are not specified by these Warranty rules.
The seller is SEVEN SPORT s.r.o. with its registered office in Borivojova Street 35/878, Prague 13000,
Company Registration Number: 26847264, registered in the Trade Register at Regional Court in Prague, Section
C, Insert No. 116888.
According to valid legal regulations it depends whether the Buyer is the End Customer or not.
“The Buyer who is the End Customer” or simply the “End Customer” is the legal entity that does not conclude
and execute the Contract in order to run or promote his own trade or business activities.
“The Buyer who is not the End Customer” is a Businessman that buys Goods or uses services for the purpose of
using the Goods or services for his own business activities. The Buyer conforms to the General Purchase
Agreement and business conditions to the extent specified in the Commercial Code.
These Conditions of Warranty and Warranty Claims are an integral part of every Purchase Agreement made
between the Seller and the Buyer. All Warranty Conditions are valid and binding, unless otherwise specified in
the Purchase Agreement, in the Amendment to this Contract or in another written agreement.
Warranty Conditions
Warranty Period
The Seller provides the Buyer a 24 months Warranty for Goods Quality, unless otherwise specified in the
Certificate of Warranty, Invoice, Bill of Delivery or other documents related to the Goods. The legal warranty
period provided to the Consumer is not affected.
By the Warranty for Goods Quality, the Seller guarantees that the delivered Goods shall be, for a certain period
of time, suitable for regular or contracted use, and that the Goods shall maintain its regular or contracted
features.
The Warranty does not cover defects resulting from:
User’s fault, i.e. product damage caused by unqualified repair work, improper assembly, insufficient insertion of
seat post into frame, insufficient tightening of pedals and cranks
Improper maintenance
Mechanical damages
Regular use (e.g. wearing out of rubber and plastic parts, joints etc.)
Unavoidable event, natural disaster
Adjustments made by unqualified person
Improper maintenance, improper placement, damages caused by low or high temperature, water, inappropriate
pressure, shocks, intentional changes in design or construction etc.
Warranty Claim Procedure
The Buyer is obliged to check the Goods delivered by the Seller immediately after taking the responsibility for
the Goods and its damages, i.e. immediately after its delivery. The Buyer must check the Goods so that he
discovers all the defects that can be discovered by such check.
When making a Warranty Claim the Buyer is obliged, on request of the Seller, to prove the purchase and validity
of the claim by the Invoice or Bill of Delivery that includes the product’s serial number, or eventually by the
documents without the serial number. If the Buyer does not prove the validity of the Warranty Claim by these
documents, the Seller has the right to reject the Warranty Claim.
If the Buyer gives notice of a defect that is not covered by the Warranty (e.g. in the case that the Warranty
Conditions were not fulfilled or in the case of reporting the defect by mistake etc.), the Seller is eligible to
10
require a compensation for all the costs arising from the repair. The cost shall be calculated according to the
valid price list of services and transport costs.
If the Seller finds out (by testing) that the product is not damaged, the Warranty Claim is not accepted. The
Seller reserves the right to claim a compensation for costs arising from the false Warranty Claim.
In case the Buyer makes a claim about the Goods that is legally covered by the Warranty provided by the Seller,
the Seller shall fix the reported defects by means of repair or by the exchange of the damaged part or product for
a new one. Based on the agreement of the Buyer, the Seller has the right to exchange the defected Goods for a
fully compatible Goods of the same or better technical characteristics. The Seller is entitled to choose the form of
the Warranty Claim Procedures described in this paragraph.
The Seller shall settle the Warranty Claim within 30 days after the delivery of the defective Goods, unless a
longer period has been agreed upon. The day when the repaired or exchanged Goods is handed over to the Buyer
is considered to be the day of the Warranty Claim settlement. When the Seller is not able to settle the Warranty
Claim within the agreed period due to the specific nature of the Goods defect, he and the Buyer shall make an
agreement about an alternative solution. In case such agreement is not made, the Seller is obliged to provide the
Buyer with a financial compensation in the form of a refund.
Date of Sale:
Stamp and Signature of Seller:
11