1
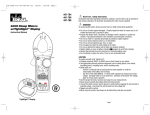
MS8251B
DIGITAL MULTIMETER
OPERATION MANUAL
MS8251B
REL MAX MIN
%
AUTO
kHz
CF
Hz
mVA
nmF
kM
0
10
20
30
40
50
60 66
1. Safety Information
Warning
To reduce the risk of electrical shock, product damage
or personal injury, please follow the safety instructions
described in the user manual. read the user manual
before using the meter.
This instrument meets GB/T 13978-92 and
GB4793.1-1995 (IEC-61010-1,IEC-61010-2-032)
standards for safety requirements for electronic testing
instruments,pollution degree 2,And over voltage
rating of CAT III 1000V and CAT IV 600V.
Follow all safety instructions to ensure safe use of the
instrument.Proper use and protection of the meter will
ensure long life of the meter.
1.1 Preparation
1.1.1 When using the meter, follow the following
safety rules:
- Always take precaution to prevent electrical shock
- Never misuse the instrument
1.1.2 Check to see if the meter or any components were
damaged during shipment.
1.1.3 Check the meter and accessories thoroughly
before using.
1.1.4 Inspect test leads and probes for cracks, breaks or
crazes on the insulation before using the meter.
1.1.5 Use test leads provided with the unit.If necessary,
replace test leads with identical specifications.
01
1.2 Use
1.2.1 Turn the rotary switch to the required function and
range to be measured.
1.2.2 When using the CAT Ⅳ environment, if the
measuring voltage between terminals and earth
ground exceeds 600V, CAT III environments or
voltage measurement between the terminal and
the earth more than 1000V, do not measure voltage.
1.2.3 Always be careful when working with voltages above
60V DC or 30V AC RMS. Keep fingers behind the
probe barriers while measuring.Never touch probes
during measurement.
1.2.4 Choose the highest range when the value to be
measured is unknown.
1.2.5 Remove test leads before switching functions on
the rotary switch.
1.2.6 Do not perform resistance, capacitance, diode and
continuity measurements on powered circuits.
1.2.7 Never connect the test leads across a voltage
source while the rotary switch is in the resistance,
diode or continuity mode. Doing so can damage
the meter.
1.2.8 Power off the circuit and discharge capacitors
before testing capacitance.
1.2.9 Do not place the meter in any environment with
high pressure, high temperature, dust, explosive
gas or vapor.
1.2.10 Stop using the meter if any failure or abnormal
function is observed.
1.2.11 Do not use meter unless battery cover is in place
a secured.
1.2.12 Avoid direct sunlight, exposing batteries to
humidity, any strong magnetic field, or high
temperatures to ensure the extended life of the
meter.
02
1.3 Mark
Note (Important safety information. Refer to
the operation manual)
High Voltage
Compliance with requirements for double insulation
(Category II)
CAT III Refers to the impulse withstand voltage protection
level in accordance with IEC-61010-1 standard
overvoltage (installation)category III,pollution
degree 2.
CAT IV Refers to the impulse withstand voltage protection
level in accordance with IEC-61010-1 standard
overvoltage(installation)category IV,pollution
degree 2
Meter complies with European Community (EU)
standards
Complies with U.S. and Canadian safety standards.
Earth Ground
1.4 Maintenance
1.4.1 To avoid electric shock or personal injury, repairs
or servicing not covered in this manual should be
performed only by qualified personnel.
1.4.2 Remove test leads before opening battery cover
1.4.3 To avoid incorrect readings causing electric shock
or personal injury,when low battery symbol,“
”
appears, replace batteries immediately.
1.4.4 The meter can be cleaned with a soft cloth to
03
remove any oil, grease or grime. Do not use liquid
solvent or detergent.
1.4.5 When the instrument is not in use, turn rotary switch
to “OFF”
1.4.6 If the instrument is not to be used for an extended
period of time, remove the batteries to prevent
damage to the instrument.
2. Features and Components
- The MS8251B is a portable, hand-held yet professional
meter that features an LCD with backlight, overload
protection and low battery indicator. These meters are
easy to use with one hand, suitable for professional
users or amateurs, and ideal for school or home use.
- Functions include: AC/DC voltage, AC/DC current,
resistance, capacitance, continuity, diode test,
frequency and duty cycle.
- Auto and manual range.
- Auto power off.
- Max measurement.
- Min measurement.
- Relative measurement
- Reading Hold function.
- True RMS .
- Simultaneously display frequency during AC voltage/
current measurements.
- Non-contact voltage test .
2.1 Components
(1) Non-contact voltage detection indicator
(2) LCD screen
(3) Function buttons
(4) Rotary switch
(5) Input sockets
(6) Non-contact voltage sensor
04
2.2 Buttons and Symbols
6
MS8251B
REL MAX MIN
%
AUTO
CF
Hz
mVA
nmF
kM
0
1
kHz
10
20
30
40
50
2
60 66
3
4
HOLDbutton: hold current reading on screen.
FUNC button: switch between functions.
RANGE button: switch between auto/manual ranges.
REL button: relative reading
MAX/MIN button: switch between maximum/ minimum
readings.
b utton: turn on/off backlight.
EMP position: thermocouple temperature measurement.
LO-Z position: identify ghost voltages.
OFF position: turn off meter.
Temp V Hz%
jack:voltage, current, resistance,
capacitance, diode, continuity, frequency, duty cycle,
temperature input terminal.
COM jack: common input terminal.
µAmA jack: current measurements <600mA.
10A jack: current measurements >600mA to 10A.
2.3 LCD display
REL MAX MIN
%
AUTO
kHz
CF
Hz
mVA
nmF
kM
5
0
05
10
20
30
40
06
50
60 66
AUTO
MAX
MIN
%
Hz, kHz
mV, V
μA, mA, A
nF, μF, mF
Ω, kΩ, MΩ
REL
NCV
Alternating current
Direct current
Diode
Continuity
Autoranging mode
Maximum value
Minimum value
Auto power off
Low battery
Percentage (duty cycle)
Hertz, Kilohertz (frequency)
Millivolt, Volt (voltage)
Micro amp, Milliamp, Amp (current)
Nanofarad, Microfarad, Millifarad
(capacitance)
Ohm, Kilohm, Megaohm (resistance)
Relative value
Non-contact voltage detection
Data hold
07
3. Specifications
The Meter should be calibrated annually between
18°C~28°C and a relative humidity less than 75%.
3.1 General Specifications
3.1.1 Manual and auto range
3.1.2 Full range overload protection
3.1.3The maximum voltage allowed between the measuring
end and the earth:CAT IV measurement environment
for 600V DC or AC(RMS),CAT III measurement
environment for 1000VDC or AC(RMS).
3.1.4 Maximum working height: 2000m
3.1.5 Display:LCD
3.1.6 Maximum display value:6599
3.1.7 Polarity indication:“-” indicates negativepolarity
3.1.8 Overload indication:“0L” or “-0L”
3.1.9 Sampling frequency: 0.4s (digital display)/ 0.04s
(bar graph).For current readings, 1s (digital display)
/ 0.1s (bar graph)
3.1.10 Units display: functions and units
3.1.11 Auto power off: 30 minutes
3.1.12 Power supply: 9V 6F22 battery
3.1.13 Low battery indication: LCD displays“ ”
Temperature coefficient: less than 0.1x specified
accuracy/°C
Operating temperature:0°C ~40°C
3.1.16 Storage temperature:-10°C ~50°C
3.1.17 Dimensions:175×85×52mm
3.1.18 Weight:approx.420g(including battery)
08
3.2 Technical Specifications
3.2.3 DC Voltage
3.2.1 True RMS Characteristics
• For non-sinusoidal signal measurement, the Meter
provides more accurate measurement than the
traditional averaging method.
• If in AC current mode, the Meter may display a random
reading between 1 and 50 when the input is not active.
This will not affect the accuracy of measurement.
• True RMS requires a minimum input level, AC current
or voltage should be 2%~100% of the maximum level.
range
3.2.2 Dual Impedance Characteristics
• Normal impedance(10M) with normal testing capabilities.
• Low impedance Lo-Z (400kΩ) for testing where “ghost
voltage” may be present.Ghost voltage can occur when
power supply conductors and adjacent unused
conductors create a capacitive coupling between
conductors.If this possibility exists, or when testing for
the presence of voltage, use the Lo-Z mode to switch to
the low impedance setting to remove the ghost voltages
during measurement.
660mV
6.6V
66V
600V
1000V
Resolution
0.1mV
0.001V
0.01V
0.1V
1V
Accuracy
±(0.8% of reading + 3 digits)
±(0.5% of reading + 5 digits)
±(0.8% of reading + 3 digits)
- Input impedance: 10MΩ
- Overload protection: 660mV range: 250V DC or AC
(RMS),6.6V-1000V range: 1000V DC/AC (RMS)
- Maximum input voltage: 1000V DC
3.2.4 AC Voltage
3.2.4.1AC Voltage (A position)
range Resolution Accuracy
±(1.5% of reading
660mV 0.1mV
+ 5 digits)
6.6V
0.001V
±(1.2% of reading
+ 5 digits)
66V
0.01V
600V
0.1V
±(1.0% of reading
+ 3 digits)
1000V 1V
Frequency Range
40 ~ 60Hz
40 ~400Hz
40 ~ 400Hz
- Input impedance: 10MΩ
- Overload protection: 660mV range: 250V DC or AC
(RMS),6.6V-1000V range: 1000V DC/AC (RMS)
- Maximum input voltage: 1000V AC (RMS)
- Response : True RMS
09
10
3.2.4.2 AC Voltage Low Impedance(lo-Z)
range Resolution Accuracy
Frequency Range
±(1.5% of reading
660mV 0.1mV
40 ~ 60Hz
+ 5 digits)
0.001V
±(1.2% of reading
+ 5 digits)
66V
0.01V
±(1.2% of reading
+ 5 digits)
600V
1000V
0.1V
1V
±(1.0% of reading
+ 3 digits)
6.6V
40 ~400Hz
40 ~ 400Hz
- Input impedance: 400kΩ
- Overload protection: 660mV range: 250V DC or AC
(RMS),6.6V-1000V range: 1000V DC/AC (RMS)
- Maximum input voltage: 1000V AC (RMS)
- Response : True RMS
3.2.5 Resistance
range
Resolution Accuracy
660Ω
6.6kΩ
66kΩ
660kΩ
6.6MΩ
66MΩ
0.1Ω
0.001kΩ
0.01kΩ
0.1kΩ
0.001MΩ
0.1MΩ
±(0.8% of reading + 5 digits)
±(1.5% of reading + 5 digits)
- Open circuit voltage: approx. 1.0V
- Overload protection: 250V DC /AC (RMS)
11
3.2.6 Capacitance
range
6.6nF
66nF
660nF
6.6µF
66µF
660µF
6.6mF
66mF
Resolution
0.001nF
0.01nF
0.1nF
0.001µF
0.01µF
0.1µF
0.001mF
0.01mF
Accuracy
±(4.0% reading + 5 digits)
±(3.0% reading + 3 digits)
±(4.0% reading + 5 digits)
- Overload protection: 250V DC or AC (RMS)
3.2.7 Diode Test
range
Resolution Function
Shows approximate forward
0.001V
voltage of diode
- Forward DC current : approx. 1mA
- Revers DC voltage: approx. 3.2V
- Overload protection:250V DC/AC(rms)
3.2.8 Continuity
range
Resolution Function
0.1Ω
If measured resistance is
less than 50Ω, a buzzer will
sound
- Open circuit voltage: approx. 1.0V
- Overload protection:250V DC/AC(rms)
12
3.2.9 Frequency
3.2.9.1 Frequency (V position):
range
66Hz
660Hz
6.6kHz
10kHz
Resolution Accuracy
0.01Hz
0.1Hz
±(1.5% reading + 5 digits)
0.001kHz
0.01kHz
- Range : 10Hz~10kHz
- Input Voltage : > 0.2V AC (Input voltage should increase
along with the frequency)
3.2.9.2 Frequency (Hz position):
range
66Hz
660Hz
6.6kHz
66kHz
660kHz
6.6MHz
66MHz
Resolution Accuracy
0.01Hz
±(1.5% reading + 5 digits)
0.1Hz
0.001kHz
0.01Hz
±(1.5% reading + 5 digits)
0.1kHz
1kHz
10kHz
- Overload protection:250V DC/AC(rms)
- Input Voltage:3V peak to peak AC
3.2.9.3 Duty Cycle
range
1 - 99%
Resolution Accuracy
±2.0%
0.1%
13
3.2.10 DC Current
range
Resolution Accuracy
660 µ A
0.1µA
6600 µ A
1µA
±(1.0% reading + 5 digits)
10µA
66mA
100µA
660mA
±(2.0% reading + 5 digits)
10A
10mA
Overload protection:
µA and mA position : Fuse FF600mA/1000V,
A position : Fuse FF10A/1000V.
When the target current is larger than 5A, do not continue
measurement for more than 10 sec. Pause for 1 minute
after the measuring.
3.2.11 AC Current
range
Resolution Accuracy
0.1µA
660µA
6600µA
1µA
±(1.5% reading + 5 digits)
10µA
66mA
100µA
660mA
±(3.0% reading + 5 digits)
10A
10mA
Overload protection:
µA and mA grade: Fuse FF600mA/1000V,
A position : Fuse FF10A/1000V.
- Frequency range: 40 ~ 400Hz
- Response: True RMS
When the target current is larger than 5A, do not continue
measurement for more than 10 sec. Pause for 1 minute
after the measuring.
14
3.2.12 Temperature
Range
Input
Test Range Accuracy
Ambient Temp ±2 digits
±4 digits
0~1000°C 400°C
1000°C
±5 digits
Ambient Temp ±2 digits
±4 digits
32~1832°F 800°F
±20 digits
1800°F
±(1.0% of reading
+3 digits)
4. Using the Meter
4.1 Data Hold
4.1.1 During a measurement, press the “HOLD” button
once to hold the reading.
4.1.2 Press “HOLD” again to release the hold.
4.2 Manual Range
4.2.1 In voltage, current, resistance and capacitance
modes, the default range is “AUTO”
4.2.2 Press “RANGE” to enter manual ranging.Each
press switches to a higher range.Pressing the
button at the highest range will return to the lowest
range.
4.2.3 Hold “RANGE” to return to “AUTO”
4.2.4 Pressing “RANGE” in Max/Min mode will return the
meter to normal reading.
Note: Manual range is disabled in frequency mode.
4.3 Relative Measurement Mode Switch
4.3.1 Press “REL to enter relative measurement. This
will store the reading when pressed and display the
difference between current reading and the stored
reading.
15
4.3.2 Press “REL ” again to return to normal.
4.4 Maximum/Minimum Reading
4.4.1 Press “MAX/MIN” to display the maximum value
recorded
4.4.2 Press “MAX/MIN” again to display the minimum
value recorded.
4.4.3 Hold “MAX/MIN” to return to normal readings.
4.5 Function Switching
4.5.1 In voltage or current modes, press “FUNC” to
switch between AC and DC.
4.5.2 In resistance, diode or continuity modes, press
“FUNC” to switch between measurements.
4.5.3 In temperature mode, press “FUNC” to switch
between °C and °F.
4.6 Backlight
4.6.1 Press “
”to turn on backlight.Press again to turn off.
4.7 Automatic Power-off
4.7.1 The meter will power itself off after 30 min of non-use.
4.7.2 Press and button to resume using the meter.
4.7.3 To disable APO, hold “REL ”while turning on the
meter.
4.8 Non-Contact Voltage Detection (NCV)
4.8.1 With the rotary switch in any position except OFF,
hold down the “NCV” button.
4.8.2 Move the tip of the meter near the voltage source
or conductor.If the voltage detected is greater than
110VAC, the buzzer will beep and the NCV indicator
near the tip of the meter will flash.
16
Note:
1.Even though there is no indication,voltage may still
exist.Do not rely solely on NCV detector to determine
the presence of voltage in a wire.The measurement
may be affected by the design of the outlet,type of
insulation and other external factors.
2.The voltage sensing indicator may turn on when a
voltage is fed to the meter.
3.Other external interference(ex.Flashlight,motor)may
trigger the NCV sensor.
4.9 AC/DC Voltage
Voltage is the electrical potential difference between two
points in a circuit. AC polarity changes over time, where
DC polarity stays constant.
Measuring AC or DC voltage:
4.9.1 Move the rotary switch to the “V” position.
4.9.2 Connect the red test lead to the “V” jack and the
black test lead to the “COM” jack.
4.9.3 Connect the test leads to the voltage source or load.
4.9.4 The measured voltage will be displayed.For DC
voltage, polarity of the red test lead will be
indicated.
4.9.5 Press “FUNC” to switch between AC/DC voltage.
4.10 Resistance
4.10.1 Move the rotary switch to the Ω ” position.
4.10.2 Connect the red test lead to the “Ω” jack and the
black test lead to the “COM” jack.
4.10.3 Connect the test leads to the circuit.
4.10.4 Resistance value will be displayed.
17
4.11 Continuity
4.11.1 In resistance mode, press “FUNC” to switch to
continuity mode.
4.11.2 Connect the red test lead to the input jack and the
black test lead to the “COM” jack.
4.11.3 Connect the test leads to the circuit.
4.11.4 If the resistance of the circuit is less than 50Ω, a
buzzer will sound.
4.12 Diode
4.12.1 In continuity mode, press “FUNC” to switch to
diode mode.
4.12.2 Connect the red test lead to the input jack and the
black test lead to the “COM” jack.
4.12.3 Connect the red test lead to the anode (+) and the
black lead to the cathode (-) of the diode.
4.12.4 The meter will display the forward biased voltage
drop across the diode.
4.13 Capacitance
”position.
4.13.1 Move the rotary switch to the “
4.13.2 Connect the red test lead to the input jack and the
black test lead to the “COM” jack.
4.13.3 Connect the test leads to the circuit/capacitor.
4.13.4 Capacitance value will be displayed.
4.14 Frequency and Duty Cycle
4.14.1 Move the rotary switch to the “Hz%” position.
4.14.2 Connect the red test lead to the input jack and the
black test lead to the “COM” jack.
4.14.3 Connect the test leads to the circuit.
4.14.4 The measured frequency and duty cycle will be
displayed simultaneously.
18
4.15 Current
NCV
4.15.1 Remove power to the circuit and discharge all
capacitance.
4.15.2 Move the rotary switch to the appropriate position
(µA, mA or A).
4.15.3 Connect the black test lead to the “COM” jack.
If the current to be measured is <600mA, connect
the red test lead to the “µAmA” jack.If the current
to be measured is >600mA, connect the red test
lead to the “10A” jack.
4.15.4 Break the circuit.Connect the test leads across
the break, with the red lead to the higher voltage
side, and the black lead to the lower voltage side.
4.15.5 Power on the circuit and the current value will be
displayed.If “OL” appears on the display, it means
the current exceeds the selected mode.Move the
rotary switch to the next higher position.
5.2 Test Lead Replacement
5. Maintenance
Warning
Replace the test leads with identical or compatible
leads.lead spec:1000V 10A.
5.1 Replace Battery
Warning
To avoid electrical shock, damage or personal injury,
remove test leads before openning battery cover.
5.1.1 If the low battery symbol “
” appears, the battery
needs to be changed.
5 . 1 . 2 Unscrew the battery cover from the back of the
meter and remove the old battery.
5.1.3 Insert a new battery and replace the cover and
tighten it to the meter.
Note:
Be sure to note the battery polarity when replacing.
19
Replace test leads if leads become worn.
6. Accessories
1.Test Leads
2.Manual
3.Battery
4.multifunctional test socket
5.electromagnetic pendant
6.K-type temperature probe
20
9V 6F22
1 pair
1 pc
1 pc
1pc
1pc
1pc
21
00-05-3591