Transcript
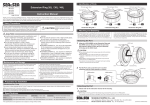
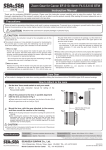
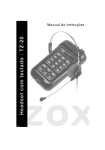
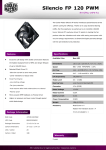
Nikon AF-S VR Micro-Nikkor ED 105mm F2.8G(IF) Focus Gear 31133 Instruction Manual 0809-Z-01A Mounting Thank you for purchasing SEA&SEA products. Please read this instruction manual carefully prior to using this product. Only with a thorough understanding of this manual’s content will you be able to use the product correctly. After reading the manual, please be sure to keep it in a place where you can easily come back to it at any time. Precautions Failure to heed the precautions listed below could result in serious consequences. To prevent injury damage to yourself and/or others, please observe the precautions as they contain highly important information related to personal and product safety. CAUTION Situations that could result in property damage or personal injury. CAUTION If it is still too loose, use the gear sheet which is included in the package. Cut the sheet into 3 to 6 pieces with scissors, and apply them between the grooves inside the gear. Carefully observe the instruction manual for the compatible lens for this product before use. This product includes an O-ring (divided into pieces) for interlocking the lens and the gear. In some cases, the interlocking may be too tight or loose when attaching focus gear A, due to deviation in the lens diameter. ①When too tight Remove the O-ring pieces from inside the gear and cut them shorter with scissors. Re-insert these pieces into the grooves inside the gear, providing ample space between the pieces. Adjust the length of the O-ring pieces for appropriate tightness. Do not force the lens into the gear when the interlocking is too tight, because this may result in damage to the lens. ②When too loose Replace the O-ring with the thicker O-ring that was also supplied with this product. If it becomes too tight with the thicker O-ring, adjust the interlocking tightness as explained above ①. The thicker O-ring may not be compatible with some lenses due to size restrictions. In this case, adjust the tightness by following the above procedure ① and using the gear sheet included in the package. Always make sure that the gear and the lens work properly after adjustment. SEA&SEA SUNPAK Co., Ltd. will not be responsible for the replacement or compensation for cameras, lenses or those accessories damaged due to your invalid operation. Use supplied screws to securely mount gears in order to prevent damage, dropping or loss. SEA&SEA SUNPAK Co., Ltd. assumes no liability for compensation of loss of captured images or expenses caused by loss of images, even if you are unable to shoot due to a product defect or malfunction. Focus Gear This product is designed for manual-focus operation utilizing the focus/zoom dial on SEA&SEA digital SLR camera housings. This product should be used in combination with the DX Macro Port Base (30105) + DX Macro Port 50 (30106). How to Attach to the Lens 1 Attach focus gear A (①) to the lens first, then attach focus gear B (②) in parallel alignment with the lens as shown in Fig.1. 2 ② ① Focus gear B Lens foreside Fig.1 Focus gear A Cutout part Screw 1 Attach the DX Macro Port Base (30105) + DX Macro Port 50 (30106) to the housing first. 2 Set the switches on the lens to the appropriate selections for your shooting condition. 3 Rotate the focus gear on the lens to align the yellow indicators to the gearwheel inside the housing. 4 The gearwheel can only be passed in between the yellow indicators. Carefully slide the camera forward into the housing, while avoiding contact with the focus gear. (Fig.4) Mount the lens, with the focus gear attached, to the camera . Please make sure the O-ring pieces inside the focus gear do not come out of the grooves when detaching the focus gear from the lens. Construction Corrosion-resistant aluminum alloy Dimensions(DIA×D) Approx. φ95×91mm / 3.8×3.6inch Weight Approx. 158g / 5.5oz Accessories Focus gear A・Focus gear B・Screws (3 pcs + 1 spare)・Screw driver・O-ring・ Gear sheet (stick-on) * The specifications and appearance are subject to change without notice. Gearwheel Housing inside (front case) Yellow indicator Focus gear (on the lens) Always make sure the focus gear and the gearwheel are properly engaged after mounting the camera to the housing. Port (DX Macro Port Base (30105) + DX Macro Port 50 (30106)) Removing 1 Rotate the focus/zoom dial on the housing to align the yellow indicators to the gearwheel. (Fig.4) 2 Carefully slide the camera toward you while avoiding contact with the focus gear. CAUTION Do not mount/remove the camera without aligning the yellow indicators and the gearwheel, because this may result in damage to the camera, housing, lens or focus gear. Refer to the each port instruction manual for installation. Fig.4 Focus/zoom dial For DX-D200・DX-D50・DX-D70・DX-S5Pro Housings CAUTION Those four housing have different mounting procedure. Attach the DX Macro Port Base (30105) + DX Macro Port 50 (30106) to the housing at the last. Housing inside (front case) Gearwheel Mounting 1 Set the switches on the lens to the appropriate selections for your shooting condition. Port (DX Macro Port Base (30105) + DX Macro Port 50 (30106)) 2 Rotate the focus gear on the lens to align the yellow indicators to the gearwheel inside the housing. Yellow indicator 3 The gearwheel can only be passed in between the yellow indicators. Carefully slide the camera forward into the housing, while avoiding contact with the focus gear. (Fig.5.①) 4 Attach the DX Macro Port Base (30105) + DX Macro Port 50 (30106) to the housing. (Fig.5.②) Focus gear (on the lens) ② Always make sure the focus gear and the gearwheel are properly engaged after mounting the camera to the housing. Fig.3 CAUTION Fig.2 Specifications Screw Always make sure that the lens with the focus gear works properly after attaching the lens to the camera. Approx. 12mm Push down on focus gear A until it comes to a stop. Set focus gear A to a position that is approx. 12mm from the lens tip as shown in Fig.2. 3 Align the cutout parts on focus gears A & B, and firmly attach both gears with 3 screws (included in the package) using the supplied screw driver as shown in Fig.3. Mounting / Removing the Camera to / from the Housing Removing 1 2 Remove the Port from the housing first. 3 Carefully slide the camera toward you while avoiding contact with the focus gear. Rotate the focus/zoom dial on the housing to align the yellow indicators to the gearwheel. ① Housing (DX-D200・DX-D50・ DX-D70・DX-S5Pro) CAUTION Do not mount/remove the camera without aligning the yello s and the gearwheel, because this may result in damage to the camera, housing, lens or focus gear. Refer to the each port instruction manual for installation. Camera Fig.5 SEA&SEA SUNPAK Co., Ltd. 3-2-20, Saiwai-cho, Kawaguchi-shi, Saitama, Japan 332-0016 TEL. +81-48-256-2251 http://www.seaandsea.jp World Customer Service Center TEL. +81-48-255-8512 (Current as of May.2012)