1
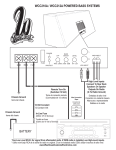
INSTRUCTIONS FOR FUNCTIONS AND CONTROLS
ELECTRICAL CONNECTION
12 SPEAKER
8
1
2
3
7
6
5
4
Speaker connecting terminals.
9
13 +12V
Anode of power connection terminals. Connect to the anode of car battery.
10
13
12
11
REM
Terminal to be connected with Remote cable, which comes from the source and which
controls the amplifier switching on. Applied voltage must be between 10 and 15 V DC.
GND
Ground terminal. Connect to the car chassis. Keep the length of the ground cable
to a minimum.
GND REM +12V
Connect to +12V of battery with
appropriate FUSE value.
1
Low Level Output
A daisy chain output For connection to another amplifier with a low level input using only a
single RCA output from the source(head unit).
Low Level Input
For connection to any source(head unit)with a low level output This is your RCA output
from the source(head unit).
Model:RAPTOR II
2
HIGH INPUT
3
GAIN Knob for volume adjustment.
4
X-OVER
Optional switches for high pass filter(HPF)/full pass filter(FLAT)/low pass filter(LPF).
5
HPF High pass frequency adjusting knob,the frequency ranges from 45Hz to 300Hz.
6
LPF Low pass frequency adjusting knob,the frequency ranges from 45Hz to 300Hz.
7
BASS BOOST Optional switches for 0dB / +6dB / +12dB.
8
INDICATOR LIGHT
When this LED sends out green light, it means that this amplifier have being working now.
When this LED sends out red light, it means that the self-protection of the amplifier.
9
REMOTE CONTROLLER OUTLET
To be connected with the remote controller, which helps to boost the gain.
Pls turn the knob of volume to be maximum before using the remote.
High level input terminals.
10
REMOTE CONTROLLER volume level knob ,the Gain ranges from 0.2 V to +6V.
11
FUSE
Standard automatic fuse, you must use the same power fuse if you need to change it.
Connect to remote
turn-on lead of
source unit.
Connect to chassis
ground of vehicle*
SPECIFICATIONS
Model
RMS [email protected] DC
Max Power
Power @ 4 Ohm
Power @ 2 Ohm
Bridged Power @ 4 Ohm
Min. Speaker Impedance
THD Distortion
Frequency Response
Input Sensitivity
Input Impedance
Signal-to-Noise Ratio
Channel Separation
Remote gain Control
Crossover Network
Low Pass Filter
Bass Boost
High Pass Filter
Fuse Rating
Size L x W x H
RAPTOR II
1200W
2x 130W
2x 235W
1x 390 W
2 Ohm
0.08%
20Hz~20KHz
0.2V~6V
10K
90 dB
50 dB
0.2V~+6V
45Hz~300Hz
0dB~+12dB
45Hz~300Hz
15A x 2
325x240x60mm
~1~
~2~
www.caosunlimited.com
www.caosunlimited.com
SYSTEM WIRING
2 CHANNEL STEREO
STEREOCONFIGURATION
CONFIGURATION
SYSTEM WIRING
BRIDGED MODE CONFIGURATION
CONFIGURATION
TROUBLESHOOTING
Before removing your amplifier ,refer to the list below and follow the
suggested procedures. Always test the speakers and their wires first.
AMPLIFIER WILL NOT POWER UP.
Check for good ground connection.
Check that remote DC terminal has at least 10V DC.
Check that there is battery power on the + terminal.
Check all FUSES.
Check that Protection LED is not lit. If it is lit, shut off amplifier briefly and then
repower it.
HIGH HISS OR ENGINE NOISE(ALTERNATOR WHINE) IN SPEAKERS.
Disconnect all RCA inputs to the amplifier , if hiss/ noise disappears , then
plug in the component driving the amplifier and unplug its inputs . If hiss/
noise disappears, go on until the faulty/noisy component is found.
It is best to set the amplifier input level as insensitive as possible. The best
subjective S/N ratio is obtainable this way . Try to drive as high a signal level
from the head unit as possible.
Connect to remote
turn-on lead of
source unit.
Connect to remote
turn-on lead of
source unit.
PROTECTION LED COMES ON WHEN THE AMPLIFIER IS POWERED UP.
Check for shorts on speaker leads.
Check that volume control on the head unit is turned down low.
Remove speaker leads ,and reset the amplifier. If the Protection LED still comes on ,
then the amplifier is faulty.
The amplifier will shut down automatically when the units ` temperature goes up to 85 ℃
This will protect the units from damage.
AMPLIFIER`S GETS VERY HOT.
Check that the minimum speaker impedance for that model is correct.
Check for speaker shorts.
Check that there is good airflow around the amplifier . In some applications,
an external cooling fan may be required.
DISTORTED SOUND.
Check that the Level control`s is set to match the signal level of the head unit.
Check that all crossover frequencies have been properly set .
Check for shorts on the speaker leads.
HIGH SQUEAL NOISE FROM SPEAKERS.
This is always caused by a poorly grounded RCA patch cord.
WARNING!
Connect to chassis
ground of vehicle*
SPEAKER IMPEDANCE 2~ 4 Ohm
Connect to chassis
ground of vehicle*
SPEAKER IMPEDANCE 4~8 Ohm
1.
2.
3.
4.
5.
6.
Over high volume will damage your speakers.
Be cautious when you use the amplifier near gasoline tank and electric wires.
Protect the connecting wires and parts to avoid any damage or short circuit.
The power must belee from the anode of the battery via FUSE.
The sound system must be in turning-off situation when you check the amplifier.
Be sure that you use the same type of FUSE when you need to replace it .
*
We reserve the right to make needed change or improvement to the product,
without informing customer about this in advance.
Made in China
~3~
~4~
~5~
www.caosunlimited.com
www.caosunlimited.com
www.caosunlimited.com