1
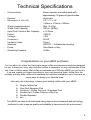
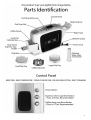
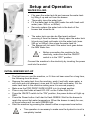
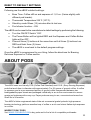
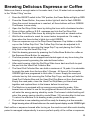
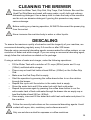
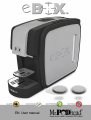
1 IMPORTANT SAFEGUARDS When using electrical appliances, basic safety precautions should always be followed, including the following: Read all instructions before using the eBOX brewer. Do not touch hot surfaces. To protect against fire, electric shock, and injury to person do not immerse cord, plug or body of the eBOX brewer in water or any other liquid. Close supervision is necessary when the brewer is used by or near children. The brewer cannot be used by persons with reduced physical, sensory or mental capabilities, or lack of experience and knowledge unless they are supervised or have been given proper instruction concerning the use of the brewer and they understand the risks involved in their safety. Children should not play with the appliance. Do not operate the brewer when unattended. Place the brewer on a flat, even, stable, heat-resistant surface, strong enough to bear its weight. Make sure there is enough space around the machine for proper ventilation. Keep brewer at least 4 inches away from walls or other objects during operation. Do not place the brewer on or near a hot gas or electric burner, or in a heated oven. Do not place the machine on top of, or close to, additional oven or other equipment that generates heat (for instance, radiators etc.) Do not place or use the machine near curtains or other flammable material and do not place anything on top of it during use. Unplug from outlet when not in use for extended periods of time and before cleaning. Allow to cool before putting on or taking off parts, and before cleaning the brewer. Do not move the machine while it is working. Do not attempt to move the brewer if it contains hot liquids. Allow brewer to cool completely before moving. Keep the power cord away from the hot parts of the machine. Do not operate the brewer with a damaged cord or plug, or after the brewer malfunctions or has been damaged in any manner. Return the brewer to an authorized service facility for examination, repair or adjustment. While in operation, the power plug must always be easily accessible in case the machine has to be disconnected. The use of any accessory not recommended for this brewer by the eBOX manufacturer may result in injury and is not authorized. Do not use outdoors or when standing in a damp or wet area. Do not let power cord hang over edge of table or counter, or touch hot surfaces. Keep the power cord out of the reach of children. To disconnect, press the “off” switch, then remove plug from wall outlet. Always turn the brewer off and unplug the power plug before cleaning the machine and before doing any kind of work on it. Do not use brewer for purposes other than its intended use. WARNING: Do not remove side panels of brewer. No user serviceable parts inside. Repair must be done by authorized personnel only. 2 SAVE THESE INSTRUCTIONS Before using, check that the mechanical components and the other parts of the machine are intact. The body of the machine, the water tank lid, the water tank, pod box, base and trays should not be broken or cracked. The sheath and plug of the power cord should not be cracked or broken. If this should occur, disconnect the plug immediately and take the machine to an authorized service facility for checking. Make sure the machine is turned off before plugging it into the socket. Before plugging in the machine, make sure that the electric power supply is the same as that of the machine. A short power-supply cord is used to reduce the risks resulting from becoming entangled in or tripping over a longer cord. If an extension cord is used, the marked electrical rating of the extension cord should be at least as great as the electrical rating of the brewer, and the cord should be arranged so that it will not hang over the edge of the table or counter where it can be pulled on by children or tripped over. The extension cord must be of the 3-pronged, 3-socketed, grounding-type, 3-wire cord, (including grounding conductor). Before using the machine, remove all protective films from the outside parts of its body. Use water only in this appliance! The first time the machine is used, there might be some smell caused by the insulating materials and the heating elements. This inconvenience disappears after a few uses. WARNING: El fabricante no se hace responsable debido a cualquier daño causado por: Improper use or use with any other purpose different than the indicated; Repairs carried out by persons other than a service facility duly authorized; Transportation or displacement of the machine by the power cord; Use of parts or components different from those provided by the manufacturer; Use of pods not allowed. Do not leave the brewer without water in the tank. Do not leave or store the brewer in rooms where the temperature is 32°F (0°C) or lower. The brewer that has already been used may be stored in a frost-free area once the water tank is emptied and dried before storing. If you are planning not to use the brewer for an extended period unplug the brewer and empty all of the water from the water tank, 3 UNPACKING AND PLACEMENT Place box on a large steady surface. Remove literature and top insert. Lift brewer out of box. Remove the machine from its package, place brewer upright on a flat surface and remove packing materials. Check that all the parts are included and are not broken. Packing materials (cardboard, cellophane, metal staples etc.) could cut or cause injury if not handled carefully or if used incorrectly; keep them out of the reach of children or unskilled persons. USER SAFETY All users of this brewer must read and understand this User’s Manual before operating or cleaning this brewer. The cord to this brewer should be plugged into a 120V AC electrical outlet only. Do not touch the hot parts immediately after using the machine. While dispensing the drink, beware of possible splashes of hot liquid. Do not slide the pod drop lever open while brewing. To avoid cup overflow, empty cup before each brew cycle. Always use a cup that is larger than the brew volume selected. Use cold water only. Do not place torn pods or use ground coffee in pod drop slot. This brewer generates heat and escaping steam during use. Use proper precautions to prevent the risk of burns, fires, or other injury to persons or damage to property. If the brewer begins to malfunction during use, immediately unplug the cord. Do not attempt to repair the malfunctioning brewer. If the brewer falls or accidentally becomes immersed in water or any other liquid, unplug immediately. Do not reach into the water! Do not use this brewer after it has fallen into or has become immersed in water. Contact Customer Service for examination and repair. In any case above, the limited warranty is not valid. Improper installation could result in permanent damage and void the limited warranty. 4 Before using the machine, we advise you to read this user manual carefully in order to make the most of the machine’s functions and avoid any problems that might arise from improper or non-compliant use. The machine is designed for making espresso and coffee, exclusively for household and small office use. It must not be used for other purposes and must not be altered or tampered with for any reason. Use for any other purpose is considered improper and therefore dangerous. Features: User Friendly and Elegant Countertop Single-Serve Coffee Machine Brews Standard 44mm Paper Filter E.S.E. Espresso Pods and Regular 44mm CPS (Coffee Pod Standard) Coffee Pods Automatically Discharges Eco-Friendly Pods into a Pod Collector Box that Holds Up to 14 Used Coffee or Espresso Pods Powerful Yet Ultra Quiet Italian Made Ulka 20 Bar Pump Easy Vertical Pod-Drop Feature Programmable Up to 15 Minutes Automatic Stand-By Accommodates Many Cup Sizes 3 Second Pre-Infusion Pod Feature for Optimum Coffee Extraction Adjustable Water Heater Thermostat from 214°F (101°C) to 235°F (113°C) Water Tank Filter Attachment Option (Water Filter Sold Separately) 29 fl. oz. (850ml) Pour-Over or Removable Water Tank Water Tank Capacity for 29 Espressos @ 1 fl.oz. (30ml), or approx. 6 Cups of Coffee @ 5 fl.oz. (150ml) or 4 Cups of Coffee @ 7 fl.oz. (210ml) Two Programmable Brew Buttons, from15-120 Seconds Removable Drip Trays for Easy Cleaning ABS Food Grade Plastic Casing State-of-the-Art Commercial Grade Hydraulic Brewing Technology Compact Italian Design to Easily Fit on Any Counter Top Dimensions: 5.50”W x10.75”H x14”D - (140mm x 275mm x 360mm) Net Weight - 8 lbs. (3.6 Kg) - Gross Weight - 11 lbs. (5 Kg) 2 Year Limited Warranty and Service at the Date of Purchase eBOX Benefits... Brews Coffee Grounds Encased in a Paper Filter and NOT a Toxic Plastic Container Uses Eco-friendly Coffee and Espresso Pods that Do Not Harm Our Environment No Plastic Tasting Coffee Widespread Availability of a Large Variety of E.S.E. Espresso Pods for Your Personal Taste Welcomes all CPS (Coffee Pod Standard) Coffee Roaster’s Pod Brands for Unlimited Coffee Choices Paper Filter Coffee and Espresso Pods Cost Less Great Investment for Enjoying Your Many Future Coffee and Espresso Brewing Experiences 5 Technical Specifications - Consumables: - Ejection: Dimension (L x H x D): - Weight (approximately): Water Tank Capacity: Used Pod Collector Box Capacity: Power: Voltage: Frequency: Insulation class: Switches: Pump Operating Pressure 44mm espresso and coffee pods with approximately 7-8 grams of ground coffee Automatic 5.5” x 11”x 14” 140mm x 275mm x 360mm 8lbs. (3,6 Kg) 29fl.oz. (850ml) ± 14 Pods 1200 W 120V 60 HZ Class I ON/OFF – Coffee/water brewing Ulka-Made in Italy 20 Bar Congratulations on your eBOX purchase! You are about to unbox the first single-serve coffee and espresso machine designed for you to brew your very own delicious coffee or espresso, or any combination of the two, from a 44mm paper filter coffee or espresso pod. With the eBOX you get to mix it up and create your brew according to your own personal taste. Aside from the multiple industry-wide coffee and espresso pod options available to you, there are so many ways to design your favorite brew. Here are just a few ways to brew great tasting coffee with your eBOX…. Single Coffee Pod One Shot Espresso Pod Combine 1 Coffee Pod and 1 Espresso Pod Double Up! 2 Coffee Pods for a Big Cup Double Espresso etc….. The eBOX has been built and tested using state-of-the-art research and technology methods in order to assure quality and reliability in harmony with the environment. 6 7 Setup and Operation WATER FILLING Flip open the water tank lid and remove the water tank by lifting it up and out from the brewer. Thoroughly rinse the water tank. Fill the water tank to the MAX water line with fresh cold water (max. 29fl.oz. or 850ml). Securely replace the water tank in the back of the brewer and close the lid. The water tank can also be filled easily without removing it from the brewer. Simply open the water tank lid and pour fresh cold water into the water tank (max. 29fl.oz. or 850ml), then close the water tank lid. The Brewer will not work if the water level goes below the MIN Water line. Before connecting the machine to the electricity, make sure that the ON/OFF switch is in the “OFF” position. Connect the machine to the electricity by inserting the power cord into the socket. INITIAL BREWER SET-UP The first time you use the machine, or if it has not been used for a long time, the following must be done: Remove the water tank from the machine, wash it well with warm water, a soft cloth and mild detergent, rinse and fill it with fresh cold water. Put the water tank back in the machine making sure it is secured properly. Make sure the POD DROP SLIDE LEVER is in its closed position. Place a cup that holds at least 8 FL.OZ. on the Coffee Drip Grid. Press the ON/OFF switch to the “ON” position; the power button will light up RED. Press the Power button it will start to flash GREEN. Wait for the brewer to reach the correct hot water temperature. When the brewer is ready for use, all three buttons will turn solid GREEN light. Start the machine by pressing the chosen coffee or espresso brew button. This operation is necessary to make sure the hydraulic circuit is completely loaded. 8 Programming the Machine SET THE BREW TIME The Coffee Brew Button and the Espresso Brew Button can be programed to your taste by adjusting the time it brews from 15-120 seconds. Press and hold either Coffee or Espresso Brew Button until the machine starts to brew then release the button. When the desired amount of coffee or espresso is in your cup, stop the brewing process by pressing the button again. The next time you brew a coffee or espresso, simply press and release the desired brew button quickly and the eBOX will remember how long you programmed the button to brew your coffee or espresso. The programmable buttons can be adjusted at any time. * The grind for different coffee and espresso pod manufacturers may vary slightly and the water may brew slower or faster through different pod brands. You may want to reprogram the brew time as needed. SET THE BREW TEMPERATURE The brewer’s water heater thermostat can be programmed from 214˚F (101˚C) to 235˚F (113˚C) to adjust the coffee and espresso brew temperature. The brewer’s thermostat is factory set at 225˚F (107˚C) and can be adjusted 10.8˚F (6˚C) hotter or 10.8˚F (6˚C) cooler by performing the following: Turn the ON/OFF Switch “ON” and the Power Button will light up RED. Press the Power Button and the Espresso Brew Button simultaneously until the RED light turns off. To adjust the brewer to make hotter coffee and espresso, press the Coffee Brew Button up to three times. Each time the Coffee Brew Button is pressed the brewer’s thermostat will be raised by 3.6˚F (2˚C). To adjust the brewer to make cooler coffee and espresso, press the Espresso Brew Button up to three times. Each time the Espresso Brew Button is pressed the brewer’s thermostat will be lowered by 3.6˚F (2˚C). To return the machine to its brewing mode, press the power button. 9 SET THE STAND-BY MODE The Machine is equipped with an energy saving stand-by mode. If the brewer has not been in use for the programed amount of time, the brewer will enter the energy saving stand-by mode. The brewer’s default setting will enter this energy saving stand-by mode fifteen (15) minutes after its last use. The brewer’s Stand-By Mode can be programmed so that the brewer will turn off after 5, 10 or 15 minutes. Turn the ON/OFF Switch “ON” and the Power Button will light up RED. Press the Espresso Brew Button and the Coffee Brew Button simultaneously for 5 seconds to get into the stand-by mode option. The RED Power Button will turn OFF and the Coffee and Espresso Buttons will blink GREEN 1, 2 or 3 times (depending on the stand-by time setting). To reduce the stand-by time by 5 minutes, press the Espresso Brew Button. To increase the stand-by time by 5 minutes, press the Coffee Brew Button. Each time you press either the Espresso Brew Button or the Coffee Brew Button, both GREEN lights will blink. One blink means 5 minute stand-by time, two blinks means 10 minute stand-by time and three blinks means 15 minute stand-by time. To return the machine to its brewing mode, press the power button. SET THE PRE-INFUSION OPTION Pre-Infusion is a feature which involves pre-wetting the coffee or espresso pod before beginning the actual brewing process. Pre-Infusion is accomplished by the machine’s pump sending water through the pod for three seconds, followed by a brief pause, after which the pump again activates and completes the brewing process. The brewer’s pre-infusion option can be turned on or off by performing the following: Turn the ON/OFF Switch “ON” and the Power Button will light up RED. Press the Power Button and the Coffee Brew Button simultaneously for 5 seconds or until the RED light turns OFF to enter the Pre-Infusion Option Mode. Press the Espresso Brew Button and its GREEN light will blink 3 timesPre-Infusion function is OFF. Press the Coffee Brew Button and its GREEN light will blink 3 timesPre-Infusion function is ON. To return the machine to its brewing mode, press the power button. 10 RESET TO DEFAULT SETTINGS Following are the eBOX’s default settings: Brew Time- Coffee ±6fl.oz and espresso ±1 ½ fl.oz. (Varies slightly with different pod brands). Thermostat Temperature 225˚F (107˚C). Stand-by mode fifteen (15) minutes after its last use. Pre-Infusion function – ON. The eBOX can be reset to the manufacturer’s default settings by performing the following: Turn the ON/OFF Switch “ON”. The Power Button will be lighted RED and the Espresso and Coffee Button lights will be OFF. Press all three (3) buttons at the same time until all three (3) buttons turn RED and flash three (3) times. The eBOX is now back to the default program settings. Once the eBOX is programmed to your liking, follow the directions for Brewing Delicious Espresso or Coffee section. ABOUT PODS The eBOX uses eco-friendly CPS (Coffee Pod Standard) and E.S.E. (Easy Serving Espresso) pods that are 44mm in diameter with approximately 7 to 8½ grams of ground coffee. A coffee or espresso pod is a pre-measured portion of ground coffee compressed between two biodegradable paper sheets and packaged individually in an air-free environment to assure maximum freshness with every cup. Paper pods are easy to use, convenient and mess free. Shelf life is 24 months. The eBOX’s Italian engineered state-of-the-art commercial grade hydraulic high-pressure brewing technology yields an excellent cup of coffee or a rich and robust Italian style espresso in no time. WHERE TO BUY PODS Visit WWW.PODHEAD.COM to buy pods and to find a list of compatible pod brands. 11 Easy Espresso or Coffee Brewing Guide 12 Brewing Delicious Espresso or Coffee Make sure there is enough water in the water tank; if not, fill water tank as explained in the “Water Filling” section. Press the ON/OFF switch to the “ON” position; the Power Button will light up RED. Press the Power Button, the power button light will start to flash GREEN. Once the correct temperature is reached, all three buttons will turn GREEN. The Brewer is now ready. Open the Pod Drop Slide Lever by sliding the lever with a backward motion. Drop a 44mm coffee or E.S.E. espresso pod into the Pod Drop Slot. Close the Pod Drop Slide Lever by sliding the lever with an inward motion. Wait for the machine to reach its correct water temperature. It’s ready to brew when the three button’s lights turn solid GREEN. Place an espresso cup on the Drop-Down Espresso Cup Holder or coffee cup on the Coffee Drip Grid. The Coffee Drip Grid can be adjusted to fit larger cup sizes by removing the Large Drip Tray and placing the Coffee Drip Grid on top the Small Drip Tray. Start the brewing process by pressing the Coffee Brew Button for coffee or the Espresso Brew Button for espresso. The brew process can be stopped and started again at any time during the brewing process by pressing the selected brew button. After each brewing, slide the Pod Drop Slide Lever back and forth to eject the pod into the Used Pod Collector Box. The Used Pod Collector Box can hold a maximum of 14 pods. It is advisable to empty the pods from the box after 14 brews. All three of the brewer’s GREEN lights are programed to blink after 14 uses. Empty the used pod collector box by first removing the Coffee Drip Trays, and then pull both the Used Pod Collector Box and the Used Pod Drip Base out from the brewer. Empty the used pods, clean the Used Pod Drip Base, put them back together and replace them in the brewer before its next use. The Machine is equipped with an energy saving stand-by mode. If the brewer has not been in use for the programed amount of time, the brewer will enter the energy saving stand-by mode. The brewer’s default setting will enter this energy saving stand-by mode fifteen (15) minutes after its last use. To return the machine to its brewing mode, press the power button. The machine is now reheating and will be ready for brewing in a few seconds. Begin brewing when all three buttons on the control panel display a solid GREEN light. Each coffee or espresso brewed after turning on the machine and after each standby period is managed independently to ensure perfect quality of the coffee or espresso. 13 CLEANING THE BREWER Remove the Water Tank, Drip Grid, Drip Trays, Pod Collector Box and the Used Pod Drip Base and wash with warm water, a soft cloth and ordinary dishwashing detergent. Use a damp cloth to clean the body of the machine and do not use abrasive detergent. Ignoring this procedure may cause serious damage. Before making any cleaning operation, ALWAYS disconnect the power plug from the socket. Never immerse the machine body in water or other liquids. DESCALING To assure the maximum quality of extraction and the longevity of your machine, we recommend descaling regularly every 3-6 months or after 200 brews. Descale using commercial descaling agents recommended for coffee makers, or use a solution of water and white vinegar. If you are using a commercial descaling agent, simply follow the instructions as stated on the package. If using a solution of water and vinegar, make the following operations: o o o o o o o o Fill the Water Tank with a solution of 2¼ cups (530ml) water and ¾ cup (180ml) undiluted white vinegar. Place a cup or bowl that holds at least 28fl.oz. (830ml) on the Coffee Drip Grid. Make sure the Pod Drop Slot is empty. Start the operation by pressing the coffee brew button to run the solution through the brewer. Repeat this cycle until the solution in the water tank is empty. Rinse the water tank and fill the water tank with fresh cold water. Repeat the process again by pressing the coffee brew button to run the entire water tank of fresh cold water through the brewer into an empty cup or bowl that holds at least 28 fl.oz. (830ml). Once empty, rinse and fill the water tank with fresh cold water and place it in the machine. Follow the security instructions on the commercial descaling agents. Avoid contact with eyes, skin, machinery and surfaces around it. Only use solutions suited for espresso or coffee machines. 14 TROUBLESHOOTING If the machine is not working properly make the simple checks set out below: PROBLEM POSSIBLE CAUSE POSSIBLE SOLUTION Machine does not start. Not properly plugged into the power socket. Make sure it is properly plugged in. The coffee is too cold. The machine is not ready. Wait until the temperature is reached, indicated by all three buttons lit with a solid GREEN light. Coffee will not brew. Not enough water in the tank OR Used Pod Collector Drawer is full. Make sure that there is enough water in the tank OR empty the Used Pod Collector Drawer. Coffee is brewing too slowly. Coffee in the pod is ground too finely. Adjust the brewing time or press the brew button again to continue brewing. Pod is stuck in the Pod Drop Slot. Pod was not ejected after last use OR the Used Pod Collector Drawer is full. Eject Pod after each use. Empty the Used Pod Collector Drawer. If pod is stuck, use tweezers to pull the pod out from the top. Pod Drop Slide Lever does not shut The coffee or espresso pod is the incorrect size, the previous used pod is still in the Drop Slot OR the Used Pod Collector Drawer is full. Use only 44mm coffee and espresso pods, clear the Drop Slot OR empty the Used Pod Collector Drawer. Water is appearing on the counter around the base of the brewer. The Coffee Cup Drip Tray or the Tray under the Used Pod Collector Drawer needs to be emptied and cleaned. Empty the liquid contents collected in the Coffee Cup Drip Tray or the Tray under the Used Pod Collector Drawer. If the problem is not listed or if it persists, even if you follow the advice given, visit www.podhead.com for technical support or contact customer service. 15 REPLACEMENT PARTS All removable parts can be ordered by contacting customer service at www.podhead.com Do not throw away the brewer with the normal household waste at the end of its life, but hand it in at an official collection point for recycling. By doing so, you help to preserve the environment. LIMITED WARRANTY Warranty Coverage: This product is warranted to be free from defects in materials or workmanship under normal use for a period of (2) years from the original purchase date. This product warranty is extended only to the original consumer purchaser of the product and is not transferable. For a period of two (2) years from the date of original purchase of the product, our Repair Center will, at its option, either (1) repair the product or (2) replace the product with a reconditioned comparable model. These remedies are the purchaser’s exclusive remedies under this warranty. Warranty Service: To Obtain warranty service, you must call our warranty service number at (401) 789-7993 for return instructions on how to deliver the product, in either the original packaging or packaging affording an equal degree of protection to the Repair Center specified below. You must enclose a copy of your sales receipt or other proof of purchase to demonstrate eligibility for warranty coverage. To return the appliance, ship to: Mr. PODhead Attn: Repair Center P.O.BOX 5477 Wakefield, RI 02880 To contact us, please email us at [email protected] What is not covered: This warranty does not cover damage resulting from misuse, accident, commercial use, improper service or any other damage caused by anything other than defects in material or workmanship during ordinary consumer use. This warranty is invalid if the serial number has been altered or removed from the product. This warranty is only valid in the United States and Canada. 16 LIMITATION ON DAMAGES: THERE SHALL BE NO LIABILITY FOR ANY INCIDENTAL OR CONSEQUENTIAL DAMAGES FOR BREACH OF ANY EXPRESS OR IMPLIED WARRANTY OR CONDITION ON THIS PRODUCT. DURATION IF IMPLIED WARRANTIES: EXCEPT TO THE EXTENT PROHIBITED BY APPLICABLE LAW, ALL IMPLIED WARRANTIES AND CONDITIONS, INCLUDING, WITHOUT LIMITATION, IMPLIED WARRANTIES AND CONDITIONS OF MERCHANTABILITY AND FITNESS FOR A PARTICULAR PURPOSE OR USE ON THIS PRODUCT ARE LIMITED IN DURATION TO THE DURATION OF THIS WARRANTY. Some jurisdictions do not allow the exclusion or limitation of incidental or consequential damages, or allow limitations on how long an implied warranty lasts, so the above limitations or exclusions may not apply to you. This warranty gives you specific legal rights and you may have other rights under the laws of your jurisdiction. AUTHORIZED SERVICE For Service Information Contact: Mr.Podhead 1-401-789-7993 SERVICE CENTER LOCATION Mr. PODhead Attn: Repair Center P.O.BOX 5477 Wakefield, RI 02880 RECORD MODEL & SERIAL NUMBER In order to receive accurate and timely warranty assistance, it is important to record the Model and Serial Number information located on the bottom of the brewer. Model:________________________________ Serial Number:_________________________ Record these numbers from the bottom of the brewer, before filling the brewer with water. 17