Transcript
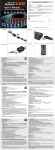
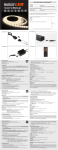
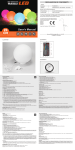
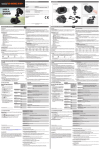
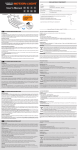
RGB Flexkit
LED
DECLARATION OF CONFORMITY
Hereby,
User’s Manual
5 METER - 300 LED - ADVANCED REMOTE
GB
NL
F
DK
D
pl
Quintezz RGB Flexkit 150-300 LED set (2,5-5mt)
Flexible LED strip
The above mentioned product complies with the essential requirements, which are
specified in the directive 2004/108/EC and 2006/95/EC on the approximation of the laws on
the Member States relating to electromagnetic compatibility.
e
This product has been tested against following
standards and specifications, applying versions
valid on November 2012:
EN55015
EN61547
EN61000
EN61347
Joseph Van Oosterum, CEO TE-Group NV, November 2012
---------------------------- Manual/RGB Flexkit 300-44/11-12/V01 ----------------------illustration 3
ILLUSTRATION 1
12V+
G
R
B
2
illustration 4
illustration 2
1
3
4
5
4
6
13
7
8
9
12 11 10
PACKAGE CONTENTS
The Quintezz RGB Flexkit consists of:
* Flexible LED strip with 3M industrial tape on the backside
* RGB LED controller
* RGB Infrared advanced remote control
* 230V DC adapter
GB
INSTALLATION
1. Place the strip on a clean, even, dry and not porous surface. Do not fold the strip! Remove the
coating paper of the tape on the backside of the strip and stick the strip in the desired location.
Note: If needed, the strip can be shortened every 3 LED’s / 5 cm, starting at the end of the strip.
2. See illustration 1
Connect the RGB LED controller wire with the strip.
Attention: The 12V connection of the strip (see 12V+ indication on the strip) and the arrow on
the plug of the RGB controller should be pointing towards each other!
Note: The controller can be fixed using tape or screws (not included!).
3. See illustration 2
Connect the other side of the RGB controller with the adapter connection.
4. See illustration 3
Connect the adapter with the power supply cable.
DESCRIPTION OF THE REMOTE CONTROL
See illustration 4
1. ON/OFF: Turn the strip ON/OFF
2. Play/Pause: Play/Pause the chosen light effect
3. DIM-buttons: Brighten or darken the chosen color
4. Main colors: Red, green, blue and white
5. Predefined colors: Change the main colors
6. Quick/Slow: Adjust the speed of the chosen light effect
7. Auto: All available light effects are shown one by one
8. FLASH: The strip will flash in white color (#)(*)
9. Fade 7: 7 colors of the strip will slowly change, from one color shade to another, without flashing (#)
10. Fade 3: 3 RGB colors will slowly change, from one color shade to another, without flashing (#)
11. Jump 7: 7 colors of the strip will change quickly (#)(*)
12. Jump 3: The strip changes into 3 RGB colors quickly (#)(*)
(#) The speed of all these light effects can be adjusted using the Quick/Slow buttons (6).
(*) The brightness of all these light effects can be adjusted using the DIM buttons (3).
13. DIY buttons and Arrow buttons: There are 3 groups of “up” and “down” arrow buttons for Red/
Green/Blue colors and 6 DIY color setting buttons. The DIY color setting buttons can be used to
store your favorite color effects. Press a DIY button, for example DIY 1, to enter the DIY color
mode. You can now adjust the brightness of the Red/Green/Blue color using the 6 arrow buttons
until you have created your desired light effect. Press the DIY1 button again to store the selected
light effect. The next time this button is pressed, it will display the color which you saved the last
time. There are 6 DIY buttons, so you can save your favorite 6 colors/brightnesses.
Note:
• If another button is pressed during the color setting process, the selected light effect will not be saved!
• All DIY buttons are independent. For example: if you press DIY 1 button first and then press DIY 2
button, DIY 1 button will be invalid until DIY 2 button will be pressed again and the current color
will be saved.
INHOUD VERPAKKING
De Quintezz RGB Flexkit bestaat uit:
* Flexibele LED strip met industriële 3M tape op de achterzijde
* RGB LED controller
* RGB infrarode geavanceerde afstandsbediening
* 230V DC adapter
NL
INSTALLATIE
1. Plaats de strip enkel op een proper (vetvrij), effen, droog en niet poreus oppervlak. Vouw de strip
niet! Verwijder de beschermstrip van de tape aan de achterzijde van de strip en plak de strip op
de gewenste locatie.
Opmerking: Indien nodig kan de strip ingekort worden om de 3 LED’s / 5 cm, te beginnen van
het einde van de strip.
2. Zie illustratie 1
Verbind de draad van de RGB LED controller met de strip.
Let op: De 12V aansluiting van de strip (zie indicatie 12V+ op de strip) en de pijl op de
controllerstekker moeten naar elkaar wijzen!
Opmerking: De LED controller kan bevestigd worden met tape of schroeven (niet inbegrepen!).
3. Zie illustratie 2
Verbind de andere kant van de RGB LED controller met de adapteraansluiting.
4. Zie illustratie 3
Verbind de adapter met de kabel voor de stroomvoorziening.
Beschrijving van de afstandsbediening
Zie illustratie 4
1. ON/OFF: Strip aan-/uitschakelen
2. Play/Pause: Het gekozen lichteffect afspelen/pauzeren
3. DIM-toetsen: Gekozen kleur helderder of donkerder maken
4. Hoofdkleuren: Rood, groen, blauw en wit
5. Vooraf gedefinieerde kleuren: Maken het mogelijk de hoofdkleurtinten te wijzigen
6. Quick/Slow: De snelheid van het gekozen lichteffect aanpassen
7. Auto: Alle beschikbare lichteffecten worden een voor een weergegeven
8. FLASH: De strip knippert in de witte kleur (#)(*)
9. Fade 7: Laat 7 kleuren van de strip langzaam veranderen, van de ene kleurtint naar de andere,
zonder te knipperen (#)
10.Fade 3: Laat 3 RGB kleuren van de strip langzaam veranderen, van de ene kleurtint naar de
andere, zonder te knipperen (#)
11.Jump 7: Laat 7 kleuren snel veranderen (#)(*)
12.Jump 3: Laat 3 RGB kleuren snel veranderen (#)(*)
(#) Voor al deze lichteffecten kan de snelheid ingesteld worden met behulp van de Quick/Slowtoetsen (6).
(*) Voor al deze lichteffecten kan de helderheid ingesteld worden met behulp van de DIM-toetsen (3).
13.DIY toetsen (“doe-het-zelf”) en Pijl-toetsen: Er zijn 3 groepen van “op” en “neer” pijltoetsen voor
Rood/Groen/Blauw en 6 DIY (“doe-het-zelf”) toetsen om kleuren in te stellen. De DIY toetsen
kunnen gebruikt worden om uw persoonlijk favoriete kleureffecten in te stellen.
Druk op een DIY toets, bijvoorbeeld DIY 1, om de DIY kleurmodus te activeren. U kunt nu de
helderheid van de Rode/Groene/Blauwe kleur aanpassen door gebruik te maken van de 6
pijltoetsen tot u uw eigen gewenste lichteffect heeft gecreëerd. Druk nogmaals op de DIY 1
toets om het geselecteerde lichteffect op te slaan. De volgende keer dat u op deze toets drukt,
zal deze het effect weergeven dat u heeft opgeslagen. Er zijn 6 DIY toetsen, dus u kunt 6 favoriete
kleuren/helderheidopties opslaan
Opmerking:
• Als u op een andere toets drukt tijdens het instellen van het gewenste kleureffect, zal het
geselecteerde effect niet worden opgeslagen!
CONTENU DE L’EMBALLAGE
Le Quintezz RGB Flexkit se compose de :
* Bande LED flexible avec ruban adhésif industriel 3M au verso
* Contrôleur LED RVB
* Télécommande infrarouge RVB avancée
* Adaptateur 230 V CC
F
installation
1. Installez la bande LED sur une surface propre, égale, sèche et non poreuse. Ne pliez pas la
bande ! Retirez le papier protecteur du ruban adhésif au verso de la bande LED et fixez la bande
à l’endroit souhaité.
Note : La bande LED peut être découpée avec des ciseaux toutes les 3 LED / 5 cm, à partir de la
fin de la bande.
2. Voir illustration 1
Connectez le contrôleur LED RVB à la bande LED.
Attention : La connexion 12V de la bande LED (voir indication 12V+ sur la bande) et la flèche sur
la fiche du contrôleur RVB doivent être dirigées l’une vers l’autre !
Note : Le contrôleur peut être fixé en utilisant du ruban adhésif ou des vis (pas inclus).
3. Voir illustration 2
Connectez l’autre extrémité du contrôleur LED RVB à l’adaptateur.
4. Voir illustration 3
Connectez l’adaptateur au câble d’alimentation électrique.
Description de la tElEcommande infrarouge
Voir illustration 4
1. ON/OFF : Allumer/éteindre la bande LED
2. Play/Pause : Play/Pause l’effet de lumière choisie
3. Touches DIM : Eclaircir/assombrir la couleur choisie
4. Couleurs principales : Rouge, vert, bleu et blanc
5. Couleurs prédéfinies : Modifier les couleurs principales
6. Quick/Slow : Accélérer/Ralentir la vitesse de la variation de couleurs
7. Auto : Tous les effets de lumière disponibles se succèdent, l’un après l’autre
8. FLASH : Scintillement de la couleur blanche (#)(*)
9. FADE 7 : changement douce de 7 couleurs, d’une nuance jusqu’à la prochaine, sans scintiller (#)(*)
10.FADE 3 : changement douce de 3 couleurs RVB, d’une nuance jusqu’à la prochaine, sans scintiller (#)(*)
11.JUMP 7 : changement rapide de 7 couleurs (*)
12.JUMP 3 : changement rapide de 3 couleurs RVB (*)
(#) La vitesse de la variation de couleurs peut être réglée en utilisant les touches Quick/Slow (6).
(*) L’intensité de la variation de couleurs peut être réglée en utilisant les touches DIM (3).
13.Touches « mémoire » (DIY) et Touches « flèche »: Il y a 3 groupes de touches « flèches » vers le
haut et vers le bas pour les couleurs Rouge/ Vert/Bleu et 6 touches « mémoire » pour composer
des couleurs personnalisées. Appuyez sur une touche mémoire, par exemple la touche DIY 1
afin d’activer le mode « composition ». Vous pouvez maintenant régler l’intensité des couleurs
Rouge/Vert/Bleu en utilisant les 6 touches « flèche » jusqu’à ce que vous avez créé votre effet de
lumière préféré. Appuyez encore une fois sur la touche DIY 1 afin de mémoriser l’effet de lumière
choisi. Quand vous appuyez la touche DIY 1 plus tard, l’effet de lumière mémorisé s’affiche. Il y a
6 touches de mémoire, donc vous pouvez mémoriser 6 couleurs/intensités préférées.
Remarque:
• Si vous appuyez sur une autre touche lors de la sélection de la couleur préférée, l’effet sélectionné
ne sera pas mémorisé !
• Toute touche mémoire (DIY) est indépendante. Par exemple : si vous appuyez d'abord sur la
touche DIY 1 et ensuite sur la touche DIY 2, DIY 1 sera annulé jusqu’à ce que vous appuyez la
touche DIY 2 encore une fois pour mémoriser la couleur choisie.
SAFETY INSTRUCTIONS
• Installation should be performed only by a competent person or professional electrician.
• Never open the RGB controller.
• Never touch the plug contacts with sharp or metal objects.
• Make sure that cables cannot cause a trip hazard.
• Use only the original power supply and original accessories.
• Do not expose the unit to direct sunlight.
• Never place the device in the vicinity of heat sources.
• Never place the unit on surfaces that are heat sensitive.
• Protect the device from moisture, dust, liquids and vapors.
• Unplug the unit at the main power socket before cleaning. Do not use any solvent based cleaning
agents, only a soft, dry anti-static cloth.
• Do not attempt repairs yourself.
• If the unit is not properly installed or operated QUINTEZZ® cannot accept liability.
TECHNICAL DATA
- Operating voltage: 230V AC
- Power supply: Europlug
- Power consumption: max 36 watts
- Ambient operating temperature: -10 ~40 °C
- Humidity: 10% - 85% (none condensing)
- Storage temperature: -20 ~60 °C
- Storage humidity: 5% - 90% (none condensing)
- Protection class:
Strip: IP68 Controller: only for indoor use
- Dimensions (L*W*H):
Strip: 5000x10x3 mm Controller: 50x35x22 mm Adapter: only for indoor use
Adapter: 130x58x31 mm
Strip:
LED Flex Strip RGB IP68
DC 12V, 6A, 36W
300 EPISTAR LEDs, 5050SMD
Max. 1700 lumen
120° viewing angle
Length: 5000mm, cuttable every 3 LED’s / 5 cm
Controller:
DC 12V, 2A per color
20 color buttons + 6 different color-light programs + DIM/faster/slower function + Pause + Auto + 6
programmable DIY buttons + 6 “mix” buttons (arrow buttons)
Adapter:
Input: 100-240V * Output: 12V / 6A
Note: For extra connectors, extension cables, spare parts and more, please visit our website: www.quintezz.com.
GUARANTEE
Quintezz® is a registered trademark of TE-Group NV. The Quintezz® brand stands for superior product
quality and outstanding customer service. That is why Quintezz® warrants this product against all
defects in material and workmanship for a period of two (2) years from the date of original purchase
of the product. The conditions of this guarantee and the extent of responsibility of Quintezz® under
this guarantee can be downloaded from our website: www.quintezz.com.
• Alle DIY toetsen zijn onafhankelijk. Bijvoorbeeld: als u eerst op de DIY 1 toets drukt en vervolgens
op de DIY 2 toets, zal de DIY 1 toets nietig worden tot de DIY 2 toets nogmaals wordt ingedrukt en
de huidige kleurinstelling opgeslagen is.
VEILIGHEIDSINSTRUCTIES
• De installatie dient enkel door een vakpersoon uitgevoerd te worden.
• Open nooit de RGB controller.
• Raak nooit de stekkercontacten met scherpe en metalen voorwerpen aan.
• Zorg ervoor dat leidingen dusdanig gelegd worden dat niemand erover kan struikelen of erop kan
trappen.
• Gebruik enkel origineel toebehoren.
• Stel het apparaat nooit aan rechtstreekse zonnestralen bloot.
• Zet het apparaat nooit in de nabijheid van warmtebronnen.
• Zet het apparaat nooit op oppervlakken die gevoelig voor warmte zijn.
• Bescherm het apparaat tegen nattigheid, stof, vloeistoffen en wasems.
• Gebruik voor het reinigen geen schoonmaakmiddelen met oplosmiddel, maar uitsluitend een
zachte, droge en antistatische doek. Trek vóór elke reiniging van het apparaat de stekker uit het
stopcontact.
• Een reparatie mag enkel door geschoold, geautoriseerd personeel uitgevoerd worden.
• Bij ongeëigend gebruik aanvaardt QUINTEZZ® geen enkele aansprakelijkheid.
TECHNISCHE GEGEVENS
- Bedrijfsspanning: 230V AC
- Voeding: Eurostekker
- Stroomverbruik: tot 36 watt
- Omgevingstemperatuur voor gebruik: -10 ~ 40 °C
- Luchtvochtigheid: 10% - 85% (niet condenserend)
- Temperatuur voor opberging: -20 ~ 60 °C
- Luchtvochtigheid voor opberging: 5% - 90% (niet condenserend)
- Veiligheidsklasse:
Strip: IP68 Controller: enkel voor binnenshuis Adapter: enkel voor binnenshuis
- Afmetingen (L*B*H):
Strip: 5000x10x3 mm Controller: 50x35x22 mm Adapter: 130x58x31 mm
Strip:
LED Flex Strip RGB lP68
DC 12V, 6A, 36W
300 EPISTAR LED’s, 5050SMD
Max. 1700 lumen
120° uitvalshoek
Lengte: 5000m���������������������������������
m, alle 3 LED’s / 5 cm inkortbaar
Controller:
DC 12V, 2A per kleur
20 verschillende kleurtoetsen + 6 lichtprogramma’s + DIM / sneller / trager functie + Pauze + Auto +
6 programmeerbare DIY toetsen + 6 “mix” toetsen (pijltoetsen)
Adapter:
Ingang: 100-240V * Uitgang: 12V / 6A
Nota: voor extra connectors, verlengkabels, onderdelen en meer, kunt u terecht op onze website:
www.quintezz.com.
GARANTIE
Quintezz® is een gedeponeerd handelsmerk van TE-Group NV. Het merk Quintezz® staat voor
producten van superieure kwaliteit en een uitstekende klantenservice. Daarom garandeert
Quintezz® dat dit product vrij is van materiaal- en fabricagefouten gedurende een periode van twee
(2) jaar na de oorspronkelijke aankoopdatum van het product. De voorwaarden van deze garantie en
de omvang van de verantwoordelijkheid van Quintezz® onder deze garantie kunt u downloaden vanaf
de website: www.quintezz.com.
NOTICES DE SECURITE
• L’installation devra être effectuée par une personne connaissant le produit.
• N’ouvrez jamais le contrôleur RVB.
• Ne touchez jamais les contacts de la fiche de courant avec des objets et outils métalliques.
• N’utilisez que des accessoires originaux.
• N’exposez jamais cet appareil directement au soleil.
• Ne posez jamais cet appareil sur des surfaces chaudes.
• Protégez votre appareil de l’humidité, de la poussière, des liquides et des vapeurs.
• Ne faites jamais fonctionner votre appareil près de matières explosives ou inflammables.
• Pour chaque entretien priez de bien vouloir retirer la prise de courant de l'appareil de la prise
électrique. N’utilisez aucunes solutions de nettoyage à base d'alcool mais seulement un chiffon
humide et mou, antistatique.
• Toute réparation doit être effectuée que par une personne qualifée.
• Si l’appareil n’est pas correctement installé ou utilisé, Quintezz® n’accepte aucune responsabilité.
SPECIFICATIONS TECHNIQUES
- Tension de l’appareil en marche : 230V CA
- Alimentation électrique : Prise de courant norme européenne
- Consommation d’électricité : Jusqu’à 36 Watt
- Température extérieure en fonctionnement : -10~40 °C
- Humidité : 10% - 85% ( sans concentration )
- Température de Stockage : -20~60 °C
- Humidité de Stockage : 5% - 90 % (sans concentration)
- Classe de protection :
Bande : IP 68
Contrôleur : Seulement pour l’intérieur Adaptateur : seulement pour l’intérieur
- Dimensions :
Bande : 5000x10x3mm Contrôleur : 50x35x22mm
Adaptateur : 130x58x31mm
Bande :
Bande LED flexible lP68
CC 12V, 6A, 36W
300 EPISTAR LED, 5050 SMD
Max. 1700 Lumen
120° Angle de vision
Longueur : 5000mm, découpable toutes les 3 LED / 5 cm
Contrôleur :
CC 12V, 2A par couleur
20 touches de couleurs différentes + 6 programmes de lumière + Fonction DIM/ralentir/accélérer +
Pause + Auto + 6 touches mémoire (DIY) + 6 touches pour composer des couleurs personnalisées
(touches « flèche »)
Adaptateur :
Entrée : 100-240V * Sortie : 12V / 6A
Remarque: Pour des connecteurs supplémentaires, rallonges, pièces de rechange, etc., veuillez
consulter notre site web: www.quintezz.com.
GARANTIE
Quintezz® est une marque déposée de TE-Group NV. La marque de Quintezz® est synonyme de
produits de qualité supérieure et d’un service après-vente excellent. C’est la raison pour laquelle
Quintezz® garantit ce produit contre tout défaut de matériel ou de fabrication pour une période de
deux (2) ans à compter de la date d’achat initiale. Les conditions de cette garantie et l’étendue de la
responsabilité de Quintezz® en vertu de cette garantie sont disponibles en téléchargement sur notre
site Internet www.quintezz.com.