1
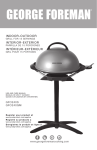
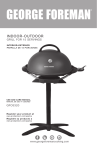
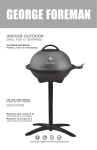
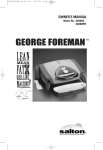
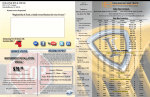
OWNER’S MANUAL
Model No. GGR50B
GEORGE FOREMAN
Indoor/Outdoor
Electric
Barbeque Grill
TM
READ AND SAVE THESE INSTRUCTIONS
WARNING: A risk of fire and electrical shock exists in all electrical
appliances and may cause personal injury or death. Please follow all safety
instructions.
IMPORTANT SAFEGUARDS
WARNING: This appliance produces heat and escaping steam during use.
Proper precautions must be taken to prevent risk of burns, fire, or other injury
to persons or damage to property.
When using electrical appliances, basic safety precautions should always be
followed to reduce the risk of fire, electric shock and injury to persons,
including the following:
1.
A person who has not read and understood all operating and
safety instructions is not qualified to operate this appliance.
2.
Never operate the Grill without the Base and Grease Tray in
place.
3.
If this appliance accidentally falls or becomes immersed in
water while plugged in, unplug it from the wall outlet
immediately. DO NOT REACH INTO THE WATER.
4.
To reduce the risk of burns or other injuries, do not touch hot
surfaces. Use of protective oven mitts or gloves is
recommended.
5.
When using his appliance, provide adequate air space above
and on the sides of the unit for air circulation. Do not operate
this appliance if it is near or touching curtains, wall
coverings, clothing or any other flammable materials.
6.
Do not use or attempt to repair a malfunctioning appliance.
Contact Consumer Service for return or repair authorization.
7.
Do not use this appliance other than intended use.
8.
Do not place any of the following materials in or on the Grill
surface: paper, cardboard, plastic and the like.
9.
Do not clean with metal scouring pads or harsh abrasives. To
do so will damage the non-stick coating.
10.
Read all instructions before using appliance.
11.
Do not touch hot surfaces. Use handles.
12.
Do not immerse cord, plug, or Temperature Control Probe in
water or other liquid. See instructions for cleaning.
13.
This appliance is not for use by children.
14.
Close supervision is necessary when this appliance is used
near
children.
15.
Unplug from outlet when not in use. Unplug and allow to cool
before putting on or taking off parts, and before cleaning the
appliance.
16.
17.
18.
19.
20.
heated oven.
21.
22.
23.
24.
25.
Always attach Temperature Control Probe to Grill before
plugging cord into wall outlet. To disconnect, turn
Temperature Control Probe to OFF, then remove plug from
wall outlet.
Do not operate any damaged appliance. Do not operate with
a damaged cord or plug, or after the appliance malfunctions,
or has been dropped or damaged in any manner. Contact
Consumer Service for return authorization.
The use of accessory attachments not recommended by the
manufacturer may cause fire, electric shock or injury.
Do not use while standing in a damp area.
Do not place on or near a hot gas or electric burner or in a
Extreme caution must be used when moving an appliance
containing hot oil or other hot liquids. Do not remove Grill
from Base until Grill is cool.
Allow grease or oil to cool before disposal.
Do not place base on top of hot surface.
Use appliance only as indicated in these instructions.
Do not attempt to dislodge food or clean the grill when it is
plugged in or when it is hot.
Fuel, such as charcoal briquettes, is not to be used with
26.
appliance.
27.
Use only on properly grounded outlet.
28.
Do not leave this appliance unattended while in use.
29.
Close supervision is necessary when any appliance is used
by or near children.
30.
Do not let cord hang over edge of table or counter, or touch
hot surfaces.
SAVE THESE INSTRUCTIONS
HOUSEHOLD USE ONLY
2
Getting To Know Your GGR50B
Indoor/Outdoor Electric Barbeque Grill
1.
2.
3.
1. Lid Handle/Vent
(PN 21007)
9.
4.
2. Lid
(PN 21008)
3. Rubber-Ringed
Fastener/Hook
5.
(PN 21039)
4. Grill
(PN 21009)
6.
5. Grease Tray
(PN 21010)
6. Grill Base
(PN 21011)
7a.
7a. Upper Pedestal Tube
(PN 21098A)
7b. Lower Pedestal Tube
(PN 21098B)
8. Pedestal Base
(PN 21013)
9. Temperature
Control Probe
7b.
Use the Rubber-Ringed Fastener/Hook to
hold lid while attending food. Rotate the
Grill Base on the Pedestal tube to position
as a wind break.
(PN 21006A)
8.
3
Extension Cord Use
We do not recommend the use of an extension cord, however if an extension
cord is required special care and caution is necessary. The cord must be a 14
Gauge, Three (3) Conductor type marked with an electrical rating of 120V, 15A,
1875W, and arranged so that it will not drape over the countertop or table top
where it can be pulled on by children or tripped over accidentally.
Electrical Power
If the electric circuit is over loaded the circuit breaker will trip and your
appliance will not operate. It should be operated on a 20amp electrical circuit
separate from other appliances.
Assembly Instructions
1.
2.
3.
4.
5.
6.
7.
8.
9.
Wash the Base, Grill, Grease Tray, and Lid in warm soapy water. Rinse
and dry thoroughly. DO NOT IMMERSE TEMPERATURE CONTROL
PROBE, wipe it off with a damp cloth and dry thoroughly.
Assemble the Pedestal Tube by joining the two halves. While pressing
the two pins in on the end of the upper Pedestal Tube, slide this end
into the unslotted end of the lower Pedestal Tube, rotating until the
pins firmly engage the holes in the lower Pedestal Tube.
Place the Pedestal Base on a flat, level surface.
Insert the slotted end of the Pedestal Tube assembly into the hole in
the center of the foot and push down firmly.
Place the Base on top of the Pedestal Tube assembly, with the hole in
the center of the Base engaging with the Tube.
Place the Grease Tray securely into position inside the Base. When
properly placed, it is held firmly with the pointed end over the center
of the Base.
Position the Grill securely into the Base, with the probe receptacle
fitting through the probe cutout in the top side of the Base.
Attach the Lid Handle to the Lid from inside the Lid with the RubberRinged Fastener.
Place the Lid over the Grill. Your Barbeque Grill is now ready to use.
4
How to Use George Foreman’s
Indoor/Outdoor
Electric Barbeque Grill
1. Turn temperature control probe to OFF position and attach securely into
the probe receptacle.
2. Plug into 120V~ 60 Hz outlet. Align desired temperature setting with the
indicator light. Place Lid securely on Grill. Allow Barbeque Gill to preheat
to desired temperature for approximately 10 minutes. See cooking charts
or recipes for more details.
3. Carefully remove Lid and place food onto Grill, cover for most foods. Cook
until done, turning at least once halfway through cooking time for most
food. Adjust temperature as needed.
You can control the moisture of foods to some extent by opening or closing
the lid vent. Turn the Lid Handle/Vent clockwise to open the vent for drier
cooking. Turn the Lid Handle/Vent counter-clockwise to minimize the vent
opening to hold in moisture for moister meats. The light on the
Temperature Control Probe will cycle on and off as the thermostat
maintains the proper temperature. This is normal operation.
NOTE: Condensation may collect on the inside of the lid when cooking.
Use caution when removing lid.
4. When finished cooking, turn temperature control probe to OFF position.
The indicator light will go off. Unplug and allow to cool before
disassembling and cleaning. See User Maintenance Instructions.
NOTE: The temperature control probe may be turned to setting 1 to keep
foods warm for short periods of time.
Hints for Grilling
•
•
•
•
Use tender cuts of meat for grilling.
Marinate tougher cuts of meat to tenderize them before grilling.
To avoid drying out meat and fish, turn only once and do not pierce.
To turn meat and fish, use a large flat plastic or wooden spatula to support
the food.
• Place meat or chicken to be roasted in a shallow baking pan. Do not cover
pan with a lid or foil. Using oven mitts, carefully place pan on preheated
Grill, taking care not to scratch the non-stick surface. Place Lid on the
Barbeque Grill.
NOTE: Just resting the baking container on top of the non-stick surface
will not damage it.
• Use only plastic or wooden utensils on non-stick surface.
CAUTION: Because some countertop finishes are more affected by heat than
others, make sure countertop surface can withstand temperatures of 150°F to
prevent discoloration or other damage to the countertop surface.
CAUTION: Grill surfaces are hot during use. Allow Grill, Grease Tray, Lid and
Base to cool completely before handling and cleaning.
5
Using Indoors
To use your INDOOR/OUTDOOR BARBEQUE GRILL indoors, simply lift the Base
unit off of the Pedestal Tube and place on a heat resistant surface.
NOTE: Never use INDOOR/OUTDOOR BARBEQUE GRILL without the base unit.
User Maintenance Instructions
CAUTION: Do not immerse temperature control probe in water or any other
liquid.
1. Unplug and allow to cool before disassembling and cleaning. Thoroughly
clean all parts after each use.
2. Remove Temperature Control Probe (DO NOT IMMERSE). Wipe with a
damp cloth and dry thoroughly.
3. Remove Grill and empty Grease Tray.
4. Wash the Base, Grill, Grease Tray, and Lid with hot soapy water and a
plastic scouring pad. Rinse and dry thoroughly.
CAUTION: Temperature Control Probe receptacle must always be completely
dry before use.
6
Suggested Cooking Charts
The following times are meant to be used as guidelines only. Cooking times
will vary due to the thickness of the meat being cooked. To be sure that the
meat is truly done, use a meat thermometer. If the meat does need more time
to cook, simply place the meat back on the Grill for 5 minute increments and
check periodically so you don’t over cook.
Grill Chart
1. Preheat INDOOR/OUTDOOR BARBEQUE GRILL.
2. Grill food according to recommended time or until desired doneness. Turn
halfway through cooking time, or more often if necessary.
3. Boneless cuts of meat will grill more evenly and will not scratch the
non-stick surface.
4. Leave the Lid on during cooking to decrease cooking time and keep food
moist and juicy.
Food
bacon
bratwurst
chicken breast
fish, 1 inch thick
frankfurters
hamburgers (4 oz each)
pork chops, 1 inch thick
sausage, fresh
steak, 3/4 inch thick
steak, 1/2 inch thick
shish-ka-bobs
shrimp, large
Temperature
5
5
4
4
5
4
5
4
5
5
5
5
Time
10-12 minutes
25-35 minutes
20-30 minutes
20 minutes
10-20 minutes
5-15 minutes
20-35 minutes
20-30 minutes
7-14 minutes
5-12 minutes
20-25 minutes
10-15 minutes
7
Roasting/Baking Chart
1. Preheat INDOOR/OUTDOOR BARBEQUE GRILL.
2. Place meat or poultry in a baking container, cover baking container with
aluminum foil or glass lid. Using oven mitts, carefully place baking
container on Grill, cover Grill with Lid to keep in moisture.
3. A cooking bag may be used inside a baking container. Follow
manufacturers instructions. Food wrapped in aluminum foil may be placed
directly on Grill.
Food
beef roast
chicken,
whole fryer
fresh ham
pork roast
baked potato,
wrap in foil
Amount Temperature
Time
Internal Temperature
2-4 lbs
5
1-1/2 to 2-1/2 hrs
medium to well 160°-170°F/71°-77°C
2-1/2 to 4 lbs
5-7 lbs
2-4 lbs
5
5
5
1-1/4 to 2 hrs
1-1/2 to 2-1/2 hrs
1-1/2 to 3 hrs
well 180°F/82°C
well 180°F/82°C
medium to well 160°-170°F/71°-77°C
1-10
5
1-1/4 to 1-1/2 hrs
until done
PLEASE NOTE: The USDA recommends that meats such as beef, pork, lamb,
etc. should be cooked to an internal temperature of 160°F and poultry
products should be cooked to an internal temperature of 170°F-180°F to be
sure any harmful bacteria, Listeria and Ecoli, has been killed. When reheating
meat/poultry products, they should also be cooked to an internal temperature
of 165°F.
8
Recipes
The Champ’s Sausage Without Guilt
Try this sizzling sausage patty that not only tastes good, but is also good for
you. Choose ground turkey breast, which is lower in fat than ground turkey
containing dark meat and skin. Turkey, especially the light meat is a good
source of niacin, which is an important B vitamin needed to maintain a
healthy nervous system.
1 slightly beaten egg white
1/3 cup finely chopped onion
1/4 cup finely snipped dried apples or
1/2 cup finely chopped fresh Red Delicious apple
1/4 cup seasoned bread crumbs
2 tablespoons chopped fresh parsley
1/2 teaspoon sea salt
1/2 teaspoon ground sage
1/4 teaspoon ground nutmeg
1/4 teaspoon black pepper
1/8 teaspoon cayenne pepper
1/2 pound lean ground turkey breast
• In a medium bowl, combine all ingredients except turkey. Add the ground
turkey and mix well.
• Shape the mixture into eight or nine 2-inch wide patties.
• Preheat the INDOOR/OUTDOOR BARBEQUE GRILL on Setting 4 for 10
minutes.
• Place sausage on INDOOR/OUTDOOR BARBEQUE GRILL. Cover and cook
on Setting 4 for 16-17 minutes. Turn and cook another 16-17 minutes or until
the meat is no longer pink and the juices run clear.
• Serves 4
This recipe is from “The Healthy Gourmet” (Clarkson Potter) by Cherie
Calbom.
9
George’s Sausage Texas Style
A spicy sausage with true Southwestern zip! These breakfast sausages are
great with a sauteed vegetable or fresh salsa and egg scramble. Buy 90%
lean ground beef for the least-fat sausage. Ninety percent lean beef has 9
grams of fat with 4 of those grams being saturated fat; whereas 73% lean beef
has 18 grams of fat with 7 of the grams being saturated.
1 slightly beaten egg white
1/3 cup finely chopped onion
1/4 cup seasoned bread crumbs
1/4 cup diced green chili peppers
1 large clove garlic, finely minced
2 tablespoons snipped fresh cilantro
1 tablespoon apple cider vinegar
1-1/2 teaspoon chili powder
1/4 teaspoon sea salt
1/8 teaspoon cayenne pepper
1/2 pound lean ground beef
• In a medium bowl, combine all ingredients except ground beef. Add the
ground beef and mix well.
• Shape the mixture into eight 3-inch wide patties.
• Preheat the INDOOR/OUTDOOR BARBEQUE GRILL on Setting 4 for 10
minutes.
• Place the patties on the INDOOR/OUTDOOR BARBEQUE GRILL. Cover and
cook on Setting 4 for 5-6 minutes.
• Cover and cook for 5-6 minutes. Turn and cook for another 5-6 minutes.
• Serves 4
This recipe is from “The Healthy Gourmet” (Clarkson Potter) by Cherie
Calbom.
10
George Foreman’s Power Burger
A flavorful hamburger that we think tastes even better than its all-meat
cousin! It pays to eat meals that minimize meat. To reduce saturated fat in a
typical burger, you can cut back on the amount of meat and make up for it
with plant-based ingredients. Bread crumbs and chopped vegetables have
been added in this recipe. You could also try cooked rice, other grains or
cereal. In addition, choose whole wheat buns; they typically contain one less
fat gram than regular or even reduced-calorie buns.
If you settle for nothing less than a cheeseburger, Swiss cheese is 1 gram
lower in fat than Cheddar, American or Monterey Jack with 8 grams of fat
versus 9 in each ounce of cheese. However, reduced fat cheese like Cheddar
or Swiss contain half the fat with 4 grams per ounce. Mustard contains 1
gram of fat per tablespoon versus a whopping 11 grams of fat in a tablespoon
of mayonnaise.
Top your burger in a healthful style with dark, leafy green lettuce, shredded
cabbage, fresh cilantro, basil or spinach.
1/4 cup chopped vegetables such as yellow onions, greens onions, zucchini,
parsley (can be sauteed)
1/4 cup seasoned bread crumbs
3/4 lb. lean ground beef
• In a medium-size bowl, combine the vegetables and bread crumbs. Add the
ground beef and mix well.
• Shape the mixture into four 4-inch patties.
• Preheat the INDOOR/OUTDOOR BARBEQUE GRILL on setting 4 for 10
minutes.
• Place the patties on the INDOOR/OUTDOOR BARBEQUE GRILL.
• Cover and cook 12-13 minutes. Turn and cook another 12-13 minutes or
until the meat is no longer pink and the juices run clear.
• Serves 4
This recipe is from “The Healthy Gourmet” (Clarkson Potter) by Cherie
Calbom.
11
Grilled Vegetables
6 slices eggplant, (or 4 baby eggplants)
2 small onions
2 small tomatoes
2 small zucchini
4-6 mushrooms
4 large cloves garlic, peeled and sliced 1/4-inch thick
1/3 cup olive oil
2 tablespoons Italian seasoning
• Slice all vegetables 1/2-inch thick.
• Brush vegetables and garlic lightly with olive oil.
• Sprinkle Italian seasoning on both sides of vegetables and garlic.
• Preheat the INDOOR/OUTDOOR BARBEQUE GRILL on Setting 4 for 10
minutes.
• Place vegetables and garlic on grill. Cover and cook on Setting 4 for 7-8
minutes. Turn and cook another 10-15 minutes or until desired doneness is
achieved.
• Serves 3-4
Serve as an accompaniment to meat and pasta, or stuff them into a piece of
pita or French bread for a grilled vegetable sandwich.
Mustard Lemon Chicken Breasts
2 tablespoons mustard
2 tablespoons balsamic vinegar
3 tablespoons lemon juice
2 cloves garlic, minced
1 teaspoon paprika
4 6-ounce chicken breasts, halved, boneless and skinless
• In a medium bowl, combine all ingredients except chicken.
• Add chicken breast and refrigerate at least one half hour.
• Preheat the INDOOR/OUTDOOR BARBEQUE GRILL on Setting 4 for 10
minutes.
• Place chicken on INDOOR/OUTDOOR BARBEQUE GRILL. Cover and cook on
Setting 4 for 7-8 minutes. Turn and cook another 7-8 minutes.
• Serves 4
12
Rosemary Lamb Chops
8 loin lamb chops
2 teaspoons chopped fresh rosemary
ground black pepper to taste
• Sprinkle chops with rosemary and pepper.
• Preheat INDOOR/OUTDOOR BARBEQUE GRILL on Setting 4 for 10 minutes.
• Place meat on INDOOR/OUTDOOR BARBEQUE GRILL. Cover and cook on
Setting 4 for 5-6 minutes for medium or 6-7 minutes for well done. Turn and
cook another 5-6 for medium or 6-7 minutes for well done.
• Serves 4
13
ONE YEAR LIMITED WARRANTY
This Salton, Inc product warranty extends to the original consumer purchaser of the product.
Warranty Duration: This product is warranted to the original consumer purchaser for a period
of one (1) year from the original purchase date.
Warranty Coverage: This product is warranted against defective materials or workmanship.
This warranty is void if the product has been damaged by accident, in shipment, unreasonable
use, misuse, neglect, improper service, commercial use, repairs by unauthorized personnel or
other causes not arising out of defects in materials or workmanship. This warranty is effective
only if the product is purchased and operated in the USA, and does not extend to any units
which have been used in violation of written instructions furnished by Salton, Inc., or to units
which have been altered or modified or to damage to products or parts thereof which have had
the serial number removed, altered, defaced or rendered illegible.
Warranty Disclaimers: This warranty is in lieu of all warranties expressed or implied and no
representative or person is authorized to assume for Salton, Inc. any other liability in
connection with the sale of our products. There shall be no claims for defects or failure under
any theory of tort, contract, or commercial law including, but not limited to negligence, gross
negligence, strict liability, breach of warranty and breach of contract.
Warranty Performance: During the above one-year warranty period, a product with a defect
will be either repaired or replaced with a reconditioned comparable model (at Salton, Inc.
option) when the product is returned to the Salton facility. The repaired or replacement product
will be in warranty for the balance of the one-year warranty period and an additional onemonth period. No charge will be made for such repair or replacement.
Service and Repair
Should the appliance malfunction, you should first call toll-free 1-800-233-9054 between the
hours of 8:00 am and 5:00 pm Central Standard Time and ask for CONSUMER SERVICE stating
that you are a consumer with a problem. Please refer to Model #GGR50 when you call.
In-Warranty Service: For an appliance covered under the warranty period, no charge is made
for service or postage. Call Consumer Service at the above number for return authorization.
Out-of-Warranty-Service: A flat rate charge by model is made for Out-of-Warranty-Service.
Please include $15.00 (U.S.) for return shipping and handling.
Salton, Inc cannot assume responsibility for loss or damage during incoming shipment. For your
protection, carefully package the product for shipment and insure it with the carrier. Be sure to
enclose the following items with your appliance: any accessories related to your problem; your
full name and return address and daytime phone number; a note describing your problem; a
copy of your sales receipt or other proof of purchase to determine warranty status. C.O.D.
shipments cannot be accepted.
Return the appliance to:
ATTN: Repair Department, Salton, Inc.
708 South Missouri St. Macon, MO 63552
For more information on Salton, Inc. products,
visit out website: www.salton-maxim.com, or you can email us at:
[email protected]
14
KEEP DATED SALES RECEIPT
FOR WARRANTY SERVICE.
Keep this booklet. Record the following for reference:
Date purchased
Model number
Date code (stamped on bottom of unit)
© 2000 Salton, Inc.
Printed in China
14