1
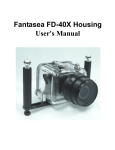
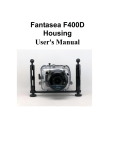
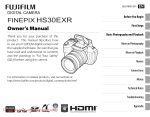
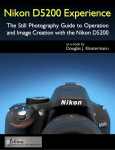
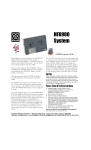
Fantasea FD-80 Housing User's Manual Table of Contents TABLE OF CONTENTS ............................................................................................................................ 2 INTRODUCTION........................................................................................................................................ 3 INCLUDED WITH HOUSING .................................................................................................................. 4 CAMERA MODEL ..................................................................................................................................... 4 A VARIETY OF USES ................................................................................................................................ 5 SPECIFICATIONS...................................................................................................................................... 5 CONTROLS ORIENTATION ................................................................................................................... 6 CONTROL DETAILS ................................................................................................................................. 9 TRAY & HANDLE SYSTEM ASSEMBLY ........................................................................................... 13 PREPARATION OF HOUSING BEFORE THE DIVE ........................................................................ 15 USING EXTERNAL STROBES: ............................................................................................................. 18 CARE & MAINTENANCE ...................................................................................................................... 18 BASIC SHOOTING TECHNIQUES ....................................................................................................... 20 CAMERA LENSES AND PORTS ........................................................................................................... 22 FANTASEA FD-80 WARRANTY ........................................................................................................... 22 2 Introduction Fantasea has introduced a new housing for the Nikon D-80 and the FD-80 is the result. Continuously improving features include, embedded optical view finder, enhanced trigger/shutter control system, new port mounting system, zoom lens capability, new aluminium B and J Handle design and separate button for On-Off control. Welcome to the exciting world of underwater digital SLR photography. Your purchase of the FD-80 housing for the Nikon D-80 digital camera will set you apart from other photographers. With this system, you will enjoy the best chance of capturing the widest variety of superior underwater images. The FD-80 offers you the opportunity to use the exact Nikon lenses for the best circumstances, including a choice of macro, wide angle, fisheye, and zoom lenses. You will find the housing to be easy and instinctive to use and handle and will have countless dives in which to experiment with the D-80's advanced imaging capabilities. Fantasea Line Photo is pleased to offer our help with any of your photographic needs. The purpose of this manual to is to provide you with the basic introduction to your FD-80, which should get you comfortable with the housing and allow you to get started taking great underwater images right away. We strongly urge you to thoroughly read the Nikon D-80 instruction manual as well, to familiarize yourself with the most common controls and settings that you will use for your underwater photography. The FD-80 housing will permit access to most of the important controls on the camera. To take full advantage of these features, it is best to have a good command of what each option can do for you, so you will know when you should use each specific control. 3 Included With Housing The FD-80 housing consists of a front and back shell that latch together to form the housing body. A screw in standard flat port is included. This port will accommodate the 18-80mm lens (without a manual zoom control). Other optional ports are available for different lenses ( 5 inch super wide angle Dome Port, 60 mm macro/close up port and 105 mm super macro port) Two Aluminium B and J housing handles come with your housing, ( due to packaging restrictions they may need to be assembled by the customer). These handles include 1” (25mm) round ball mounts which integrate nicely with most B and J Arm systems, making for easy integration with most all underwater lighting and flash systems. The handles are easily assembled by tightening one screw head per handle. They are also adjustable to fit divers using gloves. Base plate for mounting other tray and arm systems. Zoom Control Guide Band that is attached to the camera lens. Optical viewfinder eyepiece built into the back cover of the housing to assist the photographer in viewing and focusing. A five-pin TTL flash sync port to connect with the D-80's hot shoe. Removable camera mounting tray that slides into position with the D-80 attached, positioning the camera in the exact location for perfect control alignment. Spare O-Rings for the housing and lens port. Adjustment tools Wrist lanyard Warranty and other documents Instruction Manual Silicone Cleaning cloth Lens port cover Camera Model The FD-80 is dedicated exclusively to the Nikon D-80 camera. The size and shape of the camera, plus the location of controls for alignment with housing controls requires this precision design. Together, the D-80 camera and FD-80 housing offer the best combination of advanced digital photography at an affordable price. No other camera may be used in the FD-80 housing. 4 A Variety of Uses The Fantasea FD-80 housing is more than just an underwater camera system. It protects the D-80 against damage from such environmental conditions as rain, snow, dust, sand, and dirt. It is perfect protection for active outdoor sports, where these elements would normally not allow an advanced camera like the D-80 to be used without danger of damage. The lightweight, compact housing and handles make it easy to hold and use while sailing, fishing, kayaking, backpacking, or just for fun at the beach or around the pool. It will also provide a valuable tool for many commercial, industrial, and medical applications, because it is impervious to most liquids, and sprays. Specifications The FD-80 is an injection molded polycarbonate housing The main seal between front and back halves is a Radial O-ring The ports are sealed when mounted by 2 O-rings, one Radial and one Compression type. Controls use stainless steel shafts, E-clips and springs Controls are sealed by double O-rings Control knobs and buttons are made of molded polycarbonate Latches are stainless steel Handles are made of plastic covered aluminium. Flash sync port is a standard five-pin Nikonos type sync cord connector The Fantasea FD-80 has a maximum working depth rating of 200' (60m) Overall Size is 220 x 300 x 230 mm [LxWxH] Housing weight approximately 2.8 kg 5 Controls Orientation 2 9 5 8 7 6 3 1 10 4 Top and Front of Housing: Front View 1 Flash Sync Port 1 Mode Dial 2 Trigger Release Control 3 Latching Buckles 4 Power Switch 5 Exposure Compensation Control 6 Metering Mode 7 Single/Continuous/Timer/Remote Control 8 AF Mode 9 Sub Command Dial 10 Zoom Port Control 11 Focus Mode Selector 12 6 Front View 11. Zoom Port Control 12. Focus Mode Selector 7 19 11 22 23 13 14 20 15 16 17 21 18 Back & Right Side of Housing: Delete Control 13 Playback Control 14 Menu 15 Help & Protect/White Balance 16 Thumbnail/ISO sensitivity 17 PlaybackZoom/Image Quality & Size 18 Main command Dial 19 Four Way Multi-Control [4 buttons] 20 OK Button 21 Viewfinder 22 AE-L/AF-L Control 23 8 Control Details The following is a partial list of the most common uses of housing and camera controls. For the full list of camera functions and settings accessed by each control, you should consult your D-80 camera instruction manual. Please note that some of the FD-80 housing controls are designed to operate more than one camera control. The command dial and sub-command dial will perform multiple functions when operated in conjunction with other camera/housing controls. Flash Sync Port: Connect any standard five-pin Nikonos type sync cord to this bulkhead connector. Align the index dots to correctly position cord to seat in flash port. Gently and carefully push down on cord to seat the O-ring seal, and make connection with the five pins. Make sure that the pins are properly aligned and do not force closure. Tighten collar on sync cord to insure cord does not come loose or separates while underwater or during use. Mode Dial Push down and rotate housing control to change camera’s main exposure modes. Choose Manual, Aperture Priority, Shutter Priority, Program, Automatic or any of several Scene Modes. Main Shutter Release Control [Trigger]: The camera has a two stage shutter-release button. The camera sets focus and exposure when the button is pressed halfway. Focus and exposure will remain locked while the shutter-release button is kept in this position. To take the picture, press the shutter-release trigger [of the housing] the rest of the way down. Latching Buckles: Provides water tight closure to the housing. The 3 Stainless Steel buckles have a safety latch lock which should be manually pressed into the lock position and then carefully checked to ensure that the buckle cannot open by mistake during the dive. This can be checked by physically trying to open the latch without depressing the lock release. If the latch does open then you must try again to lock it down so it cannot open. Power Switch: The Control Panel will turn on and the display in the viewfinder will light. Holding the power switch in the "light bulb" position activates the exposure meters and the control panel backlight (LCD illuminator), allowing the display to be read in the dark. After the 9 power switch is released, the illuminator will remain active while the exposure meters are active or until the shutter is released. Exposure Compensation Control: Press button and rotate command dial to choose amount of compensation. Metering Mode: Press button and rotate command dial to choose Matrix Metering, Center Weighted Metering, or Spot Metering. Single/Continuous/Timer/Remote Control Shooting mode determines how the camera takes photographs: one at a time, in a continuous sequence, with a timed shutter-release delay, or with a remote control. To choose a shooting mode, press the button until the desired setting is displayed. AF Mode: Press the AF button until the desired AF setting is displayed: AF-A (auto select), AF-S (SingleServo AF) or AF-C (Continuous-Servo AF). Sub Command Dial: 10 Rotating dial independently changes Apertures in M or A exposure mode (Or the shutter speed if working the reverse mode). Rotating while pushing other control buttons affects the value represented by the control button. Zoom Port Control: 11 This button activates the zoom lens of the camera. Attach the Zoom Control Guide Ring to the lens. This is attached using the Velcro strip. Insure that the projected nub is directly on the bottom. The camera and tray are inserted in such a way that the nub of the Zoom Control Guide Ring is sandwiched between the two projections found on the lens port. All are pointed a downward direction. The Zoom Control is operated when camera is installed in housing is this manner using button #2 Focus Mode Selector: 12 Rotate the selector to choose manual focus or auto focus. When using manual focus, the guide ring should be placed over the focus ring instead of the zoom ring, in order to control the focus with the zoom port control. In this case there will be no control over the zoom. 10 Delete Control: 13 To delete the photograph currently displayed in the monitor, press the delete button. A confirmation dialog will be displayed. Press the delete button again to delete the image and return to playback. To exit without deleting the picture, press the play button. 14 Playback Control: Press housing Playback button to activate LCD monitor in Playback mode. View any image on memory card by scrolling with the left and right arrows on the Four Way Multi-Control. Press housing Playback button once more, or depress shutter release half way to turn LCD monitor off. 15 Menu: Most shooting, playback, and setup options can be accessed from the camera menus. To view the menus, press the menu button. 16 Help and Protect Menu/White Balance button: Help- In the menu mode, if a “?” icon is displayed, help for the current item can be viewed by pressing the help button. Protect- Press the button to protect the photograph currently displayed in full-frame or zoom playback or highlighted in the thumbnail list. The photograph will be marked with a "protected" icon. White Balance- To select a value for white balance, press the WB button and rotate the main command dial until the desired setting is displayed in the control panel. White balance can also be adjusted from the shooting menu. Thumbnail/ISO sensitivity: 17 Thumbnails- To display images in “contact sheets” of four or nine images, press the button in full-frame playback. ISO sensitivity- ISO sensitivity can be selected by pressing the ISO button and rotating the main command dial until the desired setting is displayed in the control panel. ISO sensitivity can also be adjusted from the shooting menu PlaybackZoom/Image Quality & Size: 18 Playback- Press the playback button to zoom in on a photograph in full-frame playback. Image Quality- Image quality can be set by pressing the QUAL button and rotating the main command dial until the desired setting is displayed in the control panel. Image quality can also be adjusted from the shooting menu. Image Size- Image size can be set by pressing the QUAL button and rotating the sub-command dial until the desired setting is displayed in the control panel. Image size can also be adjusted from the shooting menu. 11 Main Command Dial: 19 Rotating dial independently changes Shutter Speeds in M or S exposure mode (Or aperture if working in the reverse mode). Rotating dial independently while in P mode shifts the program exposure into flexible program, and changes the combination of shutter speeds and apertures. Rotating while pushing other control buttons affects the value represented by the control button. 20 Four-Way Multi-Control: Press Up and Down buttons to scroll through Menu options. Press Left and Right buttons to make menu settings and confirm settings. Use Left and Right buttons in Playback mode to scroll through images recorded on memory card. 21 OK Button: The OK button authorizes the selections made when the Multi selector buttons are used. Pressing OK to authorize [confirm] your selection. Optical Viewfinder Eyepiece 22 Built into the back cover of the housing to assist the photographer in viewing and focusing. 23 AE-L/AF-L Control: Press and Hold the AE-L/AF-L button to lock exposure and focus prior to recomposing a scene. The original exposure value and focus distance will remain set after re-composition. 12 Tray & Handle System Assembly The Fantasea FD80 Camera Housing comes with an easy to assemble Tray & Handle system. Please follow these instructions in order to assemble your system correctly. The Assembled System Item #1 Housing Item #3 Item #3 Handle Handle Item #4 Handle Screw Item #2 Item #4 Tray Handle Screw Step 1 – Attaching the Tray to the Camera Housing 1. Hold the Housing (Item #1) so its bottom side is facing up. 2. Position the Tray (Item #2) on top of the housing, so the three screw holes on the Tray are parallel to the three screw holes on the Housing's black attachment plate. Please note that the tray should be positioned in a way that the socket on the tray is facing down, towards the housing and handles. The conical side of the Tray screw holes should be facing up. 3. Use a Philips screwdriver in order to screw the three screws you have received with the Housing into the three screw holes on the Tray. It's important to tighten the screws only after all three screws are in place. Step 2 – Attaching the Handles to the Tray 13 1. Place a Handle (Item #3) on top of the end of the Tray. The Handle and Tray feature sockets that should connect to eachother. 2. Position the handle in a comfortable distance from the Housing. Please note that positioning the Handle too close to the Camera Housing will interfere with opening and closing the Housing's buckles. On the other hand, positioning the Handle too far from the Camera Housing might make it difficult to reach the Housing's control buttons while still holding the Handles. 3. Insert the Handle screw (Item #4) from the bottom of the Tray, through the track, into the Handle, and tighten the screw. 4. Do the same for the other Handle on the other side of the Tray. You can also find these instructions in our Customer Support Section on the websitehttp://www.fantasea.com/technical.asp 14 Preparation of Housing Before the Dive Make Common or Required Camera Settings: Prior to inserting camera in housing, it is recommended that Menu option settings be made according to the preferences of the user. Most of these choices are ones that will remain unchanged for most of the time while diving, and therefore it will be more convenient and less time consuming to make the settings prior to diving. Mount Housing Port: Clean & Lubricate Port O-rings 1. In order to properly maintain the Port O-rings you must periodically remove port O-rings from channel using only your fingers. 2. Push and lift the O-ring from its channel. 3. Do NOT use any sharp instruments, such as knives or dental picks, to remove O-ring. You may accidentally cut the O-ring causing a potential leakage. 4. Inspect the O-ring visually and by feel for any cuts, nicks, flat spots, stretching, or any debris, such as sand, dirt, lint, hair, or other matter that could compromise the integrity of the seal. 5. Clean O-ring by soaking in fresh water until all debris is removed. 6. Dry O-ring with a soft clean cloth. Be careful it does not leave any lint on the O-ring. 7. Lubricate the O-ring with the supplied silicone grease. Do not over-grease the O-ring. It only requires enough grease to allow it to slip into place and make a seal. It should be slippery and shiny but without any abundance or build-up of grease. A teardrop amount is usually sufficient for proper lubrication. 8. Inspect the O-ring channel for any debris or foreign matter that could damage the O-ring or cause it to lose its seal. 9. Clean the O-ring channel using a damp cloth or Q-tip. Be careful not to leave any lint behind. 10. Replace the O-ring in the channel by lifting it over the end of the port until it sits in its channel. Be sure the O-ring is not twisted or deformed and out of position in any way. 11. Mount the port on the housing body by aligning the threads on the end of the port with the mount on the housing and screwing clockwise until it is FULLY screwed in place. 15 Note 1: The FD-80 lens port uses 2 O-rings (one Radial O-ring and one Compression seal O-ring) for a watertight seal. Radial O-rings are affected by friction when closing the seal, as it rubs against a housing wall. Therefore a radial O-ring, such as the O-ring on the port, requires lubrication. Note 2 Lubrication of an O-ring does not improve the seal. It only reduces the amount of friction on the O-ring when it is being moved into sealing position. The amount of lubrication required on the port O-ring is only enough to allow it to slip into place without friction, so it does not twist or become dislodged. More grease is not better, and could in some cases have a negative affect if it is applied in large amounts to form a build-up that could trap any debris or foreign matter. Open Housing: Release all three latches at same time, and lift off back half to open housing. Opening the levers- To overcome the friction of opening, two levers are used to push against the lid with a cam action. See picture attached. Important! Be sure they are inserted all the way flat to the housing before turning to avoid damaging the protrusions on the lid. Inspect and clean main O-ring: Use a clean wet cloth. Use only water to clean the O-ring sealing surface. Do not remove the O-ring unless there is evidence that there is a need to clean the underside surface, or the channel it sits in. If the O-ring does need to be removed for cleaning or replacement, use your two thumbs and at the top corner of the housing where the O-ring groove is, push up from both side until a corner of the O-ring raises above the groove and gently grasp this O-ring section and pull it off the housing. When replacing the O-ring, place it back into the groove starting at the same corner and gently put it in by pressing it into the groove all around the housing until it is all sitting in the groove and no part of it is 16 sticking up or out of the groove. You can then apply a slight layer of silicone if you have not done this yet. Be sure it is completely seated in the channel for a proper seal. Attach the Zoom Control Guide Ring to the lens: This is attached using the Velcro strip. Insure that the projected nub is directly on the bottom when you wrap it around the lens. The camera and tray are inserted in such a way that the nub of the Zoom Control Guide Ring is sandwiched between the two projections found on the lens port of the housing. All are pointed a downward direction. The Zoom Control is operated when camera is installed in housing and button # 2 moved in an upward or downward direction. Insert D-80 camera and lens in housing: Mount camera and lens on the removable tray, using the tripod screw. Slide the tray and camera into the housing tray slot. Make sure it is completely inserted. Slide the flash sync cord into the D-80's hot shoe. Align the housing controls with the corresponding buttons on the camera. Take caution to insure the flat sync cord does not get caught in the housing seal by storing the slack alongside the left side of the camera. Place housing back over front and align the complete mating surface of the housing and the gasket, forming a proper seal. Position all three latches over latch hooks in ready position. Close all three latches at one time. If it is not possible to close all three latches at the same time, close the bottom latch first, maintaining pressure on the other side. Then close the two side latches simultaneously. Test all latches carefully to make sure that that are completely locked into place and not just pushed down. Try to open them without depressing the “Lock Release” to make sure that they cannot open accidentally. Inspect the O-ring seal for proper closure. A complete seal can be visually confirmed by looking for the black line made by the gasket around the complete circumference of the housing. Take a Test Dive: Make the first dive without camera in housing. This will give you a chance to inspect the housing seal for proper closure. In this case, any mistakes will not result in the loss of the camera. Operate all controls under pressure in the water and inspect for watertight seal. Before all dives, immerse the housing in the camera rinse tank, and press all buttons, to visually inspect for any leakage. While descending on every dive carefully observe the housing. If you see any bubbles rising from it or water entering surface immediately while holding the lens port in a downward position. Once on dry land carefully open the housing, take out the camera and dry it off if any water is on it and check to see if there is any damage. Please inspect the housing, rinse it in fresh water, dry it out and then take a dive without the camera in the housing to check for leaks or other malfunctions. 17 Recommended Initial Camera Settings: Set D-80 on M (Manual) Exposure Mode o This is to keep the built-in flash from trying to pop up in low ambient light. o The Auto Exposure Modes are not always appropriate for underwater photography. Set camera to AF focus mode Use menu option to set camera for Focus Priority Release mode. Set Camera to Single Advance Mode Choose Matrix light meter. This will provide the most sophisticated light meter for evaluating complicated and fast changing ambient light conditions. o The Matrix meter in the D-80 is a 1,005 sensor RGB light meter, insuring the most accurate evaluation of the ambient light. Set ISO to desired sensitivity setting. Use ISO 200 for the least amount of noise (digital grain), when possible. Set personal preferences by using camera menus. Using External Strobes: Compatible Strobes include any that can use the standard Nikonos five pin TTL sync. These strobes will have to be used in the Manual Flash Exposure mode. Nikon Speedlights, such as the SB-600 and SB-800 can be used with the D-80 in the iTTL Auto Flash Exposure mode. Connect the strobe sync cord to housing's bulkhead sync port. On the side of the housing port notice a simple alignment indicator [dot] The 5 pin cord contains a small channel [groove] between two of the female pins of the cord. You must insert the cord into the port so the groove is aligned with the indicator of the housing. This assures proper alignment. Hold firmly in place while fastening locking screw. Tighten the collar to secure the cord in place. The O-ring on the end of the sync cord should be inspected, cleaned and lubricated in the same way the port O-ring was treated. Using different B and J arm systems can be accommodated by attaching to the 1 “ (25mm) Aluminium ball on the top of the FD-80’s handles. Fantasea offers a full range of Aluminium B and J arm sets and fittings. Care & Maintenance Before a dive: o Protect the FD-80 from sun and heat. This will reduce the possibility of fogging due to condensation of the warm, moist air inside the housing when immersed in the colder water. It also reduces the possibility of sun damage to the polycarbonate. An insulated camera bag is a good means of protection from overheating. 18 o Protect the FD-80 from accidental impact damage. Secure the housing and camera in a safe location on the boat or in any vehicle, so it does not bounce around or bump into other cameras and housings. The insulated bag mentioned above should be padded for this reason. Do not leave the camera and housing in a camera rinse tank or bucket on the boat in route to the dive site. Rough conditions can cause impact damage and photo gear can often get tangled if too many systems are together in the tank. o Inspection of all user serviceable O-rings should be a routine pre-dive check. Required maintenance for the main O-ring involves cleaning and occasionally a small amount of silicone grease (if there is no damage requiring replacement). Use the silicone grease supplied with the housing. Use only enough grease to lightly cover the O-ring to reduce friction as it is put into its place and the seal is made. Over-lubrication should be avoided and can result in debris accumulating on the O-ring, and compromise the seal. o It is highly recommended that the housing be immersed in the rinse tank or in shallow water before every dive and all its controls operated to visually confirm that it is watertight before descending to depth. After a dive: o Rinse the housing with a strong stream of fresh water. Let it soak for about 20 minutes to allow the water to dissolve any salt residues under the controls or in tight spaces. o Operate all the controls while the housing is soaking to help dislodge any salt residue that may be caught under or around the controls. o Dip the housing vigorously several times to agitate the final remains of salt from the narrow areas or around the controls. o Detach sync cords, arms & brackets for overnight storage. This will greatly reduce the possibility of electrolysis and corrosion that can build up between similar metals on the housing. o Dry with a clean towel or allow drying naturally in a cool shady place. Traveling: o Use protective hard case when traveling to protect the camera and housing from impact damage. o If possible, do not check camera and housing case on airlines. Use a hard case that can fit under the seat or in the overhead compartment of aircraft, and hand carry. Annual Maintenance and Storage: o The housing’s main gasket and port O-ring should be replaced every year or more often if used frequently. The frequency of replacement depends on the user’s inspection of these seals and their condition at the time. If in doubt, it 19 is always better to change them in order to not take the chance of flooding the housing. o The seals on each of the controls should be replaced every couple of years or more often if needed. The best indicator of the need for replacement is if the controls become harder to operate due to a build up of salt or corrosion. o Store housing in a cool, dry location when not traveling. It is recommended that the housing be stored with the two halves together, but not with the latching buckles closed. This will take the constant compression off the main gasket. It is also recommended that the housing is not stored with the port mounted. Basic Shooting Techniques Practice handling the FD-80 on land. o Getting familiar with the location and movement of all the controls and how the changes in settings can affect your image is an important part of the process. It is better to learn the basics of the camera’s operation on land, rather than when first underwater. It is faster to operate the camera out of the housing and you will not have the limited time frame as you would if you were underwater. Focusing and Shutter release control. o Get used to operating this control on the camera in both half depress, and full depress movements. You will frequently depress the shutter release only half way to activate the exposure meter and auto focus to preview the shooting conditions and make setting changes. Once you get the feel for operating the camera control directly, you can then try it in the FD-80, using the housing’s trigger control in the same manner. Use the viewfinder eyepiece o Compose and view exposure information display. It is very important that you become familiar with the information display in the viewfinder so you can make proper exposure settings and know what other settings have been made. You will use this often and it is good to become familiar with it before attempting to read it underwater. Also practice composing and focusing the camera by eye, before using it underwater to get the feel for this operation as well. Changing Exposure Settings o Using the camera in its Manual (M) Exposure Mode gives you the ability to change either shutter speeds or apertures to control the exposure the way you want. Get used to making these changes while your eye is in the viewfinder and you are referencing the LCD display for guiding you in the exposure process. The command dial is set to change shutter speeds, and the sub-command dial is set to change apertures. Practice operating each of these controls so they become instinctive in operation. Familiarize yourself with the movements required 20 o Utilizing each housing control to properly and efficiently change camera settings. Some controls only require a straight pushing movement, while others may require pushing and rotating simultaneously to operate. Using the camera’s light meter to determine ambient light o There are three light meters in the D-80; Matrix, Center Weighted, and Spot. Read the D-80 instruction manual for complete descriptions on each of these meters and when to use each. No matter which one you choose, they all help guide you to the proper shutter speed and aperture combination for proper ambient light exposure. Where you aim the meter is also important. In underwater photography, it is important to remember to aim the meter at the background water or "sky" to get the proper exposure information. It is often necessary to gather this information, make your exposure settings, and then re-compose the scene before shooting. Sometimes it is good to operate the AE-L button o When locking in the exposure value of the background before re-composing and taking the photo. The ISO Sensitivity setting on the camera o This is the same as the film speed that photographers set on film cameras, with one small difference: There is no film. This setting is the equivalent of the film speed you would normally set. The higher the ISO sensitivity number, the more light is captured and the brighter the image. Higher ISO sensitivity numbers have more “Noise”, a term that is the digital equivalent of grain in higher speed films. Try starting out with a lower ISO sensitivity such as ISO 200 if the lighting conditions permit. Get close to you subject when shooting underwater o This will improve the effectiveness of your strobe in restoring lost color. It will also expand the sharpness of the image by reducing the amount of backscatter between the lens and the subject. Begin by choosing subjects o Those that are easy to approach and will not scare off readily when you approach. Choose subjects that will result in a large image size. This will make a more dramatic image. Change F/Stops and shutter speeds to “bracket” your exposures o This will give you a range of image exposures, from which you can choose the one that you like the best. It improves the probability of getting a good shot. Use flash all the time o This will restore the vivid colors lost through selective light absorption. Get to know the full manual power rating of your strobe, by shooting at a constant distance from an average reflective subject, and take several shots at different F/stops. Focus lock on your subject o Practice depressing the shutter release half way, and hold the focus until you are ready to record the image. If you are shooting a moving subject, it may 21 be helpful to focus lock on a nearby part of the coral reef and wait for the subject to enter into your plane of focus. Take lots of shots of any subject or scene o It is important to vary each shot by changing exposure settings or composition. This will give you a good sample of shots from which to select the best one. Camera Lenses and Ports The Fantasea FD-80 has an interchangeable port system that will accommodate a wide variety of SLR lenses for use underwater. These ports include: Standard Flat Port: This port will accommodate the 18-55 mm zoom lens in its wide angle 18mm position. This lens is very popular and is the most common lens first purchased by D-50 owners. It does not include a manual zoom control. It is meant for use in only one position. 60mm Macro Port: A very popular port for the workhorse 60mm micro Nikkor lens. This lens and port is the ideal combination for capturing the widest variety of fish identification portrait shots in a life-size reproduction. 105mm Macro Port: The micro Nikkor is the best tool for capturing the tiny and shy marine subjects. When it is not possible to closely approach your subject, the lens will still offer life-size image reproduction, but with a longer working distance. 5” Dome for 10.5mm, 12-22mm, 14mm, 15mm and 16 mm fisheye and extra wide angle lenses. Fantasea FD-80 Warranty The FD-80 includes a two-year limited warranty for defective parts which the manufacturer will replace. 22