1
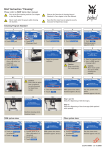
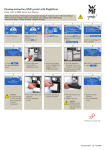
Cleaning instruction WMF 1400 Powder Milk Option Please refer to WMF 1400 User Manual. Prior to the first cleaning read the User Manual, “Customer care” chapter. Consider the Overview of Cleaning Interval Schedule in “Customer care” chapter in the User Manual. Ensure that the mixer hose is placed securely because hot liquid may escape. Never reach under the spouts while cleaning the machine. 1 We 23.04.2008 2 08:16 We 23.04.2008 3 08:16 4 5 Main menu Cleaning prog. SwitchingOff No SwitchingOff Touch clear pad 6 Cleaning prog. Mixer Rinsing IN PROGRESS… Additional pads are activated. Touch pad 7 Cleaning prog. SwitchingOff Machine Cleaning start now? Touch (Customer Care) 8 The menu (Customer Care) appears with 2 cleaning options. Touch Cleaning prog. 9 Touch Switching off The mixer rinsing program starts. 10 Cleaning prog. SwitchingOff Empty Grounds Container a n d D r i p Tr a y. Start Mixer rinsing. Duration: 30 secs. Touch Start The cleaning program starts. See steps 9 to 11. Push combi spout fully upwards Lift the adjustable screen Remove and empty grounds container Caution. Never reach into the brewing unit. 11 12 Cleaning prog. SwitchingOff Reinsert Grounds Container a n d D r i p Tr a y. Close Adjustable Screen. Pull drip tray out and empty it Replace drip tray Caution. Without a drain connection, the drip tray must be emptied. Replace grounds container Close the adjustable screen 13 13.1 Cleaning prog. SwitchingOff O p e n Ta b l e t I n s e r t . Insert the cleaning tablet. Manual insert is either in the centre between the product containers or in the centre behind the containers. 13.2 Cleaning prog. SwitchingOff Close manual insert Open the manual insert lid Add one special WMF cleaning tablet Close the manual insert lid Continue on reverse side. 33 2329 5000 1.03 09.2009 14 Cleaning prog. SwitchingOff 15 15.1 15.2 Cleaning prog. SwitchingOff cleaning tablet inserted? IN PROGRESS… Ye s Cleaning tablet inserted? Touch Yes Step 6: Only if beverages containing choc or topping components have been previously prepared. If machine is not connected to main drainage place a receptacle (.5 gallons) underneath the spout. Machine cleaning starts. Duration approx. 7 minutes. Mixer cleaning at least 1 x per week Cleaning frequency will depend on powder used. Switch off the coffee machine with the ON/OFF button and disconnect mains plug prior to cleaning A B Turn stud on bayonet fitting underneath the mixer bowl clockwise. The mixer jug is released from the arrester lock. The propeller for the mixer is now visible and can be cleaned with a cloth Dismantle two-piece mixer jug Remove milk cover Pull off mixer hose from mixer to combi spout Caution! Carefully disconnect the milk hose. C Reassemble all components Replace mixer jug Turn stud on bayonet connector back counterclockwise Push mixer hose with spring onto mixer jug fitting again and plug in combi spout Run Mixer Rinsing (see part Mixer Rinsing) Mixer Rinsing On reassembly all openings must face in the same direction Ensure that mixer hose is replaced securely. This is important, as otherwise hot liquid from the mixer may escape. Mixer rinsing only On submenu (Care) touch Mixer Rinsing Mixer rinse runs for 30 secs. Dismantle two-piece mixer jug Clean both parts of mixer jug and mixer hosing under warm running water 1 x weekly: Mix 5 ml of WMF special cleaner with 17 US fl. oz (0.5 l) of warm water Soak mixer and mixer hose in the cleaning solution Rinse mixer hose very thoroughly