1
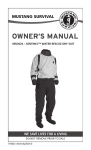
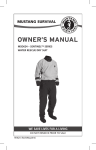
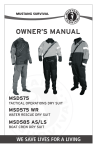
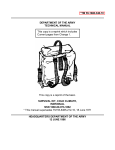
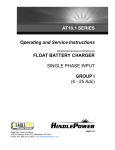
MSD660vAF
SENTINEL – AVIATION RESCUE SWIMMER DRY SUIT
AIR NATIONAL GUARD
DO NOT REMOVE PRIOR TO SALE
HT0661 (Rev12Jun2012)
TABLE OF CONTENTS
DESCRIPTION...................................................................................... 1
MSD660vAF – Aviation Rescue Swimmer Dry Suit.......................... 1
Air National Guard......................................................................... 1
SENTINEL SERIES SIZING GUIDE........................................................... 3
STEP 1 – Measuring........................................................................ 3
STEP 2 – Sizing............................................................................... 4
STEP 3 – Suit Length...................................................................... 5
INSTRUCTIONS FOR USE..................................................................... 5
Neck Seals and Wrist Fitting .......................................................... 5
Attaching Suspenders..................................................................... 6
DONNING THE SUIT............................................................................ 7
CLEANING AND MAINTENANCE......................................................... 9
Cleaning......................................................................................... 9
Maintenance.................................................................................. 9
STORING THE DRY SUIT.................................................................... 10
Folding and Packing..................................................................... 10
LEAK TESTING.................................................................................. 10
Leak Testing Procedure................................................................. 11
REPAIRS............................................................................................ 14
RAPID REPAIR NECK SEAL INSTRUCTIONS......................................... 15
Assemble Materials ..................................................................... 15
Heat Remove Current Neck Seal................................................... 15
Prepping the Materials.................................................................. 17
Attaching a Heat Activated Neck Seal........................................... 17
Inspect Replacement..................................................................... 18
RAPID REPAIR WRIST SEAL INSTRUCTIONS........................................ 19
Assemble Materials....................................................................... 19
Heat Remove Current Wrist Seal................................................... 19
Attaching a Heat Activated Wrist Seal.......................................... 21
Inspect Replacement..................................................................... 23
RAPID REPAIR PATCH INSTRUCTIONS................................................ 23
Limits of Repair............................................................................ 23
Assemble Materials....................................................................... 23
Apply Patch.................................................................................. 24
Inspect Repair............................................................................... 25
EXHAUST VALVE REPLACEMENT....................................................... 25
ACCESSORIES................................................................................... 26
Limited Warranty.......................................................................... 27
CONTACT......................................................................................... 28
DESCRIPTION
MSD660vAF – AVIATION RESCUE SWIMMER DRY SUIT
AIR NATIONAL GUARD
The MSD660vAF is a specialized dry suit designed to aid in
hypothermia protection during surface operations in or on the water
when worn with insulating undergarments.
The MSD660vAF uses Mustang Survival’s new platform design.
Designed to improve fit and function, the MSD660vAF is based on
sound engineering and user feedback. This has been achieved through:
• Extensive use of the 2003 CAESER anthropometric data set
ensures the sizing and patterns of the suits fit the greatest number
of individuals, improving range of motion without adding bulky
extra material. Sizing data is based on a review of 2,500 North
American 3-D body scans.
• Increased number of sizes provides a better fit for end users
without customization.
• Standard expanded sizing (such as short and tall sizing) for all
sizes of suits (Small -3XL).
In addition to Mustang’s platform design, the MSD660 has a number
of other salient characteristics:
• Single-layer waterproof, breathable tri-laminate GORE-TEX®
BD6.5 shell fabric.
• Heat activated adhesive wrist and neck seals, allow for rapid field
replacement of neck and wrist seals with the use of simple field
replacement tools.
• Reinforced molded foam knee and elbow pads that provide
increased knee and elbow protection and wear resistance. (NOTE:
All reinforced areas incorporate drainage to preclude entrapped
water)
• Reinforced seat/thigh area. (NOTE: All reinforced areas
incorporate drainage to preclude entrapped water)
• Low profile, lightweight, and corrosion resistant TIZIP® waterproof
zippers, are easy to operate and require less maintenance than
typical waterproof zippers incorporating brass metal teeth.
• Right arm air exhaust valve to vent excess trapped air out of the
suit.
1
• SOLAS grade retro-reflective tape on the upper shoulders and
arms for increased visibility.
• Left arm low profile zippered shoulder pocket with dual pen
holders.
• 2 x 4 inch Velcro® patch located on left chest for attachment of
nametag
• Left and right thigh elasticized expanding cargo pockets with
drainage mesh and Velcro® secured top cover entry, provide
maximum storage capacity and exhibit a low-profile function
when empty.
• Neoprene cummerbund with waist adjustment tabs allows snug
waist adjustability without impeding mobility. • Low profile adjustable wrist over cuffs.
• Adjustable internal suspenders provided a customized fit and
facilitate wearing the suits in the half-doffed position to prevent
overheating while preparing for missions or attending a briefing.
• Universally sized waterproof, breathable socks are permanently
attached and ankle cuffs reduce entry of small debris into
footwear thereby reducing wear on the socks.
• Waterproof entry and relief zippers are covered to provide flame
retardancy and help to protect the zipper teeth from damage or
contamination.
The MSD660vAF is easily donned/doffed by the wearer using a
diagonal watertight entry zipper across the torso and wearer’s left
shoulder and includes a relief zipper. Customized fit can be achieved
through adjustment of the internal suspenders to modify trunk length
for improved range of motion.
Every MSD660vAF produced by Mustang is leak tested to ensure
waterproof integrity prior to leaving our factory. All suits are 100%
tested to ensure the highest level of reliability and performance.
WARNING: Dry suits alone provide inadequate
protection for extreme climate differences. All users
should wear appropriate thermal undergarments to
prevent hypothermia (in cold climates) and moisture
wicking undergarments to prevent heat stroke (in warm
climates).
2
WARNING: Dry suits are not inherently buoyant. All
users should wear appropriate flotation devices with
the dry suit. Water rescue is inherently dangerous.
Users should be aware of risks associated with water
rescue and complete training in the use of water rescue
equipment and techniques.
SENTINEL SERIES SIZING GUIDE
The Mobility Based Sizing™ platform is like none other currently
in the industry. To order a suit that fits you best, please follow the
instructions below:
STEP 1 – MEASURING
For accurate measurements, please refer to the measurement diagram
and instructions provided.
All measurements should be taken with a ”tailors” (flexible) tape
while wearing garments and any accessories such as body armor
usually worn under the dry suit
LOCATION
3
VALUE
PROCEDURE
1
Chest
Measure the horizontal circumference around the chest
at maximum girth. For males, this is typically where the
tape runs under the armpits at the scye. For females,
this is at the bustline.
2
Waist
Measure the horizontal circumference around the waist
(belt) line.
3
Hips
Measure the horizontal circumference around the hips
and buttock at maximum girth.
4
Sleeve
With your arms horizontal, bent at the elbows, and
with your fists touching knuckle-to-knuckle out from
the chest, measure the distance from the center of the
back along the outside of the arm to the outer tip of
the wrist.
5
Inseam
Measure the vertical distance from the crotch to the
floor. Use a book pressed firmly up between the legs
and measure from the top of the book.
6
Torso Hoop
With your shoulders relaxed and the tape running
over the center of one shoulder and between the legs,
measure the vertical trunk circumference
7
Height
Vertical standing height with good posture and no
footwear.
STEP 2 – SIZING
Based on your measurements, determine your size according to the
chart below. If all your measurements fall between the ranges of two
sequential sizes (such as between S and M) select the size that best
fits your Torso Hoop and Inseam.
Figure 1
MEASURING LOCATIONS
6
1
7
2
3
5
4
LOCATION
XS
S
M
L1
L2
XL
XXL
3XL
Chest
35-38"
37-40"
39-42"
41-44"
43-46"
45-48"
49-52"
53-56"
Waist
29-32"
31-34"
34-37"
35-38"
37-40"
41-44"
46-49"
51-54"
Hips
37-40"
38-41"
39-42"
40-43"
41-44"
43-46"
47-50"
53-56"
Sleeve
29-31"
31-33"
33-35"
34-36"
35-37"
36-38"
37-39"
38-40"
Inseam
28-30"
30-32"
32-34"
33-35"
34-36"
34-36"
34-36"
34-36"
Torso Hoop
59-62"
62-65"
65-68"
67-70"
69-72"
71-74"
76-79"
78-81"
4
STEP 3 – SUIT LENGTH
Based on your height, determine your suit length according to the
chart below.
HEIGHT
XS
S
M
L1
L2
XL
XXL
3XL
Short
57-60"
61-64"
65-68"
66-69"
68-71"
70-73"
72-75"
72-75"
Regular
60-63"
64-67"
68-71"
69-72"
71-74"
73-76"
75-78"
75-78"
Long
63/66/"
67/70/"
71/74/"
72/75/"
74/77/"
76/79/"
78/81/"
78/81/"
Following Steps 1 - 3 should bring you to one comprehensive size such
as L1 Short or Medium Regular, which is a combination of your overall
measurements (chest, waist, etc.) and your height.
*Please note: If all your measurement DO NOT fall into the range
of two sequential sizes, for example, chest measurement is Medium
but Waist measurement is in L2, you may require a full customized
suit. Please contact your Mustang Survival Representative for more
information.
INSTRUCTIONS FOR USE
This manual supplies instructional, maintenance and safety
information for the MSD660, Aviation Rescue Swimmer’s Dry Suit.
NECK SEALS AND WRIST FITTING
The Rubber Neck Seals and Wrist Seals may be trimmed at the initial
fitting, but the seals tend to adjust to the wearer after a short period
of time. If no excessive seal restriction exists, and seal fit is acceptable
to the user, the seals should be left as is. Neck seals shall fit snugly
and remain in direct contact with the neck through all normal head
movements. Wrist seals shall fit tightly enough to prevent water entry,
but not tight enough to restrict blood flow. If seal sizing is required,
proceed as follows:
CAUTION: Trim neck seals with extreme caution. A
smooth trim line is essential. Excessive or careless
trimming could result in loose seals that leak and
necessitate replacement. Avoid nicking seal fabric, as
this could result in tearing the seals when donning and
doffing, and also could result in skin irritation.
1. If neck seal trimming is necessary, mark a line around
circumference of neck opening. Trimming increments shall not
exceed 1/4 inch at a time.
5
2. Carefully cut along this line with a sharp pair of scissors.
3. Trim wrist seals in same manner as neck seals, except trimming
increments shall not exceed 1/8 inch at a time.
4. After trimming seals, have the user don the suit to determine seal
restriction and water-sealing characteristics. Make any additional
adjustments to the seal.
ATTACHING SUSPENDERS
Figure 2
To attach suspenders please follow
the instructions below. The
removable suspenders can be used
to improve fit, lower in-water
resistance and reduce rescuer
fatigue. Suspenders can be adjusted
to a comfortable and secure position.
Figure 3
1. C
ompletely unzip the entry zipper.
2. Open the suit so that the two attachment points are visible.
3. Thread the end of the nylon strap attached to the suit through the
rectangular clip on the suspenders.
4. Once the nylon strap has been threaded, flare the sewn folds on the
strap to prevent it from passing back through the rectangular clip.
Figure 4
Figure 5
6
5. Repeat these steps for the other attachment point.
6. Use the suspender strap ends to adjust for a secure comfortable fit.
DONNING THE SUIT
Before donning the suit, ensure that appropriate undergarments have
been selected for the conditions.
CAUTION: Always don the dry suit on a clean surface
such as a towel or tarp to avoid attracting debris.
Pebbles, sand, dirt and other debris on the ground can
cause damage to dry suit sock and compromise the
suit’s integrity.
CAUTION: Use extreme care when donning the dry suit.
Prior to donning, remove all rings, watches, earrings,
necklaces and eyeglasses that will cause damage to
wrist and neck seals. Footwear other than socks must
not be worn inside the dry suit.
Suit Preparation Prior to Donning
1. Ensure that the Velcro® wrist covers are unfastened and the ankle
gussets are unzipped and opened.
2. Ensure Velcro® waist adjusters are loosened.
3. Ensure that the waterproof entry zipper is fully opened.
4. Ensure the suspenders are pulled out of the suit legs.
Donning the Suit
1. Slide your legs into the suit until your toes reach the end of the
socks.
2. Don the suspenders. Ensure they are crossed in back but not
twisted.
3. Apply talcum powder inside wrist seals.
4. Place the right arm into the right sleeve.
5. Carefully place the right hand into the right cuff by pointing the
fingers straight, tucking the thumb underneath and inserting the
hand through the seal. Do not make a fist when putting your wrist
through the seal.
6. Roll the Velcro® wrist covers back and refasten to a snug fit.
7
7. Repeat Steps 4 - 6 for the left arm.
8. Bring the upper portion of the suit over your head, aligning the
neck opening with the top of the head. Reach inside the top of
the neck seal with fingers and gently pull the seal outward and
down as you push your head through. Flatten any folds or rolls of
the seal against the skin.
9. Close the waterproof entry zipper. Reach over your left shoulder
with your right hand and grasp the zipper toggle. While holding
the top of the zipper, pull the toggle down until the zipper is
completely fastened.10. Ensure the waterproof relief zipper is
completely closed and the slider is fully engaged with the zipper
stop. Stow the zipper toggle in the yellow loop located under the
zipper cover.
WARNING: Failure to completely close the waterproof
entry zipper and the relief zipper will result in leakage
of water inside the suit and reduction of survival time
when in the water. Have a fellow team member doublecheck each slide fastener to ensure they are completely
closed against their sealing plugs.
11. Close ankle gusset zippers and securely fasten the Velcro®
adjustment tabs.
12. Burp the suit before water entry. Cross arms in front and gently
slide fingers between the neck seal and your neck, squat down
and force excess air through the neck opening.
Doffing the dry suit
1. Remove all equipment worn over the suit.
2. Thoroughly rinse down the exterior of the suit while wearing it,
paying special attention to the seals and zippers. Remove all dirt,
salt and debris.
3. Loosen Velcro® waist and ankle adjustment tabs. Unzip the ankle
zippers.
4. Completely open the waterproof zipper. If not completely open,
the zipper faces the risk of damage to the zipper during doffing.
CAUTION: Placing undue force on the zipper may
damage the seal and harm the integrity of the suit.
Never forcefully yank on the zipper.
8
5. Insert fingers between neck seal and neck. Gently stretch the seal
outward and upward while pulling neck seal over your head.
6. With an unclenched fist, slowly pull each hand through wrist seals
while holding the rubber seal open.
CAUTION: Pulling on the rubber wrist seal may damage
the seal.
NOTE: If wearing suspenders, remove suspenders prior
to proceeding
8. Pull suit down past hips and slide legs from the suit.
9. Follow the cleaning and storage instructions for the suit.
CLEANING AND MAINTENANCE
CLEANING
1. Thoroughly rinse your dry suit after every use.
CAUTION: Do not dry clean. Do not iron. Do not bleach.
2. Treat stains with a pre-wash treatment such as Shout® or Spray
‘n Wash®. Follow the manufacturer’s instructions. Rinse well.
3. Machine wash warm (104° F/40° C) on gentle cycle using a gentle
powder or liquid detergent. Do not use fabric softener, bleach or
wash-in treatments, as they can affect the suit’s breathability.
4. Tumble-dry using an air setting
MAINTENANCE
Regular zipper maintenance is recommended to maintain a water-tight
seal, inhibit corrosion and keep the zipper gliding freely. These steps
are essential to zipper longevity:
1. Clean the zipper of any heavy deposits of mud, sand, salt or
foreign substances using warm soapy water.
2. TIZIP® MasterSeal zippers need to be lubricated on the docking
end from time to time. Please use the original TIZIP® lubricant or
other available zipper lubricant as listed below.
3. Carefully apply over the docking end surfaces on front and back
and inside where they connect to the zipper chain.
9
CAUTION: TIZIP® MasterSeal zippers do not require
the zipper chain to be lubricated, only the docking end.
Lubricating the zipper chain may affect the zippers
performance and is not recommended.
4. Repeat before long term storage leaving the slider closed and
whenever the area is dry during use.
Care Product
Product Name
Supplier
Cleaning Fluid
Zip Care
Lubricant
McNett
Tizip
Lubricating
Zip Tech
Lubricant
McNett
Tizip
STORING THE DRY SUIT
Hang the suit with all zippers open.
FOLDING AND PACKING
1. Ensure that the suit is thoroughly clean and dry and that the main
entry zipper is in the closed position before folding and packing.
2. Lay the suit flat on its back on a horizontal; clean surface,
allowing the suit to be fully extended with none of the parts
overlapping.
3. Fold the left sleeve, from the shoulder, straight across the body of
the suit. Fold the right sleeve, from the shoulder, straight across
the body of the suit on top of the folded left arm.
4. Fold the socks over top of the legs until they reach crotch level.
5. Fold the legs, from the crotch, up to the chest level, right below
the folded sleeves.
6. Fold the suit in half.
7. To pack, roll or fold the suit ensuring that the zippers do not crease.
LEAK TESTING
Leak testing is an important part of regular care and maintenance.
Follow these instructions to test for leaks.
10
NOTE: Mustang recommends the use of its MA8836
Dry Suit Test Kit when performing leak testing. If using
alternate test equipment, care should be taken not to
damage the wrist or neck seals.
Figure 6
During testing, all components,
seams, sealed areas, and
attachments shall remain intact
and shall not show any sign of
separation, leakage, or other
damage.
Have a qualified technician test for
leaks after suit repairs, on periodic
inspection, prior to issue and every
six months thereafter, and when
a visual inspection raises any doubt about the integrity of the suit’s
waterproofing.
To perform the suit leakage test: Turn the suit inside out, with the
entry zipper and relief zipper slide fasteners fully closed.
LEAK TESTING PROCEDURE
The following suit leakage test uses Mustang Survival Dry Suit Test Kit
(MA8836). Your equipment may differ and, if so, the test should be
adjusted accordingly.
1. Completely loosen the adjustable neck seal, if equipped. Turn the
dry suit inside out.
2. Place the neck plug into the dry suit, through the main entry
zipper. Close the main entry zipper by reaching in through the
neck opening to pull the zipper toggle.
Figure 7
11
Figure 8
3. Pull the narrower end of the neck plug through the opening of the
neck seal.
4. Stretch the neck seal to fit securely around the neck plug (the end
with the smaller diameter).
Figure 9
Figure 10
5. Fit the cinching strap over the neck seal.
6. Secure the cinching strap by pulling up the excess strap, and
fasten the Velcro closures.
Figure 11
Figure 12
7. Clamp both wrist seals with the clamps provided.
8. Connect the two coiled pneumatic hoses to the output side of the
control box. The two hoses are interchangeable.
Figure 13
Figure 14
12
9. Connect the other ends of the coiled hoses to the neck plug. It
does not matter which hose connects to which plug. Figure 15
shows the correct configuration.
10. Ensure your configuration matches Figure 16, that shows the two
coiled pneumatic hoses correctly attached to the control box and
the neck plug.
Figure 15
Figure 16
11. Connect high-pressure air source to the input side of the control
box. The air pressure should be no greater than 150 psi.
NOTE: Ensure the control lever is set in the off position
before the high-pressure air is connected.
12. The control box has one pressure gauge and two controls. The
black control lever has three positions as labeled on the control
box. The knurled knob can be turned to restrict the airflow
traveling into the dry suit.
13. Move the control lever to the fast position. The suit should inflate
rapidly. Once the suit appears ¾ inflated, move the lever to the
slow position. Turn the knurled knob to restrict the airflow rate
until the suit inflates up to 12 in. water pressure. Twist the knurled
knob further to hold pressure inside the suit at 12 in. water.
Figure 17
13
Figure 18
14. Spray the entire suit with a gentle soap and water solution of
0.5% soap to water by weight. Pay particular attention to the
seams and zippers.
15. Examine any area of the suit where bubbles are forming and take
action depending on the severity as follows (note that bubbles
forming at a rate of less than one per second are probably not
leaks):
16. Small foamy bubbles collecting slowly on seam: Entrapped air. No
leak present, no action required.
17. Small foamy bubbles collecting quickly on seam: Uncertain.
Agitate seam around bubbles to remove any entrapped air. If
bubbles persist after 10 minutes then consider as leak, mark leak
area with a china marker, and document on the inspection record.
18. Steady stream of larger bubbles: Leak. Mark leak area and
document on the inspection record.
19. Any other type of bubble formation or any sign of bubbles on a
panel shall be treated as a leak.
20. When the test is completed, move the control lever to the off
position. Remove the clamps from the suit and disassemble the
rest of the test kit. Hang the suit to dry.
SUMMARY
The Mustang Survival Dry Suit Test Kit Model MA8836 should be used
with Mustang Survival dry suits. Ensure qualified technicians use this
equipment. A well-maintained suit means survival in emergencies for
which normal clothes were not designed.
CAUTION: The use of metal hangars may damage the
dry suit.
REPAIRS
The protection provided by this dry suit relies very much on its
watertight characteristics. It is extremely important that damaged suits
are handled in accordance with the following repair requirements.
If your suit is configured for use with Mustang’s heat activated
seal replacement system, seal replacement can be accomplished by
following the instructions provided in the section below.
Qualified repair personnel can normally perform minor repairs, with
adequate facilities. The manufacturer should perform all major repairs.
14
RAPID REPAIR NECK SEAL INSTRUCTIONS
An online video tutorial of this procedure is available for viewing at
mustangsurvival.com. It may be helpful to watch this video in addition
to the instructions below.
ASSEMBLE MATERIALS
Make sure that you have all of the necessary equipment and materials
to perform the neck seal replacement correctly.
You will need ONE of the following tool kits:
Rapid Repair Neck and Wrist Seal Tool Kit (Part# RE0001)
OR
Rapid Repair Neck Seal Tool Kit (Part# RE0002)
& Rapid Repair Hand Iron (Part# RE0004)
Tools and Equipment Supplied by User:
Light work gloves
Additionally you’ll need ONE of the following Rapid Repair
Neck Seals:
SEAL PART#
SEAL DESCRIPTION
COMES STANDARD
WITH SUIT SIZES
RE0005-L
Rapid Repair Rubber Neck Seal, Thin, Large
XS-3XL
RE0005-S
Rapid Repair Rubber Neck Seal, Thin, Small
-
RE0006-L
Rapid Repair Rubber Neck Seal, Thick, Large
XS-3XL
RE0006-S
Rapid Repair Rubber Neck Seal, Thick, Small
-
RE0007-L
Rapid Repair Neoprene Neck Seal, Large
XL-3XL
RE0007-M
Rapid Repair Neoprene Neck Seal, Medium
M-L2
RE0007-S
Rapid Repair Neoprene Neck Seal, Small
S
RE0007-XS
Rapid Repair Neoprene Neck Seal, Extra Small
XS
HEAT REMOVE CURRENT NECK SEAL
The neck seal in your current dry suit can be removed by using a
simple heating method with a Mustang Hand Iron. 1. Preheat the iron to its maximum temperature, approximately 310 ºF.
2. Place the circle jig inside the suit, white side up, in the middle of
the neck seal opening. A properly placed jig will make a nice flat
surface for the seal to sit against, with the bulk of the suit and
collar out of the way. See Figure 19.
15
3. Flatten out wrinkles around the perimeter of the neck seal
attachment area. Make sure there are no materials caught
between the circle jig and the neck seal.
4. Pick a point on the neck seal as a starting point and heat until
adhesive has softened, approximately 15 seconds. See Figure 20.
Figure 19
Figure 20
5. Grab neck seal and pull the neck seal away from the suit using
only light force. The neck seal will separate from the suit in the
area that was heated. Gloves may help as the neck seal will be
hot where contacted by the iron. See Figure 21.
CAUTION: Stop pulling the neck seal away from the
suit when resistance is encountered.
6. Continue to heat an adjacent section of the neck seal for 15
seconds.
7. Lightly pull the neck seal to detach the adjacent section.
8. Repeat steps 6-7 until the old neck seal has been removed.
9. Remove the circle jig from the suit when finished.
Figure 21
Figure 22
16
PREPPING THE MATERIALS
Once the existing neck seal is removed, it is time to prepare the
materials for the neck seal replacement. Make sure you have all of
your tools and materials nearby during the replacement process.
1. With the circle jig still inside the suit, center the jig in the middle
of the neck seal opening. You should have about 1” of suit
material around the outside of the circle jig. See Figure 23.
Figure 23
Figure 24
3. Peel the backing paper off the replacement heat activated neck seal.
4. Place the replacement neck seal into the opening on the suit. The
heat adhesive portion of the neck seal should be inside the suit
facing up. There should be a 1/8 inch edge of adhesive visible
around the edge of the suit.
Figure 25
See Figure 24.
5. Ensure that there are no
wrinkles in the fabric or
neck seal. Folding the neck
seal in on itself will help to
keep its shape and aid in the
replacement process. See
Figure 25.
ATTACHING A HEAT ACTIVATED NECK SEAL
Once your materials are prepped you are ready to attach your new
neck seal.
1. Preheat hand iron to its maximum temperature, approximately
310 ºF.
2. Start by heating small sections around the edge of the neck seal
for 3 – 5 seconds to tack and hold the neck seal in place. Continue
to check the alignment before heating each spot. See Figure 26.
17
Figure 26
Figure 27
3. Once the neck seal has been tacked in at least 10 places, lightly
heat the entire outside of the neck seal to tack all portions of the
seal into place.
4. Cover the neck seal with the non-stick fabric template provided.
Carefully use the iron to melt the adhesive on the neck seal. Apply
heat to a single section for at least 30 seconds using maximum
hand pressure before advancing iron to the next section leaving
some overlap with the previously heated section. See Figure 27.
5. Continue around the perimeter of the neck seal applying heat
and pressure.
6. Let the neck seal and fabric cool and then remove the circle jig.
7. Inspect for proper adhesion by examining the entire perimeter on
both the inside and outside of the suit.
8. Pinhole leaks may be corrected by re-heating the area for an
additional 30 seconds using maximum pressure.
INSPECT REPLACEMENT
After installation is complete the suit should be leak tested before use.
If a leak originates from a wrinkle in the fabric, the neck seal should
be removed and a fresh neck seal installed. Repeat the leak test.
Once you have verified there are no leaks your new neck seal is now
ready to be used.
18
RAPID REPAIR WRIST SEAL INSTRUCTIONS
An online video tutorial of this procedure is available for viewing at
mustangsurvival.com. It may be helpful to watch this video in addition
to the instructions below.
ASSEMBLE MATERIALS
Make sure that you have all of the necessary equipment and materials
to perform the wrist seal replacement correctly.
You will need ONE of the following tool kits:
Rapid Repair Neck and Wirst Seal Tool Kit (Part# RE0001)
OR
Rapid Repair Wrist Seal Tool Kit (Part# RE0003)
& Rapid Repair Hand Iron (Part# RE0004)
Tools and Equiptment Supplied by User:
Light work gloves
Additionally you’ll need ONE of the following Rapid Repair
Wrist Seals:
SEAL PART#
SEAL DESCRIPTION
COMES STANDARD
RE0008-M
Rapid Repair Rubber Wrist Seal, Thin, Medium
XS-3XL
RE0008-S
Rapid Repair Rubber Wrist Seal, Thin, Small
-
RE0009-L
Rapid Repair Neoprene Neck Seal, Large
XL-3XL
RE0009-M
Rapid Repair Neoprene Neck Seal, Medium
M-L2
RE0009-S
Rapid Repair Neoprene Neck Seal, Small
S
WITH SUIT SIZES
HEAT REMOVE CURRENT WRIST SEAL
The wrist seal in your current dry suit can be removed by using a
simple heating method with a Mustang Hand Iron. All steps should be
practiced prior to applications with heat.
1. Preheat the iron to its maximum temperature, approximately 310 ºF.
2. Roll the jig to form the smallest possible diameter. See Figure 28.
3. Place the jig inside the suit. See Figure 29.
4. Center the jig about the seal and fabric interface.
19
Figure 28
Figure 29
5. Stretch the jig until the ends meet forming a cylindrical shape. See
Figure 30.
6. Flatten out wrinkles around the wrist seal attachment area.
7. Lay the wrist seal flat and place the non-stick fabric sheet on top.
8. Press the iron on the non-stick fabric sheet with moderate
pressure for 30 seconds. See Figure 31.
Figure 30
Figure 31
9. Remove the iron from the surface
10. Gently separate the seal from the fabric by lightly peeling. Gloves
may help as the wrist seal will be hot where contacted by the iron.
See Figure 32.
CAUTION: Stop pulling the wrist seal away from the
suit when resistance is encountered.
11. Heat the adjacent area for 20 seconds and continue to pull.
12. Rotate the wrist seal and repeat steps 9 to 12 until the seal has
been completely separated. See Figure 33.
13. Leave the wrist seal and sleeve to cool prior to completing any
further actions. Gloves may help as the wrist seal will be hot
where contacted by the iron.
20
Figure 32
Figure 33
ATTACHING A HEAT ACTIVATED WRIST SEAL
The wrist seal in your current dry suit can be applied by using a simple
heating method with a Mustang Hand Iron. All steps should be
practiced prior to applications with heat.
1. Preheat hand iron to its maximum temperature, approximately
310 ºF.
2. Flip the suit right side out.
3. Remove adhesive paper backing from wrist seal.
4. Roll the Wrist Seal replacement jig and place it into the wrist seal.
See Figure 34.
Figure 34
Figure 35
5. Line up the jig such that approximately ¼” of the jig is exposed.
6. Stretch the wrist seal jig until the ends meet to form a cylindrical
shape. See Figure 35.
7. Insert the jig and wrist seal into the sleeve from the inside. Ensure
that dry suit seam lines up with the seam of the wrist seal jig.
8. Ensure the suit arm becomes taut and 1/8” of adhesive protrudes
from the cuff end. See Figure 36.
9. Flatten the cuff such that the seam appears right of center. See
Figure 37.
21
Figure 36
Figure 37
10. Center the non-stick paper over the wrist seal where the seal
and suit meet and press the iron with moderate pressure for
approximately 30 seconds. See Figure 38.
11. Leave the non-stick sheet on the seal for approximately 10
seconds before removing.
Figure 38
Figure 39
12. Clean off any adhesive that has attached to the non-stick paper.
See Figure 39.
13. Continue around the circumference of the wrist seal applying heat
and pressure to each adjacent section for 30 seconds.
14. The following steps (14a-15d) are performed for rubber wrist seals
only. Do not perform these steps with neoprene wrist seals.
a. Remove the wrist seal jig.
b. Invert the suit sleeve inside out.
c. Re-insert the wrist seal jig.
d. Press the region around the seam of the dry suit for 30 seconds
to ensure complete adhesion. See Figure 40.
22
15. Let the wrist seal and fabric Figure 40
cool and then remove the jig.
16. Inspect for proper adhesion by
examining the entire perimeter
on both the inside and outside
of the suit.
17. Pinhole leaks may be corrected
by re-heating the area for an
additional 30 seconds using
maximum pressure.
INSPECT REPLACEMENT
After installation is complete the suit should be leak tested before use.
If a leak originates from a wrinkle in the fabric, the wrist seal should
be removed and a fresh neck seal installed. Repeat the leak test.
Once you have verified there are no leaks your new wrist seal is now
ready to be used.
RAPID REPAIR PATCH INSTRUCTIONS
An online video tutorial of this procedure is available for viewing at
mustangsurvival.com. It may be helpful to watch this video in addition
to the instructions below.
LIMITS OF REPAIR
It is recommended that the following guidelines be used in
determining potential for repair:
• Pinholes and small slits, cuts and tears less than 1 inch in length
may be patched by the heat-sealing method.
• Do not patch the neck or wrist seals or socks.
• The total area of patches should not exceed 10% of the suit.
Repair no more than 10% of any one panel.
• Any holes larger than a small slit, cut or tear less than 1 inch in
length should be sent to Mustang Survival for repair.
ASSEMBLE MATERIALS
Make sure that you have all of the necessary equipment and materials
to perform the puncture repair correctly. A list is provided below:
Rapid Repair Dry Suit Patches (Part# RE0010)
Rapid Repair Hand Iron (Part# RE0004)
23
APPLY PATCH
The puncture in your dry suit can be repaired using a simple heating
method with a Mustang Hand Iron. All steps should be practiced prior
to applications with heat.
1. Preheat hand iron to its maximum temperature, approximately
310 ºF.
2. Turn dry suit inside out.
3. Locate puncture.
4. Lay the dry suit on flat surface such that the inside surface of the
suit is facing up.
5. Ensure dry suit material is flat and wrinkle free around the
puncture. See Figure 41.
6. Ensure area around puncture is both clean and dry.
Figure 41
Figure 42
7. Place the shiny side of the patch downwards so that it is in
contact with the inside surface of the dry suit.
8. Ensure the patch is centered over the puncture. See Figure 42.
9. Place hot iron on patch and apply pressure perpendicular to the
flat surface for approximately 20 – 25 seconds. See Figures 43–44.
Figure 43
Figure 44
24
10. Remove iron and turn off.
11. Allow patch and suit to cool for approximately 5 minutes.
INSPECT REPAIR
After repair is complete the suit should be leak tested before use.
It is recommended that a leak test be completed using Mustang
Survival’s Dry Suit Test Kit (Mustang P/N MA8836) or equivalent to
test the complete integrity of the suit
Once you have verified that there are no leaks your suit is ready to be
used.
EXHAUST VALVE REPLACEMENT
The exhaust valves (Part# RE7017) are designed to be easily replaced.
They may be unscrewed and removed with little difficulty. Use the
following procedure:
Figure 45
1. U
nscrew the top of the valve
housing cover.
3. If necessary, use large pliers
to remove the valve. Thread
damage as a result of removal
is not a concern because the
old valve is to be discarded.
4. Unscrew the valve body from its
core and remove it from the suit.
5. Remove the rubber gaskets; set all valve parts aside.
6. Place a new valve and flapper into the hole, with the suit material
between the rubber gaskets, and screw it together. Hand-tighten
only.
7. Perform a leak test to ensure the suit is watertight.
25
ACCESSORIES
The following Accessories are available for your MSD660vAF:
•
Neoprene Survial Hood (Part # MA7348)
•
Sentinel Dry Suit Liner (Part # MSL600)
•
Sentinel Female Dry Suit Liner (Part # MSL601)
•
McNett Zip Tech – zipper lubricant (Part # MA2292)
For more information on these items please visit
www.mustangsurvival.com.
26
WARRANTY INFORMATION
LIMITED WARRANTY
Mustang Survival products are warranted to be free from defects in
materials and workmanship for a period of one year from the date
of purchase by the initial purchaser (the Customer End user) under
normal and intended conditions and use. Proof of purchase may be
required at the discretion of Mustang Survival. Products, which, in the
sole judgment of Mustang Survival, have received excessive or abusive
use or have been altered in any way by a dealer, the Customer or any
other person, will not be covered by this limited warranty. Mustang
Survival requires return of the product (postage or delivery costs
prepaid by Customer) for inspection before determining whether the
product will be covered under limited warranty. A return authorization
is required before the goods are returned and should be obtained
by contacting our Customer Service Department. Once returned,
Customer Service, Quality Assurance and Sales Departments inspect
the product as required. It is then determined whether the product
will be covered under this limited warranty. If the product is deemed
to be covered under our warranty policy, it will either be repaired or
replaced at the sole discretion of Mustang Survival at no charge to the
Customer. The only obligation or liability of Mustang Survival under
this limited warranty is to repair or replace the product and Mustang
Survival shall not, under any circumstances be liable for loss of use
or any consequential damages sustained by the Customer. All other
warranties expressed or implied, and remedies with respect to the
condition or use of the product, which might otherwise be provided by
law in any jurisdiction, are specifically excluded.
27
CONTACT
For further information concerning this manual or the suit, contact:
Mustang Survival
Tel:
1.800.526.0532
E-mail: [email protected]
Web:mustangsurvival.com
28
Mustang Survival has been providing lifesaving solutions
for over 45 years. Through constant innovation and the
application of new technologies, Mustang is the leading
supplier of quality flotation and hypothermia protection
products to the most demanding users — from fishermen,
sailors and commercial mariners to the Coast Guard, fighter
pilots and even NASA astronauts.
WE SAVE LIVES FOR A LIVING
mustangsurvival.com
TOLL FREE 1.800.526.0532
|
EMAIL [email protected]
Mustang Survival and seahorse design is a registered trademark of Mustang Survival Corp.
Our commitment to quality has earned our Burnaby facilities ISO 9001 registration, the highest of all international
standards. This is our guarantee you’re receiving the ultimate in design and manufacturing.