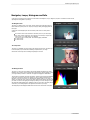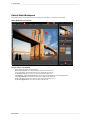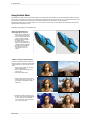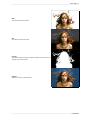
1
Perfect Mask User Manual Copyright © onOne Software, Inc. All Rights Reserved. Table of Contents Chapter 1: Welcome to Perfect Mask Chapter 2: Introduction Using the Help System Contacting onOne Software Additional Help System Requirements Installation Licensing and Registration Opening and Saving Files Using Modules Using as Standalone Using with Photoshop Using with Lightroom Using with Aperture Using with Other Applications Chapter 3: Perfect Layers (Home) Getting Started Perfect Layers Workspace Perfect Layers Tool Well Using the File Browser Navigating the Preview Navigator, Loupe, Histogram and Info Preview Window Modes Using Perfect Layers Creating a New File and Adding Layers Adjusting Canvas Size Cropping the Image Working with Layers The Layers Pane Transforming Layers Trimming Layers Using Color Fill Layers Retouching Layers Red Eye Tool Masking Layers Mask Modes Using the Masking Brush Using the Masking Bug Preferences Menus Keyboard Shortcuts 1 2 3 4 5 6 7 8 9 10 11 12 14 16 17 18 19 20 21 22 24 25 27 28 29 30 31 32 33 34 35 36 37 38 39 40 41 44 47 48 51 Chapter 4: Perfect Mask Getting Started Understanding Masking Perfect Mask Workspace Perfect Mask Tool Well Navigating the Preview Navigator, Loupe, Histogram and Info Preview Window Modes Using Perfect Mask Preparing Your Image Viewing the Mask Keep, Drop and Refine Brushes Magic Brush and Colors Masking Brush Clean Up Tools Pen Tool Adjust Mask Pane Module Settings Menus Keyboard Shortcuts Chapter 5: Index 53 54 55 56 57 58 59 61 62 63 66 68 69 72 74 76 78 79 82 83 Welcome to Perfect Mask 1 Welcome to Perfect Mask Create high quality masks quickly and easily with new automated functionality and powerful tools in Perfect Mask 5.2, the next generation of Mask Pro. Automatic Background Removal, Drop and Refine Brushes, and clean-up tools make selecting subjects and isolating backgrounds for removal extraordinarily accurate. You'll be amazed at how well Perfect Mask 5.2 works even when masking tough subjects like hair and glass on complex backgrounds. Use Perfect Mask 5.2 directly with Adobe Lightroom, Photoshop, Photoshop Elements or Apple Aperture as a plug-in, or use it as a standalone application. The flexibility allows you to work seamlessly in the workflow of your choice. Perfect Mask 2 Introduction Introduction This introductory chapter includes general helpful information about how to use this help system, how to contact onOne Software, how to install and access the software, etc. It covers many of the foundation topics that you will need to understand to get started. Pages in this Section Using the Help System Contacting onOne Software Additional Help System Requirements Installation Licensing and Registration Opening and Saving Files Using Modules Using as Standalone Using with Photoshop Using with Lightroom Using with Aperture Using with Other Applications Perfect Mask Introduction 3 Using the Help System This user guide is html based and readable in most web browsers. On the left side, you will see a table of contents that make it easy to find the section you are looking for. The table of contents is hyperlinked and will take you to the specified section by clicking on them. The main body of the page will show you the content you have requested. Use the scroll-bar at the right to scroll down for additional content. You may see hyperlinks in the body text. They will be blue and underlined. Clicking on one of these hyperlinks will take you to more relevant information. You use the same forward and back buttons in your browser to navigate this user guide as you would a regular web page. You can even bookmark pages so you can find them quickly later. If you don't see what you are looking for in the table of contents, try the search field at the upper right. You can type in what you are looking for and an index of pages will be created automatically that contain your search term. Printing the Manual You can print individual pages by pressing the Print button at the top of the page. A complete printable PDF version of this user guide is available in the user guide section of the onOne website. This version may be downloaded and viewed when you do not have an internet connection. The PDF version may also be installed on your tablet or eReader device for viewing off our computer. Perfect Mask 4 Introduction Contacting onOne Software At onOne Software, we value our customers and offer a variety of ways to be contacted. • Visit our company website at: www.onOnesoftware.com • For technical support please visit: www.onOnesoftware.com/support onOne Software, Inc. 15333 SW Sequoia Parkway Suite 150 Portland, OR 97224 Telephone: 503-968-1468 Fax: 503-968-1469 © 20072013 onOne Software, Inc. All rights reserved. onOne Software is a registered trademark of onOne Software, Inc. The onOne Software logo are trademarks of onOne Software, Inc. Adobe, Photoshop, Photoshop Elements, Photoshop Lightroom, Flash and Acrobat are trademarks of Adobe Systems, Incorporated. Mac OSX, the Mac logo, iPhoto and Aperture are trademarks of Apple, Inc., registered in the U.S. and other countries. Microsoft, Windows, Windows Vista, Windows 8 and .NET are registered trademarks of Microsoft Corporation. All other trademarks are the property of their respective owners. The activation system used by onOne Software, Inc. is licensed under Patent No. 5,490,216. For a full list of license disclosures view the LICENSE.TXT file installed with the software. Perfect Mask Introduction 5 Additional Help Technical Support Contact technical support at www.ononesoftware.com/support or by filing out a request form. Knowledge Base Search the Knowledge Base for common issues, tips & tricks, and compatibility questions. Frequently Asked Questions Check the list of Hot Topics on the onOne web site. This covers the most frequently asked questions. Video Tutorials Visit the onOne University for free online video tutorials and archived webinars. Many users find these to be the best and fastest way to get started and learn new techniques. Perfect Mask 6 Introduction System Requirements Recommended Minimum Operating System Mac OSX Mac OSX 10.6, 10.7, 10.8 (current maintenance releases, 64 bit) Mac OSX Mac OSX 10.7, 10.8 (current maintenance releases, 64 bit only) Windows Windows Vista, Windows 7 or Windows 8 (current maintenance releases, 32 and 64 bit) Windows Windows, Windows 7 or Windows 8 (current maintenance releases, 64 bit) Processor Intel Core 2 Duo, Xeon or better processor(s) Quad-core Intel Core i5, Xeon or better processors(s) RAM 4 GB RAM 8+ GB RAM Hard Drive 1.5 GB for installation 1.5 GB for installation Fast 7200 RPM or SSD drives Display OpenGL 2.0 compatible video card with 256 MB dedicated video RAM 1280x720 resolution OpenGL 4.0 compatible video card with 1GB dedicated video RAM 1920x1080 resolution Optional Application Integration Photoshop CS4, CS5, CS6 Photoshop Elements 9, 10, 11 Photoshop Lightroom 2, 3, 4 Apple Aperture 2.1, 3 Photoshop CS5, CS6 Photoshop Elements 10, 11 Photoshop Lightroom 4 Apple Aperture 3 Other Internet connection for activation, auto update checking, online help, content downloads and tutorials. High-speed internet connection for activation, auto update checking, online help, content downloads and tutorials. Wacom tablet for pressure sensitive input. Hardware display calibration tool. About Windows Video Cards If you are using Perfect Photo Suite from a Windows based computer, it is important that you have the latest drivers for your video card installed to get the best performance. Check with your video card manufactures website for the latest drivers. Be sure your video card is OpenGL 2 compliant and has 256MB or more of dedicated VRAM. Many integrated video cards on low-end laptops may not meet these requirements. Perfect Mask Introduction 7 Installation To install Perfect Photo Suite, double click the installer icon and allow the installer to guide you. You may have downloaded the installer from the onOne Software website or it may be on a DVD if you elected for a physical shipment. You should close any supported host applications such as Photoshop, Lightroom or Aperture as well as any standalone versions of onOne products before installing or updating. Mac OSX The application is installed in the Perfect Photo Suite folder in the Applications folder. All plug-in files for supported host applications (such as Photoshop, Lightroom, Aperture, and Photoshop Elements) found during the installation process will be installed automatically. You will see a summary of installed plug-ins at the end of installation. If a previous versions of Perfect Photo Suite is found, it will be maintained or replaced based on your preference during installation. Support files are installed into /Library/Application Support/ and ~/Library/Application Support/ folder. Windows The application is installed in the Perfect Photo Suite directory in the onOne Software directory in the Program Files directory. All plug-in files for supported host applications (such as Photoshop, Lightroom, Aperture, and Photoshop Elements) found during the installation process will be installed automatically. You will see a summary of installed plug-ins at the end of installation. If a previous versions of Perfect Photo Suite is found, it will be maintained or replaced based on your preference during installation. Support files are installed into \ProgramData\onOne Software\. Uninstalling To uninstall Perfect Photo Suite, follow these instructions. You should deactivate your product before uninstalling. This will allow you to transfer your license to another computer. Mac OSX 1. Go to the Applications/Perfect Photo Suite/Documentation folder. 2. Double click on the Remove Perfect Photo Suite application. Windows 1. Go to Control Panels. 2. Under Programs select Uninstall a program. 3. In the list that comes up select Perfect Photo Suite and then click on the Uninstall button. Perfect Mask 8 Introduction Licensing and Registration Perfect Photo Suite will operate as a trial version for 30 days from when it is installed. If you have purchased Perfect Photo Suite, you will want to license it so you can continue to use it past the trial period. When you install Perfect Photo Suite it will prompt you to license it. Simply click on the license button and enter your license code. Your license code can be found in your order confirmation email if you purchased the download version directly from onOne Software. If you purchased a physical copy of Perfect Photo Suite, a sticker on the information card will have the license code on it. Your license code allows you to install Perfect Photo Suite on two computers. When you enter your license code, Perfect Photo Suite communicates with the onOne activation server and will activate your software. Your software must be licensed and activated to function past the trial period. If the computer you are activating does not have access to the internet, you can manually activate your software by following the manual activation instructions in the license dialog. If you wish to move your copy of Perfect Photo Suite from one activated computer to new computer you will need to deactivate it first. Deactivation is a simple process. Simply open Perfect Photo Suite and select Deactivate from the Help menu. This will deactivate Perfect Photo Suite on the current machine, allowing you to install and activate it on another machine. If you lose your activation code, have your computer stolen and can not deactivate it, need to install on more than two computers or have other activation issues please contact onOne customer service at 1-888-968-1468 or visit the support section of the onOne software website. It is important to register your copy of Perfect Photo Suite if you did not purchase it directly from onOne Software, so we can provide you with the best possible service. Registered users of Perfect Photo Suite are eligible for free technical support, information regarding new versions and products, free updates, upgrade pricing and special offers on new products. Product Improvement Program We believe that the best products are made by listening to our customers. We use many methods to gather your ideas and feedback including: emails, surveys, direct conversations, market analysis and the Product Improvement Program. The Product Improvement Program is built into our software and gathers information about how our software is used. It is the most accurate way for us learn what features are important to you and how our products fit into your workflow. Enrollment in the program is voluntary. When you participate, we collect basic information about how you use our programs and basic information about your computer. This information helps us learn what features are important to you and how we can make our software easier to use. No personal information is collected and you will not be contacted. You can choose to participate in the Product Improvement Program the first time you launch an onOne product. You can change your participation later, just click the Help menu, then Help Improve onOne Products. You can learn more about the Product Improvement Program here. Perfect Mask Introduction 9 Opening and Saving Files Supported File Types Perfect Photo Suite uses the Photoshop (PSD) file format as its default file type. The Photoshop file format is a commonly supported, publicly documented file format that is also the standard file for Adobe Photoshop. It is also supported by Photoshop Elements, Lightroom, Aperture and many other image editing applications. It supports multilayered images and layer masks making it the perfect format for durable, adjusting imaging. Perfect Photo Suite also supports the opening and saving of the following file types. Photoshop (PSD) Photoshop Large Document (PSB) Tagged Image File Format TIFF (TIF) Joint Photographic Experts Group JPEG (JPG) Portable Network Graphic (PNG) Camera Raw files from over 200 digital cameras Photoshop PSD files will maintain all the layers and layer masks you create in Perfect Photo Suite and are recommended as your main file format. If your saved file will be larger than 2 GB or 30,000 pixels on a side, your image will automatically be saved in the .PSB or Large Document format. This is a newer version of the PSD file format and still maintains all your layers and masks. You can use the Save As command to save flattened TIF and JPG files or PNG files with transparency. Camera raw files can only be opened, not saved directly. They must be saved as another file type. Opening Files You may open an existing file in several ways. 1. 2. 3. 4. Open the file from the File > Open menu if you are using Perfect Photo Suite as a standalone application. Dragging a file onto the Perfect Photo Suite icon. Double-clicking on an image in the Perfect Photo Suite Browser. Sending a file to Perfect Photo Suite from a host application like Photoshop or Lightroom using the Perfect Photo Suite plug-in. When opening an existing PSD file that has been editing in Photoshop it may contain unsupported layer types such as text layers, adjustment layers, etc. you will see a warning. You can still open a flattened version of the image if this happens. You can learn more here. Saving Files 1. 2. 3. 4. You may save the open file using the save option. If you have created a new PSD, you will be prompted to select the name and location of the file. You may save a copy of the image using the Save As command. This allows you to select the name and location. You may save flattened images in the TIF, JPG, PNG format from the Save As command in the file menu. If you have accessed Perfect Photo Suite using a plug-in from another application, follow the instructions from that application for saving. If you are opening a JPG, TIF, PNG, or RAW file, Perfect Photo Suite will default to saving a new PSD file. To save over the original file, use the Save As command and select the original file. Perfect Mask 10 Introduction Using Modules Perfect Photo Suite is a collection of modules, or tools, that work together to accomplish your digital workflow tasks. At the heart of Perfect Photo Suite is the Perfect Layers module which acts as the host for the other modules. It is responsible for: The opening and saving of files Merging multiple files into a single, layered file Selecting the layer you would like to work on in other modules Depending on how you access Perfect Photo Suite you may never notice Perfect Layers, but it is there working in the background each time. The Module Selector If you access Perfect Photo Suite as a standalone application you will start in the Perfect Layers module. This is where you will open your file and prepare it for editing. When you are ready, you will select the module you wish to use from the Module Selector in the upper right corner of the main window. You can easily switch between modules by clicking on another in the Module Selector. This allows you to perform multiple tasks during the same editing session. This is the module selector from the Perfect Photo Suite. It contains all of the available modules that onOne Software makes. If you have purchased a single product, you will only see that product module When you have completed your work, you return the and Perfect Layers in your module selector. Perfect Layers module to save your work. If you access Perfect Photo Suite as a Photoshop Plug-in you will not see the Module selector. You will also not see the module selector if you use the following modules as plug-ins through Lightroom or Aperture: Perfect Portrait Perfect Effects Perfect B&W FocalPoint Perfect Resize When you access these modules as plug-ins you use them on their own and then return back to Lightroom or Aperture directly. Your file will be saved and closed automatically. If you access Perfect Layers or Perfect Mask through Lightroom or Aperture you will start in the Perfect Layers module. If you want to have access to all your modules during an editing session from Lightroom or Aperture, select the Perfect Layers plug-in. This will start you in Perfect Layers and the Module Selector will be visible, allowing you to access all of the installed modules. Perfect Mask Introduction 11 Using as Standalone Perfect Photo Suite can be used as a standalone application without the need of Photoshop, Lightroom or other host application. To launch it follow these steps: Mac OSX 1. 2. 3. 4. Open your Hard Drive. Navigate to the Applications folder. Navigate to the Perfect Photo Suite folder. Double click on the Perfect Photo Suite application icon. You can add Perfect Photo Suite to your dock for easy access by clicking and holding the icon in the dock, then select the Keep In Dock option. If you use Launchpad it can be found there as well. Windows Vista and 7 1. Go to your Start Menu. 2. Select the onOne Software group. 3. Select Perfect Photo Suite. If you selected the "Add Icon to Desktop" option during installation you can also access Perfect Photo Suite from there. Windows 8 1. Open the Start screen by pressing the Window key. 2. Select Perfect Photo Suite. If you selected the "Add Icon to Desktop" option during installation you can also access Perfect Photo Suite from there. Perfect Mask 12 Introduction Using with Photoshop If you have the Premium Edition of Perfect Photo Suite, you can access it as a plug-in through Adobe Photoshop or Photoshop Elements. This includes the onOne panel for Photoshop for fast access to plug-ins and their presets. As a Photoshop plug-in you can use modules in the Photoshop workflow. This includes using selections and masks as well as Smart Objects and Smart Filters. You can also record actions for automating and batch processing. If you do not have the Premium Edition of Perfect Photo Suite and would like to use it inside of Photoshop, contact onOne Customer Service about upgrading to the Premium Edition. To use Perfect Photo Suite inside of Adobe Photoshop follow these steps: 1. Open the image you want to work on. 2. Select the layer you want to work on. Generally Perfect Photo Suite works on a copy of your selected layer, not the entire image. 3. From the File menu, select Automate, and then the module you would like to use. To use Perfect Photo Suite inside of Adobe Photoshop Elements, follow these steps: 1. Open the image you want to work on. 2. Select the layer you want to work on. Generally Perfect Photo Suite works on a copy of your selected layer, not the entire image. 3. From the File menu, select Automation Tools, and then the module you would like to use. Perfect Layers is not accessible from Adobe Photoshop or Photoshop Elements. onOne Panel Perfect Mask Introduction 13 Users of Adobe Photoshop CS4 and higher can also access Perfect Photo Suite as plug-ins using the onOne Extension Panel. This provides fast access to the Perfect Photo Suite and its presets. To access the onOne panel, go the Window > Extensions menu in Photoshop and select onOne. The onOne panel behaves just like any other panel in Photoshop. It can be minimized or nested with other panels. To access a module, simple double-click on it. To use a preset, single click on the module name. A menu of available presets will be displayed. Simply doubleclick on one to apply it to your selected layer. If you wish to record actions using Perfect Photo Suite be sure to access it from the File > Automate menu when recording. Perfect Mask 14 Introduction Using with Lightroom If you have the Premium or Lightroom & Aperture Edition of Perfect Photo Suite you can access Perfect Photo Suite as a plug-in inside of Lightroom. This provides an integrated, round-trip workflow. Perfect Photo Suite is the perfect companion for Adobe Photoshop Lightroom. It integrates tightly with it and provides a seamless experience for enhancing your images. There are several ways to use Perfect Photo Suite with Lightroom. Plug-In Extras Perfect Photo Suite can be accessed from the File > Plug-in Extras menu. This is the preferred way to access it. It gives you access to all installed modules and has the most flexibility in how the files are handled. To edit an image in Perfect Photo Suite follow these steps. 1. Select the image in Lightroom. 2. Go the File menu and select the Plug-In Extras flyout. 3. Select the module you would like to use. When you access Perfect Photo Suite as a plug-in from Lightroom the module selector is only available for Perfect Layers or Perfect Mask. When you select one of these modules you can use as many modules as you desire during the same editing session. At the end of the editing session you must save and close the image from the Perfect Layers module. When you select a module other than Perfect Layers or Perfect Mask your image will be sent to it directly and when you press Apply, the image is saved and closed automatically and you are returned back to Lightroom. Selecting Multiple Images If you have multiple images selected, the behavior varies depending on which modules you select. Perfect Layers or Perfect Mask: Multiple images will be merged into a new, multilayered file. Then you may access any modules available in the Module Selector. All other plug-ins: The first image will be opened in the selected module. You make your adjustments and then when you hit apply the image is automatically saved and closed. Then the subsequent images are processed with the same settings automatically. Lightroom Plug-in Preferences When you use Perfect Photo Suite through the Plug-In Extras menu there are important file handling options that are controlled in the Preferences dialog of the Perfect Layers module. These need to be configured in advance based on your desired workflow. File Type: The file type drop-down menu determines what type of file will be created. The default is PSD, which maintains layers. You can also select JPG or TIF if you prefer those formats and are not concerned about maintaining layers. The last option is same as source, which maintains the file type of the original file, except for Camera raw files which are saved as PSD. Color Space: The color space drop-down menu determines what RGB working color space is used; Adobe RGB 1998, sRGB or ProPhotoRGB. Bit Depth: The bit-depth drop-down menu determines the bit depth, either 8-bit or 16-bit per pixel. Resolution: The resolution drop-down menu determines the resolution of the file. Stack with Original: When enabled, the new image is stacked with the original image, making it easier to organize. Use Original for Single PSDs: When enabled, if you select a single PSD file, it will be edited directly, rather than having a copy made. External Editor Perfect Mask Introduction 15 You can also access modules as external editors for all modules except Perfect Layers or Perfect Mask. You can access them from the Edit In contextual menu. These behave similarly to the plug-ins in the Plug-In Extras menu but ignore the preferences set in Perfect Layers. Instead you have the option to control a subset of these options each time you access a module, in the same way you do when you access Photoshop or any other external editor. Batch Processing There are two ways to batch process multiple images in Lightroom with Perfect Photo Suite. It depends on the number of images that you want to process and where you want them saved as to which method is best. Small Batches If you have a small number of images you can batch process them using the same method you would process a single image using the plug-in from the Plug-in Extras menu. A good example would be two similar images that you would like to process the same way. Follow these steps. 1. 2. 3. 4. Select both images. Go to the Plug-in Extras menu and select the module you would like to use. The first image will open in the module, do your work. Press Apply. The first image will be saved and closed automatically. The second image will be opened in the module and the settings used on the first image will be applied automatically, then it will be saved and closed and you will be returned to Lightroom. Remember, you can't batch process with Perfect Layers or Perfect Mask, your images will be stacked to create a new multilayered file instead. If you need to use brushes to apply effects, you should not batch process as brushing is not repeated on multiple images. Large Batches If you need to batch process a large number of images, or control the file size, naming or save to location you should batch process through Lightroom's Export dialog, located in the File menu. Batch processing through Export is driven by presets, so you need to create a preset that accomplishes the work you desire first. 1. Select the images you wish to batch process. 2. Go the Export under the File menu. 3. At the top under the Export to drop-down, select the module to use. 4. Complete the module specific options below. These will start with the preset, followed by options for selecting the export location, file naming, file size, etc. 5. Press the export button. You cannot save Lightroom export presets or use the Export with Previous option. Perfect Mask 16 Introduction Using with Aperture If you have the Premium or Lightroom & Aperture Edition of Perfect Photo Suite you can access Perfect Photo Suite as a plug-in inside of Aperture. This provides an integrated, round-trip workflow. Perfect Photo Suite integrates tightly with Apple Aperture and provides a seamless experience for enhancing your images. Perfect Photo Suite can be accessed from the Photo > Edit with Plug-In menu. To edit an image in Perfect Photo Suite follow these steps. 1. Select the image in Aperture. 2. Go the Photo menu and select the Edit with Plug-In flyout. 3. Select the module you would like to use. When you access Perfect Photo Suite as a plug-in from Aperture the module selector is only available for Perfect Layers or Perfect Mask. When you select one of these modules you can use as many modules as you desire during the same editing session. At the end of the editing session you must save and close the image from the Perfect Layers module. When you select a module other than Perfect Layers or Perfect Mask your image will be sent to it directly and when you press Apply, the image is saved and closed automatically and you are returned back to Aperture. Selecting Multiple Images If you have multiple images selected, the behavior varies depending on which modules you select. Perfect Layers or Perfect Mask: Multiple images will be merged into a new, multilayered file. Then you may access any modules available in the Module Selector. All other plug-ins: The first image will be opened in the selected module. You make your adjustments and then when you hit apply the image is automatically saved and closed. Then the subsequent images are processed with the same settings automatically. The file type, bit-depth and color space of the image is determined by the preferences in Aperture for external editors. Perfect Photo Suite will maintain the file type, either PSD or TIF automatically to support compatibility with plug-ins from other manufactures. Keep in mind only PSD files store re-editable layers and mask. Perfect Mask Introduction 17 Using with Other Applications You can use Perfect Photo Suite as an external editor with many other workflow applications such as Adobe Bridge or Apple iPhoto. First check the application user guide to see if it supports external editors. It should detail how to configure the host application to use an external editor. Generally this will include selecting Perfect Photo Suite setting the file type to send to it. It is best to use PSD files if supported. Below are the instructions for configuring iPhoto. 1. Open the Preferences dialog, from the iPhoto menu. 2. Click on the Advanced tab. 3. From the Edit Photos: pop-up select the In Application... option (note if you have ever selected another external editor, it may be listed here instead.) 4. From the Choose dialog that appears, navigate the the Perfect Layers folder, inside the Applications folder and select Perfect Layers. 5. In the RAW Photos: option, uncheck the Use RAW when using external editor option, and check the Save edits as 16-bit TIFF files option . Perfect Mask 18 Perfect Layers (Home) Perfect Layers (Home) Perfect Layers is the home base module for Perfect Layers. It is responsible for: The opening and saving of files Merging multiple files into a single, layered file Selecting the layer you would like to work on in other modules Depending on how you access Introduction you may never notice Perfect Layers, but it is there working in the background each time. On its own, Perfect Layers is incredibly useful, especially if you don't own Adobe Photoshop. It is the fast and easy way to a layered workflow. Use it to change skies, composite multiple images together or retouch portraits. Some of the features: Combine multiple images into a layered Photoshop-compatible file. Adjust layer size, position, blending mode and opacity. Use the built-in layer masks and masking tools to blend multiple layers together. Use the Retouch Brush to remove blemishes and dust spots. With Perfect Layers, multiple images can be merged as separate layers of a single new file. Then photographers can easily reorder and position each layer; As well as change blending modes and opacity. In addition, photographers can selectively blend, or mask layers together using the Masking Brush and Masking Bug developed originally for PhotoTools and FocalPoint. Perfect Layers saves its work as native layered Photoshop files so users can open them directly with Photoshop for additional editing. Perfect Mask Perfect Layers (Home) 19 Getting Started This getting started section will give you the basics of using Perfect Layers. If you have never used Perfect Layers before, this is a good place to start. You might also try watching the getting started video tutorial. For detailed information on steps and controls mentioned in the getting started section, see the "Using Perfect Layers" section instead. Pages in this Section Perfect Layers Workspace Perfect Layers Tool Well Using the File Browser Navigating the Preview Navigator, Loupe, Histogram and Info Preview Window Modes Perfect Mask 20 Perfect Layers (Home) Perfect Layers Workspace Perfect Layers provides you with an easy-to-use work space for editing your photos. Below is an overview of the main sections. The Main Window: The main window sections of Perfect Layers: A. Browser Section: This is located on the left side of the window. It is where you browse and select your images. B. Tool Well: This is where the tools are located. C. Preview Window: This is the main section where you preview and work on images. D. Tool Options Bar: This strip above the preview window contains the options for the selected tool. E. Navigator, Loupe Histogram and Info Pane: This pane will access navigational, loupe,histogram features as well as file information. F. Layers Pane: This is where you control the image order and apply blending modes. G. Module Selector: This is where you select other modules to work in. H. Close & Save Buttons: This is one way to save or close the current image. Perfect Mask Perfect Layers (Home) 21 Perfect Layers Tool Well There are nine different tools in the tool well. More details about each tool are covered in the following chapters, click on a tool title to learn how to use it. Transform Tool This moves and changes the size and rotation of your layer. Crop Tool This crops your image. Trim Tool This trims a single layer. Masking Brush This masks areas using brush strokes to expose underlying layers. Masking Bug This masks areas using gradients to expose underlying layers. Retouch Brush This retouches small imperfections. Red Eye Tool This tool reduces red eye. Pan Tool This tool repositions your image within the preview window. Zoom Tool This tool changes the magnification in the preview window. Perfect Mask 22 Perfect Layers (Home) Using the File Browser Built into Perfect Layers is a file browser, located in the left panel. You can use it to browse your images as well as content you download from the onOne website. The browser starts by displaying a series of sample images used in many of the onOne Software video tutorials. Below is a description of the controls in the file browser. A. Browser Tabs: This switches between the Browser tab and the Extras tab. The Extras tab displays the included backgrounds, borders and textures. B. Folder Tree: This drop-down menu displays the folder paths above the folder you are browsing. You can use this to quickly navigate up the folder tree. The currently selected root folder is displayed here as well. C. Closed Folder: A closed sub-folder has a dark gray tab and the arrow faces to the right. D. Open Folder: An open sub-folder has a light gray tab and the arrow faces down. E. Search Field: Use the search field to locate files in the current sub-folder. Simply start to type and your results will appear in a new sub-folder called search results while you type. F. Image File: A file is displayed as a thumbnail of the image and will have the filename and extension listed below it. G. Resize Handle: On the right edge is a resize handle that you can drag to change the size of the browser or close it. H. File Info: This window will show captured and modified dates, color space, exposure settings and size on disk if applicable. I. Browser Modes: These icons control the browser views. One column, two column, three column or list view. Browsing a Folder You can select which folder to browse by selecting Browser... in the File menu. The last folder you browsed will be remembered and displayed automatically. Navigating the Browser To open a sub-folder, click on it. To close it, click on it again. Only one top-level folder can be open at a time. Double-clicking on a folder sets it to the root folder and its name will appear in the folder tree drop-down. The selected item, either a folder or file, will have a light silver box around it. You can use the up and down arrow keys to change your selection in the browser. You can open or close folders using the command (control on Windows) up and down arrows. You can select multiple files by holding down the shift key. Perfect Mask Perfect Layers (Home) 23 You cannot move or delete files from the File Browser. Opening Files from the Browser You can open an image in the browser by double-clicking it. If you already have an image open you will be prompted to either merge the selected file as a new layer or to open it as a new file. If you have multiple images selected, you can open them as layers using the Open Selected from Browser command in the File menu. Searching for Files To search for files in the currently selected folder, type in the name of the file in the search field. The search results appear in a new sub-folder called search results, which will be selected automatically. You can clear the search field by pressing the x at the right end of the search field. Browser Pop-Up To view a larger preview on an image, enable the Show Browser Pop-up in the View menu. When you mouse over a thumbnail, a larger preview will be displayed in a pop-up window. Resizing and Closing the Browser The browser can be resized by dragging the resize handle on the right margin of the browser. The browser can be closed or reopened by clicking on the resize handle or using the cmd (control on Windows) left and right arrow keys. Browser Modes The browser offers four viewing modes. Three that display thumbnails in columns and one list view. The browser modes are selected using the browser mode icons at the bottom of the browser. single column view two column view list view Extras Tab The Extras tab displays add-on content including backgrounds, borders and textures. When you download content packs from the onOne website they are automatically installed in the Extras tab. Perfect Mask 24 Perfect Layers (Home) Navigating the Preview Perfect Layers provides several ways to navigate and view your image in the Preview window. The Preview Window above is the main section where you preview and work on images. Hand Tool The Hand tool is used to position the image within the Preview window, whenever the preview zoom is larger than the viewable area. To pan (scroll) in the Preview window: Select the Hand Tool and drag the image until you locate the area you wish to view. With any other tool selected, hold down the spacebar while you drag the image in the window. Double-click the Hand tool in the Toolbar to set the image to a magnification that fits completely in the current window size. Zoom Tool The Zoom tool changes the magnification of the image in the Preview window. With the Zoom tool selected: Click in the Preview window to zoom in and center the image at the location clicked. Click and drag in the Preview window to draw a rectangular, the screen fills with the area within the rectangle when you release the mouse. Hold the Option key (Mac) or Alt key (Win) and click to zoom out. Double-click the Zoom tool in the Toolbar to set the image to 1:1 or 100% magnification, showing every pixel. This is best when examining small details. Perfect Mask Perfect Layers (Home) 25 Navigator, Loupe, Histogram and Info At the top of the control panel on the right of the main window is the Navigator | Loupe | Histogram | Info panes. It contains four useful tools for inspecting and viewing details of your image. The Navigator Pane This gives you a birds-eye view of your image. The blue square region marks the image area that is visible in the preview pane. You can pan your image by clicking and dragging inside the blue region. At the bottom of the Navigator pane are several Zoom presets. Click on a Zoom preset to activate. FIT: Zooms to fit the current canvas size. This allows you to see your entire image. FILL: Zooms to fit the current layer. This is great if you are working on a layout and want to zoom in on a smaller layer you are adjusting. 100: Zooms to 100% or actual pixels. This is best for judging small details. 50: Zooms to 50% 25: Zooms to 25% The Loupe Pane This gives you a magnified view of the section of the preview under the cursor. This allows you to view the quality of your results while maintaining a complete view of your image. At the bottom of the Loupe Pane is a sliding for adjusting the zoom level. The Histogram Pane This gives you a color chart of the shadow, mid-tone and highlight areas based on the image RGB values. This is useful to show areas within the image that may be clipping. Clipping is when your image contains pure blacks or white and can signify loss of highlight or shadow detail. The left side of the histogram represents the shadows, while the right represents the highlights. At the top of each end is a triangle. If the triangle is lit, there is clipping on that side of the histogram. If you click on the arrows, you will activate the clipping overlay on your image. The areas of your image with a blue overlay are pure black, while the areas with the red overlay are pure white. You can turn the clipping view off again by clicking on one of the triangles. You can also temporarily enable clipping view by holding down the J key at any time. The clipping view is useful when you are making adjusts to the brightness and contrast of your image. The Histogram pane also displays the RGB values under the cursor at the bottom of the pane. Perfect Mask 26 Perfect Layers (Home) The Info Pane The info pane will display important metadata about your file including: Camera type File type Focal length and lens information Date and time captured Exposure information ISO Shutter Speed Aperture Exposure Value Filename Color Space Dimensions File Size and Bit Depth If your camera allows for GPS the GPS button will be viewable and you can click on it to get the GPS cordinates for where the image was taken. This feature only works if you have GPS enabled on your camera or mobile device. Otherwise you will not see the GPS button. The Info panel is not visible when you access Perfect Layers as a Photoshop plug-in. Perfect Mask Perfect Layers (Home) 27 Preview Window Modes The preview window has several modes including; single image, side-by-side (horizontal or vertical) and split-screen (horizontal or vertical) versions of an image. This allows you to compare layers side-by-side or to view a layer mask and the layer side-by-side. At the bottom left of the Preview Window is a button that toggles and shows the current Preview Mode. You can also change the mode from the View menu. Single Mode Screen. Left-Right Screen. Left-Right Split Screen. Top-Bottom Screen. Top-Bottom Split Screen. Tip: You can use the keyboard shortcuts below to quickly switch view modes. Items in parenthesis are for Windows. Command (Control) L: Command-Option (Control-Alt) L: Command (Control) T: Command-Option (Control-Alt) T: Command (Control) Y: Change the preview mode to Left/Right. Change the preview mode to Left/Right Split screen. Change the preview mode to Top/Bottom. Change the preview mode to Top/Bottom Split screen. Change the view mode to single image. Perfect Mask 28 Perfect Layers (Home) Using Perfect Layers This section covers the complete use of Perfect Layers. It includes how to use each tool and control as well as information on preferences and menu options. Pages in this Section Creating a New File and Adding Layers Adjusting Canvas Size Cropping the Image Working with Layers Masking Layers Preferences Menus Keyboard Shortcuts Perfect Mask Perfect Layers (Home) 29 Creating a New File and Adding Layers You can create a new file in several ways. 1. Create a new, empty file from the File > New menu. The New Image dialog is presented, see the image to the right. From the New Image dialog, you have the following options. Name: Presets the name of the image. Preset: Lists a range of preset image dimensions for common print sizes. Width: Sets the width. There is a drop-down menu that includes inches, cm and pixels. Height: The same as the width, just for setting the height. Swap Dimensions button: Pressing this button will swap the current width and height. Resolution: Sets the resolution of the image. Color Space: Sets the color space (icc profile) of the image. The default is set based on the user preferences. Only RGB color space profiles are available. Bit Depth: Sets the bit depth of the image, either 8 or 16 bit. 1. Merge one or more images together using the Add Layer from File command. 2. Merge one or more images together using the Lightroom or Aperture plug-ins or external editor option. 3. Dragging one or more images onto the Perfect Layers icon. Adding Layers from Files You may add images (flat or layered) as layers into an open file by: 1. Using the Add Layer from File command from the File menu. 2. Using the Lightroom or Aperture plug-ins when an image is already open. Attempting to open or merge files from the application icon or from the Lightroom or Aperture plug-ins will prompt the user to either merge the files into the existing image or create a new one. Perfect Mask 30 Perfect Layers (Home) Adjusting Canvas Size The canvas size, or image size is the aperture through which you view the layers. An image may have layers that are larger than the canvas size and are partially hidden by the canvas size aperture. 1. When creating a new empty file from the File > New dialog, an arbitrary size is set by you. When creating a new image, you have the option to set the resolution. 2. When creating a new PSD file by merging other files together using the Add Layer from File command, the source image that has the largest pixel dimensions will become the bottom most layer and will set the canvas size. The canvas size is adjustable by the user. 3. When opening an existing PSD file, the canvas size is already set. The canvas size is adjustable by the user by accessing the Canvas Size dialog from the Edit menu. Layer image data outside the canvas area is maintained. Adjusting the Canvas Size 1. In the top section, Current Size, it displays the current canvas size and is non-editable. 2. Below the Current Size is the New Size section. It displays the current width and height and is editable. There is a drop-down menu with options for pixels, inches, and cm. There are width and height fields where you can adjust the canvas size. The canvas size dialog does not interpolate (resize all the layers at the same time). This is the same as the image size dialog box in Photoshop when the resize image option is disabled. There is a lock proportions toggle that locks the width and height proportions together. Adjusting the width will change the height proportionally. This option is on by default. At the top of the new size section is a pop-up called Set To. The values in the pop-up are; Current Layer, All Layers and Custom. When a user selects the current layer option, the width, and height are set to the size of the currently selected layer(s). If the user selects all layers, the width and height are set to the union of all the layers, making all the pixels on all layers visible in the canvas. If the user selects one of the layer size options and then manually overrides them, the pop-up changes to custom. Perfect Mask Perfect Layers (Home) 31 Cropping the Image Crop Tool: This is used to crop the entire image. The crop tool removes any pixels outside a crop box and changes the canvas size at the same time. To crop the image, select the Crop Tool from the tool well. Then drag a box over the area you wish to keep. The area outside the crop box appears darkened for guidance. You can resize and move the crop box. When you are satisfied with your settings, press the Apply button in the Tool Options Bar or press enter. Moving the Crop Box To move the Crop Box, simply click and drag inside the box. You can also nudge the box using the arrow keys on your keyboard. Resizing a Crop Box To resize the Crop Box, click and drag on any of the resize handles. Clicking on a corner handle allows you to adjust two sides at the same time. Clicking on a side handle allows you to adjust that side. If you hold the shift key down while adjusting the size, the proportions of the box are maintained. You cannot rotate a Crop Box. You can enter the size in pixels of the crop box by typing in the width and height fields of the Tool Options Bar. There are also buttons to automatically set the crop to the current layer or canvas size. Perfect Mask 32 Perfect Layers (Home) Working with Layers The concept of a layers and a layered workflow is the key benefit of Perfect Layers. Having the ability to create composites of multiple layers is the most powerful tool in a photographer's arsenal and is the hear of many photographers workflows. This feature is lacking in Lightroom and Aperture and requires photographers to purchase Photoshop which is expensive and cumbersome to learn. Articles in this Section The Layers Pane Transforming Layers Trimming Layers Using Color Fill Layers Retouching Layers Red Eye Tool Perfect Mask Perfect Layers (Home) 33 The Layers Pane Layers are listed in the Layers Pane, located in the right column. It lists the layers and contains the controls to adjust them. Layer Visibility You may change the visibility of a layer (hide it) by pressing the eye icon to the left of the layer thumbnail. This will hide a layer without deleting it. You can hide all layers except the current layer by holding the option (Mac OS X) or alt (Windows) key when clicking on the eye icon. This is especially useful for viewing the bottom most layer, which in some cases is the original image. This acts like a before and after preview. Changing Layer Order You may change the order of layers by dragging and dropping layers into the order you prefer. You may select multiple layers at the same time by holding down the command (Mac OS X) or control (Windows) key while clicking. Renaming Layers You can rename a layer by double-clicking on it. The name turns into an editable field. Type in your preferred name and press enter. When merging files together the layer name is the name of the source image. This is a useful verification of the source image. Deleting a Layer You may delete a layer by selecting the layer, then pressing the Delete button. You may also use the Delete key on your keyboard. Duplicating a Layer You may duplicate or copy the current layer by pressing the Copy button. You may also use the command (Mac OS X) or control (Windows) + J keyboard shortcut. Merging Layers You may merge layers by selecting them and then pressing the Merge button. You may also use the command (Mac OS X) or control (Windows) + E keyboard shortcut. Creating Color Fill Layers Color Fill Layers are new layers filled with a solid color. They are useful for altering the color and tone of the image. To create a Color Fill Layer, press the Fill button. You can learn more about using Color Fill Layers here. Changing Blending Modes Blending modes determine how the selected layer blend with the layer(s) below it. The default blending mode is normal. This maintains the full opacity of the upper layer. Perfect Layers also supports many other blending modes which can be used to alter the brightness, contrast and color of the image by combining either a copy of the underlying layer or a Color Fill Layer. Changing Opacity The opacity slider controls how opaque, or how strong the selected layer is. The default is 100%. At lower settings, the layer will blend with the layer(s) under it. Altering the blending mode and opacity of a layer can create a wide range of color and tone effects. Layer Masks If you use any of the masking tools, a layer mask will be created automatically. A layer mask appears as grayscale thumbnail next to the layer icon. There is no need to select the layer mask to work on it, invert it, or reset it. Think of it as always selected with the layer. Perfect Mask 34 Perfect Layers (Home) Transforming Layers Transform Tool: The Transform Tool is located at the top of the tool well. It is used to manipulate the image and layers. A layer may be repositioned, sized or rotated using the Transform Tool. When the Transform Tool is selected, transform handles will appear on the edges of the selected layer. You use these transform handles to manipulate the image. You can only transform one layer at a time. Repositioning a Layer To reposition a layer, simply click and drag inside the transform box. You can also use the keyboard arrow keys to nudge a layer one pixel in any direction. Resizing a Layer To resize a layer, click and drag on any of the transform handles. Clicking on a corner handle allows you to adjust two sides simultaneously. Clicking on a side handle allows you to adjust that side. If you hold the shift key down while adjusting the size, the proportions of the layer are maintained. If you hold down the option (Mac OS X) or alt (Windows) key while resizing your image will resize from the center instead of from the edge. You can hold down both the shift and option or alt simultaneously to resize, proportionally from the center. You can also type in the size you desire in the Tool Options Bar (see below) in the width and height fields. You can also size a layer to fill the canvas automatically by pressing the Fill but in the Inspector. The Tool Options Bar Rotating a Layer To rotate a layer, move the Transform Tool near but just outside a corner transform handle. Notice that the tool cursor changes to a rotate cursor. Now click and drag to rotate the layer. You can also use the opt (alt) left and right arrow keys to rotate a layer when the transform tool is selected. To rotate the layer quickly in 90 degree increments, you can use the rotate left and rotate right buttons in the Tool Options Bar. Flipping a Layer You can flip a layer either horizontally or vertically by pressing the flip buttons in the Tool Options Bar. When you have completed your transforms you need to commit the changes. You can do this by pressing the Apply button that appears in the Tool Options Bar or by pressing the enter key. You can cancel a transform by pressing the Cancel button in the Tool Options Bar or by pressing the escape key. Perfect Mask Perfect Layers (Home) 35 Trimming Layers Trim Tool: The trim tool is used to trim or crop a layer. It removes any pixels outside of a crop-style box for the current layer. Using the Trim Tool To trim a layer, select the Trim Tool from the tool well. It looks like a pair of scissors. Then drag a box over the area you wish to keep on the selected layer. The area outside the trim box appears darkened for guidance. You can resize and move the trim box. When you are satisfied with your settings, press the Apply button in the Tool Options Bar. Moving the Trim Box To move the Trim Box simply click and drag inside the box. You can also nudge the box using the arrow keys on your keyboard. Resizing a Trim Box To resize the Trim Box, click and drag on any of the resize handles. Clicking on a corner handle allows you to adjust two sides simultaneously. Clicking on a side handle allows you to adjust that side. If you hold the shift key down while adjusting the size, the proportions of the box are maintained. You cannot rotate a Trim Box. You can manually enter the size of the trim box in pixels using the width and height fields in the Tool Options Bar (see below). When you have completed your adjustments, you need to commit the changes. You can do this by pressing the Apply button that appears in the Tool Options Bar or by pressing the enter key. You can cancel a transform by pressing the Cancel button in the Tool Options Bar or by pressing the escape key. The Trim Tool Options Bar Perfect Mask 36 Perfect Layers (Home) Using Color Fill Layers Color Fill Layers provide fast, re-editable ways to alter the brightness, contrast and color of your image. Color Fill Layers leverage the power of layers, blending modes, and opacity. Color Fill Layers are simply layers filled with a solid color. However by changing the color, blending mode, and opacity along with Perfect Layer's masking tools you can do the following: Create a burn or dodge layer to selectively lighten or darken the image. Convert the image to black and white. Tint the image any color. Add a vignette. Simulate photographic filters like warming and cooling. Create darkroom looks like sepia toner. Creating Color Fill Layer To create a Color Fill Layer, press the Fill button in the Layers Pane or use the New Color Fill Layer command from the Layers menu. The Color Fill Layer dialog will appear. With this dialog you can select a preset or manually adjust the color, blending mode, and opacity of the Color Fill Layer. 1. Preset: This pop-up list contains presets for many common filter effects. Select a preset from the menu to preview it on your image. 2. Fill Color: This is a color well that displays the current color. You may press the color well to open a color picker dialog. Selecting new colors in the color well will be previewed in realtime on the image. 3. Blending Mode: This option sets the blending mode for the layer. You can always change this later from the Layers pane. 4. Opacity: This slider sets the opacity for the layer. You can think of this as a strength slider for the effect. You can always change this later from the Layers pane. Editing a Color Fill Layer You can edit an existing Color Fill Layer by using the Edit Color Fill Layer option from the Layers menu. It will reopen the Color Fill Layer dialog where you can adjust the settings. Color Fill Layers work similar to a regular layer. You can move, resize, rotate, trim, delete and duplicate them. Masking a Color Fill Layer You can mask, or selectively apply a Color Fill Layer using any of the masking tools in Perfect Layers, similar to any other layer. To learn how to mask a layer, see the Masking Layers section. Perfect Mask Before After Perfect Layers (Home) 37 Retouching Layers Retouch Brush: Use the Retouch Brush to remove small imperfections like dust. You can retouch small imperfections on a layer using the Retouch Brush. Just dab the retouch brush on spots like acne, dust spots, power lines, etc. It looks at the neighboring areas and fills in the brush with similar color and texture. It is best to use the smallest brush size possible and to work by dabbing rather than making large brush strokes. If you dab with the Retouch Brush and don't like the results, use the undo command and try using a smaller brush or vary your brush stroke and try again. You can control the Retouch Brush using the Tool Options Bar (see below). Brush Size: This adjusts the overall size of the brush. Brush Feather: This adjusts the hardness of the brush. It works best to use a feather larger than 50 to blend and look natural. Brush Opacity: This adjusts how strong the retouching is. Use 100% to completely remove an imperfection. Use a lower opacity to soften them. W: If you have a Wacom pressure sensitive tablet, you can adjust the size of the brush according to the pressure. Click on the "W" in the box to activate the Wacom sensitivity controls. Use Clone Brush: You can choose the "Use Clone Brush" option by clicking the the box to activate it. This will allow you to select an area to clone. Hold down the option (Mac) or alt key (Win) and click the area you want to clone from. Then click and drag on the area you want to clone over and it will clone from the point you selected. You can adjust the size of brush, feather and opacity just as you would with the regular brush. This just gives you more control over the area you want to retouch. Perfect Mask 38 Perfect Layers (Home) Home > Perfect Layers (Home) > Using Perfect Layers > Working with Layers > Red Eye Tool Red Eye Tool Red Eye Tool: To instantly reducered eye. The Red Eye Tool is the perfect tool for eliminating or reducing red eye in your images. It's a simple one-click stamp that will immediately take care of red eye. You start by selecting the red eye brush in your Tool-Well. Next adjust your brush size to be as close to the same size as the red eye you are wanting to remove. Then dab the tool over the eyes. The Protect Skin toggle reduces the tools affect on skin colored areas. It is on by default. If the red-eye reduction is not strong enough, try toggling this off. Perfect Mask Perfect Layers (Home) 39 Masking Layers Masking allows you to selectively blend layers together. It is the heart of using Perfect Layers. Creative examples of what you can do with masks: Change heads from one image to another. Replace the sky by merging exposures or image together. Add a vignette. Burn or Dodge to lighten or darken selective areas. Combine a motor drive sequence. Create a montage. You can think of masking as painting with black paint on white paper. A white mask reveals all the layer that the mask is attached to. An all white mask is considered blank or empty and shows all the selected layer. As you use the masking tools, you are adding black paint (Paint-Out mode). Where you paint with black you are hiding the current layer, allowing the layer(s) under it to show through. Think of it like cutting a hole in the mask. If you make a mistake, you can switch your paint color to white (Paint-In mode) and paint the layer back in like an eraser. When you paint you have more than just white or black, but any shade of gray in between depending on the opacity of the brush. Shades of gray partially hide the layer, blending the layers together. Each layer in Perfect Layers has a mask automatically added to it. This allows you blend each layer differently. Masking in Perfect Layers is done in a nondestructive, re-editable way that is compatible with Photoshop. The masking done in Perfect Layers are stored as layer masks which can be viewed and edited later in Perfect Layers and Photoshop. There are several global masking options that can be accessed from either the Tool Options Bar or the Masking Menu. They affect the entire mask on the selected layer. Reset Mask Reseting a mask returns it to all white. The entire layer is visible. Invert Mask Invert swaps the white for black and black for white. What was hidden is now revealed and vice-versa. Inverting a mask can be very useful. It allows you to paint a layer in, rather than out, which is handy if you only want to work with a small area. Copy and Paste Mask Perfect Layers allows you to copy the mask from one layer to another. This is handy if you have painted a complex mask on one layer for an adjustment and you wish to use the same mask on another layer for a different adjustment. To copy or paste a mask, use the Copy Mask and Paste Mask commands from the Masking menu. It is important that the source and target layers are the same size, or you may get odd results. Perfect Mask 40 Perfect Layers (Home) Mask Modes Mask Mode allows you to view your image mask in several ways. The pulldown Mask Mode is located at the bottom of the Preview Window A close-up of the Mask Mode and options All Layers (default option, this shows the mask for the current layer). Mask-Red (this shows the mask for the current layer). Mask-White (this shows the mask for the current layer). Mask-Dark (this shows the mask for the current layer). Mask-Grayscale (this shows the mask for the current layer). Current Layer (Displays only the currently selected layer, this is the same as option-clicking on a layer). Mask Mode allows you to view the mask for each layer that you have created with the Masking Brush and Masking Bug. You can view the mask in several modes, which are accessible from the Show Mask pop-up in the Masking Pane, from the Masking menu, the masking tool inspectors or from the preview window mode pop-up in the bottom left of each preview pane. Below are examples of the different mask view modes. You can toggle the mask view on and off with the command (Mac OSX) or control (Windows) plus m keyboard shortcut. Mask-Red Mask-White The masked area appears as 50% red. This is similar to the Quick Mask view in Photoshop. The masked area appears as solid white. Mask-Dark Mask-Grayscale The masked area appears as 90% black. Perfect Mask The masked area appears as black. The unmasked areas appear as white. This is the same as viewing a layer mask in Photoshop. Perfect Layers (Home) 41 Using the Masking Brush The Masking Brush: The Masking Brush functions like a brush tool for masking layers. The Masking Brush is one of two tools in Perfect Layers for masking layers. When you select the Masking Brush, your tool icon changes to a circle that represents the size of the brush. It may also appear as two concentric circles (see below), indicating the inner hard edge and outer soft edge of the brush if the feather control is set above zero. There is also either a plus or minus in the center of the brush. Minus means the brush mode is set to paint-out, plus means it is set to paint-in. How to use the Masking Brush To use the Masking Brush, select it in the tool well. Make sure you are on the layer you wish to hide. Then check your brush mode and confirm it is set to PaintOut. You are ready to mask now, simply paint on the image in the areas you wish to hide. As you brush, you will see the underlying layer(s) appear. If you make a mistake while brushing you have several options to correct them: First you can use the Undo command from the edit menu. This will undo the last brush stroke you created. You can toggle the paint mode to Paint-In and brush over your mistake. The Masking Brush Tool Options Bar Paint Mode The paint mode controls is you are Painting-Out (hiding the layer) or Painting-In (restoring the layer). You can tell your current mode by looking at the plus or minus icon in the center of the brush. If the icon is minus, you are painting out. If the icon is a plus, you are painting-in. You can change the mode in the Tool Options Bar, or by pressing the X key, or by holding down the option (alt) key temporarily. Invert Mask Invert swaps the hidden areas for the visible areas. What was hidden is no revealed and vice-versa. Inverting a mask can be very useful. It allows you to paint a layer in, rather than out, which is handy if you only want to work with a small area. You can invert the mask with the command (Mac OS X) or control (Windows) I keyboard shortcut, or by pressing the Invert button in the Tool Options Bar. Reset Mask Reseting a mask reveals the entire layer it is associated with. You can reset the mask by pressing the Reset button in the Tool Options Bar. Brush Size You can control the size of the brush using the Size pop-up in the Tool Options Bar. You use a small brush at high magnification for precise work, and a large brush at fit to screen for general work. To the right, you can see examples of brush strokes at varying sizes. You can control the size of the brush several ways: Use the Size pop-up in the Tool Options Bar. Use the left and right bracket keys ( [ ] ). Use the mouse scroll wheel (preferences must be set to this). Use your Wacom pressure sensitive tablet. Perfect Mask 42 Perfect Layers (Home) Feather You control the amount of feathering or hardness of the brush by using the Feather pop-up in the Tool Options Bar. The feather has a range from 1 to 100 percent. You use a small feather at high magnification for precise, hard-edged work and a large, soft-edged brush at fit to screen for general work. You can visually see your feather by watching the outer concentric circle of the brush tool. To the right you can see examples of different feather options. You can control the size of the brush several ways: Use the Feather pop-up in the Tool Options Bar. Use the shift + left and right bracket keys ( [ ] ). Opacity You can control the opacity, or strength of the brush with the Opacity pop-up in the Tool Options Bar. Think of the opacity as the shade of gray you are painting with. The opacity has a range from 1 to 100 percent. You use a high opacity to paint quickly and hide large areas. You use a lower opacity for blending areas together or for subtle work. To the right you can see examples of different opacity options. You can control the size of the brush several ways: Use the Opacity pop-up in the Tool Options Bar. Use the option (Mac OSX) or alt (Windows) + 0-9 keys. Use your Wacom pressure sensitive tablet. Wacom® Controls Perfect Layers supports pressure sensitive Wacom tablets. When you use the Masking Brush you can enable pressure sensitive controls for the brush size, brush opacity, or both simultaneously. Click on the W button next to each control in the Tool Options Bar to activate the pressure sensitive controls. The harder you press; the greater the size or opacity will get. You can set the maximum value you want to use the Brush Size and Opacity sliders. To the right you can see examples of how pressure sensitivity can be used to control the Masking Brush. Perfect Mask Perfect Layers (Home) 43 Perfect Brush The Perfect Brush option enabled a unique, color-based, self masking technology. When enabled, as you paint with the Masking Brush it collects the colors under the center of the brush and only masks those colors. This protects the mask from being applied across edges. A great of example of using the Perfect Brush option would be for masking a sky along a horizon of mountains. Perfect Mask 44 Perfect Layers (Home) Using the Masking Bug Masking Bug: This is used for masking layers by creating gradient masks in either a round or rectangular shape. The Masking Bug is perfect for tasks like swapping skies, creating vignettes and graduated filters using Color Fill Layers. Learning to use the Masking Bug is fast and easy. All the adjustments made with the Masking Bug are live and readjustable while using the Masking Bug... so don't be afraid to experiment with it. To use the Masking Bug, select it in the tool well. Select the layer you wish to mask. Now click the center of the area you wish to mask out. A new rectangular Masking Bug appears where you click. You can change the shape from rectangle to round by using the Shape pop-up menu in the Tool Options Bar. Adjusting the Masking Bug Learning to use the Masking Bug is easy and fun. Start by adding a Masking Bug to a layer and then set the Mask View mode to Mask - Grayscale. This will let you see the Masking Bug in simple black and white. Start by moving the Masking Bug. Click and drag inside the center square or circle. Now change the size and angle by clicking and dragging on the the legs. The legs are the shorter limbs with closed terminals. As you pull the legs the bug gets larger. As you twist the legs the Masking Bug rotates. Now adjust the feather by changing the angle of the right antenna. The antennas are the longer limbs with the open terminals. The right antenna length changes the opacity of the current layer. You won't see any change when the grayscale mask preview in on. The left antenna length controls the opacity of the Masking Bug. Finally tilt the Masking Bug by holding down the option (Mac OSX) or alt (Windows) key and click and drag in the body. This will tilt the plan of the bug in 3D. You can use this to change the feather or shape of the Masking Bug. To reset the angle, hold the option or alt key and double-click in the body. You can adjust the Masking Bug while the Masking Bug tool is selected. When you change layers or switch to another tool the mask created by the Masking Bug is rendered. If you want to use the Masking Bug again on the same layer the old Masking Bug will be replaced and you simply start again. Below is the Tool Options Bar that contains the controls for the Masking Bug. Perfect Mask Perfect Layers (Home) 45 Feather You can control the amount of feathering or hardness of the edge of the Masking Bug using the Feather Slider. The feather has a range from 1 to 100 percent. You use a small feather to create a hard edge, a soft feather for a larger, softer transition. To the right you can see examples of different feather options. You control the feather by: Using the Feather Slider in the tool options bar. Changing the angle of the right antenna. Hard Feather 0% Soft Feather 50% 100% Opacity 50% Opacity Round Masking Bug Rectangular Masking Bug Opacity You can control the opacity, or strength of the Masking Bug with the Opacity Slider. The opacity has a range from 1 to 100 percent. You use a high opacity to completely hide the area under the Masking Bug. You use a lower opacity for blending areas together or for subtle work. To the right you can see examples of different opacity options. You can control the opacity several ways: Using the Opacity Slider in the tool options bar. Changing the length of the left antenna. Shape This controls the shape of the masking area. You can choose none, round or rectangle. Use the round Masking Bug to create vignettes or soft, round masks. Use the rectangular Masking Bug to swap skies, add gradient filters, etc. Use the none option to remove an existing Masking Bug from a layer. Grid This turns on or off the ability to view a grid that represents the area effected by the mask. You can also set this to Auto and the grid will appear only when making adjustments then turn off after the adjustment is made. Invert Mask Invert swaps the white for black and black for white. What was hidden is now revealed and vice-versa. Inverting a mask can be very useful. It allows you to remove what is outside the Masking Bug rather than what is contained within. You can invert the mask with the command (Mac OS X) or control (Windows) i keyboard shortcut. Reset Mask Reseting a mask returns it to all white. The entire layer is visible. Perfect Mask 46 Perfect Layers (Home) Retouching the Masking Bug You can retouch the Masking Bug with the Masking Brush. The mask created by the Masking Brush sits on top of and overrides the Masking Bug. You can add to a Masking Bug with the Masking Brush when the paint mode is set to Paint-Out. You can subtract from a Masking Bug with the Masking Brush when the paint mode is set to Paint-In. Masking Bug View Options There are several options for viewing the Masking Bug, located in the Mask Menu: Masking Bug Tool Opacity: Not to be confused with the opacity of the mask. This option controls how visible the Masking Bug tool outline appears on screen. If the Masking Bug is interfering with the view of the image, you can turn it down to make it more subtle. This control has no effect on how the image itself appears. Masking Bug Grid: This allows you to turn the grid that appears under the Masking Bug on or off. Normally, it is set to Auto, where the grid will appear while you are adjusting the Masking Bug only. Perfect Mask Perfect Layers (Home) 47 Preferences The preferences dialog for Perfect Layers contains general application settings that are used by Perfect Layers. The Perfect Layers preferences are accessed from the Perfect Layers menu on Mac or the Edit menu on Windows. The preferences contain the following controls: General Settings 1. Working Color Space: When a new file is created or file is opened and has no color profile associated with it, this is the assumed color profile for the image. Images that come from other hosts or have tagged or embedded profiles will use the associated profile instead. 2. Scrolling Controls: Lets you select how the mouse scroll wheel or scrolling gesture works. The options are: 1. None: Default 2. Preview Zoom: Adjusts the zoom of the preview window. Scrolling up increases the zoom, scrolling down decreases the zoom. It is important that the zooming is comfortable, not too fast or slow or jerky. 3. Preview Pan: Pans the image, like using the pan tool or navigator. It is important that the panning is comfortable, not too fast or slow or jerky. 4. Brush Size: Adjusts the size of the current tool if relevant, such as a brush tool. 3. Preview Background Color: You may select the color of the background behind the preview image. The default color is black. There should be options for black, white, light gray, dark gray and custom... The custom option a color picker where you can select your own background color. Lightroom Plug-In Settings 1. File Type: Specifies four options. PSD (Supports Layers, Defaults Setting. Same as Source (PSD for Raw). TIFF (No Layers). JPEG (No Layers). 2. Color Space: Specifies the color space to use when processing copies from Lightroom. This is similar to the working color space pop-up in the general preferences tab, however there are only the three options supported by Lightroom: sRGB, Adobe RGB 1998 and ProPhotoRGB. 3. Bit Depth: Sets the bit depth for the copies created by Lightroom, the options are 8 and 16 bit. 4. Resolution: Sets the resolution of copies created by Lightroom. 5. Stack with Original: Enabled by default, copies created by Lightroom are stacked with their original or source image. 6. Use Original for Single PSDs: Enabled by default. If your selection is a single PSD file, the original PSD is opened rather than creating a copy. Performance Settings 1. Memory Usage: Specifies the amount of system memory (RAM) that is used by the application. The default 50% will work well on systems with 4-8 GB of RAM. If you have more than 8 GB of RAM and you work with large images you can try a larger setting. 2. VRAM Usage: Specifies the amount of video memory (VRAM) that is used by the application. The default 50% will work well on systems with more than 256MB of VRAM. If you only have 256MB, try a higher setting of 70%. 3. Segmented Brush Undo: When enabled, the last brush stroke made is segmented into many smaller strokes allowing you to undo a portion of a segment rather than an entire segment. This is off by default to reduce the amount of memory used for storing undo operations. Perfect Mask 48 Perfect Layers (Home) Menus Perfect Layers (Mac OS X Only) About Perfect Layers: Opens the about box, displays your version number and activation code. (Help menu on Windows) Preferences: Opens the preferences dialog. (Edit menu on Windows) Quit Perfect Layers: Quits Perfect Layers. File Menu New: Opens the create new file dialog for creating a new file. Open: Opens the open dialog for locating and opening an existing file. Add Layer(s) from File: Opens the open dialog for location files to merge into the current open file. Open Selected from Browser: Opens the images selected in the browser. Browse...: Opens the browse dialog where you can select which folder you would like to browse in a new browser tab. Browse Extras: Switches the browser to the Extras tab where you can view and open website content. Open Recent: Displays a list of recently opened files. Close: Closes the current file. You will have the opportunity to save or not. Save: Saves the current file. Save As: Opens the Save As dialog where you can select the filename and location to save to. Revert to Saved: Reopens the file without your changes. Batch: Opens the Batch mode window (Perfect Resize Only) Edit Menu Undo: Undoes the last action. Redo: Redoes the last undone action Undo Stroke: If segmented undo is enabled and the last action was a brush stroke, this will undo the entire brush stroke rather than the last brush segment. Redo Stroke: If segmented undo is enabled and your last action was to undo a brush stroke, this will redo the entire brush segment. Cut: Disabled. Copy: Disabled. Paste: Disabled. Adjust Canvas Size: Opens the canvas size dialog where you can adjust the canvas size. Perfect Mask Perfect Layers (Home) 49 Layer Menu Duplicate: Duplicates or copies the current layer. Delete: Deletes the current layer. Merge Layers: Merges the selected layers into a single layer. Merge All: Merges all layers into a single layer. New Stamped Layer: Creates a new layer above the current layer that contains a merged version of all the layers under it. Hide Other Layers: Toggles the visibility off of all layers except the current one. Makes it easy to see just the current layer. New Color Fill Layer: Adds a new color fill layer. Edit Color Fill Layer: Opens the color fill layer dialog where you can set the properties of the selected color fill layer. Masking Menu Invert Mask: Inverts the mask. Visible areas become hidden and hidden areas become visible. Reset Mask: Resets the mask to plain white. Copy Mask: Copies the mask from the current layer. Paste Mask: Pastes the mask in the clipboard to the mask on the current layer. Masking Bug Tool Opacity: Sets the opacity of the Masking Bug tool cursor. Masking Bug Grid: Toggles the view mode of the Masking Bug grid. View Menu Zoom In: Adjusts the preview zoom in one increment, makes the preview image larger. Zoom Out: Adjusts the preview zoom out one increment, makes the preview image smaller. Fit to Screen: Sets the zoom to fit the entire image on screen. Fill with Layer: Sets the zoom to fit the current layer. Actual Pixels: Sets the zoom to 100% or actual pixels. Show Browser Pop-up: Enables the browser pop-up window. Browser Mode: Allows the user to select how the Browser Library displays the categories. Show Clipping: Shows the clipping overlay view, which over-rides the current mask view. Preview Mode: Allows the user to switch preview modes. Preview Background Color: Toggles the background color options. Show Mask: Allows the viewer to see the mask. Mask View Mode: Allows the user to select the various mask modes. Window Menu Navigator/Loupe/Histogram: Opens and closes the Navigator pane. Layers: Opens and closes the Layers pane. Show Browser Panel: Hides or shows the Control Panel. Show Control Panel: Hides or shows the Control Panel. Hide Panels: Hides or shows all Panels. Full Screen: Toggles to and from full screen mode. Document Name: Shows the name, zoom level and bit depth of the open image. Perfect Mask 50 Perfect Layers (Home) Help Menu Search: Searches the menus (Mac OSX only). Perfect Layers Online Help: Opens this html Help in your default web browser. Video Tutorials: Opens the online Video Tutorial in your default web browser. Getting Started: Opens the online Getting Started overlay. Show Keyboard Shortcuts: Opens the keyboard shortcut inspector. Perfect Inspiration: Takes you to the Perfect Inspiration web site. Check for Updates: Checks with the onOne update server to see if you are running the current version. If there is a newer version you will be notified and be walked through the update process. Deactivate: Opens the activation dialog. These are used to deactivate your software for moving it to another computer or for a return. Registration: Opens the default web browser and navigates to the registration page of the onOne website. Provide Feedback: Opens the default web browser and navigates to the feedback page of the onOne website. Help Improve onOne Products: Opens the Improve onOne Products dialog. Perfect Mask Perfect Layers (Home) 51 Keyboard Shortcuts Action Mac Win New File cmd n ctl n Open cmd o ctl o Open as Layer cmd shift o ctl shift o Save cmd s ctl s Save As cmd shift s ctl shift s Preferences cmd , ctl k Undo cmd z ctl z Undo Stroke cmd opt z ctl alt z Redo cmd shift z ctl shift z Redo Stroke cmd shift opt z ctl shift alt z Open/Close Navigator Pane cmd 1 ctl 1 ctl 2 Open/Close Layers Pane cmd 2 Open/Close Browser Panel cmd left arrow ctl left arrow Open/Close Control Panel cmd right arrow ctl right arrow Hide Panels tab tab Full Screen Mode cmd ctl f F11 Delete Layer del del Select Pan Tool h h Select Zoom Tool z z Select Trim Tool t t Select Move Tool v v Select Masking Brush b b m Select Masking Bug m Zoom-In cmd + or cmd = ctl + or ctl = Zoom-Out cmd - ctl - 1:1 cmd opt 0 ctl alt 0 Fit to Screen cmd 0 ctl 0 Fit to Layer cmd shift 0 Brush Size larger ] smaller [ larger ] smaller [ Brush Feather softer shift ] harder shift [ softer shift ] harder shift [ Brush Opacity opt 1 (10%) opt 2 (20%) opt 0 (100%) etc opt 1 (10%) opt 2 (20%) opt 0 (100%) etc Layer Opacity 1 (10%) 2 (20%) 0 (100%) etc 1 (10%) 2 (20%) 0 (100%) etc ctl m ctl shift 0 Show Mask ctl m Toggle Mask View cmd opt m ctl alt m Invert Mask cmd i ctl i Duplicate Layer cmd j ctl j Merge Layer cmd e ctl e Merge Visible cmd shift e ctl shift e Constrain Prop shift drag on corner shift drag on corner Grow from center opt drag on corner Toggle Paint-In/Paint-Out/Erase x opt alt drag on corner x alt Toggle Single View Preview cmd Y ctl Y Toggle Left/Right Preview cmd L ctl L Toggle Left/Right Split Preview cmd opt L ctl alt L Toggle Top/Bottom Preview cmd T ctl T Perfect Mask 52 Perfect Layers (Home) Toggle Top/Bottom Split Preview cmd opt T ctl alt T Show Clipping alt J Perfect Mask opt J Perfect Mask 53 Perfect Mask Perfect Mask is the next generation of Mask Pro, the leading software for background replacement. Perfect Mask takes the core strengths of Mask Pro to another level, by automating many common masking tasks with incredible accuracy. Perfect Mask's new masking technology makes selecting subjects and isolating backgrounds surprisingly easy. With Automatic Background Removal, an initial mask is made on your image that can be fine-tuned using the Erase and Refine Tools. With these new features, you can create high quality masks in just a few clicks. You'll be amazed at how well this works even when masking tough subjects like hair and glass on complex backgrounds. Perfect Mask works where you do with seamless integration into your workflow whether you use Lightroom, Aperture or Photoshop. It even works as a standalone application. Perfect Mask 54 Perfect Mask Getting Started This getting started section will give you the basics of using Perfect Mask. If you have never used Perfect Mask before this is a good place to start. You may also watch the getting started video tutorial. For detailed information on steps and controls mentioned in the getting started section, see the Using Perfect Mask section. Perfect Mask Perfect Mask 55 Understanding Masking Masking allows you to selectively blend layers together. Creative examples of what you can do with masks: Change heads from one image to another. Replace the sky by merging exposures or image together. Add a vignette. Burn or Dodge to lighten or darken selective areas. Combine a motor drive sequence. Create a montage. You can think of masking as painting with black paint on white paper. A white mask reveals all the layer that the mask is attached to. An all white mask is considered blank or empty and shows all the selected layer. As you use the masking tools, you are adding black paint (Paint-Out mode). Where you paint with black you are hiding the current layer, allowing the layer(s) under it to show through. Think of it like cutting a hole in the mask. If you make a mistake, you can switch your paint color to white (Paint-In mode) and paint the layer back in like an eraser. When you paint you have more than just white or black, but any shade of gray in between depending on the opacity of the brush. Shades of gray partially hide the layer, blending the layers together. Perfect Mask 56 Perfect Mask Perfect Mask Workspace Perfect Mask provides you with an easy-to-use work area for editing your photos. Below is an overview of the main sections. Perfect Mask work area overview: The main sections of Perfect Mask: A. The Tool Well: This is where the tools are located. B. The Tools Option Bar: This is where information and options about each tool is set. C. The Preview Window: This is the main section where you preview and work on images. D. The Modules Selector: This is where you choose which software module to use. E. The Navigator, Loupe and Histogram Pane: This pane will access the Navigational, Loupe and Histogram features. F. The Adjust Mask Pane: This is where you control various masking and blending modes. G. The Colors Pane: This is where the colors you select to Keep and Drop appear in a list. H. The Cancel/Apply Button: This is where you cancel or apply an action. Perfect Mask Perfect Mask 57 Perfect Mask Tool Well There are 14 different tools in the tool well. They are divided into four sections. More details about each tool will be covered in the next chapters. Keep Brush Tool This tool offers a selective undo for the drop brush. Drop Brush Tool This tool offers a fast way to remove large sections in a single stroke. Refine Brush Tool This tool cleans up intricate areas and the borders between the Keep and Drop Brush. Masking Brush Tool This masks out areas using brush strokes to expose underlying layers. Magic Brush Tool This precise tool protects the Keep Colors and removes Drop Colors. Color Spill Brush Tool This tool is used to help remove color spill from solid backgrounds like blue and green screens. Keep Color Eyedropper Use this tool to add colors to the Keep List. Drop Color Eyedropper Use this tool to add colors to the Drop List. Pen Tool Use this tool for detecting and tracing edges around an image for masking. Chisel Tool This tool is used for removing fringes or halos along hard edges. Blur Tool This tool is similar to the chisel, but rather than removing edge pixels, it softens or blurs them. Bucket Tool This tool is used to remove large areas quickly. Pan Tool This tool drags your image within the preview window when it's larger than the viewable area. Zoom Tool This tool changes the magnification in the preview window. Perfect Mask 58 Perfect Mask Navigating the Preview Perfect Mask provides several ways to navigate and view your image in the Preview window. The Preview Window above is the main section where you preview and work on images. Hand Tool The Hand tool is used to position the image within the Preview window, whenever the preview zoom is larger than the viewable area. To pan (scroll) in the Preview window: Select the Hand Tool and drag the image until you locate the area you wish to view. With any other tool selected, hold down the spacebar while you drag the image in the window. Double-click the Hand tool in the Toolbar to set the image to a magnification that fits completely in the current window size. Zoom Tool The Zoom tool changes the magnification of the image in the Preview window. With the Zoom tool selected: Click in the Preview window to zoom in and center the image at the location clicked. Click and drag in the Preview window to draw a rectangular, the screen fills with the area within the rectangle when you release the mouse. Hold the Option key (Mac) or Alt key (Win) and click to zoom out. Double-click the Zoom tool in the Toolbar to set the image to 1:1 or 100% magnification, showing every pixel. This is best when examining small details. Perfect Mask Perfect Mask 59 Navigator, Loupe, Histogram and Info At the top of the control panel on the right of the main window is the Navigator | Loupe | Histogram | Info panes. It contains four useful tools for inspecting and viewing details of your image. The Navigator Pane This gives you a birds-eye view of your image. The blue square region marks the image area that is visible in the preview pane. You can pan your image by clicking and dragging inside the blue region. At the bottom of the Navigator pane are several Zoom presets. Click on a Zoom preset to activate. FIT: Zooms to fit the current canvas size. This allows you to see your entire image. FILL: Zooms to fit the current layer. This is great if you are working on a layout and want to zoom in on a smaller layer you are adjusting. 100: Zooms to 100% or actual pixels. This is best for judging small details. 50: Zooms to 50% 25: Zooms to 25% The Loupe Pane This gives you a magnified view of the section of the preview under the cursor. This allows you to view the quality of your results while maintaining a complete view of your image. At the bottom of the Loupe Pane is a sliding for adjusting the zoom level. The Histogram Pane This gives you a color chart of the shadow, mid-tone and highlight areas based on the image RGB values. This is useful to show areas within the image that may be clipping. Clipping is when your image contains pure blacks or white and can signify loss of highlight or shadow detail. The left side of the histogram represents the shadows, while the right represents the highlights. At the top of each end is a triangle. If the triangle is lit, there is clipping on that side of the histogram. If you click on the arrows, you will activate the clipping overlay on your image. The areas of your image with a blue overlay are pure black, while the areas with the red overlay are pure white. You can turn the clipping view off again by clicking on one of the triangles. You can also temporarily enable clipping view by holding down the J key at any time. The clipping view is useful when you are making adjusts to the brightness and contrast of your image. The Histogram pane also displays the RGB values under the cursor at the bottom of the pane. Perfect Mask 60 Perfect Mask The Info Pane The info pane will display important metadata about your file including: Camera type File type Focal length and lens information Date and time captured Exposure information ISO Shutter Speed Aperture Exposure Value Filename Color Space Dimensions File Size and Bit Depth If your camera allows for GPS the GPS button will be viewable and you can click on it to get the GPS cordinates for where the image was taken. This feature only works if you have GPS enabled on your camera or mobile device. Otherwise you will not see the GPS button. The Info panel is not visible when you access Perfect Mask as a Photoshop plug-in. Perfect Mask Perfect Mask 61 Preview Window Modes The preview window has several modes including; single image, side-by-side (horizontal or vertical) and split-screen (horizontal or vertical) versions of an image. This allows you to compare layers side-by-side or to view a layer mask and the layer side-by-side. At the bottom left of the Preview Window is a button that toggles and shows the current Preview Mode. You can also change the mode from the View menu. Single Mode Screen. Left-Right Screen. Left-Right Split Screen. Top-Bottom Screen. Top-Bottom Split Screen. Tip: You can use the keyboard shortcuts below to quickly switch view modes. Items in parenthesis are for Windows. Command (Control) L: Command-Option (Control-Alt) L: Command (Control) T: Command-Option (Control-Alt) T: Command (Control) Y: Change the preview mode to Left/Right. Change the preview mode to Left/Right Split screen. Change the preview mode to Top/Bottom. Change the preview mode to Top/Bottom Split screen. Change the view mode to single image. Perfect Mask 62 Perfect Mask Using Perfect Mask Perfect Mask's new masking technology makes selecting subjects and isolating backgrounds surprisingly easy. With Automatic Background Removal, an initial mask is made on your image and can then be fine-tuned using the Drop and Refine Tools. With these new features, you can create high quality masks in just a few clicks. You'll be amazed at how well this works even when masking tough subjects like hair and glass on complex backgrounds. Perfect Mask provides several ways to work depending on your user level and the type of image. It works for beginners through advanced users. Below are example workflows for different user levels. Simple hard edged subject on a solid background Simple hard edged subjects on a solid background are very easy. 1. Start by opening an image into the Layers module of Perfect Mask. 2. Load a new background if desired and place it under the subject. 3. Switch to the Mask module from the module selector. 4. Press the Remove Background button in the Adjust Mask pane. It will detect solid color backgrounds and remove them automatically. 5. Press Apply to return to the Layers module to save your changes. Complex or Semi-Transparent Subject One of the more difficult subjects to mask is hair or other semi-transparent and intricate subjects against a varied background. Try these steps for the best results. 1. Start by opening an image into the Layers module of Perfect Mask. 2. Add a new background and align it in the Layers module. 3. Next select the Mask module. 4. Select the Drop Tool from the toolwell and loosely brush the areas you don't want. The brush strokes will automatically expand to similar colors. 5. Next select the Refine Tool and paint over the edge of the foreground and background to remove fringe colors or small islands of color. You can brush over areas more than once to improve the results. Perfect Mask Perfect Mask 63 Preparing Your Image To get the most out of Perfect Mask, it is best to prepare your composite layers in advance. This means placing your new background as a layer under your subject (target) layer. This can be accomplished in Photoshop, Photoshop Elements of the Layers module of Perfect Mask. Below are instructions to get you started. Photoshop and Photoshop Elements 1. Start by opening your subject image and background image. 2. Determine which image is the correct size and aspect ratio, either the subject or background. In this example, the subject image is the correct size. 3. Select whichever image is not the correct size, use the select all command and the copy command to copy the image to the clipboard. 4. Now return to the other image and paste the results as a new layer. 5. Here, the new layer is a sky and should be positioned under the subject. Drag it under the subject layer in the Layers palette. Note that if the subject layer is a Background Layer, it needs to be converted into a normal layer to position a layer under it. Simply double-click on it to convert it to a normal layer. Perfect Mask 64 Perfect Mask 6. Next, reduce the opacity of the upper layer to 50-70%. This makes it easier to see the subject and background simultaneously. 7. Select the background layer. 8. Use the transform tool to size and position the background correctly with the subject layer. Keep in mind you can always adjust this later or change to a different background. 9. Select the subject layer and return its opacity to 100%. Now, you are ready to start Perfect Mask. Layers Module of Perfect Mask 1. Determine which image to use as the correct size and aspect ratio, either the subject image or the background image. 2. Start by opening this image. In this case, the foreground image is the correct size. 3. Next find your background image and open it. You will be prompted to either add the image as a new layer or create a new image. Select the "add as new layer" option. Tip 1: If you are working from Lightroom or Aperture, you can open the first image into the Layers Module, then return to Lightroom, or Aperture, select your background image and send it to the Layers Module to merge it in as an another layer. Tip 2: If you don't have a background that you like, try one of the included backgrounds that come with Perfect Mask From the Extras tab in the Layers Module. Perfect Mask Perfect Mask 65 4. The background will be added on top of the foreground, simply drag it below in the Layers pane. 5. Next, reduce the opacity of the upper layer to 50-70%. This makes it easier to see the subject and background simultaneously. 6. Select the background layer. 7. Use the transform tool to size and position the background correctly with the subject layer. Keep in mind you can always adjust this later or change to a different background. 8. Select the subject layer and return its opacity to 100%. Now, you are ready to start Perfect Mask. Perfect Mask 66 Perfect Mask Viewing the Mask Perfect Mask allows you to view the mask for each Preview Window pane. You can view the mask in several modes, which are accessible from the Mask View Mode at the bottom of each Preview Window pane. Below are examples of the different mask view modes. You can toggle Mask View on and off with the control + M keyboard shortcut. Original Shows the original target layer, with no mask. Think of this as a before image. Composite Shows the current layer with the masked areas transparent so you can see the layers under it. This is what the results will look like when you apply. Think of this as the after image. Red Overlay The masked area appears as 50% red. This is similar to the Quick Mask view in Photoshop. Perfect Mask Perfect Mask 67 White The masked area appears as solid white. Dark The masked area appears as 90% black. Grayscale The masked area appears as black, the unmasked areas appear as white. This is the same as viewing a layer mask in Photoshop. Segments Displays the results of the initial segmentation. Perfect Mask 68 Perfect Mask Keep, Drop and Refine Brushes Keep and Drop Brushes: Used to assign segments to be kept or removed. When you launch Perfect Mask it starts by breaking the image down into small similar colored segments. The Keep and Drop Brushes are used to assign segments to be kept or removed. By default, all segments are marked as Keep when you open Perfect Mask. The first step in masking most images is to use the Drop Brush and make large brush strokes through areas you want to remove. The brush strokes you make will automatically be expanded to similar color and textured segments. The Drop Brush offers a fast way to remove large sections in a single stroke. Below are descriptions of the controls in the Keep and Drop Brush Tool Options Bar. Size: Adjusts the size of the brush. Use a large size for large areas and a smaller brush to get into the tight spots. Refine: Sets how thick of an edge is automatically refined. This smooths out segment artifacts and reduces color fringing. Segment: Sets the size, or mass of the segments that are created. The default setting of 8 works best for most images. You can see the segments using segment view. If your image has few colors and is creating too many segments will little difference, try a higher setting. If your image has many colors and gradations use a lower setting. Tolerance: The expand tolerance controls how similar segments need to be before they are grouped together. Auto Expand: When enabled, segments of similar color to those under the drop brush will be dropped as well. Remove Background: Attempts to find a solid color background and remove it automatically. If you press the button and nothing happens, your background is too varied to be removed automatically. You can increase the segment size and try again or use the Drop Brush. Wacom Toggle: If you have a Wacom pressure sensitive tablet you can control certain parameters with pressure. Controls with a W icon next to them support this when they are turned on. Refine Brush: This tool cleans up intricate areas and the borders between the Keep and Drop Brush. The Refine Brush is used to clean up the borders between keep and drop segments as well as intricate areas like hair, lace, mesh and tree branches. Once you have removed the majority of the background with the Drop Brush, paint the intersection of the subject and background to refine the border. This will remove islands of background color and make the edge more defined. Below are descriptions of the controls in the Refine Brush Options Bar. Size: This slider adjusts the size of the brush. Select a brush size that is just larger than the intersection of the subject and background. Avoid using oversized brushes it will take longer to process and may yield lower quality results. Color Decontamination: When enabled, colors from the drop regions are filtered out of the keep regions. This changes the colors of the pixels in the image. This is useful when the background you are trying to remove have a strong color such as green or blue screens. Reset: This will reset the tool back to the default settings. Wacom Toggle: If you have a Wacom pressure sensitive tablet you can control certain parameters with pressure. Controls with a W icon next to them support this when they are turned on. Perfect Mask Perfect Mask 69 Magic Brush and Colors Magic Brush: The Magic Brush is used to make powerful and precise masks in difficult places. The Magic Brush is the most powerful and precise tool in Perfect Mask. When you are dealing with the most difficult subjects, the Magic Brush is the go-to tool. It works by comparing Keep and Drop colors. It protects the Keep colors and removes the Drop colors. This allows it to mask through glass, smoke, fog or other semitransparent, non-sharp edged subjects. Below are descriptions of the controls in the Magic Brush Options Bar. Painting Mode: Toggles the painting mode, either Paint-Out, Paint-In or Automatic. Automatic is generally the best choice for this tool. It will paint-in and out at the same time based on the colors. Size: The brush size slider controls the size of the brush. Use the smallest brush needed. Feather: The brush feather slider controls the feather, or hardness of the brush. Make sure you have a feather of at least 25 to blend in retouched areas evenly. Transition: The transition slider determines how hard the cut-off is between Keep and Drop colors. Think of this like feathering. A low transition setting creates a harder edge between the Keep and Drop colors. A higher setting will create a softer transition. Threshold: The threshold slider determines how far away from the exact keep colors are allowed to be removed. A low threshold setting will keep only the exact colors in the keep pane. As you increase the threshold, more colors close to the keep colors will be protected. The Transition and Threshold are linked together. Changing one, has the inverse affect on the other. If you can't adjust one control, try increasing or decreasing the other. Reset: This will reset Tool Options Bar back to default settings. Wacom Toggle: If you have a Wacom pressure sensitive tablet you can control certain parameters with pressure. Controls with a W icon next to them support this when they are turned on. Color Decontamination: When enabled, Perfect Mask will attempt to remove the Drop color component from semi-transparent areas. This can be helpful for reducing color fringing and spill colors when working on blue or green screens. Perfect Mask 70 Perfect Mask Auto Brushing There are two ways to use the Magic Brush. The first method is called auto brushing. Start by selecting the Magic Brush and simply click in the background, then brush into the subject. The color to remove is automatically assigned as the color at the center of the brush when you click down. As long as there is a strong difference between the subject and background this can be a quick way to paint away the background. Tip: When using the auto brush technique, you should have no colors in your Colors pane. Be sure to confirm that the Painting Mode is set to Paint-out only. Eye Dropper Tools The second and more precise way to use the Magic Brush is to select colors to keep and drop using the Eye Dropper tools. The Eye Droppers live in the tool well. There are two droppers; one for selecting colors to keep and one for selecting drop colors. It is best to zoom into at least 100% or use the Loupe tool when selecting colors. When working with selecting colors for the Magic Brush, it is best to work in small, similar colored sections. Avoid selecting every keep and drop in your image. The Keep and Drop colors and Magic Brush are global tools, meaning that they don't care what area of the image you are painting. If you have the color blue for example that you want to remove from the background, but your subjects eyes are blue... if you paint over both areas the background and eyes would be removed. To deal with similar colors in different regions, you can create different color sets. In the Colors pane you can create as many Keep and Drop color sets as needed. To create a new color set, press the Add button at the bottom of the Colors pane. You have the option to create either a new Keep, Drop, or both color sets. You can also disable a set by clicking on the toggle in its upper left corner. You can delete a color or a set, depending on your selection by pressing the delete button. You can manually adjust a color by double-clicking on it. This will open a color picker where you can see the color values as well as adjust the color if needed. Once you have selected the Keep and Drop colors for your region, brush over it with the Magic Brush. If the results are not as desired, refine your Keep and Drop colors and brush over the region again. Tip: Keep the number of colors per set to less than six to maintain optimum performance. You can create as many sets as you need as you work your way around the image. Perfect Mask Perfect Mask 71 Color Spill Brush: The color spill brush removes reflected or transmitted background color from the keep or edge areas. It works by removing adjacent colors marked by the drop brush without altering the transparency. This brush is useful for removing reflected or spill color from reflective, opaque subjects such as chrome, leather, metals, etc. It is not desirable to alter the opacity of these opaque areas, as they are not near the edge of the subject. Instead the reflected color needs to be painted away. Below are descriptions of the controls in the Color Spill Brush Tool Options Bar. Size: The brush size slider controls the size of the brush. Use the smallest brush needed. W: When selected, this activates the Wacom brush controls. Feather: The brush feather slider controls the feather, or hardness of the brush. Make sure you have a feather of at least 25 to blend in retouched areas evenly. Strength: The brush slider controls the strength of the brush. Smart Strength: When the Smart Strength option is enabled, the strength is automatically adjusted based on how strong the local drop colors are. Override Color: When enabled, the Color Spill brush paints with the color you specify rather than one determined automatically. You can select the color to paint with either with the associated dropper tool or by clicking on the color well. Perfect Mask 72 Perfect Mask Masking Brush The Masking Brush: The Masking Brush functions like a brush tool for masking layers. The Masking Brush in Perfect Mask is the same as in other onOne modules, or using the paint brush in Photoshop. When you select the Masking Brush, your tool icon changes to a circle that represents the size of the brush. It may also appear as two concentric circles (see below), indicating the inner hard edge and outer soft edge of the brush if the feather control is set above zero. There is also either a plus or minus in the center of the brush. Minus means the brush mode is set to paint-out, plus means it is set to paint-in. How to use the Masking Brush To use the Masking Brush, select it in the tool well. Make sure you are on the layer you wish to hide. Then check your brush mode and confirm it is set to Paint-Out. You are ready to mask now, simply paint on the image in the areas you wish to hide. As you brush, you will see the underlying layer(s) appear. If you make a mistake while brushing you have several options to correct them: First you can use the Undo command from the edit menu. This will undo the last brush stroke you created. You can toggle the paint mode to Paint-In and brush over your mistake. The Masking Brush Tool Options Bar Paint Mode The paint mode controls is you are Painting-Out (hiding the layer) or Painting-In (restoring the layer). You can tell your current mode by looking at the plus or minus icon in the center of the brush. If the icon is minus, you are painting out. If the icon is a plus, you are painting-in. You can change the mode in the Tool Options Bar, or by pressing the X key, or by holding down the option (alt) key temporarily. Invert Mask Invert swaps the hidden areas for the visible areas. What was hidden is no revealed and vice-versa. Inverting a mask can be very useful. It allows you to paint a layer in, rather than out, which is handy if you only want to work with a small area. You can invert the mask with the command (Mac OS X) or control (Windows) I keyboard shortcut, or by pressing the Invert button in the Tool Options Bar. Reset Mask Reseting a mask reveals the entire layer it is associated with. You can reset the mask by pressing the Reset button in the Tool Options Bar. Brush Size You can control the size of the brush using the Size pop-up in the Tool Options Bar. You use a small brush at high magnification for precise work, and a large brush at fit to screen for general work. To the right, you can see examples of brush strokes at varying sizes. You can control the size of the brush several ways: Use the Size pop-up in the Tool Options Bar. Use the left and right bracket keys ( [ ] ). Use the mouse scroll wheel (preferences must be set to this). Use your Wacom pressure sensitive tablet. Perfect Mask Perfect Mask 73 Feather You control the amount of feathering or hardness of the brush by using the Feather pop-up in the Tool Options Bar. The feather has a range from 1 to 100 percent. You use a small feather at high magnification for precise, hard-edged work and a large, soft-edged brush at fit to screen for general work. You can visually see your feather by watching the outer concentric circle of the brush tool. To the right you can see examples of different feather options. You can control the size of the brush several ways: Use the Feather pop-up in the Tool Options Bar. Use the shift + left and right bracket keys ( [ ] ). Opacity You can control the opacity, or strength of the brush with the Opacity pop-up in the Tool Options Bar. Think of the opacity as the shade of gray you are painting with. The opacity has a range from 1 to 100 percent. You use a high opacity to paint quickly and hide large areas. You use a lower opacity for blending areas together or for subtle work. To the right you can see examples of different opacity options. You can control the size of the brush several ways: Use the Opacity pop-up in the Tool Options Bar. Use the option (Mac OSX) or alt (Windows) + 0-9 keys. Use your Wacom pressure sensitive tablet. Wacom® Controls Perfect Mask supports pressure sensitive Wacom tablets. When you use the Masking Brush you can enable pressure sensitive controls for the brush size, brush opacity, or both simultaneously. Click on the W button next to each control in the Tool Options Bar to activate the pressure sensitive controls. The harder you press; the greater the size or opacity will get. You can set the maximum value you want to use the Brush Size and Opacity sliders. To the right you can see examples of how pressure sensitivity can be used to control the Masking Brush. Perfect Mask 74 Perfect Mask Clean Up Tools Perfect Mask features several handy clean-up tools. The clean-up tools are located towards the bottom of the toolwell on the left side of the screen. The cleanup tools are the chisel, blur and bucket. The Chisel Tool: The Chisel tool is used for removing fringes or halos along hard edges. Fringes are common when the background to be removed is brighter than the foreground. The chisel works like a chisel or plane in a wood shop. It removes just a sliver along the edges. The chisel tool only works on the edges so you don't have to be careful with it. Mode: Select remove or restore. Size: Adjusts the size of the chisel tool. Feel free to use a large chisel to make brushing fast. The size of the chisel does not affect how much is chiseled off. Amount: Controls the amount, or depth of the chisel. Use the lowest amount needed to maintain as much detail as possible. Chisel Hardness: Adjusts how sharp the edge created by the chisel is. The higher the amount, the softer the edge. Tip: You can double-click on the chisel tool icon in the toolwell to apply the chisel to the entire image. The Blur Tool: Softens edges where you paint. Softening the edges on blurred or semi-transparent subjects like hair can make them blend with a new background in a more realistic manner. The blur tool only works on the edges so you don't have to be careful with it. Mode: Select remove or restore. Size: Adjusts the size of the blur tool. Feel free to use a large size to make brushing fast. The size of the brush does not affect the blur amount. Amount: Controls the amount of blur. Use the lowest amount needed to maintain as much detail as possible. Hardness: Adjusts how sharp the edge between the blurred and sharp area is. The higher the amount, the softer the edge. Tip: You can double-click on the blur tool icon in the toolwell to apply it to the entire image. The Bucket Tool: The Bucket Tool is used to remove large areas quickly. Simply click in any isolated area to remove it completely. It is important that the area to be removed has a completely transparent margin around it, or the entire image will be removed instead. Perfect Mask Perfect Mask 75 Mode: Controls whether the bucket tool is to remove (Paint Out) or replace (Paint-In) the area that is clicked on. Perfect Mask 76 Perfect Mask Pen Tool The Pen Tool: The Pen tool works by detecting and tracing edges. It is useful for when you have large hard-edged areas or if the difference in color between the subject and background are too close together for the color based tools to work. The Pen creates a path, or selection. When you complete a path you have the option to remove either what is inside or side of the path. The controls for the Pen Tool are located in the Tool Options Bar. The Pen has two working modes, magic and classic. In Magic Mode: the default, the pen attempts to detect and trace edges. It works well when there is a significant difference between the subject and background and the edge is variegated such as a mountain. In Classic Mode: the pen draws straight lines from point to point that you click. You can force classic mode by toggling the Classic Pen check-box, or by holding down the shift key. Area: Adjusts the size of the area that the pen tool looks at to detect an edge. Use as small a magnetic area as possible while being practical. Attraction: Adjusts how precise or tight the path is to the edge. If you have a highly variegated subject use a high setting of 100 or more. If you subject is mostly straight or curved edges, like a building try a lower setting to create cleaner, straighter lines. Hardness: Adjusts the hardness of the edge that is created when you select the region to remove. The lower the setting, the harder the edge. Classic Pen: When enabled, the pen only draws straight lines between points when you click. This is useful when working on straight lined subjects like architecture or when the boundary of the subject and background are ambiguous and need an artists interpretation. To use the Pen Tool, start by selecting it in the toolwell. Then click and hold at the edge you want to trace. Then move the pen along the edge. You will see that the path is attracted to the edge and attempts to trace it. If you make a mistake, just trace backwards and the path will change. If you let go, click on the last point and continue to work with the path. You can manually push the path where you like by clicking in the middle and tugging it like a string. If you encounter an area where the pen will not detect the edge automatically, try holding down the shift key and drawing straight line segments until the edge becomes hard again. You must complete a path by returning to the starting point to be able to remove the selected area. To complete the path, hold down the shift key and move your cursor back over the starting point. A red circle will appear and the text "Click now to close the path" will appear. Click to close the path. Tip: you can automatically close the path by command (Mac) or control (Win) clicking any time you are not over a control point. Perfect Mask Perfect Mask 77 When the path is complete the pen tool will turn into a gavel with either a minus or plus symbol. Click in the region, either inside or outside the path to remove an area. If the gavel has a plus icon, rather than minus it is set to Paint-in, instead of paint-out. Just change the mode in the inspector. If the edge is too hard or too soft, use the undo command, adjust the Edge Mask slider in the inspector and click again in the region you want to remove. Using the Classic Pen Tool The pen tool when used in classic mode is similar to the pen tool in most illustration applications. Simply click to set a standard control point. If you click and drag you create a Bezier control point with handles for adjusting the curve of the line segment. There are several keyboard shortcuts that are essential when using the classic pen tool. Option Mac Windows Modifier Modifier Key Key Move Point Mode: Used to reposition a point. Hold the modifier key, then mouse over a point. When the icon turns to a normal arrow you are in move point mode. Command Control Auto Close Path: Used to close a path without moving to the origin point. Hold the modifier, wait for the icon to turn to the complete icon and click anywhere except a control point. Command Control Convert Point Mode: Used to convert a standard point into a Bezier point. Hold the modifier and move over a point. When the icon turns to a carrot (^) click and drag on a point to reveal the handles. Option Alt Break Bezier Handles: Used to adjust Bezier handles independently of each other. Useful for complex curves. Hold the modifier and move over a control handle. When the icon turns to a carrot (^) click and drag on the control handle to change the angle. Option Alt Perfect Mask 78 Perfect Mask Adjust Mask Pane The Adjust Mask Pane contains several important controls that affect the entire mask or how Perfect Mask is applied. Adjustments: The Adjustments button opens the Adjust Mask dialog, pictured below. This dialog contains several global mask adjustments. Remove Background: Attempts to find a solid color background and remove it automatically. If you press the button and nothing happens, your background is too varied to be removed automatically. You can increase the segment size and try again or use the Drop Brush. Apply As: Sets how Perfect Mask is applied. You can apply the results to the current layer, permanently removing pixels. This is generally not recommended. New Layer, this is safer as the original image is preserved, but you can not readjust the mask. This is generally not recommended Layer Mask, this is the default setting. The mask is stored as a re-editable, nondestructive layer mask. Layer masks are supported by Perfect Layers, Perfect Photo Suite and Photoshop. Copy with Layer Mask. This is the safest option. It applies the mask as a reeditable, non-destructive layer mask on a copy of the original layer. keep in mind that if you use color decontamination you are also changing the color of the layer, not just the transparency so this option is the most flexible. Adjust Mask Dialog Accessed from the Adjust Mask pane, the Adjust Mask dialog contains several global mask adjustments. White Contrast: Sets the white clip point of the mask. This is useful for reducing haze that shows too much of the original layer. Black Contrast: Sets the black clip point of the mask. This is useful for reducing haze that shows too much of the new background layer. Feather: Softens the edge of the mask globally. Generally this is better accomplished in a selective way using the blur tool. Grow/Shrink: Increases or decreases the size of the mask. Shrinking the mask globally can remove minor fringes but may sacrifice small details such as hair. Generally this is better accomplished in a selective way using the chisel tool. Reduce Noise: Looks for and reduces noise in the mask caused by a noisy, grainy image or dust on the camera sensor. Perfect Mask Perfect Mask 79 Module Settings There is a settings dialog located in the Edit menu which contains settings specific to Perfect Mask. Remember tool mode for each tool: When enabled, the tool mode (Paint-In, Paint-out, Auto) is remembered for each tool rather than a global basis. Segment Scaling: When Perfect Mask opens, it segments the image into many small similar colored irregular segments. The number of, and thus the precision of segments is determined on the number of processing cores and the segment scaling preference. The default setting, Smaller will be the fastest and will take about ten seconds to process. Selecting the Medium or Large option will take longer to load but will create smaller, more precise segments. Perfect Mask 80 Perfect Mask Menus Perfect Mask Menu About Perfect Mask: Opens the about box. This dialog contains your serial number, version number, and information on contacting onOne Software for support. Preferences: Opens the preferences dialog. Quit: Quits the application. Tip: On Windows, the preferences can be found in the Edit menu, the About Box can be found in the Help menu. File Menu Apply: Applies the current settings and options to your image and returns to the host application. Cancel: Cancels Perfect Mask and returns back to the host application with no changes. Edit Menu Undo: Reverses the last user action. Redo: Reapplies the last user action if it has been undone. Undo Stroke: If the last action was a brush stroke, this reverses the entire brush stroke. Redo Stroke: If you last action was an undo of a Brush Stroke, this reapplies the entire stroke. Reset All: Resets all the floating palette controls back to their default settings. Module Settings: Opens the Perfect Mask specific settings. Preferences (Windows Only): Opens the Perfect Mask preferences dialog. Mask Menu Invert Mask: Inverts the mask. Reset Mask: Resets the mask to all white. Remove Background: Attempts to remove the background automatically if the background color is consistent. Perfect Mask Perfect Mask 81 View Menu Zoom In: Adjusts the preview zoom in one increment, makes the preview image larger. Zoom Out: Adjusts the preview zoom out one increment, makes the preview image smaller. Fit to Screen: Sets the zoom to fit the entire image on screen. Fill with Layer: Sets the zoom to fit the current layer. Actual Pixels: Sets the zoom to 100% or actual pixels. Show Clipping: Shows the clipping overlay view, which over-rides the current mask view. Preview Mode: Allows the user to switch preview modes. Preview Background Color: Toggles the background color options. Show Mask: Allows the viewer to see the mask. Mask View Mode: Allows the user to select the various mask modes. Window Menu Navigator/Loupe/Histogram: Hides or shows the navigator pane. Adjust Mask: Hides or shows the Adjust Mask pane. Colors: Hides or shows the Colors pane. Show Control Panel: Hides or shows the Control Panel. Hide Panels: Hides or shows all Panels. Full Screen: Toggles to and from full screen mode. Document Name: Shows the name, zoom level and bit depth of the open image. Help Menu Search: Searches the menus (Mac OSX only). Perfect Mask Online Help: Opens this html Help in your default web browser. Video Tutorials: Opens the online Video Tutorial in your default web browser. Getting Started: Opens the online Getting Started overlay . Show Keyboard Shortcuts: Opens the keyboard shortcut inspector. Perfect Inspiration: Takes you to the Perfect Inspiration web site. Check for Updates: Checks with the onOne update server to see if you are running the current version. If there is a newer version you will be notified and be walked through the update process. Deactivate: Opens the activation dialog. These are used to deactivate your software for moving it to another computer or for a return. Registration: Opens the default web browser and navigates to the registration page of the onOne website. Provide Feedback: Opens the default web browser and navigates to the feedback page of the onOne website. Help Improve onOne Products: Opens the Improve onOne Products dialog. Perfect Mask 82 Perfect Mask Keyboard Shortcuts Perfect Mask has many keyboard short-cuts to make it faster to access common buttons and menu items. It also uses many of the keyboard shortcuts that Photoshop uses, making it intuitive to learn. Here is a list of the most commonly used keyboard shortcuts: Action Mac Win Apply enter enter Cancel esc esc Preferences cmd , ctl k Undo cmd z ctl z Redo cmd shift z ctl shift z Reset All cmd opt z ctl alt z Switch to Pane cmd 1,2,etc. ctl 1,2,etc Select Pan Tool h h Select Zoom Tool z z Select Keep Brush k k Select Drop Brush d d Select Refine Brush r r Select Masking Brush b b Select Magic Brush m m Select Pen Tool p p Select Chisel Tool c c Select Blur Tool l l s Select Keep Dropper Select Drop Dropper Select Bucket Tool s Zoom-In cmd + or cmd = ctl + pr ctl = Zoom-Out cmd - 1:1 cmd opt 0 ctl alt 0 Fit to Screen cmd 0 ctl 0 Fit to Layer cmd shift 0 ctl shift 0 Show Clipping opt J ctl - alt J Tool Size larger ] smaller [ larger ] smaller [ Tool Feather softer shift ] harder shift [ softer shift ] harder shift [ Tool Opacity opt 1 (10%) opt 2 (20%) opt 0 (100%) etc opt 1 (10%) opt 2 (20%) opt 0 (100%) etc Toggle Paint Mode (paint-in, paint-out) x opt x alt Show/Hide Mask ctl m ctl m Toggle Mask View cmd opt m ctl alt m Preview Modes - Single Image - Left/Right - Left/Right Split - Top/Bottom - Top/Bottom Split cmd Y cmd L cmd opt L cmd T cmd opt T ctl Y ctl L ctl opt L ctl T ctl opt T Open/Close Control Panel cmd right arrow ctl right arrow Hide Panels tab tab Full Screen Mode cmd ctl f F11 Perfect Mask Index Deleting a Layer 33 ,33 Directory 22 Display 6 Drop Brush 68 A About Perfect Layers 18 Activation 8 Adding Layers from Files 29 Additional Help 5 Address 4 Adjusting Canvas Size 30 Adjusting Mask 78 Adjusting the Masking Bug 44 Aperture 16 Auto Brushing 69 B Batch 16 ,14 Blending Mode 33 blur 57 Blur Tool 74 Bridge 17 Browser 20 ,22 Brush Feather 41 ,72 Brush Opacity 41 ,72 Brush Size 41 ,72 Brush tool 57 Brushes 68 Brushing 69 bucket 57 Bucket Tool 74 C Canvas Size 30 Changing Blending Modes 33 Changing Layer Order 33 Chisel Tool 57 ,74 Classic Pen Tool 76 Clean Up Tools 74 Clipping 25 Color Fill Layer 36 Colors 69 Contacting 4 Contacting onOne Software 4 Contrast 78 Copy and Paste Mask 39 ,55 Creating a New File 29 Crop Box 31 Crop Tool 20 ,21 Cropping the Image 31 D Deactive 8 E Edit Menu 48 Edit with Plug-in 16 Editing a Color Fill Layer 36 eReader 3 Export 16 ,14 External Editor 16 ,14 ,17 Eyedropper 57 F FAQ 5 File Browser 22 File Formats 9 File Menu 48 ,22 Flipping a Layer 34 Folder 22 Frequently Asked Questions 5 G Geting Started 19 Getting Started 54 H Hand Tool 20 ,24 ,58 Help 5 ,3 Help Menu 48 Histogram 20 ,25 ,59 I Installation 7 Introduction 2 Invert Mask 39 ,41 ,55 ,72 iPhoto 17 K Keep and drop palate 69 Keep Brush 68 Keyboard Shortcuts 51 ,82 Knowledge Base 5 Opening 9 L Layer Masks 33 Layer Menu 48 Layer Visibility 33 Layers 32 Layers Pane 20 Left-Right Screen 27 ,61 Left-Right Split Screen 27 ,61 Legal 4 Licensing 8 Lightroom 14 Loupe 20 ,25 ,59 M Mac OSX 6 Magic Brush 69 Mask Dialog 78 Mask View 66 Masking a Color Fill Layer 36 Masking Brush 20 ,21 ,41 ,72 Masking Bug 44 ,20 ,21 ,41 ,72 Masking Bug Tool 44 Masking Bug Tool Options Bar 44 Masking Layers 39 ,55 Masking Menu 48 Masks 20 Menus 48 , Merging Layers 33 Module Selector 10 Moving a Layer 34 Moving the Crop Box 31 Moving the Trim Box 35 P Paint Mode 41 ,72 Pan 57 Pan Tool 21 ,58 PDF 3 Pen Tool 76 ,57 Perfect Layers 10 Perfect Mask Perfect Mask User Interface 56 Phone 4 Photoshop 12 Photoshop Elements 12 Plug-In Extras 14 PNG 9 Preferences 47 Preparing Your Image 63 Preview 24 Preview Window 20 Preview Window Modes 40 ,27 ,61 Printing 3 PSB 9 PSD 9 R navigating the preview 58 Navigating the Preview Window 20 Navigator 20 ,25 ,59 RAW 9 Refine Brush 68 Registration 8 Renaming Layers 33 Reset Mask 39 ,41 ,55 ,72 Resizing a Crop Box 31 Resizing a Layer 34 Resizing a Trim Box 35 Retouch Brush 20 ,21 Retouch Tool 37 Retouching Layers 37 Rotating a Layer 34 O S onOne Panel 12 onOne Software 4 onOne University 5 OpenGL 6 Save As 9 Saving 9 Show Mask 41 ,72 Single Mode Screen 27 ,61 Standalone 11 Support 4 Support File Types 9 System Requirements 6 N T Tablet 3 The Layers Pane 33 The Mask Modes 40 The Trim Inspector 35 TIF 9 Tool Well 20 ,21 ,57 Top-Bottom Screen 27 ,61 Top-Bottom Split Screen 27 ,61 Transform Tool 20 ,21 Transforming Layers 34 Trim Tool 20 ,21 ,35 Trimming Layers 35 U Uninstalling 7 User Guide 18 ,1 User Interface 20 ,56 Using Color Fill Layers 36 Using Modules 10 Using Perfect Layers 28 Using Perfect Mask 62 Using the Help System 3 Using the Trim Tool 35 Using with Photoshop 12 V Video Tutorials 5 View Menu 48 Viewing the Mask 66 W Wacom 41 ,72 Webinar 5 Welcome 53 Window Menu 48 Windows 6 Working with Layers 33 Z zoom 57 Zoom Tool 20 ,24 ,21 ,57 Zooming 59