1
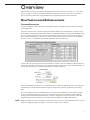
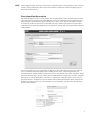
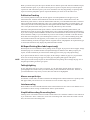
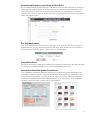
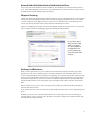
eArtist 4.0
Release Notes and
Upgrading from
eArtist 3.0
ArtScope.net
November 2009
[email protected]
Overview
This document covers the new features and enhancements made to eArtist over version 3.0.x. Users who
wish to upgrade to eArtist 4.0 should first purchase the upgrade from version 3.0.x from our website at
http://www.artscope.net/eArtist. Upgrade instructions are included at the end of this document.
New Features and Enhancements
Currency Conversion
eArtist now supports multiple currencies including the ability to assign the currency symbol per currency,
and exchange rate.
Currencies now have their own table in the eArtist Admin module. You can edit the list of currencies and
the exchange rates directly from the Admin module->Set System Settings tab->Currencies and Markup tab,
or you can click on the blue arrow icon next to the Currencies title to go to the Currencies table directly. A
link to a URL that keeps up-to-date currency rates is on the Currencies table view. If you sell in multiple
currencies often, it is important to keep the Exchange Rate data up-to-date often.
You have the option to designate two extra currencies as “display” currencies. When you change these two
extra display currencies, hovering over your retail price with your mouse arrow in the Artwork module will
display what the retail price is of that artwork in the two display currencies.
Invoices and Exhibitions can be set to use a different currency than your default currency, and pricing will
automatically be refreshed and calculated using the exchange rates you have specified in your Currency
table.
Prices are copied into Invoices and Exhibitions, so changes in the exchange rates will not affect existing
invoices or exhibition price lists. If you need to refresh your pricing on an exhibition, click the Refresh
Pricing button on the exhibition form detail. If you need to refresh your pricing on an Invoice, click the
Refresh Pricing button on the Invoice form detail next to the Wholesale or Retail radio buttons.
NOTE: Shipping charges are always recorded in your default currency. If you are using a different currency on your
Invoice, the shipping charge will display on your invoice in the invoice currency.
NOTE: Unlike shipping charges, Payments can be made in a different currency. On the payment screen, select the
currency of the payment being made. eArtist will record the exchange-rate amount, and display the payment in the chosen currency.
Curriculum Vitae Generation
The Admin module has a new “CV” tab. On this tab, you’ll find fields to enter extra data about your artist
career that you don’t normally track with exhibitions, invoices or constituents such as publications you’ve
been featured in, your professional degree information, or other awards. You have the option to include
or exclude any of these sections from a Curriculum Vitae report which can be printed or exported. Your
curriculm vitae will list all the exhibitions you’ve tracked in eArtist by date, and all constituents who have
made purchases.
You may designate how or if a Constituent even appears on your Curriculum Vitae with a new “Include
in CV” field in the Constituent module. Before running the CV report, you should go through your
Constituent buyers and assign them to a particular section in the “Include in CV” field. “Corporate” buyers
will list the business name. “Private” will list the calculated Saluation. Listing a buyer as either “Corporate
Anonymous” or “Private Anonymous” will show as “Anonymous” under the respective sections. If you
have more than one “Anonymous” buyer, the number will be tallied and shown next to the “Anonymous”
moniker. If you do not wish to list your Constituent even as anonymous, you may set the “Include in CV”
field to “Do Not Include”.
When you run the CV report, the report is broken into two distinct reports: The artist and exhibition report,
and the collections report, so you will be asked to print or export two reports when you click the print or
export icons. The collections report is your list of constituents. You may skip printing or exporting either
report. You will be prompted to print or export both whether you cancel one or the other or not.
Publication Tracking
You can track publications that your artwork appears in. Tracked publications can appear on your
Curriculum Vitae. A button on the Publications tab in the Artwork form, and the button next to the
Publications portal on the CV tab of the Admin module will take you to the Publications table to add more
entries and details about the publication. Once you’ve added a publication where your work appears, you
can link any artwork record to that publication through the Artwork module->Form View->Publications
tab. Use the pull-down menu on the portal to select the publication by name and date.
The footer of the publication table layout contains a custom field for determining what and how your
publications are noted on your CV. The editable field is a pre-evaluated calculation field. Treat this field as
if you were creating a normal FileMaker calculation. The evaluated field is shown below the pre-calculated
field to check the validity of your calculation. If you aren’t sure of what you should or can enter into this
field, email our tech support. If your evaluated preview shows a “?”, you’ve done something wrong with
the calculation. Email our tech support if you are unable to fix your calculation. The default definition
contains formatting for books, newspaper articles, magazine articles, and pamphlets. If no publication type
is selected, the format will only display the publication name and date.
A4 Report Printing (Non-label reports only)
Printed reports are now formatted to allow printing on A4 size paper. If you print to A4 sized paper, change
the default page size on Admin module->Set System Settings tab->Interface tab. When you print your
reports, A4 will automatically be selected as the default page size in the page setup options dialog.
If you print to both A4 and U.S. Letter size paper, set this setting to whichever page size you print to the
most. You can always change the page size in the page setup dialog that appears with reports.
NOTE: Label, postcard, and envelope reports are NOT formatted for A4 printing. Do not change the page size in
the print options dialog for these type reports.
Tab highlighting
If your Artwork has activity or notes, or expenses, etc., the tabs on the Artwork Form view will have a
green highlight above them to alert you to the fact that you have information on those tabs. Likewise, if
your Constituents have any activity or notes, those tabs will also be highlighted.
Mouse-over quick-tips
Icon buttons, certain fields, and other selectable items throughout the eArtist interface have quick-tip notes
that appear when your mouse hovers over the items for a few seconds to help you use eArtist.
Interface scaling
Portal windows on forms and other elements of the eArtist interface will now scale in size with the size of
your window to allow viewing of additional line items in portal windows.
Simplified Ascending/Descending Sorts
Clicking on list view headers will now sort the column in the reverse order the column was last clicked. So
if you clicked on a “Title” column once, it will sort in ascending order. Click on the title column a second
time, and it will sort in descending order.
Send an email support request from within eArtist
We’ve included a button right on the front page of the Admin “About” tab that will enable you to compose
and send an email support request to us. Your system must have a default mail application setup to send
email, and you must be connected to the internet. eArtist will send your email application a composed
email for you to send to us. You must send the email from your email application. eArtist will only help you
compose the support request.
Pre-Sold designation
Some work you may have already sold before purchasing or using eArtist. If you do not wish to create a
back-dated invoice, you may designate an artwork as “Pre-Sold”. These artworks will not be availble for
sale through invoices, and will appear as “Not for Sale” or “Sold” elsewhere.
Framed Size Field
The Artwork Size field is generally for pre-framed sizes. Enter the post-framed size in this field. The framed
size will appear in exhibitions and invoices as well as the Artwork Information sheet.
Personalized and Anonymous Proof Sheets
As art competitions and artwork submissions become more electronic, this report format will print out a
“proof-sheet” similar to a slide sheet. Choose the format that will best support your artwork image size as
well as submission requirements. Customize the artwork captions to meet your submission requirements
with the Caption Definition fields. Treat the Definition field as if you were creating a normal FileMaker
calculation. The Preview shows you the results of your Definition.
Certification of Authenticity language added to
Artwork Information sheets and Invoices
We’ve had a lot of requests for a Certificate of Authenticity report. Because this is a legal document best
overlooked by your lawyer or solicitor, the best option for this is really to create a merge file in Microsoft
Word that you keep handy and fill out with your artwork information as you see fit, as this document could
potentially be very long and will absolutely be custom to your artistic situation.
However, we’ve added support to include some basic “Certification of Authenticity” language to both your
artwork information sheets and your Invoice notes.
Customize your Certification language on the Artwork Reports layout. The editable field is a pre-evaluated
calculation field. Treat this field as if you were creating a normal FileMaker calculation. The evaluated
field is shown below the pre-calculated field to check the validity of your calculation. If you aren’t sure of
what you should or can enter into this field, email our tech support. If your evaluated preview shows a “?”,
you’ve done something wrong with the calculation. Email our tech support if you are unable to fix your
calculation.
If you don’t wish to use this feature, blank out the field. Otherwise, this language will appear at the bottom
of your Artwork Information sheets.
You can copy this language, when needed, to any Invoice you create by clicking the icon next to the Notes
field on your Invoice.
Edition Management Enhancements
You can now track the original artwork to your editions by designating the original artwork id on the
Editions tab in Artwork. Be sure to include this ID before you create your edition, otherwise, it will only
appear on one record in your editions.
In order to create a print edition from an existing original, go to your original artwork record. Duplicate the
record by using CTRL+D (PC) or Apple+D (Mac) or selecting Records menu->Duplicate Record. Change
the artwork medium and wholesale price. Enter “1” of X number of edition prints in the editions field. Click
on the Editions tab and enter the Original Artwork ID in the Original Artwork field, and the Edition Type,
Publisher, and Printer information if you wish. Then click the “+” sign next to the edition number field.
You will be asked to create the edition for just one print or the total prints in your edition. (Typically, you’d
select total prints if you are starting a new edition.) After eArtist has created all your edition records, you
may get a dialog box reminding you that you will need to increase the edition number before you can add
any more prints to the edition.
The Edition Report will also now show the Total Sold value and Total Retail Value, and the number or editions Sold. The Editions tab will show the total retail value of your edition and total number in the edition.
Expanded Status Field
Constituents have an expanded viewable “Status” field for those who have a lot of stati.
Price Rounding and Currency support in Exhibitions
Just like invoices, Exhibitions can be set with a specific currency. Exhibition reports will list the artwork
using the current exchange rate for that currency.
You may also set an exhibition to round the pricing for artworks when the currency exchange rate creates odd prices. Rounding in Exhibitions is turned on by default. If you do not want to round pricing for
Exhibitions, set the Rounding field to “Don’t Round” on the Exhibition form.
Exhibition Price Lists show Framed Sized
Exhibitions and Exhibition lists will now show the Framed Size (if available) for an artwork.
Artwork Sold at Exhibition Retains Exhibition Retail Price
You can now sell an artwork directly from an exhibition. The exhibition price will be transfered to the invoice. Click on the Shopping Cart icon next to your exhibition line item, and a new Invoice will be created
with that artwork with the exhibition price and currency.
Shipment Tracking
eArtist now supports shipment tracking with Federal Express. If you use Federal Express for your shipping,
and include your FedEx shipment number when you enter the shipping information for an invoice, a little
“S” icon will appear on the shipping line item on your invoice. Clicking on the “S” will bring up a webviewer page showing the status of that package from the Federal Express website.
eArtist is not supporting this feature for UPS or other shipping vendors at this time, however, you may still
enter a tracking website into the Shipping Types table through the Admin module.
If you use FedEx to ship your
artwork, and enter a tracking
number for your shipment,
an “S” button will appear on
your shipment line item on
your invoice. Clicking on the
“S” button will open the FedEx
tracking site.
ArtScope.net Webviewer
When you first open eArtist 4, if you are connected to the internet, the ArtScope.net home page will be
displayed in a web-viewer. Our home page has art-world related news from around the globe as well as
reviews and announcements from the Chicago art community. You’ll find our news spider actually provides
timely art news faster from the original sources, and consolidates it much faster than any arts magazine on
any bookstore magazine rack. Our reviews of shows in and around the Chicago area are often linked and
quoted around the internet. Also, keep abreast of any developments with eArtist, with the eArtist support
links.
We don’t charge for our news, so feel free to help us out by making your Amazon purchases through our
Amazon book and store links.
If you want to advertise on our site, follow the Google ad link to purchase space in our Google-managed ad
space.
Eventually, we’ll have more community-based features to not only help you sell more art, but help you
research galleries, and get your press out to the public, allow public posting of show announcements, mapmashups, and more. Keep watching!
Upgrading to eArtist 4.0
from eArtist 3.0.x
NOTE: If you are upgrading from any version of eArtist earlier than eArtist 3.0, you must purchase the additional
upgrade service from ArtScope.net, and allow ArtScope.net to transfer your data for you to the new version.
eArtist 4.0 does not have a script that will automatically transfer data from a version earlier than version
3.0.
Installing eArtist 4.0 will create a whole new eArtist directory. If you have eArtist 4 open, close and exit
out of the application before proceding.
1. Open your version of eArtist 3.
2. Create a backup of your eArtist 3 files:
•
•
Go to the System Administration tab of the Admin module.
Click on the “Data Backup” button. Click this button even if you have a scheduled backup to
create fresh backup files in your eArtist 3 backup directory.
3. Quit eArtist 3.
4. COPY the backup files (ending in .bak) from your eArtist 3/BACKUP directory.
5. PASTE the backup files to your eArtist 4/BACKUP directory. (You do NOT need to rename the
extention on these files).
6. Open eArtist 4.0.
7. Enter your artist name and eArtist 4.0 registration key from your eArtist 4.0 registration email, and
click the “Register” button to register your copy of eArtist 4.0.
NOTE: You may fill in the rest of your details if you’d like, or simply wait until later, but the application must be
registered before running the upgrade script!
NOTE: The eArtist 4.0 upgrade script will NOT copy your artist information from eArtist 3.0. You will have to reenter your artist information (and logo, if applicable) on the Set System Settings tab of the Admin module.
8. Select the Scripts menu->Update to eArtist 4.0 from 3.0 script.
•
•
•
•
You will be presented with a couple warning/reminder messages before the import process will
begin. Read through these carefully!
You will be prompted through a series of import dialog boxes which will import data from
your eArtist 3 backup files into eArtist 4. The import dialogs should be set automatically. You
shouldn’t have to adjust anything on these dialogs. Simply click OK through all the dialogs.
A couple of the imports into the Admin module will report that the “Help” file cannot be found.
This is OK. Just click through these dialogs and “Continue” the script when prompted.
When the script is complete, you should have run through nearly 20 table imports.
9. Check ALL your data in eArtist 4.0 for accuracy. If only some inaccuracies exist, correct them. If
you do not think the data transfered appropriately, you may try again by quiting eArtist 4, uninstalling eArtist 4, and starting from scratch, including reinstalling eArtist 4, and copying over your
eArtist 3 backup files. If you still need help, and if you think the problem may be minor, you may
send an email support request to [email protected], or, purchase the upgrade service to eArtist
4.0 and we’ll be happy to do the upgrade for you. If you are an expert FileMaker user, you may also
attempt to correct the import yourself by checking through the import dialogs as they pop up during
the upgrade script. If you want to learn more about importing/exporting data to/from eArtist, be sure
to read the import/export section of our User Manual.