1
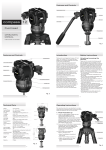
The Cesaral Soundmaster (by Cesar Alonso-Cesaral Magic)
Version 6
1) Introduction
You have in your hands an efficient and effective solution to play sounds effects and High
Fidelity music in a very easy and flexible way, and very importantly, at the specific moment
you need each sound. Your audiences will have no idea how you have such precise control
over those sounds, and they will be amazed by your professional presentations.
The Cesaral Soundmaster allows very fast and easy access to 100 Random audio files and to
hundreds of sequential audio files.
The Cesaral Soundmaster system has been designed to be multi functional. In co-operation
with professional magicians around the world a great deal of thought has been put into the
design of the unit in order to give performers a tool that works to their best advantage.
The Soundmaster system consists of:
1) A Central Unit that is connected to an amplifier or sound system through a stereo
standard headphone jack. Normally you will use a headphone to stereo RCA cable to connect
the Soundmaster to your amplifier / sound system.
2) A Remote Control Unit. There are different transmitters (Control Units) that can be
used to control the Cesaral Soundmaster. No product on the market has so many control
possibilities.
Page - 1
Here are some of the available control units:
Some of the Remote Control Units available
Page - 2
The first Remote Control Unit is called the “Cesaral Invisible Key” which is a 12 button
transmitter (already used with some of our other Cesaral Magic tricks):
The pen marker has 12 buttons arranged in such a way that you have easy access to the
specific button you want each time. The pen is held in such a way that nobody will realize you
have 100% control over the Cesaral Soundmaster unit.
The second unit is a small “5 button Control Unit” (size: 38mm x 85mm x 15,7mm):
This control unit, as we will see in detail later on, is used to manage the basic control
functions of the Soundmaster.
The third remote control unit is the “Cesaral Magic Wand”:
This is an optional control Unit that can be ordered, and is great for Kids shows. We will look
at the Cesaral Magic Wand later on in greater detail.
Page - 3
The fourth remote control unit is a special Thumb
Tip with three buttons, called the “Cesaral Magic
T.T.”. This control unit can be used for some basic
“sequential mode” functions as we will see later.
The buttons can be covered with brown tape to
disguise them. (This is an optional control Unit that
can be ordered). This special TT can be ordered at
any time, and you may specify the functions you
want for each of the buttons.
The fifth remote control unit is a special set
of Foot Pedals.
You may order from 1 to 12 foot pedals, and
we can program the function of each
individual pedal according to your needs.
The sixth remote control unit is a 4 button body remote.
You can easily hide it in your jacket or on any part of your
body for easy access.
You may also decide on the function that you want each of
the buttons to have. You may have several of these
remotes working together.
The seventh control unit is an add-on for the SM58
Shure handheld microphone.
This is a special cover with 12 buttons that can be used
to control the Soundmaster in multiple ways.
You may decide which function (any function) that you
want to have in each of the buttons.
Page - 4
The Sound files are stored on a standard SD memory card. This can be up to a 2 Gig card
formatted in FAT32 (not FAT16 or NTFS). The SD memory card plugs into the Cesaral
Soundmaster to provide Music, Speech or Sound effects.
3) Soundmaster central unit
Here you can see the inner workings of the central unit:
A: Power switch. Push it to the right to
switch the Cesaral Soundmaster ON.
B: Green LED. This lights up when you
switch the unit ON.
C: Charger connector
D: Lithium Polymer rechargeable battery
(can also be offered with a 3xAA battery
holder)
E: Main processor
F: Stereo headphone jack output.
G: SD Card socket.
H: LED that lights up when an order is
received.
I: Antenna. This should be in the vertical
position for proper reception.
J: LED that indicates reception activity
K: LED that lights up when a sound is
being played.
You may order your Soundmaster with either a Lithium-Polimer rechargeable battery, a
battery holder for three AA batteries, or prepared for powering via a transformer. The most
versatile configuration is with a battery holder, as you may use either normal AA batteries or
rechargeable batteries.
The Soundmaster is quite small and is therefore easy to pack and transport. You may also
connect to it any amplifier.
Page - 5
4) Loading the SD memory card with sound files
Your sound files should be compiled and edited on your main computer. If you have a laptop
you can also change and modify your files “on the go”.
Some computers already have an integrated slot to read SD
memory cards. If your computer does not have one of these
slots you will need to purchase a special memory stick to
load them on to your computer using a USB connection.
One SD memory card is supplied with your Cesaral
Soundmaster. We are also able to supply the memory sticks
and extra SD cards if required.
Memory stick that is plugged
into the USB port
The SD memory card is a standard memory device that can hold a large number of files. They
can be found in many stores as they are widely used for digital cameras, MP3, MP4, and many
other electronic devices.
After buying a new SD card you must first format it into FAT32 file format in order for it to be
recognizable by the Soundmaster. This can be easily done via Windows explorer.
5) Names of the sound files
One of the amazing aspects of Soundmaster is that you don’t need a specific program to
configure it. The name given to the sound files determines how they will be used - which
control unit will play them, in what effect, and in what order.
The white remote Control Unit deals with the Sequential
access mode. It is called the Effect Selector
The first thing that you need to do when you start an
effect, is to press the button (there are 12 on this remote)
associated with that effect. Thanks to this remote, each
effect may have its own sounds and they will not mix with
sounds from other effects.
The sounds for effect number “1” are activated pressing
button number “1”, and so on.
On the SD card, the file names used in the Sequential access mode have this format:
Yxx_nn <x…x>.mp3
The first 6 characters of each file on the SD card define the mapping for each file. They set up
the effect that will use it, the playing order, and the remote Control Unit that will have to be
used to play it. Let’s have a look at this in more detail:
Page - 6
•
"Y" is the effect identifier. Here are the possible values for it and their meanings:
o Pressing button “1” on the Effect Selector all the sound files that start with the
letter “A” are selected.
o Pressing button “2” on the Effect Selector all the sound files that start with the
letter “B” are selected.
…and so on until…
o Pressing button “12” on the Effect Selector all the sound files that start with the
letter “L” are selected.
•
“xx” is the remote control identifier. Here are the possible values and their meanings:
o I1 =The sound is associated to the sequential list 1 that is managed by the 12
button Invisible Key (Pen marker control unit)
o I2 = The sound is associated to the sequential list 2 that is managed by the 12
button Invisible Key (Pen marker control unit)
o T1 = The sound is associated to the sequential list 1 that is managed by the
Thumb Tip control Unit – button 1 (in the tip of the Thumb Tip).
o T2 = The sound is associated to the sequential list 2 that is managed by the
Thumb Tip control Unit – button 2 (in the middle of the Thumb Tip).
o T3 = The sound is associated to the sequential list 3 that is managed by the
Thumb Tip control Unit – button 3 (the remaining button).
o B1 = The sound is associated to the sequential list 1 that is managed by the Body
remote control unit number “1”.
o B2 = The sound is associated to the sequential list 2 that is managed by the Body
remote control unit number “2”.
o B3 = The sound is associated to the sequential list 3 that is managed by the Body
remote control unit number “3”.
o M1 = The sound is associated to the inertial remote control unit.
The playing pointer for each of the sequential lists described is independent from the rest. If
you activate one effect using the Effect Selector control unit, then the pointer will be reset
and the different control units used for that effect will have their own pointer pointing to the
beginning of each list.
With this naming convention you may easily select, for each effect in your performance, the
remotes that you prefer to use. The type of effect you will be performing may determine
whether you should use one remote or another.
•
“nn” Contains a two-digit number from “01” to “99”. This means that each control
unit, for each of the effects, can have up to 99 sounds available.
If one group of sounds of one effect of one remote control unit only has one file, then that file
will be repeated each time the specific button is pressed. If the list has several sounds, once
the last sound is played, the pointer goes back again to the first sound on the list.
•
<x…x>
Is a bunch of optional characters that the player will ignore.
Page - 7
For example, these sound file names are correct:
AB1_01 example.mp3
This file is the first one on the list, it is controlled by the body
remote “1”, and in the effect “A”
CT1_99 example 2.mp3
This file is the sound number 99 on the list, it is controlled by
the Thumb Tip button 1, and is only active in the effect “C”
AT3_01 running gag 1.mp3
BT3_01 running gag 1.mp3
CT3_01 running gag 1.mp3
DT3_01 running gag 1.mp3
In this case, the same sound file is being used in the effects
“A”, “B”, “C”, and “D”, using button “3” of the Thumb Tip.
Here are examples of sound file names that are NOT correct:
AB1_1
bad example 1.mp3
CT1_099 bad example 2.mp3
Important note: The total length of the names may not have more than 65 characters.
The sounds used in Random access mode are organized in 10 Playlists with 10 audio files in
each (a total of 100 sequences available). They have this format: “ZZnnn <x...x>..mp3”.
“ZZ” is the Playlist number:
“01” to use the first Playlist
“02” to use the second Playlist
…
“10” to use the tenth Playlist
“nnn” is a track number from 1 to 10:
“<x...x>” is a bunch of optional characters that the player will ignore
Again, the limit on file name length is 65 characters, including the leading number and the
trailing file extension.
The sounds used in Pre-show mode (music that you normally play before your performance,
after it, or during the intermission) have this format: “X <x...x>..mp3”.
The order in which these sequences are played depends on the order in which they were
copied onto the SD card.
Again, the limit on file name length is 65 characters, including the leading number and the
trailing file extension.
Page - 8
6) Operation modes
When the Central Unit is switched ON, it starts working in the Random Access Mode / Playlist
“1”.
You will soon find out which mode is better for you - either random access mode or sequential
access mode, but of course you can use both.
When some of the remote control units are used they automatically switch the Soundmaster
Central Unit to the sequential access mode. This is the case, for example, with the Thumb Tip
control unit. If you are in the sequential access mode and want to go to the random access
mode, you will have to use the 12 button pen marker control unit. We will look at this in more
detail later.
We are now going to look at the default commands of each of the control units. We would like
to take this opportunity to remind you that you may want to change the functions of these
remotes….and that very importantly this is covered in the price of the Soundmaster - we will
not charge you for it.
4.1) Commands of the 12 button Pen Control Unit: switch 1 and 2 must be in “on” position.
When the pen marker is not in use after the performance please do not forget to switch OFF
both switches:
Random Access mode Pen Control Unit functionality
When you power ON the Central Unit, the Playlist “01” is the one that is active until you
select another one, or you switch to the sequential access mode.
In the following list, “ZZ” is the Playlist to which that sound belongs.
Button
Button
Button
Button
Button
Button
Button
Button
Button
Button
1…..plays the
2…..plays the
3…..plays the
4…..plays the
5…..plays the
6…..plays the
7…..plays the
8…..plays the
9…..plays the
0…..plays the
file
file
file
file
file
file
file
file
file
file
with
with
with
with
with
with
with
with
with
with
the
the
the
the
the
the
the
the
the
the
name
name
name
name
name
name
name
name
name
name
“ZZ001 <x...x>
“ZZ002 <x...x>
“ZZ003 <x...x>
“ZZ004 <x...x>
“ZZ005 <x...x>
“ZZ006 <x...x>
“ZZ007 <x...x>
“ZZ008 <x...x>
“ZZ009 <x...x>
“ZZ010 <x...x>
.mp3”
.mp3”
.mp3”
.mp3”
.mp3”
.mp3”
.mp3”
.mp3”
.mp3”
.mp3”
Button “x”: If you press “x” for about 1 second, release it, and then press it again for about 1
second, the Central Unit goes to Sequential Mode. The unit remembers the last audio played
in sequential mode so that the “go to next sound button” goes to the following sound in the
sequential list.
Button “y”: This has the same functionality as in Sequential Mode
If you have the file named “ERROR.MP3” on the SD card, then this sound will be played in
case you try to play a sound that does not exist on the SD card. We advise you to put this kind
of file on the SD card.
Page - 9
Sequential Access mode Pen Control Unit functionality
Sequential Access mode Pen Control Unit functionality.
Button 1
Button 2
Button 3
Button 6
Button 7
Button 8
Button 4
Button 5
Button 0
Button “x”
Button “y”
Plays the first sequential audio file of the list I1 of the
selected effect. For example if you have selected the effect
“A”, the file “AI1_01 <x…x>.mp3” will be placed.
Plays the previous audio sequence of the list I1 of the
selected effect.
Plays the next audio sequence of the list I1 of the selected
effect.
Plays the first sequential audio file of the list I2 of the
selected effect. For example if you have selected the effect
“A”, the file “AI1_01 <x…x>.mp3” will be placed.
Plays the previous audio sequence of the list I2 of the
selected effect.
Plays the next audio sequence of the list I2 of the selected
effect.
Volume up. Each time you press and release this button the
volume goes up a little bit.
Volume Down. Each time you press and release this button
the volume goes down a little bit.
Pause-resume
If you press “x” for about 1 second, release it, and then
press a button “1”, “2”, …”0”, then the Random Access
mode is activated, and the Playlist is determined by the
number pressed after the “x”.
Fade out function
While a music file is being played, the RED LED on the board will turn ON. If the requested
sound can not be found, then the red LED will flicker.
Important: If in sequential mode and the requested file is not found or has a naming error,
the next sequence played will be the first one on the list.
If a music file is being reproduced and another sound file is requested, then the actual sound
file will stop before the requested file is executed. When a button is pressed, it only takes a
fraction of a second to play the selected sound.
If you want to have a specific button programmed, just email [email protected]
Page - 10
4.2) Selecting an effect with the Effect Selector:
As we saw before, this remote control unit is used to activate the sounds associated with a
specific effect that we want to perform. You may wish to keep this controller in the same
place as you keep the materials that you will be using for the different effects in your
performance.
Button 1: Selects the sounds for effect “A”. These are files that
start with the letter “A”. So, the files have this format
Axx_nn <x…x>.mp3
Button 2: Selects the sounds for effect “B”. These are files that
start with the letter “B”. So, the files have this format
Bxx_nn <x…x>.mp3
Button 3: Selects the sounds for effect “C”. These are files that
start with the letter “C”. So, the files have this format
Cxx_nn <x…x>.mp3
Etc…
Button 12: Selects the sounds for effect “L these are files that
start with the letter “L”. So, the files have this format
Lxx_nn <x…x>.mp3
When you manage the files on the SD card, just sort them by name and you will be able to see
the order clearly.
4.3) Commands on the 5 button transmitter:
This important Control Unit has the following functionality:
Button 1: Sound Up until the button is released
Button 2: Sound Down until the button is released
Button 3: Play pre-show music. When one finishes, then the next one is played without delay.
If music is being played and you press this button again, then you will PAUSE the current
track. If you press this button again, then you will RESUME the track.
Button 4: Fade-out. For example, this is the button that you would press to start the show.
Button 5: Go to the next pre-show music track. When the last pre-show music track is played,
the list starts from the beginning again (the first one is played, and so on).
If you want to have a specific button programmed, just email [email protected]
Page - 11
4.4) Commands on the Magic Wand Control Unit:
Important: In all of the operation methods of the Want Control Unit, switch 1 must be in “ON”
position, and switch 2 in “OFF” position. When you finish the performance, don’t forget to
put both switches in “OFF” position.
The wand has been designed to work in mixed Random/Sequential mode, as in this case
finding the proper button to be used is more difficult and thus the functionality had to be
simplified.
Commands in the 12 buttons Wand Control Unit:
Button
Button 12
Button 11
Button 10
Function
The same function as button “3” of the pen marker control unit
The same function as button “2” of the pen marker control unit
The same function as button “1” of the pen marker control unit
Button 9
Button 8
The same function as button “8” of the pen marker control unit
The same function as button “7” of the pen marker control unit
Button 7:
Button 6:
Button 5:
Button 4:
Button 3:
Button 2:
Button 1:
Plays random
Plays random
Plays random
Plays random
Plays random
Plays random
Plays random
file
file
file
file
file
file
file
“00007
“00006
“00005
“00004
“00003
“00002
“00001
<x…x>.mp3”
<x…x>.mp3”
<x…x>.mp3”
<x…x>.mp3”
<x…x>.mp3”
<x…x>.mp3”
<x…x>.mp3”
<x…x> is a bunch of optional characters that the player will ignore.
Page - 12
4.5) Commands on the 3 button Thumb Tip control Unit:
This Control Unit always works in sequential mode:
Button 1: Plays the next sound in the T1 sequential list of the selected effect. So, the format
of the files that will play is: YT1_nn <x…x>.mp3.
In this file format, “Y” is the identifier of the selected effect, and “nn” is the sequence
number from “01” to “99”.
Button 2: Plays the next sound in the T2 sequential list of the selected effect. So, the format
of the files that will play is: YT2_nn <x…x>.mp3.
In this file format, “Y” is the identifier of the selected effect, and “nn” is the sequence
number from “01” to “99”.
Button 3: Plays the next sound in the T3 sequential list of the selected effect. So, the format
of the files that will play is: YT3_nn <x…x>.mp3.
In this file format, “Y” is the identifier of the selected effect, and “nn” is the sequence
number from “01” to “99”.
If one sequential list only has one file, then this file will be played each time the specific play
button is pressed.
<x…x> is a bunch of optional characters that the player will ignore.
4.6) Commands on the Body control units:
You may hide several of these remotes on different parts of
your body or in your own magic props.
You may order these remote control units whenever you
want, and assign to each button the desired functionality.
With these remotes you may access sound files that use this
format:
YB1_nn <x…x>.mp3
YB2_nn <x…x>.mp3
YB3_nn <x…x>.mp3
An interesting option is having one of these remotes in the pocket of your shirt and assigning
to all 4 buttons the same function: play the next sound in the list YB1_nn <x…x>.mp3. In this
list you may keep different sounds.
<x…x> is a bunch of optional characters that the player will ignore.
Page - 13
Another interesting functionality of this remote is using it installed into a waistcoat:
Button 1: Plays the next sound in the selected list.
Button 2: Plays the previous sound in the selected list.
• If the sound has finished playing it goes back to the
beginning of the last played track.
• If the sound has not finished playing, pressing this button
goes to the previous placed track.
Button 3: Pause.
• Pauses actual play.
• You can press this button and the move forward or
backwards to position the play pointer properly. Pressing
the pause-resume button again will play what we need.
Button 4: Fade-out.
Any other imaginable configuration for this kind of remote is easily available at no extra cost.
7) Some possible Magic effects
Random Access mode: This is great for producing a sound at the exact time you need it – Or
indeed a voice or music track.
•
You can use this mode in a talking book test (the device is hidden in a book). When the
word has been chosen the book asks questions and then reveals the number.
•
For children's shows you can trigger a funny sound if something silly happens. You could
have a routine where you interact with kids from the audience, and depending on what
they say or do, you trigger the appropriate sound
•
Quiz Show, this is great for Bingo Callers.
•
Use with “Rocky Racoon” to make him talk and make noises when he drinks
•
Granddad’s teeth:
My Granddad passed away last week, he was an amazing magician and he had promised
that he would tell me the secret to the world’s greatest trick, but sadly he passed away
without telling me. He did give me this box though, and inside are his teeth. When you
remove the teeth they begin to chatter. You put the teeth back into the box and
wow!.... they start talking and give you the instructions on how to do the worlds
greatest trick!
Following Granddad’s instructions (via the Soundmaster) a card is forced. Then a
newspaper is folded up into a small packet and the paper is put into the box with the
teeth. Chomping noises are heard and small pieces of newspaper fly out from the box
(as per snowstorm). When the paper is removed Granddad’s teeth have done their work
and the name of the card chosen is seen to be cut out from the paper by the teeth!
Page - 14
Sequential Access mode: In this mode you can control Sound or Music files in sequential order
and under your complete control. Once the Soundmaster has played the first track in your
sequential list it will wait until you click the button again to activate the next track in your
list.
•
•
•
•
Great for Vent work
You could make your puppet speak
You might put words into your spectators mouths,
…or maybe just use it for playing music tracks.
Mixed Random and sequential mode of the Wand control unit:
Effect: you give a kid a magic wand and tell the audience that you will teach the kid how to
use the wand. You ask some kids to stand up and to imagine that they are part of a xylophone.
You take the wand and touch some of the heads of the kids with it. Each time a head is touch,
a note sounds…the magician is playing the Harry Potter music! When the kid tries to do the
same, all kinds of strange sounds come from his wand. The magician teaches him until the kid
is able to make his wand work fine.
8) Soundmaster LED lights
External red LED. If when you request a sound and you hear nothing, look at this LED to check
to see if the order was received by the Soundmaster. This LED will show whether the order
sent remotely was received or not.
Small green and red LED (inside the unit)
If the external red LED does not light when a remote order is sent, look at these two LEDs. If
they flicker a lot, then there may be radio interference.
Big red LED (inside the unit)
If this LED flickers 3 times, the unit is telling you that the requested sound is not available.
This is normally caused by a problem with the name of the sound file, and you must therefore
check that name format. When a sound is played, this LED flickers continuously during
reproduction.
Big green LED (inside the unit)
This LED just shows that the Cesaral Soundmaster is switched ON.
9) Final notes
It is possible to connect a FM Sender Unit to the Soundmaster so that your sounds are
transmitted to a FM Radio or receiver that in turn can be connected to your amplifying System
Upon demand, the Cesaral Soundmaster can be used to control other devices such as
Thumpers, Lights, and Servo Units.
Upon demand, the Cesaral Soundmaster can be programmed as per your requirements,
personalizing each of the buttons to suit you and your needs.
Page - 15
The Cesaral Soundmaster has an internal cache that accelerates the execution of each of the
random files and sequential files. The time from when you press one button until the specific
sound track is played, is less than 0,1 seconds. This is one of the most important features of
the Cesaral Soundmaster and makes it unique!
To avoid picking up radio interference, we recommend you use shielded cables. Also, if
you are plugging into a low impedance microphone jack, make sure that you have an
impedance matching transformer if the sound has distortion.
Pen ink refill for the 12 buttons Pen Marker control Unit
Just pour some drops of
ink through the pen point
to refill the pen.
You can buy pen refills in
many places.
10) Power supplies
There are two possible configurations for the Soundmaster central Unit:
Case a) The Soundmaster central unit is powered by 3 standard AA batteries. In this case
you may use normal batteries or rechargeable NiMh ones.
Upon request, the central unit can also be powered by a Lithium Polymer rechargeable
battery or even by an external transformer.
Case b) The Soundmaster central unit is powered by a rechargeable Lithium battery. It
takes some hours to fully recharge the battery, but the time will depend on the initial charge
of it. Use only the charger provided.
The transformer included is valid for all the countries of the world, as it can be plugged into
networks with 110V to 240V, but you may need an additional physical adaptor depending on
the country where you live. This adaptor is sold in many stores.
For example, for North America, connect a
dual-voltage appliance with a European plug
to a U.S. 120V AC outlet. These kinds of
adapters do not convert voltage.
Once you purchase your adaptor, you may
find it easier to tape it to the charger so
that you have it handy each time you need
it.
Page - 16
When you connect the three pin charger
connector
to
the
connector
inside
Soundmaster, take care to align the three
pins properly so that each of them goes into
the proper hole in the connector. It does
not matter if you insert in one position or
another… just align the three pins with the
connector with the three holes, as shown in
this diagram:
The 12 buttons Pen control unit (rechargeable version).
In this model, the charging point is in the middle of the pen as shown in this picture:
To charge it please only use the charger included.
The 12 buttons Pen control unit (battery version):
This model uses a 6volts alkaline battery. If the voltage drops below 5Volts, it will continue
working but with less transmitting power. To increase the life of the battery keep it turned off
when not in use, leaving the two micro-switches in the off position. The red LED will light
once you send an instruction. Watch the intensity of the LED light as a reference for the
charge status of the battery.
The batteries that can be used for the Pen Transmitter have one of these references: L106,
11A, and GP11A.
The price is about $1.90. The lifetime of the battery is about 10 hours of use, so it will be
valid for a good number of performances. If you can’t find them, email me at
[email protected].
When changing the battery don’t forget to install it in the correct position: positive (+) to the
flat piece of the battery holder, and negative (-) to the spring piece of the battery holder as
shown in the picture.
Opening the pen can be hard if you don’t follow these instructions carefully. If you just try to
pull out the upper piece by firmly holding the pen body, it will be hard. But if you twist the
upper piece a little bit while you pull it (see the diagram), still holding the pen body firmly,
you will find it much easier. Please ask for a demo video if you still have any doubts.
Page - 17
The 5 button control unit is powered by a standard 12V battery. By removing the two screws
you will be able to change it easily. If you have any doubts, please ask Cesaral magic for a
video explaining this procedure.
The 12 button Effect Selector is powered by a standard 12V battery. By removing the two
screws you will be able to change it easily. If you have any doubts, please ask Cesaral magic
for a video explaining this procedure.
The Magic Wand control unit is powered by a rechargeable battery. A charger is included.
One end of the magic wand has the charging connector.
The 3 button thumb tip control unit is powered by a rechargeable battery. A charger is
included (the same charger used for the Wand, is used for this transmitter).
The foot pedal control unit is powered by a rechargeable battery. A charger is included (the
same charger used for the Wand, is used for this transmitter).
The body remote control unit is powered by a rechargeable battery. A charger is included
(the same charger used for the Wand, is used for this transmitter).
The Shure SM58 microphone control unit is powered by a rechargeable battery. A charger is
included (the same charger used for the Wand, is used for this transmitter).
Page - 18
11) Registering
If you want to get added value, information and other ideas related to the Cesaral
Soundmaster please send an email to [email protected] giving the serial number that
appears below or register it via www.cesaral.com.
Thanks for purchasing this product; I really hope that you enjoy it.
Sincerely:
Cesar Alonso (Cesaral Magic)
FISM 2006 Invention Award
Your “Cesaral Soundmaster” Serial number:
Cesaral Magic products: Check them out at www.cesaral.com!
Cesaral Lego Car
Cesaral Mental Mind Calculator
Cesaral Invisible Key
Cesaral Production Machine
Cesaral Psychokinetic Pen
Cesaral Rocket Bottle
Cesaral Magic Bulb
Cesaral Time Perfect II
Cesaral PK 4D Die
Cesaral Mental Amplifier
Cesaral Color Prediction
Cesaral iPhone Perceptions
Cesaral Oil and Water “in Crescendo”
Cesaral Mental Mind PC Calculator
Cesaral Time Perfect
Cesaral Melting Point
Cesaral Psychokinetic Pencil
Cesaral Real Time Rocket Bottle
Cesaral Magic T.T.
Cesaral Card Finale
Cesaral Roman-Code Thumper
Skully, the “lifeless” assistant
Cesaral Magic Bulb Pro
Cesaral Dancing Handkerchief
Cesaral ESP Calculator
Cesaral Magic Presentations
Cesaral Melting Point Reloaded
Cesaral Psychokinetic Twig
Cesaral Interference Detector
Cesaral Soundmaster
Cesaral Red Hot UV Lite
Cesaral ESP Perceptions
Cesaral Magic pendulum
Cesaral Open Perceptions
Page - 19