1
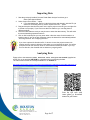
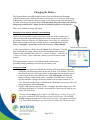
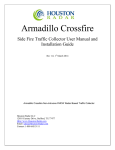
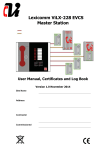
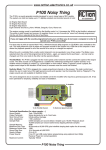
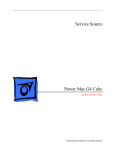
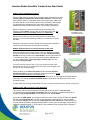
Houston Radar Armadillo Tracker Quick Start Guide
STEP1: Select installation location
Pick a location where the traffic is free flowing and the Armadillo has at least
100 feet (30m) of unobstructed road in either direction. Avoid mounting
within 100 feet (30m) of congestion points such as stop signs, sharp turns
and traffic signals. Avoid mounting where trees, branches or other objects
are obstructing the Armadillo’s view of the traffic. Best performance is
obtained at locations where traffic volume is under 1000 vehicles/hour.
Mount on the side of a two lane undivided road to measure both
directions. Mount within 12 feet (3.6m) off to the side of the road. We
recommend making the incoming direction the closer lane.
Installation on two
lane undivided road
Mount in the median of a four lane divided road to measure both
directions. Pick a location where the median is no more than 12 (3.6m)
feet wide.
Mounting on the side of a 4 lane divided road will allow the Armadillo to
capture only the closest two incoming lanes accurately.
STEP2: Strap the box to a pole by the side of the road
Using the provided quick release straps, mount the Armadillo at least 6
feet (1.8m) high but no more than 10 feet (3m) high. Adjust the sliding
bracket on the top to tilt the box to point down to look at a spot about 75
to 100 feet (20 to 30m) in front of it (pull the slider plate half way out if
you are mounting about 7 feet (2m) high and all the way if you are
mounting 10 feet (3m) high.
Installation on four
lane divided road
You may mount as low as 5 feet (1.5m) if the location has low traffic
density and you are on an undivided two lane road. Push the plate in all
the way for this mounting height.
When installing on the side of the road point the Armadillo inwards
towards the road by using the guide lines on the top of the box. Do not
point the Armadillo inwards at a 45 degree angle.
When installing in the median between opposite flowing traffic, do not angle the Armadillo towards
either side. You should still tilt the Armadillo down to point about 100 (30m) feet in front of the
mounting location.
To deter theft, the mounting bracket allows the use of a bicycle cable and lock to secure it to the pole.
STEP3: Power ON and verify proper detection
Turn the key switch to the ON position and verify that you hear just one 1 second beep.
Ten beeps indicate that less than 30% battery capacity is remaining and battery should be recharged. A fully charged battery will operate the box for over 2 weeks.
If you have the GPS option, you must turn on the box at the location as the GPS will only geotag
the data when first turned on. The GPS is then switched off automatically to conserve power.
For the next 5 minutes, the box will emit a short beep for every vehicle that it logs allowing you
to verify that the Armadillo is properly detecting traffic. Incoming vehicle will trigger a beep when it
passes the Armadillo (within +/- 25 feet (8m) of the Armadillo). Most outgoing traffic will trigger a
© 2005 to 2014 Houston Radar LLC
12818 Century Drive, Stafford, TX 77477
http://Houston-radar.com
Toll Free: 1-888-602-3111
Page 1 of 7
beep within 50 to 200 (15 to 60m) feet after crossing the Armadillo though large tucks may be
tracked as much as 300 (90m) feet when permitted by road conditions.
If you do not hear a beep for each vehicle (within the stated accuracy count of the counter), adjust
the pointing angle or mounting height to get a clearer “view” of the traffic.
Scan the QR code on the right on your smart phone to
watch a quick installation video on the Armadillo Tracker
on YouTube.
http://youtu.be/QGLEoxRIM4c
Connecting to the Armadillo to Retrieve Data
There are two ways to connect to retrieve data from the Armadillo:
Retrieving data using the USB interface:
1. Connect the provided cable to the weatherproof connector
on the bottom of the box and tighten to secure the
connection. Plug the USB connector on the other end in a
USB slot on a Microsoft Windows computer.
2. Power on the Armadillo. Windows will detect a USB to
RS232 converter and install a COM port. If your computer is
connected to the Internet it will automatically install the
drivers. Otherwise drivers are located on the provided CD
ROM in the USBdrivers folder.
When connected to the USB port or USB charger, the stats box will
also slow charge the internal battery and supply power to the
Armadillo in the case of a depleted battery.
Retrieve data using the built in Bluetooth wireless interface:
USB and Charger Connection
You must have a Bluetooth adapter on your computer or an Android smartphone or tablet to
make a Bluetooth connection. On the computer, Bluetooth is indicated by the
bar. A Bluetooth Class I USB adapter is provided.
icon in the task
We highly recommend using the provided Class I USB Bluetooth adapter even if your
computer has a built-in Bluetooth adapter. Built in adapters are usually 10m range Class
II adapters and will only allow a connection if you are next to the box. The Armadillo has
a high performance very long range Class I adapter that will perform best when paired
with the provided Class I adapter.
If you have previously paired your computer’s Bluetooth adapter with the Armadillo, you can
skip to the next section. If this is the first time you are connecting to this particular box, you
must first pair the two Bluetooth adapters.
1. Open the Bluetooth interface on your computer by clicking on the
icon and then scan
for devices (or click on “Add a device”). All Houston Radar Bluetooth device names
start with “HR-BT“ and the complete and unique name is also printed on the box. You
must pair once with each Armadillo from your PC.
© 2005 to 2014 Houston Radar LLC
12818 Century Drive, Stafford, TX 77477
http://Houston-radar.com
Toll Free: 1-888-602-3111
Page 2 of 7
2. Once the scan locates the Armadillo, right click and select “pair” and establish the
connection. Windows will then assign a COM port to this paired connection. A pairing key
is not required but in case it is requested, enter 1234.
The Bluetooth interface in the Armadillo is not operational if its USB port is plugged in
to a computer. It is not affected by the AC fast charger or a dedicated USB charger.
You can also connect to the Armadillo via the free Houston Radar Android app. Then
download and share the data file with your computer via email, Dropbox or Google Drive
(third party apps are required for sharing).
Search for “Houston Radar LLC” in the Android Playstore to download and install the
app. Then connect via Bluetooth, download the data file, share to your PC and then
import the file as described in the next section.
Scan the QR code above with your Android smart phone or tablet to install the app from
the Android Playstore.
© 2005 to 2014 Houston Radar LLC
12818 Century Drive, Stafford, TX 77477
http://Houston-radar.com
Toll Free: 1-888-602-3111
Page 3 of 7
Importing Data
1. Start the previously installed “Houston Radar Stats Analyzer” and then go to
Data->Data Import Wizard…
2. Select “Import From Radar…” option.
a. If you downloaded the .dat file via the Android app and shared it with this PC (via
email or a file sharing service), select “Import From File…” option.
3. Drag and drop the data from the pane on the right a project on the left (you can right click
to create a new project). If you have more than one data set, you can drag them to
different projects.
4. Once the traffic stats are read you may choose to erase the data memory. This will avoid
the same data being imported next time.
5. Click on OK at which point you may enter either a direction name for this location or a
location name. If you do not pick a direction name, the data will be automatically labeled
“Incoming Direction” and “Outgoing Direction”.
If you have captured bi-direction traffic, it’s best to choose the project name as the
location and then enter the direction name when you are importing the data. You will be
prompted to enter the direction name for each direction that was recorded. If you only
see one direction, the Armadillo did not detect any outgoing traffic.
Analyzing Data
Please refer to the Houston Radar Advanced Stats Analyzer user manual (supplied as
a PDF file) on the provided CD ROM for a detailed tutorial on analyzing the data.
The latest version of this file is always available on our website at:
http://www.houston-radar.com/user-manuals/HoustonRadarAdvancedStatsAnalyzerUserManualRelease.pdf
Scan the QR code with
smart phone to download
manual in pdf format.
© 2005 to 2014 Houston Radar LLC
12818 Century Drive, Stafford, TX 77477
http://Houston-radar.com
Toll Free: 1-888-602-3111
Page 4 of 7
Charging the Battery
The Houston Radar Armadillo features a state-of-the-art Lithium Iron Phosphate
(LiFePO4) battery that will allow the unit to run between 2 to 3 weeks on a full charge.
Additionally it will retain the charge for many weeks when switched off and placed on
the shelf, thus being ready when needed. You must fully charge the battery once initially
using the provided fast AC charger for the on-board fuel gauge to work properly.
There are 3 methods to charge the battery:
Charging Via the Fast AC Charger (recommended)
Connect the provided fast charger to the black connector on the weather proof
cable provided with the product and plug the circular connector into its mate on
the bottom of the box. Plug the AC charger into a 110 to 240V AC wall socket.
Ensure that the light on the quick charger turns on. A red light means that the
battery is charging. A green light means that the battery is fully charged.
Fast AC Charger Connector
A fully depleted battery will take about 3.5 hours for a full charge. You may
also monitor the percentage charge via the Houston Radar Stats Analyzer.
Connect to the Armadillo and go to File->Connect To Radar… and click on
“Connect To Radar”. Once connected, a battery icon will be shown in the
window.
The charging status is shown via a blinking thunder bolt and the
percentage charge remaining is listed next to the battery icon.
Charging Via USB
Battery Charge Status Icon
1. Connecting to a powered USB hub (any desktop USB port and most notebook
USB ports) will charge the battery at the rate of about 1.5Watt/Hour. This will
take about 2 days for a full charge and is recommended only for a quick top off.
2. Connecting to an AC powered high power USB wall charger will allow the
battery to charge with as much power is available from that source. You can
typically purchase a charger in the open market with an output current of 1 or
1.8A. This will provide about 3.3Watt/Hour or 6Watt/Hour respectively. This will
charge the battery in 11 to 19 hours.
3. Plug the USB connector into the 12VDC car adapter provided with the unit. This
will charge the battery at 1.8A and is convenient for a quick top off while in your
vehicle out in the field.
The unit will not charge from an Apple wall USB charger as those chargers do
not follow standard the USB high power charger specification. The unit will
usually charge from high power USB chargers of other smart phones and tablets
(e.g. Android and Samsung etc.) as these typically follow the USB specification.
© 2005 to 2014 Houston Radar LLC
12818 Century Drive, Stafford, TX 77477
http://Houston-radar.com
Toll Free: 1-888-602-3111
Page 5 of 7
Charging Via the Optional Built-In High Performance MPPT Solar Charger
If you have purchased the solar kit option to use in a permanent
installation, connect the provided 5W (or 10W) solar panel to the
solar panel circular connector on the bottom of the box. This will
provide full autonomy in practically all locations even in winter.
In the northern hemisphere, the solar panel must be pointed towards
true South (not magnetic south) and angled based on the latitude of the
location. Most smart phones feature a compass that may be set to
point towards true South.
The suggested angle from the horizontal is (location latitude + 15º).
The solar panel will charge the battery even with the key switch in the
off position but you will not be able to connect to the Armadillo if the
switch is off.
To see a visual history of the Armadillo’s charge/discharge
status, simply connect to the Armadillo via the Houston
Radar Stats Analyzer and then click on the battery icon. A
window will open that will track the charge status of the
battery. It will also calculate the rate of charge or discharge
of the battery. This is a very helpful tool when debugging
charging issues.
The Armadillo also logs the battery charge, voltage and
ambient temperature every hour to internal data memory.
These parameters are extracted when you retrieve the traffic
statistics data from the Armadillo and may be plotted. This
will allow you to ensure that the solar charger is keeping the
battery adequately charged.
© 2005 to 2014 Houston Radar LLC
12818 Century Drive, Stafford, TX 77477
http://Houston-radar.com
Toll Free: 1-888-602-3111
Page 6 of 7
Recommended Solar Panel Angle
This device complies with part 15 of the FCC Rules. Operation is subject to the following
two conditions: (1) this device may not cause harmful interference, and (2) this device
must accept any interference received, including interference that may cause undesired
operation. The device must be located 20 cm or more from persons. The device must not
be co-located with other transmitters.
Changes or modifications not expressly approved by the party responsible for compliance
could void the user's authority to operate the equipment.
Any modification or use other than specified in this manual will strictly void the
certification to operate the device.
This product contains a rechargeable Lithium Iron Phosphate battery (LiFePO4).
Charging must be performed indoors in a dry environment only by the provided LiFePO4
battery charger. Do not charge unsupervised or hidden from view. Do not expose charger
to rain, water or moisture. Securely cap the connectors on the bottom when installing box
outdoors.
Battery must be recycled or disposed properly per local recycling regulations or may be
returned to us for recycling.
Do not crush, pierce, and incinerate product or the battery. Discontinue use immediately
if any leaking occurs.
Product contains no user serviceable parts inside. Do not attempt to open or repair. Doing
so will void all warranty.
Specifications may change without notice.
© 2005 to 2014 Houston Radar LLC
12818 Century Drive, Stafford, TX 77477
http://Houston-radar.com
Toll Free: 1-888-602-3111
Page 7 of 7