1
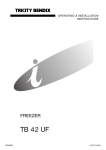
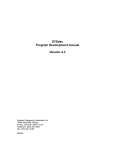
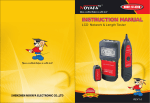
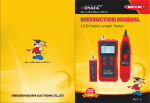
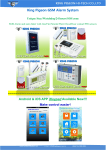
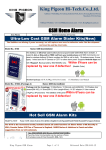
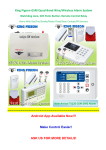
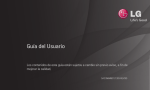
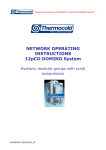
GSM Alarm System
S3526
User Manual
Ver 1.2
Date Issued: 2009-06-07
All rights reserved by King Pigeon Hi-Tech. Co., Ltd.
Website: Http://www.GSMalarmsystem.com
A Top Safety and Protection Solution In The Worldwide!
www.GSMalarmsystem.com
Table of contents
1.
Brief introduction ------------------------------------2
2.
Safety Directions ------------------------------------2
3.
Standard Packing list ------------------------------3
4.
Physical Layout -------------------------------------3
5.
Features ----------------------------------------------5
6.
Settings -----------------------------------------------6
7.
Operating Instructions ---------------------------- 8
8.
Installation -------------------------------------------10
9.
Add wireless sensors -----------------------------14
10.
Technical specifications --------------------------16
11.
Important information -----------------------------17
12.
Maintenance-----------------------------------------17
13.
Quality Warranty -----------------------------------18
King Pigeon Hi-Tech. Co., Ltd.
Page 1 of 20
Ver 1.2
File No.: 35260011
A Top Safety and Protection Solution In The Worldwide!
www.GSMalarmsystem.com
1. Brief introduction
The GSM Alarm System S3526 is a new security protection solution
special for home, house and office and other applications. It based on
Wireless GSM Communication network. When any sensor activated, it
will Call&Send SMS to owners telephone immediately.
The GSM Alarm System S3526 can setup by SMS easiler.
What you need is a SIMCard which supports Call ID function.
2.Safety Directions
Safe Startup
Do not use GSM Alarm System when using GSM equipment
is prohibited or might bring disturbance or danger.
Interference
All wireless equipment might interfere network signals of
GSM Alarm System and influence its performance.
Avoid Use at Gas Station
Do not use GSM Alarm System at a gas station. Power off
GSM Alarm System it near fuels or chemicals.
Power it off near Blasting Places
Please follow relevant restrictive regulations. Avoid using the
device in blasting places.
Reasonable Use
Please install the product at suitable places as described in
the product documentation. Avoid signal screening by
covering the mainframe.
King Pigeon Hi-Tech. Co., Ltd.
Page 2 of 20
Ver 1.2
File No.: 35260011
A Top Safety and Protection Solution In The Worldwide!
www.GSMalarmsystem.com
Use Qualified Maintenance Service
Maintenance can be carried out only by qualified maintainer.
Waterproofness
The product is not waterproof. Please install it at dry places
and keep it dry.
3. Standard Packing List
Control Unit X1
Wireless Magnetic Door Sensor X1
Wireless Remote Controls X 2
Wireless PIR Motion Sensor X1
Wired Mini Siren(110dB) X1
Regulated 12vDC Power Supply X1
User Manual X1
Optional Accessories: (Wired or Wireless Sensors)
PIR Motion Sensors
Glass Break Sensors
Magnetic Window Sensors
Magnetic Steel Scrolling Door Sensor
Temperature Sensors
and Other Sensors.
4. Physical Layout
4.1 Control Unit physical layout
King Pigeon Hi-Tech. Co., Ltd.
Page 3 of 20
Ver 1.2
File No.: 35260011
A Top Safety and Protection Solution In The Worldwide!
Power
External 12VDC Power Status LED,power on will on.
Status
Arm Status LED,in armed mode, it flashs green, always
green is disarmed.
Busy
Always red color means the mainframe calling out or
sending SMS out or triggered,normally, it flashs.
Run
GSM Network Led, flash 1 time per 1 second, means
searching and registering GSM network. Flash 1
second and off 3 seconds, means the gsm netwok was
registered, always on means under the
communication.Otherwise,means the SIMCard hasn’t
been fixed well or GSM network signal is weakness.
Alarm
Out
4.2
www.GSMalarmsystem.com
Alarming it will on and the buzzer will make a sound.
Relay output closed it will on, otherwise it is off.
Monitor
Microphone working, will on,otherwise it is off.
Charge
Under charge the internal backup battery,it will on,
otherwise, it is off.
8Pin connector definition
Interface
PIN 1
GND
PIN 2
Siren positive electrode
PIN 3
12VDC Power Output Source, can use it for any device or
sensors that need 12VDC to work.
PIN 4
Output relay negative electrode
King Pigeon Hi-Tech. Co., Ltd.
Page 4 of 20
Ver 1.2
File No.: 35260011
A Top Safety and Protection Solution In The Worldwide!
www.GSMalarmsystem.com
(Relate Voltage:2A/250VAC)
PIN 5
Output relay positive electrode
(Relate Voltage:2A/250VAC)
PIN 6
GND
PIN 1
Wired sensor input 1 (e.g.: Temperature sensor.)
PIN2
Wired sensor input 2(e.g.: Photoelectric Beams Sensor.)
Tips:
1.
The Output relay is similar the Power Switch, you can use it to control the light,
gate,DVR and other applications. Its drived by 5VDC, related voltage is
2A/250VAC,<40W, when you use high vlotage applications, please note the
cables.
5. Features
1)
GSM Frequency: Dual-Band(900/1800MHz);
2)
Can armed,disarmed by SMS or remote control;
3)
Automaticed send SMS Alert to the pre-set cellphone when any sensor
triggered;
4)
Equips with 2 Wired Zones,NC/NO is optional, Zone Name is editable;
5)
Equips with 8 Wireless Zones, Zone Name is editable;
6)
Supports 3 SMS Alert telephones and 5 Call alarm phone numbers;
7)
Equips with 1 relay output, it like a switch, use for driving DVR, light,
gate or other electric appliances once the system triggered. The relay
output On or Off can be controlled by SMS or Telephone;
8)
The external power failure alert function;
9)
Supports wiretap through internal Mircophone;
10) Can remote start Siren and arm/Disarm the system by telephone;
11) Can alert the remote control operation information by SMS;
12) Equips SOS Alarm button on the remote control for emergency alarm;
13) Standby internal rechargeable battery which can last 12 hours;
King Pigeon Hi-Tech. Co., Ltd.
Page 5 of 20
Ver 1.2
File No.: 35260011
A Top Safety and Protection Solution In The Worldwide!
www.GSMalarmsystem.com
14) Based on the GSM communication network and Operation Menu
Display technology, apply to wide range situations.
6. Settings
The S3526 designed for easiler setup, all the setup can be done by SMS
commands. Also, you can setup it by call, the commands are the same as
the SMS Commands.
Before the setting, please read the user manual carefully. Then insert the
SIMCard and fix it well, then power on the mainframe, the control unit will
search and register the GSM Network automatically, once the Run Led
flashs 1 second and off 3 seconds, means the gsm netwok was
registered,then you can start to set it. Also, you can set the system by SMS
after it finished GSM Network registration.
Please setup it following the follow table:
Notice:
1)When set the system by SMS, if success, will return one SMS to confirm, otherwise,
means the setting failure;
2)When set the Control Unit by phone, the system will request you input password to
enter the system. if success, will make a long Di sound to confirm, if it makes didi sound,
means the setting failure.The operation commands please see tables.
3) Depending on the infrastructure, the SMS Command Control functions may not work
in all countries.
Telephone and SMS Commands For GSM Alarm System
Setup Basic Functions
Com.
Functions&Descriptions
11#
Set the control unit when triggered, The siren will sound.(Default)
11*
When the control unit triggered, the siren will not sound.
King Pigeon Hi-Tech. Co., Ltd.
Page 6 of 20
Ver 1.2
File No.: 35260011
A Top Safety and Protection Solution In The Worldwide!
www.GSMalarmsystem.com
21#
Set wired zone as NC type.
21*
Set wired zone as NO type. (Default)
31#
Modify password. The original password is 1234.
Setup SMS Alert Telephone numbers
Com.
Functions&Descriptions
40#
Inquire the preset SMS Alert telephone numbers. (Can’t inquire it
by telephone,only by SMS.)
41#
Set the 1st SMS Alert telephone Number.
42#
Set the 2nd SMS Alert telephone Number
43#
Set the 3rd SMS Alert telephone Number.
Setup Call Alert Telephone numbers
Com.
Functions&Descriptions
50#
Inquire the preset Dial phone number. (Can’t inquire it by phone,
only by SMS.)
51#
Set the 1st dial phone number.
52#
Set the 2nd dial phone number.
53#
Set the 3rd dial phone number.
54#
Set the 4th dial phone number.
55#
Set the 5th dial phone number.
Setup SMS Alert Contents
Com.
Functions&Descriptions
70#
Inquire the Wired zone Name.(Can’t inquire it by phone)
71#
Set the the1st wired zone name.
72#
Set the 2nd wireld zone name.
80#
Inquire the wireless zone names. (Can’t inquire it by phone)
81#
Set the 1st wireless zone name.
82#
Set the 2nd wireless zone name.
83#
Set the 3rd wireless zone name.
84#
Set the 4th wireless zone name.
85#
Set the 5th wireless zone name.
King Pigeon Hi-Tech. Co., Ltd.
Page 7 of 20
Ver 1.2
File No.: 35260011
A Top Safety and Protection Solution In The Worldwide!
86#
Set the 6th wireless zone name.
87#
Set the 7th wireless zone name.
88#
Set the 8th wireless zone name.
www.GSMalarmsystem.com
Tips!
1)
Send 1234#01# to arm the system, or call into the system, then enter 1234# 01#
to arm it.
2)
Change the password: send 1234#31#1111#, Or call into the system, then enter
1234#31#1111#. Means change the password 1234 to 1111.
3)
Set the first dial phone Number 20202020:
Send SMS 1234#51#20202020# to the system or call the system, then enter
1234#51#20202020#.
4)
Delete the preset alarm number:
Send SMS 1234#51## or call the sytsem, then enter 1234#51##. Will delete the
first dial phone number, the same format to delete the other alarm phone numbers
and SMS alert numbers.Send SMS 1234#41## or call the system, then enter
1234#41## to delete the first SMS alert number.
5)
Change the zone name: (The zone names should less than 12 letters.) Send
1234#81#door# to change the wireless zone 1 name to door.
6)
Please help to setup the first SMS Alert Number firstly, so that you can receive all
the confirmation SMS.
7. Operating Instructions
7.1 Arm or Disarm and Emergency Alarm by remote controls
Wireless ANT
Arm Button
Disarm Button
This Button Useless)
Emergency Button
King Pigeon Hi-Tech. Co., Ltd.
Page 8 of 20
Ver 1.2
File No.: 35260011
A Top Safety and Protection Solution In The Worldwide!
www.GSMalarmsystem.com
Press the button “ ” on the remote control, the Control Unit enters arm
status. under this status, any sensor triggered, the control unit will alarm
and the siren will sound 90S.
Press the button “ ” on the remote control, the Control Unit disarms
immediately. under this status, any sensor triggered, the control unit will not
alarm and the siren will not sound, except the Emergency Button.
Press Emergency button” ” on the remote control or Press any
Emergency button.The Control Unit will enter emergency alarm status.
The siren will not sound, but will alert the pre-set phone number
immediately.
7.2 Arm or Disarm by SMS and Telephone.
There’re two way to operate it.
Method 1: Send SMS to Arm or Disarm;
2: Call to the Control unit.
In order to operate it easier, we designed simply commands, as below:
SMS & Call Operation Instructions
XXXX#01#---Arm
XXXX#01*---Disarm
XXXX#02#--- Switch ON the relay output for 3 minutes.
XXXX#02* --- Switch OFF the relay output.
XXXX#03# --- Switch ON the siren for 3minutes
XXXX#03* --- Switch OFF the siren immediately.
(XXXX Stands for the password.)
7.3 External AC power failure alarm
When the system detects a power cut in external AC power for longer then
two seconds it will send SMS to the SMS Alert target cell phones.when the
AC power restored, it will send SMS to you, without calling.
King Pigeon Hi-Tech. Co., Ltd.
Page 9 of 20
Ver 1.2
File No.: 35260011
A Top Safety and Protection Solution In The Worldwide!
www.GSMalarmsystem.com
7.4 Handling the received alarm
If the Control Unit receives any alarm signal from any sensors, will start the
siren intermittently and switch on the relay output. At the same time,dial the
Call alert telephone numbers one by one three times. If programmed, it will
also send SMS to SMS Alert Target cell phones, the SMS content will
include the zone name. If answered the alarm calling, you can listen into
sounds from the alarm system area.
After answered the call, press 01# to arm, press 01* to disarm.
If the user hangs up, the Control Unit will stop alarm and call other alarm
telephones, until answered.
7.5 Arm/disarm and wiretap through telephone
You can use any telephone to call the Control Unit, after detecting 15
seconds will make click sounds, waiting for you to enter the password. if the
entered password is correct, you can arm or disarm it and listen in the
control unit area.
8. Installation
Before installing the control unit and sensors and sirens, please help to test
the system firstly, including wireless sensor, wired sensor, power supply,
gsm signal, etc.
8.1 Insert SIM into Control Unit
In the backside of the control unit, please install the GSM SIM
card
.
King Pigeon Hi-Tech. Co., Ltd.
Page 10 of 20
Ver 1.2
File No.: 35260011
A Top Safety and Protection Solution In The Worldwide!
www.GSMalarmsystem.com
8.2 Install the Magnetic door/window sensors
Magnetic door/window sensors signal the Control Unit when the two parts
separate by more than between 1.5 to 3.0cm.
In some circumstances an Infrared beam fence is more appropriate than
magnetic sensors. i.e. veranda, picture window balcony, boundary wall
e.t.c.
King Pigeon Hi-Tech. Co., Ltd.
Page 11 of 20
Ver 1.2
File No.: 35260011
www.GSMalarmsystem.com
A Top Safety and Protection Solution In The Worldwide!
Wired or wireless glass break sensor can also be used (see below)
For a Scrolling Steel Door, a special Wireless Scroll Steel Door magnetic
sensor, must be used due to interference of the wireless signal caused by
the steel door.
Installation: attach the larger half to the floor and attach (rivet or glue) the
smaller half to the scroll steel door. An alarm is triggered when the halves
are separated by more than three to 5.00 cm.
Scroll Steel Door
8.3 Install the wireless PIR Motion Sensor
King Pigeon Hi-Tech. Co., Ltd.
Page 12 of 20
Ver 1.2
File No.: 35260011
A Top Safety and Protection Solution In The Worldwide!
www.GSMalarmsystem.com
The PIR sensor will detect a person since human temperature is different to
ambient temperature. When triggered, the PIR will signal the Control Unit.
Apply the detection area illustration below when installing.
Wireless curtain sensor, detection area illustration below:
8.4 Install other sensors
For smoke, you can use wireless smoke sensor, for gas leakage detection,
you can install gas leakage sensor below
King Pigeon Hi-Tech. Co., Ltd.
Page 13 of 20
Ver 1.2
File No.: 35260011
A Top Safety and Protection Solution In The Worldwide!
www.GSMalarmsystem.com
8.5 Install the Control Unit
In order to avoid destruction of the Control Unit by intruders, please install it
in a concealed location, convenient to the operator.
If applicable, ensure that an uninterruptible AC power outlet is available
near the Control Unit. First connect accessories to the Control Unit then the
AC adapter.
8.6 Install Siren
Connect the Siren and the Speaker to the Control Unit and fix them in
appropriate locations .
Strobe Siren
Siren
Linght Siren
8.7 Install Other Wired Sensors
Connect the sensors’t two cable to the interface 2 is ok, the S3022 can
supports 4 Wired Sensors, so you can add Wired Photoelectric Beams
sensors for outter, install temperature sensors, water leakage sensors,
wired smoke sensor, wired Panic Button, Wired PIR Motion Sensors and so
on.
9. Add Wireless Sensors to the Control Unit
The Wireless sensors in the package box are pre-coded prior to shipping.
Add additional wireless sensors to the control units, please help to see
King Pigeon Hi-Tech. Co., Ltd.
Page 14 of 20
Ver 1.2
File No.: 35260011
A Top Safety and Protection Solution In The Worldwide!
www.GSMalarmsystem.com
below:
1)
2)
Open the back cover of the Wireless sensor carefully;
Locate the IC boards black jumpers, labelled A0-A7 and D0-D3.
3)
The A0-A7 , 3X8 PIN connectors,are the Wireless Address bits code
area, and the D0-D3 are 3X4 PIN connectors, are Wireless data bits
code area;
Also, you can see the H, N, and L letters besides the 3X8 PIN and 3X4
PIN connectors, like below;
Connect L and N is means 0, and connect H and N is means 1,
connect neither L and N nor H and N is means 2 ;
According to below table, select the Zone and set the 3X4 PIN
Wireless data bits code area according to selected zone.
According to the wireless sensors in the Standard package, set all
4)
5)
6)
7)
wireless sensors’ Wireless Address bits the same. Then install the
cover carefully.
8) Turn off the sensors’ power before setting .
9) Trigger the wireless sensor and test the setting result. If the wireless
sensors do not work, please check the jumpers again.
10) You can set many sensors in the same zone.
Notice:
After you restored the system to factory deflaut(By press the Reset Button),
you should learn the wireless senors to the control units again. The method
is below:
Step 1: Power on the Control Units and waiting it registered successful;
Step 2: Press the Reset button in the backside of the control unit, nearby
the Simcard Solt;the Busy LED will turn Red Color, trigger any
wireless sensor, the Busy Led will flash and make “Di” Sound to
confirm the operation. If the control unit doesn’t makes “Di” sound,
means the learning failure, please try again.
King Pigeon Hi-Tech. Co., Ltd.
Page 15 of 20
Ver 1.2
File No.: 35260011
www.GSMalarmsystem.com
A Top Safety and Protection Solution In The Worldwide!
Appendix: Zone Setting Table
Serial No.
Wireless data bits
Deflaut Zone Name
D0
D1
D2
D3
Zone 1
Wireless Zone Activated
1
0
1
0
Zone 2
Wireless Zone Activated
1
0
1
1
Zone 3
Wireless Zone Activated
1
1
0
0
Zone 4
Wireless Zone Activated
1
1
0
1
Zone 5
Wireless Zone Activated
1
1
1
0
Zone 6
Wireless Zone Activated
1
1
1
1
Zone 7
Wireless Zone Activated
1
0
0
1
Zone 8
Wireless Zone Activated
0
1
0
1
Notice:
1.
All the Zone Names can be edited by user through SMS Commands;
10. Technical specifications of Control Unit
Rated Voltage:
12VDC 1.5A
Working temperature:
-10℃~+60℃
Storage temperature:
-20℃~+60℃
Relative humidity:
10-90%, No condensation
Work frequency:
GSM900,1800Mhz
King Pigeon Hi-Tech. Co., Ltd.
Page 16 of 20
Ver 1.2
File No.: 35260011
www.GSMalarmsystem.com
A Top Safety and Protection Solution In The Worldwide!
Communication protocol:
GSM PHASE 2/2+ (include data service)
Wireless sensor receiving frequency:
433+/-0.5MHz
Wired Zones: 2
Wireless Zones: 8
Related Voltage of the Output Relay: 2A/250V AC
Effective distance of wireless transmission: 100 m (Open area)
Battery: Built-in lithium-ion battery: 1000mAh
7.2V
Standby time Approx. 12hours (depending on the network
condition)
Net Weight: 0.80Kg
11. Important information
1) Please read the User Manual carefully before you install the Control
Unit and set the Control Unit.
2) Do not install the system in close vicinity with objects that generate
strong interference, such as TV set and computer.
3) Install the system in a hidden place.
4) Avoid getting water into the Control Unit.
5) Have a secure connection to the main power supply.
6) This product was designed for the indoor use.
7) Opening the control unit cover will void the warranty.
12. Maintenance
1) In case of failure, please contact the distributor or manufacturer.
2) If the Control Unit works, while the remote control and other sensors
fail, please check and change the battery.
3) If the remote control works, but the ,Control Unit fails to send SMS
texts, switch the power of Control Unit off and switch it on after one
minute. Test this system after another minute, or check the settings
are correct and the GSM Signals are strong enough.
King Pigeon Hi-Tech. Co., Ltd.
Page 17 of 20
Ver 1.2
File No.: 35260011
A Top Safety and Protection Solution In The Worldwide!
www.GSMalarmsystem.com
4) If the Control Unit can run and sensors work, but cannot send SMS
texts, please change SIM Card to check it.
5) If the problem cannot be solved, please contact the distributor or
manufacturer.
13. Warranty
1) This system is warranted to be free of defects in material and
workmanship for one year from the date of purchase.
2) This warranty does not extend to any defect, malfunction or failure
caused by abuse or misuse by the Operating Instructions. In no event
shall the manufacturer be liable for any alarm system altered by
purchasers.
The End!
Any questions please help to contact us feel free.
Email Us: [email protected]
Http://www.GSMalarmsystem.com
Http://www.Kingpigeon.com.cn
King Pigeon Hi-Tech. Co., Ltd.
Page 18 of 20
Ver 1.2
File No.: 35260011
A Top Safety and Protection Solution In The Worldwide!
www.GSMalarmsystem.com
Warranty Card
Model ______________
Product ID ___________
Date of Purchase__________________
Date of Production___________________
Maintenance Record
__________________________________________________
__________________________________________________
__________________________________________________
Dealer _____________________________
King Pigeon Hi-Tech. Co., Ltd.
Page 19 of 20
Ver 1.2
File No.: 35260011