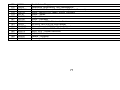
1
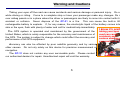
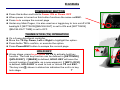
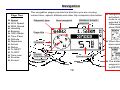
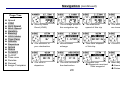
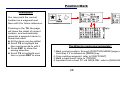
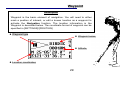
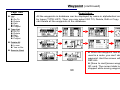
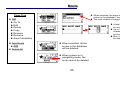
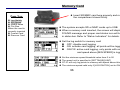
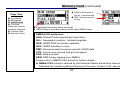
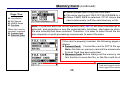
GT-31
BGT-31
Owner’s Manual
Version 0.4
Welcome
Congratulations for choosing GT-31! We hope you will agree it is an
excellent navigator. We want you to have a very pleasant outdoor
experience with GT-31 so please check the content in the package first. If
you find any items missing, please contact the authorized dealer
immediately. All our dealers are ready and willing to help.
This manual provides detailed instructions for operating GT-31. To fully
understand all the features and functions, please take time to read through
this manual before using your GT-31. Some useful tips are also included
in this manual. We hope GT-31 will enhance your enjoyment of outdoor
activities.
Please visit www.locosystech.com and send us your comments. From
time to time, we will have updates and upgrades available - based on your
suggestions and recommendations. Have fun with your GT-31!
Sincerely yours,
LOCOSYS Technology Incorporated
Package Check List
Standard package:
1 GT-31
1 USB data/charge cable
1 Installation CD,
containing
Owner’s Manual, Drivers,
and Utilities
* Contact your dealer if any
parts are missing.
Options:
- USB Car Charger
- USB Travel AC/DC
adapter
- Bike Mounting Kit
- Arm Strap
* Ask your dealer for detail
2
Warning and Cautions
Taking your eyes off the road can cause accidents and serious damage or personal injury. Do not operate GT-31
while driving or riding. Come to a complete stop or have your passenger make any changes. Do not secure GT-31
over airbag panels or in a place where the driver or passengers are likely to come into contact with it in the event of an
accident or collision. Never dispose of the GT-31 in a fire. This can cause the built-in lithium-ion polymer
rechargeable battery to explode. If, for any reason, the electrolytic liquid of the battery comes into contact with the
skin or the eyes, flush with plenty of water and call for medical help immediately.
The GPS system is operated and maintained by the government of the
United States, which is solely responsible for the accuracy and maintenance of
the GPS. The system is subject to change which could affect the accuracy and
performance of all GPS equipment.
Accuracy can also be affected by poor satellite geometry and by various
other causes. Do not rely solely on this device for precision measurement or
navigation.
The GT-31 does not contain any user serviceable parts. Please contact
our authorized dealers for repair. Unauthorized repair will void the warranty.
3
I know it’s pretty. But …
taking your eyes off the
road can cause
accidents and
serious damage or
personal injury.
Table of Contents
Welcome
Warnings and Cautions
Table of Contents
Introduction
Controls
Power/ESC Button
Thumb Stick Operation
Hold Key
Before Getting Started
Status Indicators
Introduction to the pages
Page System Tree
Main Menu
Satellite Signal
Trip Meter
Speed
Navigation
Track
Position Mark
Waypoint
Route
2
3
4
5
7
7
7
7
8
9
10
10
13
14
15
17
19
22
28
29
33
Memory Card
Data Logger
Alert
NAVILINK
Settings
Miscellanies
How to.
Track back to where you came from
Calculate the area
Activate Speed Genie
Download and upload data
Update firmware
Map Datum List
Water Immersion
Warranty and Repair
4
36
39
40
42
43
51
52
52
54
55
57
63
64
72
73
Treasure your
GT-31 GPS the
same way treasure
your sailboat
Introduction
The GT-31 is a wonderfully compact, business card sized navigator, carefully designed to
embody ergonomic principles. It will comfortably fit in the palm of your hand, mount on the
handlebar of bike or motorcycle, and can even be worn on your arm. The stylish unit can
stand on your desk as a funky gadget, or, more usefully, can be placed on the dashboard in
your car.
The GT-31 can run for up to 46 hours in power saving mode, backlight off with the built-in
lithium ion polymer rechargeable battery. It can be recharged while connected to car
cigarette lighter, mains power outlet, or your PC/Notebook. When traveling where no car or
mains power is available, you may purchase an AA battery adapter, or a rechargeable power
bank (Solar charger) to extend the usage.
A state-of-the-art Thumb Stick (TS) allows for simple, one-handed
operation. This rugged navigator is waterproof to IPX7 standards or, immersible in the
water for 30 minutes at a depth of 1 meter, and, it floats!
GT-31 is not only developed to handle outdoor activities, but also to handle
various professional uses, such as speed, hazard area, zone alerts, altitude or other alerts defined
by the user. To store trip data for longer journeys, there is a SD/MMC slot for extra data storage
capacity. And, it can be used as a Real-Time GPS
Receiver by connecting to your PC/Notebook.
5
Introduction (continued)
FRONT
BACK
Built-in
Antenna
Strap Hole
Internal Buzzer
LED
Mounting Screw Holes
Thumb
Stick
Built-in Rechargeable Battery
Power/ESC
Button
BOTTOM
LCD
Waterproof
compartment
USB Slot
SD/MMC Card Slot
6
Controls
POWER/ESC BUTTON
Press this button and hold to Power ON or Power OFF
When power is turned on this button functions the same as ESC.
Press in to escape the current page
Under any Main Pages, it is also used as a toggle key to turn on/off LCM
backlight if [SETTINGS]/[BACKLIGHT] is set to ON and [SETTINGS]
\[BACKLIGHT TIME] is set to OFF.
THUMB STICK (TS) OPREATION
It’s a 5-way directional controller.
Move the TS Up, Down, Left or Right to highlight the option.
Press In the TS to confirm, or execute the option.
Press Power/ESC button to escape the current page.
HOLD KEY
At any stage, press In and Hold the TS to activate hold key
function. The hold key function can be defined in [SETTINGS]
/[HOLD KEY]. If [MARK] is defined, HOLD KEY will save the
current location if available, as a new waypoint. If [KEY LOCK]
is defined, HOLD KEY is used to lock or unlock TS and ESC.
The key icon( ) shown in status bar indicates the unit is in key
lock stage.
7
Press In
Before Getting Started
GT-31 is designed for easy operation. If this is your first time to own a GPS navigator, just follow the
instructions in the following pages and you will quickly get familiar with this unit.
.
Before Use
1) Charge the battery. It takes around 4 hours for the
built-in battery to be fully charged.
2) Initialize the receiver. Leave the GT-31outside with
a clear view of sky until it gets position fix. After
that, it needs only around 45 seconds to find its
location. When the unit has not been used for long
time or it’s taken to a far distance from where you
initialized it, you will need to re-initialize the unit
before use.
3) Configure the system. Set up the parameters
under the [SETTINGS] page. The system will store
your configuration in its built-in flash memory.
4) Consult with your dealer or contact us. If you
have any question about setting up the GT-31 we will
be pleased to assist you to get familiar with the unit.
5) Mark and edit waypoints, and create a route
(refer to [MARK], [WAYPOINT] and [ROUTE]
pages for details)
GT-31 can now tell you:
Where you are
Where you have been
Where you are going
How did you made up your trip, and
Many other interesting possibilities…
8
Status Indicators
Position fix and Bluetooth Indicators
Positioning with 3D
fix(highlighted for DGPS fix)
Bluetooth on
Positioning with 2D fix
Bluetooth connected
Acquiring signal
Available only on
BGT31
Audio Indicators
Enabled
Battery&Key Lock Indicators
Full Battery
Key Locked
Memory card Indicators:
card access in progress. Do not remove card.
Other Indicators
External Power: appears when USB
connected
Target Alert:
appears when approaching
predefined waypoints
Over Speed:
appears when speed
exceeds preset value
Disabled
card access stopped, safe to remove card
card write-protected
card full, safe to remove card
card unknown or unformatted
Altitude Alert Indicator
9
appears when altitude reaches the preset altitude.
Page System Tree
Sat Signal
Trip Meter
Sat signal
Sky View
Fixed Info
Odometer
Total Time
Trip MAX Speed
Trip AVG Speed
Trip Time
Trip Odometer
Time Now
Stop Watch
Speed(big font)
Altitude(big font)
Time Now
(big font)
Speed
Speed
MAX Speed
Nsecond MAX
AVG
Nsecond AVG
Speed
MAX/Nsecond
AVG Speed
Navigation
Speed
VMG
AVG Speed
MAX Speed
Heading
Bearing
ODO Meter
Time Pass
Altitude
Departure
Arrival
Status
To NEXT
To DST
Time now
Sunrise
Sunset
10
Track
Position Mark
Edit and Save
Egg Laying
Mark
Interval
STOP
Distance
1 Second
5 Seconds
10 Seconds
30 Seconds
1 Minute
Clear
Save to Card
View
Mark
Go To
First (Point)
Last (Point)
Nearest Point
Detail
Egg Laying
Area (Calculation)
Settings
Speed
WPT Name
WPT Symbol
Page System Tree (continued)
Waypoint
List
Go To
Delete
Edit
Copy
Type List
Del All
Save to Card
Route
List
Go To
Edit
Delete
Copy
Reverse
Rename
Area Calculation
New Route
Delete All
Memory
Card
Log Switch
Off/On/On-Fix
Min Speed
NMEA Items
GGA
GLL
GSA
GSV
RMC
VTG
ZDA
SBN
File Size
Card Size(max.2GB)
128KB
512KB
1024KB
2048KB
Format Card*
Remove Card*
*If card presented
11
Data
Logger
Interval
Min Speed
Save to Card
Clear
Alert
Buzzer
On/Off
Over Speed Alert
Off/30-150KMH
Altitude Alert
Off/Above/Below
Target Alert
Waypoint type
Off/10M~1KM
NAVILINK
Down/Upload
the data saved
on the built-in
flash memory
Page System Tree (continued)
Settings
Language
Time Zone
Unit (of Measurement)
Time Format
Date Format
Time Zone
Arrived
Map Datum
Position (Format)
User Grid
Power Mode
DGPS Source
Interface
Backlight Time
Contrast
External Power Mode
BLUETOOTH*
BT SNIFF
User Name
Usage
Default&Reset
MISC
NAVILINK Port*
Speed AVG Time
Speed Genie
Hold Key
Serial No.
Version
Cold Start
Calendar
Reserved
*BGT31 only
12
Main Menu
Page Tree
Satellite Signal
Trip Meter
Speed
Navigation
Track
Position Mark
Waypoint
Route
Memory Card
Data Logger
Alert
NAVILINK
Settings
MISC
Satellite signal
and position fix
info
Provides the
information on
your movement
Showing&managing Navigating along
instant, average & your waypoints or
maximum speeds routes
(Speed Genie)
The current and
historical direction
of movement
Marking a location The database of
for future reference destination points
or for other uses
The courses you
plan to navigate
along
Logging position an Logging position and
speed data into SD speed data into
card (in NMEA or internal flash memory
(in SBP format)
SBN)
Setting up alarms
Configuring the
system
A calendar up to
the year 2060
Data exchange
with host PC
13
Satellite Signal
Page Tree
Sat Signal
Sky View
Fixed Info
GPS Signal
Satellite signal
strength bars.
A hollow signal
bar indicates the
corresponding
SAT is not used
for positioning.
The ID of the GPS
Satellites GPS in
view
SKY View
Satellite position. The two
circles indicate satellite
elevation as seen from
your current position
Satellite number being
seen
Satellite number being
tracked
PDOP - Position Dilution
of Precision. The lower
the better
14
GPS Fixed Info
Time in UTC
Date in UTC,
Heading
Velocity, Altitude
Current Location
Coordinates
(in DDMM.MMM)
Trip Meter
Page Tree
The Trip Meter pages provide Current Speed, Trip Timer, Average Speed, ODO Meter,
and more. All the meter pages have a similar format below.
Odometer
Status Indicators
Total Time
Trip MAX Speed
Speed Trend
Trip AVG Speed
2D or 3D fixed
Trip Time
Trip Odometer
Time Now
Time Now
Current speed
- Unit
Buzzer sound alert
Odometer
SD/MMC card
Stop Watch
Speed(big font)
External power
Page title
Battery status
Time Now
(big font)
Altitude(big font)
15
Trip Meter (continued)
Page Tree
Total accumulated
operating time since
last reset
Current altitude
in big font
Maximum speed
during the trip since
last trip reset
Current local
Time in big font
Average speed during
the trip - derived from
trip odometer and trip
time
Current speed
in big font
Odometer
Total Time
Trip MAX Speed
Trip AVG Speed
Trip Time
Trip Odometer
Time Now
Stop Watch
Speed(big font)
Time Now
(big font)
Altitude(big font)
Time elapsed
for the trip since
last trip reset
Accumulated
mileage during the
trip since last trip
reset
16
Current local time
([SETTINGS]/ [UTC]
must be set properly)
Press TS to reset,
pause or start
Stopwatch
Speed
GT-31 will automatically switch to this screen if [SPEED GENIE]
threshold is set and the current speed is above it. Then if the current
speed goes below the threshold, GT-31 will switch to [MAX/NS MAX]
page to report the result. Refer to how to active speed genie for details.
Page Tree
Speed
MAX Speed
Up to 14 history maximum speeds can be saved
automatically. The available commands:
RESET: zero the current max.speed
SAVE: save the current max.speed
if [SPEED GENIE] is off
RESTORE: display a max speed from history
and set it as the current max. speed
CLEAR: zero all history max. speeds.
NS MAX AVG
NS AVG Speed
MAX/NS MAX
Time Now
Up to 10 history maximum average speeds can be
saved automatically. The available commands:
RESET: zero the current max.avg.speed
SAVE: save the current max.avg.speed
if [SPEED GENIE] is off
RESTORE: display max avg speed from history
and set it as current max.avg. speed
CLEAR: zero all history max.avg.speeds.
Continued to
next page
17
Speed (continued)
Page Tree
Speed
MAX Speed
Display the current average speed for N-second (10S) time interval.
The time interval can be specified in [SETTINGS]/[SPEED AVG
TIME]
The value of [NS MAX AVG] page is the maximum value of
[NS AVG SPEED]
NS MAX AVG
NS AVG Speed
MAX/NS MAX
Time Now
18
Navigation
Page Tree
Speed
AVG Speed
MAX Speed
Heading
Bearing
ODO Meter
Time Pass
Altitude
Departure
Arrival
Status
To NEXT
To DST
Time now
Sunrise
Sunset
The navigation pages provide the direction you are moving,
current time, speed, altitude and other trip computer information.
Waypoint type
Next waypoint
Distance to next
waypoint
Navigation features will be
activated only when a
route or waypoint has been
selected for navigation.
Otherwise the page will
show READY FOR NAV.
Page title
When the waypoint has
been reached, the arrival
message will be displayed
Compass
Pointer
Direction to be
navigated to
Current speed
The distance for reaching
waypoint can be specified
in [SETTINGS]/[ARRIVED]
19
Navigation (continued)
Page Tree
Speed
VGM
AVG Speed
MAX Speed
Heading
Bearing
ODO Meter
Time Pass
Altitude
Departure
Arrival
Status
To NEXT
To DST
Time now
Sunrise
Sunset
Large Compass
Velocity Made
Good (VMG)
The average peed of
this navigation trip
The maximum
speed of this trip
The direction you
are traveling
The direction of
your destination
Accumulated
mileage
Total time elapsed
of this trip
Current altitude
The time of
departure
The time arrived at
the destination
Progress Info
Waypoints reached.
/Total waypoint
Next waypoint info
20
Name
Distance
Navigation (continued)
Page Tree
Speed
AVG Speed
MAX Speed
Heading
Bearing
ODO Meter
Time Pass
Altitude
Departure
Arrival
Status
To NEXT
To DST
Time Now
Sunrise
Sunset
Large Compass
Name of destination
waypoint
Distance to destination
The sunset time at
the current location
The sunrise time at
the current location
At any pages under Navigation, you may press in the TS to select the larger compass display.
Current speed
Bearing
Distance to destination
Type and Name of destination waypoint
For any reason, you may cancel, or skip current navigation of the trip.
When CANCEL is selected, current navigation function will be disabled
When SKIP is selected, the current navigation function will remain
effective, but will skip the waypoint that is navigating to, and jump to the
next waypoint.
21
Track
Track pages provide two types of movement information:
The active movement of the trip (Egg Laying page)
The historical movement of the trip (View page)
Egg laying
Showing the
track map
Mark
Mark the currently
viewed point as a
new waypoint
Interval
Clear
Set the log
interval:
Stop
Distance
1 Sec
5 Sec
10 Sec
30 Sec
1 Min
Delete
track
22
The track data is logged on the built-in flash
memory.
Up to 8192 points can be logged
To log the track data, you first need to set
the Interval.
In View mode, the system will stop to log
active movement.
Save to card
Save track to
SD card
(will stop
the current
data logging
on SD card)
View
Settings
Mark
Set the info to be
Go To
displayed:
First
Speed
Last
WPT name
Nearest
Detail
WPT symbol
Egg Laying
Area
(Calculation)
Track (Egg Laying)
Page Tree
Egg Laying
Mark
Interval
STOP
Distance
1 Second
5 Seconds
10 Seconds
30 Seconds
1 Minute
Clear
Save to Card
Detail
View
Mark
Go to
First Point
Last Point
Nearest Point
Detail
Navigation
Area Calculation
Settings
Speed
WPT Name
WPT Symbol
Under Track page, when press in the TS, under Track page, the screen will show the
current movement with an egg laying drawing. The Current Speed, Waypoint Name,
and Waypoint Symbol can be selected to display or not to display under Setting page.
North pointer
Waypoint Name
Waypoint Symbol
Current Speed
You are
here
Track points
Map Scale
The scale can be adjusted by scrolling
the TS Up or Down, from 15m to 260KM
23
Usage status bar
Up to 8192 track points can be
logged in the track database
Track (continued)
Page Tree
Egg Laying
Mark
Interval
While the TS is pressed in, the
current location will be marked as
a waypoint.
Refer to Position Mark page for
further details.
STOP
Distance
1 Second
5 Seconds
10 Seconds
30 Seconds
1 Minute
Clear
Save to Card
View
Mark
Go To
First
Last
Nearest
Detail
Egg Laying
Area Calculation
Settings
Speed
WPT Name
WPT Symbol
To set the log frequency
It can be set to log from 1, 5, 10, 30
second, to 1 minute intervals.
Or if Distance is selected, distance
interval from 10m to 400m can be
specified.
To clear the logged tracking data
24
When Clear is selected, it will
jump to the Egg Laying page
automatically, and the Usage
Status Bar Chart will be cleared.
Track (continued)
Page Tree
Egg Laying
Mark
Interval
STOP
Compact
1 Second
5 Seconds
10 Seconds
30 Seconds
1 Minute
Clear
Save to Card
View
Mark
Go To
First
Last
Nearest
Detail
Egg Laying
Area Calculation
Settings
Speed
WPT Name
WPT Symbol
View: When View page is selected, it will show the detail of the tracked information:
Note: While View Page is selected, the system will stop the track logging.
North Up pointer
In View mode, it
always shows
north up.
The point being
requested to
display the detail.
The date and time the
point was logged.
Range scale
Scroll Up and Down
with the TS to adjust.
It can be adjusted from
15m to 260 KM.
Total number of points being logged
The number of logged point being
displayed. Use Left/Right key to
select previous or next logged point.
25
Track (continued)
Pressing in the TS will mark the track
point you have selected. The marked
point will be automatically assigned a
numerical waypoint name. You may
edit it with new name and new type.
Page Tree
Egg Laying
Mark
Interval
STOP
Compact
1 Second
5 Seconds
10 Seconds
30 Seconds
1 Minute
Clear
Save to Card
View
Mark
Go To
First
Last
Nearest
Detail
Egg Laying
Area Calculation
While GO TO is selected, the page will
jump to Navigation page automatically.
While pressing in the TS, the page will
show the first logged point of this trip.
While pressing in the TS, the page will
show the last logged point of this trip.
Settings
Speed
WPT Name
WPT Symbol
26
Track (continued)
Page Tree
Egg Laying
Mark
Interval
Compact
STOP
1 Second
5 Seconds
10 Seconds
30 Seconds
1 Minute
Clear
Save to card
View
Mark
Go To
First
Last
Nearest
Detail
Egg Laying
Area Calculation
Settings
Speed
WPT Name
WPT Symbol
The page will show the nearest track point
logged to current position.
Any one of the track points can be marked as
a waypoint by pressing in the TS.
Pressing in the TS, the page will show
number of the track point, altitude, heading,
speed, and the coordinates of the point being
selected.
Pressing in the TS, the page will jump to
the Egg Laying page and resume the
track logging.
The system may calculate the area based on the track points
traveled, including the distance from the first point to the last
point.
Refer to the page of How to Calculate Area for further details
27
Position Mark
Description
You may mark the current
location as a waypoint and
then edit it for future reference.
Pressing in the TS, the page
will show the detail of current
location, and automatically
generate a waypoint name in
numerical order.
All the items can be edited
Scroll TS to highlight the
item and press in to edit it
Press ESC to show the
saving selection
Scroll TS to highlight next
item or press ESC to save
dghj
The Ways to create new waypoints
1.Mark current position: through [POSITION MARK] page or
Hold Key if it is defined as [MARK] key.
2.Copy existing waypoint: refer to [WAYPOINT]
3.Mark a track point: refer to [TRACK]
4.Imported from a host PC via NAVILINK: refer to [NAVILINK]
28
Waypoint
Description
Waypoint is the basic element of navigation. You will need to either
mark a position of interest, or edit a known location as a waypoint to
activate the Navigation function. The location information in the
Waypoint is described below. The coordinate format of waypoint can be
specified in [SETTINGS]/[POSITION]
Waypoint type
Waypoint name
Altitude
Location coordinates
29
Waypoint (continued)
Page Tree
List
Go To
Delete
Edit
Copy
Project
Type List
Go To
Delete
Edit
Copy
Project
Description
All the waypoints in database can be displayed by name in alphabetical order (LIST) or
by types (TYPE LIST). Then you may select GO TO, Delete, Edit or Copy. Or, you
can delete all the waypoints in the database.
Delete All
In use
Yes or No
Save to Card
30
When the waypoint has been
used in a route, you can’t delete the
waypoint. And the screen will not show
DEL ALL
[Save to card] saves waypoints to
SD card. The current data logging will be
stopped while saving waypoints
Waypoint (continued)
Page Tree
List
Go To
Delete
Edit
Copy
Project
Type List
Go To
Delete
Edit
Copy
Project
Delete All
In use
Yes or No
Save to Card
GO TO
Select the waypoint to navigate
Highlight the waypoint you want to
navigate to.
Press in the TS, the page will jump
to Navigation page automatically.
EDIT
You can change the waypoint type,
name, coordinates, and distance:
When EDIT is selected, the screen
will display the details of the waypoint
Scroll the TS Up or Down to select the item(s) you want to edit and press
in the TS to confirm the selection.
When EDIT has been completed, press the ESC button to save the edition.
DELETE
When a waypoint is no longer required,
you can delete it from database:
Highlight the waypoint you want to
delete.
Press in the TS, and select Delete to
delete the waypoint.
When the waypoint
is being used in a
route, you can’t
delete it
31
Waypoint (continued)
Waypoint 001
created
Page Tree
COPY
You can copy the waypoint in
the database for future use.
List All
Go To
Delete
Edit
Copy
Project
You can create a new waypoint
by projecting the old waypoint.
Distance and
bearing to M000
must be specified.
By Type
Go To
Delete
Edit
Copy
Project
Delete All
In use
Yes or No
Save to Card
Always carry a first aid kit
There are many bad things that can happen in the outdoors, from
minor cuts and bruises, bites or stings, to more serious things like
broken bones and head injuries. It always pays to be prepared,
and the added weight of a first aid kit is fairly insignificant.
Contact your local stores. There are several available specifically
designed for day-trippers and backpackers, and…
- Carry a GT-31 with you -
32
Route
Page Tree
When selected, the page will display all the
routes in the database, and,
The total number of waypoints in each route.
List
Go To
Edit
Delete
Copy
Reverse
Rename
Area Calculation
New Route
Edit
Delete All
A total of 20 routes can
be created.
Up to 13 alphabetical
characters can be used
for the route name
Max 125 waypoints can
be added to a route
When selected, all the
routes in the database
will be deleted.
When system is in
navigating mode, the
route cannot be deleted.
33
Route (continued)
Page Tree
Scroll with the TS to highlight the route
and press in. The page will show related
features for this route.
List
Go To
Edit
Delete
Rename
Copy
Reverse
Area
New Route
Press in the TS, the page will
jump to Navigation and navigate
to the first waypoint in that route.
When a route is no longer
required, you can delete it
from the database.
When navigating, you can’t delete
the route.
Edit
Delete All
You can edit the
route with the
waypoints in the
database.
Press the TS in
again to show all
the waypoints in
the waypoint
database.
When pressed
in the TS, it
will show all
the waypoints
in this route.
34
You can edit the route with the
waypoints in the database.
Scroll with the TS to select.
Press in to confirm the selection.
Route (continued)
Page Tree
List All
Select the waypoint you
wish to insert and press in
to confirm the selection.
Continued from
previous page
Go To
Delete
Edit
Copy
Reverse
(track
back)
Rename
Area
Calc lation
New Route
Press in the TS to delete the waypoint from the route
When the TS is pressed in, the route name
and the waypoints in the route will be copied.
Reverse is functioned similar to backtracking.
When the TS is pressed in, the route name will be
copied and all the waypoints in this route will be in
reversed order.
Edit
Delete All
Press the TS in again to
edit the name of route
35
Memory Card
Page Tree
Log Switch
Min Speed
NMEA Items
File Size
When the card is
correctly inserted
Format Card
Remove Card
Insert SD/MMC card here properly and make sure
the compartment closed firmly
The system accepts SD or MMC cards up to 2GB.
When a memory card inserted, the screen will display CARD
FOUND message and proper card status icon will be displayed
in status bar. Refer to “Status Indicators” for details.
Set the log switch for memory card
OFF: disable card logging
ON: activate card logging, all points will be logged
ON-FIX: active card logging, only points with valid position
and speed above [MIN SPEED] is logged
Set the minimum speed threshold value from 0 to 50
The speed unit is specified in [SETTINGS]/[UINT]
GT-31 will only log points to memory with speed above this value
The minimum speed valid only if [LOG SWITCH] set to ON-FIX.
36
Memory Card (continued)
GGA is being set to
log at 1-second rate.
GLL is being set not
to log.
Page Tree
Log Switch
Min Speed
NMEA Items
File Size
When the card is
correctly inserted
Format Card
Remove Card
Highlighted items are being activated.
SBN format is mutually exclusive with other NMEA items.
NMEA-0183 sentences:
GGA: Global Positioning System fixed data
GLL: Geographic position - latitude/longitude
GSA: GNSS DOP and active satellites
GSV: GNSS satellites in view
RMC: Recommended minimum specific GNSS data
VTG: Course over ground and ground speed
ZDA: Date and time
SBN: SiRF binary logging (non-NMEA)
Please refer to NMEA 0183 format for further details.
NMEA-0183 format is defined by the National Marine Electronics Association (NMEA),
Standard for Interfacing Marine Electronic Devices, Version 2.20, January 1, 1997.
37
Memory Card (continued)
Page Tree
Log Switch
Min Speed
NMEA Items
File Size
When the card is
correctly inserted
Format Card
Remove Card
Select proper size to log the track data.
File sizes can be set:128,512,1024,2048KB or card size
When CARD SIZE is selected, GT-31 stores the data on the
card continuously until the card memory is full.
Note: To prevent data lost on the memory card, GT-31 will store the data up to the file size
selected, and generates a new file automatically. And then, start again to store the data until
file size selected has been reached. Therefore, it is safer to select small file size. However, it
also depends on post-processing requirement to select file sizes.
If the card is properly inserted, the following pages will be
shown:
Format Card: Format the card to FAT16 file system.
Note: All data on memory card will be erased when the
Format Card has been selected.
Remove Card: Before taking out the memory card, execute
this function to save the file, or the file could be damaged.
Total data logged/ card size
Data logged since power on(TXT or SBN)
38
Data Logger
Page Tree
Interval
Min Speed
Save to Card
Clear
Select log time interval from 0 to 60 seconds.
“0” will disable data logger.
GT-31 has a built-in data logger up to 20480 points. You can either save the
logged data into SD cards or use NAVILINK Utility to download it to a host PC.
Set the minimum speed threshold value from 0 to 50
The speed unit is specified in [SETTINGS]/[UINT]
GT31 will only log points with speed above this value
Save the logged data to SD card (in SBP format)
The original SD logging operation will be stopped while copying the
logged data to SD card.
Total points logged / Maximum points
Points logged since power on (SBP)
Clear logged data in flash memory
GT-31 logs data in cyclic mode. After filling memory, the oldest data is
overwritten by the new data.
39
Alert
Page Tree
Buzzer
On/Off
Over Speed
On/Off
Speed Setting
Altitude
On/Off
Above/Below
Altitude Setting
Target
On/Off
Waypoint type
Setting
Description
GT-31 generates audio and visual signals through a
Buzzer and red LED. These signals can be used to
provide Over Speed, Altitude or other alerts defined
by the user.
Select to turn on the audio alert.
Red LED will be on automatically
when anyone of the alerts is
Select the Speed or disable
(OFF) the Over Speed alert.
40
The over speed alert can be set
from 30KM/H to 150 KM/H.
Alert (continued)
Page Tree
Buzzer
On/Off
Over Speed
On/Off
Speed Setting
Altitude
On/Off
Above/Below
Altitude Setting
Target
On/Off
Waypoint type
Setting
This product can
automatically alert you
when approaching the
target.
Move the TS Left
or Right to select
Below or Above
alerts
Scroll up or down the TS to select
altitude for the alert
The range is from 0M to 15240M.
GT-31 will automatically alert you when
above or below the selected altitude.
Move the TS Left or
Right to select the
target alert (using
waypoint types).
Scroll up or down the TS to select the
approaching distance for the alert.
The range is from 10M to 1KM.
41
NAVILINK
NAVILINK provides the connection between the unit and the host
PC/Notebook to download or upload the data. For firmware update
please check [SETTINGS] page.
Download data includes: Waypoints, Routes, track points and data
logger (SBP data) stored on the built-in flash memory.
Upload data includes: Way points, Routes and track
Before downloading or uploading, make sure the driver for USB has
been successfully installed on your host PC/Notebook. This driver is
coming with the package in the Installation CD. Or you can download
the driver from our web.
When data transfer has been completed, press the Power/ESC
button (or remove USB cable) to reset the unit.
Please refer to How to Download and Upload the Data in this
manual for further details
Besides USB, BGT31 also supports NAVILINK connection through
Bluetooth. The NAVILINK port can be specified in [SETTINGS]\
[NAVILINK PORT]
42
Settings
Multiple languages are supported. However,
due to the limited display space, some terms
are in shortened format. Please check this
manual for clear definition.
Page Tree
Language
Time Zone
Unit
Time Format
Date Format
Arrived
Map Datum
Position Format
User Grid
Power Mode
DGPS Source
Interface
Backlight
Backlight Time
Contrast
External Power
Bluetooth
Bluetooth Sniff
…
This item supports LEFT/RIGHT key for value change
The current value for the highlighted item is shown here
Select the time zone you are in. More than 25 cities or states are built.
If you can’t find the time zone you need in the table, select Others and set
the time difference.
Metric (meter), Imperial (feet) measuring systems and Nautical
Mile(NM) can be selected
Select 24-Hour or 12-Hour time format
Continued to next page
43
Settings (continued)
Available Date formats:
Date-Month-Year
Month-Date-Year,
Year-Month-Date
Page Tree
Language
Time Zone
Unit
Time Format
Date Format
Arrived
Map Datum
Position Format
User Grid
Power Mode
DGPS Source
Interface
Backlight
Backlight Time
Contrast
External Power
Bluetooth
Bluetooth Sniff
…
Set the distance to indicate the
arrival at destination waypoint in
10 meters or up to 400 meters
The GT31 navigation function relies on the value of
[ARRIVED] to judge if the next waypoint is reached or not. An
arrived message will be displayed to notify you if the distance
to the next waypoint is less than the value of [ARRIVED].
GT31 will load the next waypoint automatically and continue
navigating until the last waypoint is reached.
Continued to next page
44
Settings (continued)
The default map datum setting is WGS-84.
There are over 180 map data that can be
selected in the database. Refer to Map Datum
List.
You may define your own map datum in the
USER GRID page.
Page Tree
Language
Time Zone
Unit
Time Format
Date Format
Arrived
Map Datum
Position Format
User Grid
Power Mode
DGPS Source
Interface
Backlight
Backlight Time
Contrast
External Power
Bluetooth
Bluetooth Sniff
…
MGRS
– Military Grid Reference System
User Grid
– The format defined in the USER GRID page
UTM
– Universal Transverse Mercator Projection
Grid System
OSGB
- Great Britain Grid System
LMBT EST97
- Estonian Grid System
Continued to next page
45
Settings (continued)
To select normal or low power mode
It is recommended to use LOW POWER mode in a
clear sky view environment.
Page Tree
Language
Time Zone
Unit
Time Format
Date Format
Arrived
Map Datum
Position Format
User Grid
Power Mode
DGPS Source
Interface
Backlight
Backlight Time
Contrast
External Power
Bluetooth
Bluetooth Sniff
…
To enabled or disabled SBAS.
It is recommended to enable SBAS only in the area
coved by SBAS
DGPS feature will be disabled
automatically when Low Power
mode is activated.
Two protocols for USB interfaces: NMEA Output rate
NMEA protocol
GGA: 1 second
SiRF Binary protocol
GSA: 1 second
RMC: 1 second
GSV: 5 seconds
LCM backlight Control:
OFF: disable
ON: backlight can be controlled by
Backlight Time
Backlight toggle key: Refer to Power/ESE
key definition.
Continued to next page
46
Settings (continued)
Set the timer for the backlight.
OFF – backlight timer disabled.
10 Seconds – turned off automatically after 10 seconds.
30 seconds – turned off automatically after 30 seconds.
1 Minute – turned off automatically after 1 minute.
Page Tree
Language
Time Zone
Unit
Time Format
Date Format
Arrived
Map Datum
Position Format
User Grid
Power Mode
DGPS Source
Interface
Backlight
Backlight Time
Contrast
External Power
Bluetooth
Bluetooth Sniff
…
Adjust the LCD contrast by moving the
thumb stick Right or Left.
When On is selected, the power to the unit can
be controlled by external USB power source.
This selection is only available on BGT-31 Bluetooth version.
Pressing in the TS to enable the Bluetooth wireless communication
The
icon will be displayed every 4 seconds when Bluetooth
wireless communication is activated.
Continued to next page
47
Settings (continued)
Bluetooth Sniff mode reduces power consumption. It is recommended to
always turn on this mode. However some Bluetooth hosts do not support it
and may cause the communication failure. In such case, please turn off sniff
mode and try again. Turn off sniff mode while Bluetooth connection is
established will cause Bluetooth module reset. A reconnection from the host
is needed.
Page Tree
…
DGPS Source
Interface
Backlight
Backlight Time
Contrast
External Power
Bluetooth
Bluetooth Sniff
Username
Usage
Default Value
Navilink port
Speed AVG
Time
Speed Genie
Hold Key
Serial No.
Version
Cold Start
Maximum 13 characters for username string
The file name of logged data in SD card will include username string
The usage of waypoints and routes
Format:
RTE: routes created/Maximum routes
WPT: waypoints created/Maximum routes
Set the settings back to factory defaults.
Continued to next page
48
Settings (continued)
BGT31 supports Navilink port selection.
GT31 can only USB port for NAVILINK
Page Tree
…
DGPS Source
Interface
Backlight
Backlight Time
Contrast
External Power
Bluetooth
Bluetooth Sniff
Username
Usage
Default Value
Navilink port
Speed AVG
Time
Speed Genie
Hold Key
Serial No.
Version
Cold Start
SPEED AVG TIME defines the time interval for speed averaging. The
available interval is from 1 to 60 seconds [SPEED] page calculates
maximum average speed based this value.
SPEED Genie defines the minimum threshold speed to activate “speed
genie” function. Please refer [SPEED] page for details.
Define “Hold key” function
Continued to next page
49
Settings (continued)
Page Tree
…
DGPS Source
Interface
Backlight
Backlight Time
Contrast
External Power
Bluetooth
Bluetooth Sniff
Username
Usage
Default Value
Navilink port
Speed AVG
Time
Speed Genie
Hold Key
Serial No.
Version
Cold Start
The product serial number
The version number of firmware.
Press TS and select [YES] to start firmware
update. USB cable must be connected in
advance.
Refer to “How to update firmware”
Cold start will initialize GPS receive completely.
Use cold start if the unit cannot get position fix in 60-80 seconds with a
clear sky view
50
Miscellanies
Description
Operation
Move the Thumb Stick up or down to select the year
Move the Thumb Stick right or left to select the
month
Press in the Thumb Stick to show the date of today
This page provides a 120-year calendar for
the date information from the year of 1940 to
2060
51
How To: Track Back to Where You Came from
To return to the point where you started the trip:
View the logged data under the Track page
Select the first point where you started the trip
Press in the TS to display the table
Select Go To and press in the TS
The page will jump to Navigation and guide you the way to go back home.
Highlight Track and press
in TS to display the Egg
Laying page.
Press in the TS to display the table.
st
Highlight First to display the 1 point.
Press in the TS again to display the
sub-table
Highlight Go To, the system will guide
you to the first point of your trip.
Press in the TS to show the table.
Highlight VIEW.
Press in the TS again to display the
tracking info.
52
How To: Track Back to Where You Came from (continued)
In addition to using saved waypoints or routes to navigate back where you came from, you may either
search the waypoint under Waypoint page, then select GO TO, or
execute the Reverse function to reverse the order of the waypoints in that route, then select GO TO to
navigate back the same route you came on:
For Example: If you started from a Gas Station (Waypoint 006), and came here following the Route
NAVIGPS01, now you want go back to Gas Station:
When Reverse function is activated, the waypoints will be listed in reversed order.
Highlight the reversed Route, and press in the TS to display the table
Select GO TO.
The system will navigate you back where you came from.
53
How To: Calculate the Area (Area Calculation)
Area Calculation is a useful feature when you wish to measure an area. There are two pages ROUTE or TRACK in
which you may have the access to this feature:
ROUTE Page
TRACK Page
It calculates the area based
on the track logged.
Press in the TS and select
VIEW page.
Press in the TS again to
display the table.
Move the TS to highlight
AREA.
Press in the TS to
calculate.
It calculates the area based
on the waypoints in a route.
Press in the TS to display
the table.
Select the route you want
to calculate the area.
Press in and select AREA
Press in to calculate.
Route name, total waypoints
in the route to be calculated
Total points calculated
The total distance from the
first point to the last point
The distance from the first
point to the last point
The result
The result calculated
54
How to: Activate Speed Genie
GT-31 can anticipate what you want to see on the screen during Speed Sailing or
other speed-based sport. This function is called SPEED GENIE. SPEED GENIE
automatically changes SPEED screens shown on the right and resets MAX and AVG
speeds at the best possible time. After each speed run you will see your MAX speed
and your best N-second average speed without having to use buttons.
To set up the SPEED GENIE
1.
Set [SETTINGS]/[SPEED GENIE] to the speed threshold of your choice. When you reach this speed, your
GT-31 will automatically show your speed in big font.
55
How to: Activate Speed Genie(continued)
2.
Set [SETTINGS]/[SPEED AVG TIME]. For example, when you aim for 10-second speed runs set this time
to 10s. If you aim for a 500m World Sailing Speed Record, set it to 21 seconds.
3.
Enter the SPEED page in GT-31 main menu. Once your settings 1&2 above are in place this is the only
thing to do to activate SPEED GENIE
SPEED GENIE is only active in the SPEED page of GT-31. You can operate
your GT31 manually as usual, but you need to come back to the SPEED
section when you need the GENIE to work.
*Special thanks to Dr. Tom Chalko, who designed the Speed Genie function of GT31/BGT31.
56
How To: Download and Upload Data
The data stored on the internal flash memory, including the routes, waypoints, track data and logger data can be
•
Saved to SD card and then read on PC/notebook directly from the SD card
•
Downloaded to a PC or Notebook via USB cable.
USB cable also enables upload of routes and waypoints edited on PC or Notebook to GT31.
Basic Operation of Downloading or Uploading via USB cable:
Make sure the USB driver has been successfully installed on your host.
Connect the USB data
Power on the unit, go to NAVILINK page, press in the
TS to enter NAVILINK mode
Execute the utility, NAVILINKII.exe on your host
You will see the screen on the right displayed.
In [Navi.Data] command page, you can select the items and
Click the command button to start upload or download.
When data transfer has been completed, press the
Power/ESC button to reset the unit.
57
How To: Download and Upload Data (continued)
To Download Navigation Data to a host PC
Step 1: Select “COM Port”
Step 2: Change the default folder if needed
Step3: Select “Navi.Data” command page
Step 4: Select the desired data items
Step 5: Click [Read] button to start downloading
data. While data downloading, the
progress bar will display the progress
and the related messages are shown in
the message box below.
58
How To: Download and Upload Data (continued)
To Upload Navigation Data from a host PC to GT-31
Step 1: Select “COM Port”
Step 2: Select the data items to be uploaded
Step 3: Click [Write] command and select the file (refer to
NAVILINK file naming) to start uploading data.
NOTE: Routes will have reference to waypoints.
Follow the steps below to ensure data consistence:
(1) Backup the routes/waypoints if needed
(2) Delete all routes and waypoints
(3) Upload the new waypoints ( *.wpt) first then upload new
routes (*.rte). All waypoints referred in the new routes should
be already uploaded before uploading routes.
NOTE: The uploaded track will override the original track in the device.
59
How To: Download and Upload Data (continued)
To Delete Navigation Data in GT-31
Step 1: Select “COM Port”
Step 2: Select the data items to be deleted
Step 3: Click [Delete] to start deleting data
NOTE: Waypoints cannot be deleted if waypoints
are referenced by routes.
To Backup/Restore All Data in GT-31
Step 1: Select “COM Port”
Step 2: Change default folder if needed.
Step 3: Select “Clone” command page. Click
[Backup] or [Restore] to start back up or
restore.
60
How To: Download and Upload Data (continued)
To Download Logger Data(SBP) in GT-31
Step 1: Select “COM Port”
Step 2: Change default folder if needed.
Step 3: Select “Log.Data” command page. Click
[Read] to start downloading logger data.
The downloaded data is saved as SBP file and
can be converted to plt,gpx,kml,nmea files.
Click [Convert] to start SBP file conversion.
61
How To: Download and Upload Data (continued)
NAVILINK File Naming
The file names are composed of device serial number and proper file extension. The file extensions
include:
wpt - Oziexplorer Waypoint
rte - Oziexplorer Route
plt - Oziexplorer Track
plt.nmea - Track in NMEA format
spd - history speeds file
sbp - binary packet binary data file (for DATA LOGGER)
sbn - binary data file (for MEMORY CARD)
txt - NMEA text file (for MEMORY CARD)
set - device settings file
gpx - GPS exchange format
kml - Google Earth compatible format
62
How To: Update the Firmware
Follow the steps described below to update your GT-31 firmware.
.
Make sure that the USB driver has been installed on your
PC/Notebook.
Connect the USB cable between the unit and PC/Notebook.
Power on the GT-31. Go to
[SETTINGS]/[VERSION] then Press
[ENTER] to set the device to firmware
update mode.
Execute the utility, GT31Updater.exe, on your PC/Notebook.
You will see the screen on the right displayed.
1. Select correct COM port that the unit is connected.
2. Click “Browse” button to select the file that you want to
update. The file is always with an extension file name, .s.
3. Click “Execute” button and wait completion.
Unplug USB cable. Press POWER to start the unit with the new
firmware.
63
Map Datum List
No
1
2
3
4
5
6
7
8
9
10
11
12
13
14
15
16
17
18
19
20
21
22
Abbrev
ADINDA
ADINDB
ADINDC
ADINDD
ADINDE
ADINDF
ADINDG
AFGY
AIN70
AINSA
ANA65
ANT43
ARC50A
ARC50B
ARC50C
ARC50D
ARC50E
ARC50F
ARC50E
ARC50F
ARC50G
ARC60
Description
Adindan-MEAN FOR Ethiopia, Sudan
Adindan-Burkina Faso
Adindan-Cameroon
Adindan-Ethiopia
Adindan-Mali
Adindan-Senegal
Adindan-Sudan
Afgooye-Somalia
Ain el Abd 1970-Bahrain
Ain el Abd 1970-Saudi Arabia
Anna 1 Astro 1965-Cocos Islands
Antigua Island Astro 1943 Antigua (Leeward Islands)
Arc 1950 MEAN FOR Botswana, Lesotho, Malawi, Swaziland, Zaire, Zambia, Zimbabwe
Arc 1950-Botswana
Arc 1950-Burundi
Arc 1950-Lesotho
Arc 1950-Malawi
Arc 1950-Swaziland
Arc 1950-Zaire
Arc 1950-Zambia
Arc 1950-Zimbabwe
Arc 1960-MEAN FOR Kenya, Tanzania
64
23
24
25
26
27
28
29
30
31
32
33
34
35
36
37
38
39
40
41
42
43
44
45
46
47
48
ASC58
ASC45
ASTHI
AST61
AST52
AUST66
AUST84
AYABE
BELLE
BERM57
BISSAU
BOGOTA
BUKIT
CAMP
CAMPO
CANTO
CAPESA
CAPCAN
CARTH
CHTHM
CHUA
COREGO
DEBOLA
DJAKA
DOS68
EAST67
Ascension Island 1958 Ascension Island
Astro Beacon E 1945-Iwo Jima
Astro DOS 71/4-St Helena Island
Astro Tern Island (FRIG) 1961 Tern Island
Astronomical Station 1952 Marcus Island
Australian Geodetic 1966 Australia & Tasmania
Australian Geodetic 1984 Australia & Tasmania
Ayabelle Lighthouse-Djibouti
Bellevue (IGN) Efate & Erromango Islands
Bermuda 1957-Bermuda
Bissau-Guinea-Bissau
Bogota Observatory-Columbia
Bukit Rimpah Indonesia (Banka & Belitung Islands)
Camp Area Astro Antarctica (McMurdo Camp Area)
Campo Inchauspe - Argentina
Canton Astro 1966 - Phoenix Islands
Cape - South Africa
Cape Canaveral - Bahamas, Florida
Carthage - Tunisia
Chatham Island Astro 1971 New Zealand (Chatham Island)
Chua Astro - Paraguay
Corrego Alegra - Brazil
Debola - Guinea
Djakarta (Batvia) Indonesia (Sumatra)
DOS 1968 New Georgia Islands (Gizo Island)
Easter Island 1967 - Easter Island
65
49
Eur50
50
51
52
53
54
55
56
57
58
59
60
61
62
63
64
65
66
67
68
69
70
71
72
73
EUR-A
EUR-B
EUR-C
EUR-D
EUR-E
EUR-F
EUR-G
EUR-H
EUR-I
EUR-J
EUR-K
EUR-L
EUR-M
FORT55
GAN70
GEO49
GRA49
GUAM63
GUNSG
GUX
HERAT
HJOR
HK63
HUTZU
European 1950 MEAN FOR Austria, Belgium, Denmark, Finland, France, West Germany, Gibraltar,
Greece, Italy, Luxembourg, Netherlands, Norway, Portugal, Spain, Sweden, Switzer-land
European 1950 MEAN FOR Austria, Denmark, France, West Germany, Netherlands, Switzerland
European 1950 MEAN FOR Iraq, Israel, Jordan, Lebanon, Kuwait, Saudi Arabia, Syria
European 1950 - Cyprus
European 1950 - Egypt
European 1950 England, Channel Islands, Ireland, Scotland, Shetland Islands
European 1950 - Finland, Norway
European 1950 - Greece
European 1950 - Iran
European 1950 - Italy (Sardinia)
European 1950 - Italy (Sicily)
European 1950 - Malta
European - Portugal, Spain
European 1979 MEAN FOR Austria, Finland, Netherlands, Norway, Spain, Sweden, Switzerland
Fort Thomas 1955 Nevis, St Kitts (Leeward Islands)
Gan 1970 - Republic of Maldives
Geodetic Datum 1949 - New Zealand
Graciosa Base SW 1948 Azores (Faial, Gracias, Pico, Sao Jorge, Terceira)
Guam 1963 – Guam
Gunung Segara - Indonesia (Kalimantan)
GUX 1 Astro - Guadalcanal Island
Herat North - Afghanistan
Hjorsey 1955 - Iceland
Hong Kong 1963 - Hong Kong
Hu-Tzu-Shan - Taiwan
66
74
75
76
77
78
79
80
81
82
83
84
85
86
87
88
89
90
91
92
93
94
95
96
97
98
99
INDIAB
INDIAN
IND54
IND75
IRE65
ISTS68
ISTS69
JI61
KANDA
KRG49
KERT48
KSA51
LC61
LEIGO
LIB64
LUZON
LUZMD
MAH71
MASWA
MERCH
MIDW61
MINAC
MINAN
MNT58
MPOR
NAHWA
Indian - Bangladesh
Indian - India, Nepal
Indian 1954 - Thailand Vietnam
Indian 1975 - Thailand
Ireland 1965 - Ireland
ISTS 061 Astro 1968 South Georgia Islands
ISTS 073 Astro 1969 - Diego Garcia
Johnston Island 1961 - Johnston Island
Kandawala - Sri Lanka
Kerguelen Island 1949 Kerguelen Island
Kertau 1948 - West Malaysia & Singapore
Kusaie Astro 1951 - Caroline Islands
L.C. 5 Astro 1961 - Cayman Brac Island
Leigon - Ghana
Liberia 1964 - Liberia
Luzon Philippines (Excluding Mindanao)
Luzon - Philippines (Mindanao)
Mahe 1971 Mahe Island
Massawa - Ethiopia (Eritrea)
Merchich - Morocco
Midway Astro 1961 - Midway Islands
Minna - Cameroon
Minna - Nigeria
Montserrat Island Astro 1958 Montserrat (Leeward Islands)
M'Poraloko - Gabon
Nahrwan - Oman (Masirah Island)
67
100
101
102
NAHWB
NAHWC
NAPAR
103
NAD27A
104
105
106
NAD27B
NAD27C
NAD27D
107
NAD27C
108
109
110
111
112
113
114
115
116
117
118
119
120
121
122
123
124
NAD27E
NAD27F
NAD27G
NAD27H
NAD27I
NAD27J
NAD27K
NAD27L
NAD27M
NAD27N
NAD27O
NAD27P
NAD27Q
NAD83A
NAD83B
OBS39
EGP07
Nahrwan - Saudi Arabia
Nahrwan - United Arab Emirates
Naparima BWI - Trinidad & Tobago
North American 1927 MEAN for antigua, Barbados, Barbuda, Caicos Islands, Cuba, Dominican Republic,
Grand Cayman, Jamaica, Turks Islands
North American 1927 MEAN for Belize, Costa Rica, El Salvador, Guatemala, Honduras, Nicaragua
North American 1927 MEAN FOR Canada
North American 1927 MEAN FOR CONUS
North American 1927 MEAN FOR CONUS (East of Mississippi
River) including Louisiana, Missouri, Minnesota
North American 1927 MEAN FOR CONUS (West of Mississippi River)
North America 1927 Alaska
North American 1927 Bahamas (Except San Salvador Island)
North American 1927 Bahamas (San Salvador Island)
North American 1927 Canada (Alberta, British Columbia)
North American 1927 Canada (Manitoba, Ontario)
North American 1927 Canada (New Brunswick, Newfoundland, Nova Scotia, Quebec)
North American 1927 Canada (Northwest Territories, Saskatchewan)
North American 1927 Canada (Yukon)
North American 1927 Canal Zone
North American 1927 Cuba
North American 1927 Greenland (Hayes Peninsula)
North American 1927 Mexico
North American 1983 Alaska, Canada, CONUS
North American 1983 Central America, Mexico
Observatorio Metereo 1939 Azores (Corvo & Flores Islands)
Old Egyptian 1907 - Egypt
68
125
126
127
128
129
130
131
132
133
134
135
136
137
138
139
140
HAWAME
HAWAI
KAUAI
MAUI
OAHU
OMAN
OS36
OS36B
OS36C
OS36D
OS36E
PICO
PIT67
PONT58
PONT48
PORT36
141
PRV56A
142
143
144
145
146
147
148
149
PRV56B
PRV56C
PRV56D
PRV56E
PRV56F
PRV56G
PRV56H
PRVVEN
Old Hawaiian MEAN FOR Hawaii, Kauai, Maui, Oahu
Old Hawaiian Hawaii
Old Hawaiian Kauai
Old Hawaiian Maui
Old Hawaiian Oahu
Oman - Oman
Ord. Survey Great Britain 1936 MEAN FOR England, Isle of Man, Scotland, Shetland Islands, Wales
Ord. Survey Great Britain 1936 - England
Ord. Survey Great Britain 1936 England, Isle of Man, Wales
Ord. Survey Great Britain 1936 Scotland, Shetland Islands
Ord. Survey Great Britain 1936 - Wales
Pico de las Nieves - Canary Islands
Pitcairn Astro 1967 - Pitcairn Island
Point 58 MEAN FOR Burkina Faso & Niger
Pointe Noire 1948 - Congo
Porto Santo 1936 Porto Santo, Madeira Islands
Provisional South American 1956 MEAN FOR Bolivia, Chile, Colombia,
Ecuador, Guyana, Peru, Venezuela
Provisional South American 1956 - Bolivia
Provisional South American 1956 Chile(Northern, Near 19South)
Provisional South American 1956 Chile(Southern, Near 43South)
Provisional South American 1956 Columbia
Provisional South American 1956 Ecuador
Provisional South American 1956 - Guyana
Provisional South American 1956 – Peru
Provisional South American – Venezuela
69
150
151
152
153
154
155
156
157
158
159
160
161
PRV63
PUERT
QATAR
QORNO
REUNI
ROME40
SANTO65
SAOBRZ
SAPPR
SCHWA
SELVA
SGS85
162
SA69A
163
164
165
166
167
168
169
170
171
172
173
174
SA69B
SA69C
SA69D
SA69E
SA69F
SA69G
SA69H
SA69I
SA69J
SA69K
SA69L
SA69M
Provisional South Chilean 1963 Chile (South, Near 53South) (Hito XVIII)
Puerto Rico Puerto Rico, Virgin Islands
Qatar National – Qatar
Qornoq - Greenland (South)
Reunion - Mascarene Islands
Rome 1940 - Italy (Sardinia)
Santo (DOS) 1965 Espirito Santo Island
Sao Braz Azores (Sao Miguel, Santa Maria Islands)
Sapper Hill 1943 - East Falkland Island
Schwarzeck – Namibia
Selvagem Grande - Salvage Islands
SGS 85 - Soviet Geodetic System 1985
South American 1969 MEAN for Argentina, Bolivia, Brazil, Chile, Colombia, Ecuador, Guyana, Paraguay,
Peru, Trinidad & Tobago, Venezuela
South American 1969 Argentina
South American 1969 Bolivia
South American 1969 Brazil
South American 1969 Chile
South American 1969 Colombia
South American 1969 Ecuador
South American 1969 Ecuador (Baltra, Galapagos)
South American 1969 Guyana
South American 1969 Paraguay
South American 1969 Peru
South American 1969 - Trinidad & Tobago
South American 1969 - Venezuela
70
175
176
177
178
179
180
181
182
183
184
185
186
187
188
189
SASIN
TAN25
TIMBA48
TOKTO
TKYJP
TKYKR
TKYOK
TRST68
VITIL6
WAKE60
WAKE52
WGS72
WGS84
YACER
ZANDR
South Asia - Singapore
Tananarive Observatory 1925 Madagascar
Timbalai 1948 Brunei, East Malaysia (Sabah, Sarawak)
Tokyo - MEAN FOR Japan, Korea, Okinawa
Tokyo - Japan
Tokyo - Korea
Tokyo - Okinawa
Tristan Astro 1968 - Tristan da Cunha
Viti Levu 1916 Fiji (Viti Levu Island)
Wake - Eniwetok 1960 - Marshall islands
Wake Island Astro 1952 - Wake Atoll
WGS 1972 - Global Definition
WGS 84-Default
Yacare - Uruguay
Zanderiji - Suriname
71
Water Immersion
The GT31/BGT31 is designed to comply with IEC standard 60529 IPX7, which means that it can
withstand immersion in 1 meter of water for 30 minutes. Submersion for more than 30 minutes and/or
subjecting the unit to (dynamic) pressures higher than 1m of water may cause water entering and
damaging the unit. After submersion, be certain to wipe dry and air dry the unit thoroughly before
opening its SD card door. Since moisture condensation may occur inside the unit due to air
temperature differences inside and outside the unit, it is important to dry the unit in warm and dry
environment with the SD card door open after each use. This regular drying will prevent condensed
moisture from accumulating inside the unit. To minimize the possibility of internal condensation the SD
card door should only be opened in a dry environment.
72
Warranty and Repair
WARRANTY
LOCOSYS warrants this product to be free from defect in material and workmanship for 12 months
from the date of purchase.
This warranty does not cover the damage due to the shipping of the product, external causes, including
accident, abuse, misuse, problems with electrical power, usage not in accordance with product
instruction, product that have been repaired or altered by other than LOCOSYS authorized service
person, dealer, problem(s) caused by use of parts and components not supplied by LOCOSYS upon
request. This warranty does not cover any accessories or parts added to product after the product
shipped from LOCOSYS.
Product is treated as out of warranty when it is out of the warranted 12 months period, or it has been
repaired or altered by other than LOCOSYS authorized service person, dealer, or which has been
subjected to misuse, abuse, accident, or improper installation.
In no event shall LOCOSYS be liable for any incidental, special, indirect or consequential damages,
whether resulting from the abuse, misuse, or inability of use this product or from defects in the product.
73
Warranty and Repair
REPAIR
LOCOSYS will repair the defective products covered under this limited warranty, if they are returned to
LOCOSYS. If the product does prove defective, it will be repaired at no charge during the warranty
period and at normal repair charge rates when out of the warranty.
To obtain warranty service, contact your local LOCOSYS dealer. An original or copy of the sales
receipt from the original dealer is required. LOCOSYS will not repair or replace missing components
from any package purchased not from authorized dealer.
The repaired product will be warranted subjected to the original warranty only. SCYTEX reserves the
right to charge a "No Fault Found" fee for product returned as defective where no fault could be found
by LOCOSYS. LOCOSYS owns all parts removed from repaired product.
Product returned by LOCOSYS to other location beside the Customers' site will bear extra charge and
should be credited to the Customers. It is the Customers responsibility to ensure that the package
containing the defective product is durable enough to be resistant against further damage and
deterioration during transportation. In case of damages occurring during the transportation, the repair is
treated as “Out of Warranty”.
74
Authorized Dealer
Revision History
Part Number
Revision
Date
Document Number:
75
Note