1
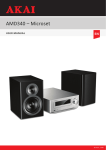
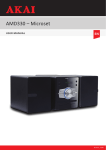
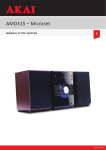
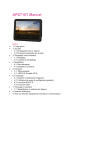
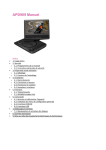
AMC306 – Microset
User manual
EN
© Elmarc, 14/04
Table of contents
1 Intended use
3
2 Safety4
2.1Labels in this manual
4
2.2General safety instructions
4
3 Functions
3.1Remote control
3.2AMC306 Microset
5
5
6
4 Operation
4.1CD functions
4.2Radio functions
4.3USB functions
4.4LINE-IN
7
7
10
11
13
5 Cleaning and maintenance
5.1Handle and care of a disc
14
14
6 Disposal of used electric and electronic equipment
15
7 Technical data
16
2
1 Intended use
The Microset plays music from CDs and USB. Music can also be played via
the LINE-IN port. The FM function lets you listen to the radio. Read the
manual with care before the first use.
55 A number of functions are not described in this manual. Please read
the quick start guide that comes with the product.
Manufactured under license from Dolby Laboratories. "Dolby" and the
double-D symbol are trademarks of Dolby Laboratories. Confidential
unpublished works. Copyright 1992-1997 Dolby Laboratories. All rights
reserved.
55 Because of the great variety of products with USB ports and their
sometimes quite manufacturer-specific functions we can neither
guarantee that all devices will be recognised, nor that all operating
options that are possible in theory will actually work.
3
2 Safety
2.1 Labels in this manual
66 WARNING A warning means that injury or death is possible if the
instructions are not obeyed.
11 CAUTION A caution means that damage to the equipment is possible.
55 A note gives additional information, e.g. for a procedure.
2.2 General safety instructions
66 WARNING Do not put force on the appliance. The appliance can fall
and can cause serious injury.
66 WARNING Do not insert any objects in the ventilation holes.
66 WARNING This appliance employs a laser system. To prevent direct
exposure to the laser beam, do not open the appliance. Visible laser
radiation when open and interlock defeated.
11 CAUTION Do not spill any liquid on the appliance.
11 CAUTION Do not block the ventilation holes.
55 This appliance is double insulated; therefore no earth wire is
required. Always check that the mains voltage corresponds to the
voltage on the rating plate.
4
3 Functions
3.1 Remote control
1
15
2
3
5
7
9
11
13
4
16
6
18
8
19
10
21
12
23
14
25
17
20
22
24
1. STANDBY button
2. Digit buttons
3. PROGRAM button
4. ALB - button
5. VOLUME button +
6. FAST REWIND / PREVIOUS button
7. VOLUME button 8. TUNER - button
9. CD button
10.USB button
11.INTRO button
12.REPEAT button
13.Sleep timer button
14.Equaliser button
15.MUTE button
16.ALB + button
17.PLAY/PAUSE button
18.FAST FORWARD / NEXT
button
19.TUNER + button
20.FM button
21.SOURCE button
22.RANDOM button
23.AUTO/STOP button
24.MEMORY button
25.ST/MONO button
General functions
• To switch on the appliance, press the STANDBY button (1). To switch
back to the standby mode, press the STANDBY button (1) again.
• To mute or restore sound, press the MUTE button (15).
• To adjust the volume, press the VOL - (7) button or the VOL + button
(7).
• To start playback, press the PLAY/PAUSE button (17) once.
• Press the PLAY/PAUSE button (17) again to pause playback.
5
• To stop playback, press the AUTO/STOP button (22).
• To select the source mode , press the SOURCE button (20).
• To switch between Mono and Stereo reception, press the ST/MONO
button (24).
Sleep timer
• Press the button SLEEP (13) repeatedly until the desired setting is
found. The SLEEP indicator is ON.
Using the EQ function
Select from the various sound effects
• Press the button EQ (14) repeatedly until the desired setting is found.
3.2 AMC306 Microset
1
2
6
1.
2.
3.
4.
5.
6.
7.
8.
9.
3
7
4
8
5
9
CD compartment
LCD Display
On / Off key (POWER)
SOURCE button
Volume dial
PLAY/PAUSE button
Stop button
USB slot
Line in jack
6
4 Operation
4.1 CD functions
1
Preparation
• Press the CD compartment (1) to open the appliance
• Insert the CD with the label upwards
• Close the CD compartment (1)
2
3
4
16
6
18
17
20
11
12
22
• Press the SOURCE button (20) to select the CD mode.
During playback, the following functions are available:
• To start playback, press the PLAY/PAUSE button (17) once.
• To pause playback, press the PLAY/PAUSE button ((17)) once; to resume
playback, press the button again.
• To select a track, press the PREV button (6) or the NEXT button (18)
until the desired track is set.
7
• To search for a specific point on the disc, hold the PREV button (6) or
the NEXT button (18) until the point is reached and release the button.
• Press the digit buttons (2) to select a desired track.
• To stop playback, press the AUTO/STOP button (22).
55 Please note:
• Normally, if an MP3 disc is loaded, the unit will take longer time to
read the initial data.
• If a disc contains mixed content (e.g. MP3 and video files), the
appliance will only recognise, list and play one content type.
To program a CD:
With the PROGRAM function favourite tracks from the disks can be
stored.
• Press the AUTO/STOP key once (22).
• Press the PROGRAM key once (3).
• To select a track, press the PREV button (6) or the NEXT button (18)
until the desired track is set.
• Press the PROGRAM button (3) once to store a chosen track.
• Repeat the last 2 steps to add to the programme list.
• To start playback, press the PLAY/PAUSE button (17) once.
• To delete the program during the playback, press the AUTO/STOP
button (22) twice.
Using the REPEAT function
For video discs and audio CDs
• Press the REPEAT button (12) once to repeat the current chapter or
track.
REPEAT appears on the display.
• Press the button 2 times to repeat all chapters or tracks.
REPEAT ALL appears on the display.
• Press the button once again to cancel the function.
For audio discs (MP3/WMA)
• Press the REPEAT button (12) once to repeat the current chapter or
track.
REPEAT appears on the display.
• Press the button 2 times to repeat all the numbers within the album.
REPEAT ALBUM appears on the display.
• Press the button 3 times to repeat all chapters or tracks.
8
REPEAT ALL appears on the display.
• Press the button once again to cancel the function.
Using the RANDOM function
• Press the button 1 times to play all tracks in random order. The repeat
function is now off.
RANDOM appears on the display.
• Press the button once again to cancel the function.
Using the ALB+/- function
For audio discs (MP3/WMA)
• Press the ALB- (4) button or the ALB+ (16) button to select the desired
folder.
Using the INTRO function
• Press the INTRO (11) button to play the first ten seconds of a track.
• To cancel the function, press the INTRO (11) button again. The
appliance will resume the normal playback.
9
4.2 Radio functions
2
3
4
16
6
18
17
20
11
12
22
• Press the SOURCE key (20) to select the radio mode.
TUNER appears on the display.
• To switch between Mono and Stereo reception, press the ST/MONO
button (24).
Automatically adjust the frequency
• To search for frequencies automatically, press the AUTO/STOP button
(22).
• Press the button once again to cancel the function.
• To select a preset station, press the digit buttons (2).
Adjust the frequency manually
• To tune to the station of your choice, press the TUN- (8) button or the
TUN+ (19) button repeatedly until the frequency is found.
• Touch MEMORY (25) to add the current station to your favourites
• Use the number buttons to determine the preset position. Start with a
0 for numbers under ten.
• To skip to the next preset station, press the PREV button (6) or the
NEXT button (18).
10
4.3 USB functions
8
• Insert the USB device in the slot (8). The device can only be connected
one way.
6
18
17
20
12
22
• Press the SOURCE button (20) to select the USB mode.
USB appears on the display.
The display shows the total number of tracks.
During playback, the following functions are available:
• Press the PREV button (6) or the NEXT button (18) to select a folder or
a file.
• Press PLAY/PAUSE (17) to confirm.
• To pause playback, press the PLAY/PAUSE button (17) once; to resume
playback, press the button again.
• To stop playback, press the AUTO/STOP button (22).
Using the REPEAT function
• Press the REPEAT button (12) once to repeat the current chapter or
track.
11
• Press the button 2 times to repeat all the numbers within the album.
• Press the button 3 times to repeat all chapters or tracks.
• To cancel the function, press the REPEAT (12) button again. The
appliance will resume the normal playback.
• To remove the device, gently pull it out of the slot.
Due to the great variety of products with USB ports and their sometimes
quite manufacturer-specific functions we can neither guarantee that all
devices will be recognised, nor that all operating options that are possible
in theory will actually work.
12
4.4 LINE-IN
6
18
17
20
22
• Connect the external appliance to your AMC306 Micro System.
• To select the source mode LINE-IN, press the SOURCE button (20).
LINE-IN appears on the display.
During playback, the following functions are available:
• To select a track, press the PREV button (6) or the NEXT button (18)
until the desired track is set.
• To start playback, press the PLAY/PAUSE button (17) once.
• To pause playback, press the PLAY/PAUSE button ((17)) once; to resume
playback, press the button again.
• To stop playback, press the AUTO/STOP button (22).
• To remove the device, gently pull it out of the slot.
13
5 Cleaning and maintenance
66 WARNING Before performing any cleaning or maintenance, switch
off and unplug the appliance.
• Clean the outside of the appliance with a soft cloth. When the
appliance is very dirty, dampen the cloth slightly with water and a
neutral solution.
• Put the appliance on a horizontal flat surface.
• When the appliance is not in use for longer period, we recommend
switching the appliance off at the master power switch.
5.1 Handle and care of a disc
• Hold the disc with fingers. Hold the disc outer edge and/or the centre
spindle hole. Do not touch the disc surface.
• Do not bend or press the disc. Do not expose the disc to direct sunlight
or heating sources.
• Clean the disc surface with a soft, dry cleaning cloth. Wipe the disc
surface gently, radially, from centre towards the outer edge.
• Do not apply thinner, alcohol, chemical solvent, or sprays when
cleaning. Such cleaning fluids will permanently damage the disc
surface.
14
6 Disposal of used electric and electronic
equipment
The meaning of the symbol on the material, its accessory or packaging
indicates that this product shall not be treated as household waste.
Please, dispose of this equipment at your applicable collection point
for the recycling of electrical and electronic equipments waste. In the
European Union and Other European countries which there are separate
collection systems for used electrical and electronic product. By ensuring
the correct disposal of this product, you will help prevent potentially
hazardous to the environment and to human health, which could
otherwise be caused by unsuitable waste handling of this product. The
recycling of materials will help conserve natural resources. Please do not
therefore dispose of your old electrical and electronic equipment with
your household waste.
Do not dispose of batteries as household waste but take them to a battery
recycling facility.
For more detailed information about recycling of this product, please
contact your local city office, your household waste disposal service or
the shop where you purchased the product.
For more information and warranty conditions, please visit: www.akai.eu
15
7 Technical data
General
• LCD Display
• Voltage: 100 - 240VAC ~ 50/60 Hz
• Power consumption: 10W
• Standby power consumption: <0,5W
• Frequency response: +/- 3 dB (20Hz ~20KHz)
• Speaker output: 2 x 2,5W RMS
• Impedance: 8Ω 3W
• Dimensions:
• Weight:
Disc output
• Frequency range: 20Hz ~20KHz
• Dynamic range: ≥ 70dB
• Signal/noise ratio: > 80dB
Remote control
• Battery size: 2 x AA
• Dimensions:
• Weight:
Radio
• Frequency range: 87,5~108 MHz
Supported media formats
• Disc types: CD/CD-R/CD-RW
• Audio formats: MP3
USB port
• Maximum USB memory:
Line in jack: 3.5 mm
Working environment
• Operating temperature: - 10 ~ +35 °C(elsius)
• Relative humidity: 5% ~90%
16