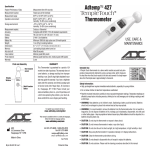
1
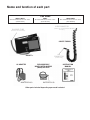
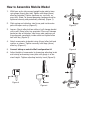
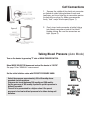
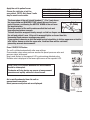
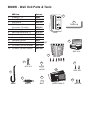
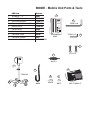
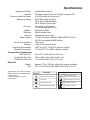
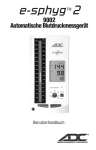
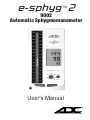
e-sphyg 2
TM
9002
Automatic Sphygmomanometer
User’s Manual
®
AMERICAN DIAGNOSTIC CORPORATION
A Special
Thank You...
Thank you for choosing an ADC® blood pressure instrument. We're proud of the care and quality
that goes into the manufacture of each and every item that bears our name. Only the finest materials are
used to assure you of a timeless instrument designed for optimum performance.
You'll quickly appreciate the results, for you now own one of the finest sphygmomanometers that
money can buy.
With proper care and maintenance, your ADC® blood pressure instrument is sure to provide you
with many years of dependable service. Please read the following instructions and general information
which will prove helpful in allowing you to enjoy your ADC® product.
Advantages of Digital
Your new ADC® e-sphygTM 2 sphygmomanometer is intended to provide you with all of the functionality of a traditional sphygmomanometer, with none of the problems associated with these devices.
Using state-of-the-art technology, your e-sphygTM 2 sphygmomanometer will provide you with performance, versatility, and reliability exceeding the most popular aneroid and mercurial instruments.
Its dual mode design will permit the instrument to fully measure a patient’s blood pressure and pulse
automatically. In manual mode, it allows you to use the time proven auscultatory method to obtain blood
pressure readings.
Thank you for your patronage. It is indeed our pleasure to serve you.
Sincerely,
American Diagnostic Corp.
ADC® 9002 e-sphygTM 2
Table of Contents
Introduction and Intended Use . . . . . . . . . . . . . . . . . . . . . . . . . . . . .4
Warnings and Precautions . . . . . . . . . . . . . . . . . . . . . . . . . . . . . . . .5
Product Features . . . . . . . . . . . . . . . . . . . . . . . . . . . . . . . . . . . . . . . .6
Name and Function of Each Part . . . . . . . . . . . . . . . . . . . . . . . . . .7-8
Preparation for Use . . . . . . . . . . . . . . . . . . . . . . . . . . . . . . . . . . .9-10
How to Assemble Wall Model . . . . . . . . . . . . . . . . . . . . . . . . . . . . .11
How to Assemble Mobile Model . . . . . . . . . . . . . . . . . . . . . . . . . . .12
Cuff Connections . . . . . . . . . . . . . . . . . . . . . . . . . . . . . . . . . . . . . . .13
Taking Blood Pressure . . . . . . . . . . . . . . . . . . . . . . . . . . . . . . . .13-16
Memory Function . . . . . . . . . . . . . . . . . . . . . . . . . . . . . . . . . . . . . .17
Error Displays and Troubleshooting . . . . . . . . . . . . . . . . . . . . .18-20
Care and Maintenance . . . . . . . . . . . . . . . . . . . . . . . . . . . . . . . . . . .21
Wall Unit Parts and Tools . . . . . . . . . . . . . . . . . . . . . . . . . . . . . . . .22
Mobile Unit Parts and Tools . . . . . . . . . . . . . . . . . . . . . . . . . . . . . .23
Mobile Base Assembly Parts . . . . . . . . . . . . . . . . . . . . . . . . . . . . . .24
Specifications . . . . . . . . . . . . . . . . . . . . . . . . . . . . . . . . . . . . . . . . .25
Limited Warranty . . . . . . . . . . . . . . . . . . . . . . . . . . . . . . . . . . . . . . .26
Replacement Parts . . . . . . . . . . . . . . . . . . . . . . . . . . . . . . . . . . . . .27
This manual is intended to assist the user in the safe and efficient operation of the Automatic Sphygmomanometer 9002. The product must be used in accordance with the procedures
contained in this
manual and must not be used for purposes other than those described herein. It is essential to read
and understand the entire manual.
Introduction and Intended Use
The 9002 digital ADC® e-sphygTM 2 sphygmomanometer is a digital sphygmomanometer intended for measurement of systolic and diastolic blood pressure and
pulse rate in adult patients, i.e., age 12 and above. This product is not designed for
neonatal use. Inaccurate readings may result if it is used on a child's arm.
Accuracy was evaluated during clinical studies in which results with the 9002 digital
ADC® e-sphygTM 2 sphygmomanometer were compared with simultaneous auscultatory measurements obtained with a standard sphygmomanometer. In these studies, the
onset of the fourth (or fifth) Korotkoff sound was taken as the diastolic pressure for the
purpose of determining overall efficacy. A copy of this study is available from ADC® on
request. To ensure that accuracy is maintained, compare readings obtained with the
9002 digital ADC® e-sphygTM 2 sphygmomanometer with values measured by a
trained observer using a manual sphygmomanometer at least every 6 months.
Blood pressure measurements determined with this device are equivalent to those obtained by a trained observer using the cuff stethoscope auscultatory method, within
the limits prescribed by the American National Standard, Manual, electronic, or automated
sphygmomanometers.
The 9002 digital ADC® e-sphygTM 2 sphygmomanometer has the ability to function according to its specifications in the presence of common arrhythmia such as atrial or
ventricular premature beats or atrial fibrillation.
Warnings and Precautions
Warning - A warning statement in this manual identifies a condition or practice which, if not corrected or discontinued immediately could lead to patient injury, illness, or death.
Warning - If luer lock connectors are used in the construction of tubing, there is a possibility that they might be
inadvertently connected to intravascular fluid systems, allowing air to be pumped into a blood vessel. Immediately
consult a physician if this occurs.
Warning - Do not allow a blood pressure cuff to remain on patient for more than 10 minutes when inflated above
10mmHg. This may cause patient distress, disturb blood circulation, and contribute to injury of peripheral nerves.
Warning - Safety and effectiveness with neonate cuff sizes 1 through 5 is not established.
Warning - For all blood pressure systems that can be wall mounted, ensure that the unit is securely mounted
prior to use to avoid damage to the instrument and potential patient injury.
Warning - Do not use the 9002 in an explosive environment such as where flammable
anesthetics exist or inside an oxygen chamber with strong electrostatic and electromagnetic fields e.g., mobile
phones.
Warning - Use of this instrument on patients under dialysis therapy or on anticoagulant, antiplatelets, or steroids
could cause internal bleeding.
Warning - Do not use cuffs, AC adapters or batteries other than those included with this product or replacement
parts supplied by the manufacturer.
Warning - This system may fail to yield specified measurement accuracy if operated or stored in
temperature or humidity conditions outside the limits stated in the specifications section of this manual.
Warning - When using with an infant or child cuff, extra care must be taken to prevent over-inflation. To prevent
discomfort or injury to the patient, ensure preset pressure is not set above the desired level.
Warning -This product may contain a chemical known to the state of California to cause cancer, birth defects, or
other reproductive harm.
Caution - Federal law restricts this device to sale by or on the order of a physician or licensed healthcare practitioner.
Caution - To avoid any possibility of accidental strangulation, keep this unit away from children and do not drape
tubing around your neck.
Note - To obtain the greatest accuracy from your blood pressure instrument, it is recommended that the instrument be used within a temperature range of 50°F (10°C) to 104°F (40°C), with a relative humidity range of 1590% (non-condensing).
Note - All connectors and inflation system should remain connected to the device during storage to avoid dust
entering through the connector port.
Product Features
DUAL DISPLAY COLUMN LCD and SEGMENT LCD (Simulated Mercury Column)
The pressure can be read in the column LCD height and as digital value in the
segment LCD.
DUAL MEASUREMENT MODE "AUTO" and "MANUAL" Modes of Measurement
Determination of blood pressure can be made either automatically by the oscillometric
method or manually by the auscultatory method using a
stethoscope.
MODE
AUTO
DEFLATION RATE
MEMORY
Maintained at 4.0 to 4.9mmHg/sec Last measured result auto saved
Maintained at preset rates of:
MANUAL
N/A
2.5, 4.5 or 6.5mmHg/sec
Cuff Sizes (Auto Mode)
The Small Adult size cuff will accommodate arms of approximately 7.4 to 10.6 inches (19.0
to 27.0 centimeters). A Small Adult cuff should be used on patients 12 or older only (in auto
mode).
The Adult size cuff will accommodate an upper arm circumference range of approximately
9.0 to 15.7 inches (23.0 to 40.0 centimeters).
The Large Adult size cuff will accommodate that of approximately 13.3 to 19.6 inches (34.0
to 50.0 centimeters).
Cuff Sizes (Manual Mode)
In manual mode, any of ADC’s® 5 cuff sizes (child, small adult, adult, large adult or thigh)
may be used, on any patient.
Operation with AC Adapter or Rechargeable Battery
The digital ADC® e-sphygTM 2 sphygmomanometer is powered by either an AC Adapter or
rechargeable nickel metal hybrid (NiMH) battery (both included).
Name and function of each part
MAIN UNIT
SEGMENT LCD
INFLATION MARK
COLUMN LCD
DEFLATION
MARK
2mmHg
PULSE
MARK
1mmHg
BATTERY MARK
POWER MARK
PRESET PRESSURE KNOB
START/STOP BUTTON
AC INDICATOR
SET/MEMORY BUTTON
MODE SELECTOR
AIR CONNECTOR
AIR PLUG
AC ADAPTER JACK
MAIN POWER
SWITCH
O :OFF
I :ON
BATTERY
COMPARTMENT
COVER
BATTERY
CONNECTOR
ADAPTER PLUG
BATTERY PLUG
Name and function of each part
Cuff Sizes
SMALL ADULT
Arm circumferences of 7.4”-10.6”
(19.0-27.0cm)
ADULT
Arm circumferences of 9.0”-15.7”
(23.0-40.0cm)
LARGE ADULT
Arm circumferences of 13.3”-19.6”
(34.0-50.0cm)
LUER CONNECTOR
(Male Luer to Female Bladder Tube)
BLADDER TUBE
(Female Luer Connection)
COILED TUBING
AIR
CONNECTOR
ADCUFFTM
(to main unit)
AC ADAPTER
ADAPTER PLUG
RECHARGEABLE
NICKEL METAL HYBRID
(NiMH) BATTERY
INSTRUCTION
MANUAL
BATTERY PLUG
Other parts included depending upon model selected.
Preparation for Use
Connecting and Using the AC Adapter (All models)
Connect AC ADAPTER PLUG to AC ADAPTER JACK
ADAPTER
PLUG
Plug AC ADAPTER in the power socket.
AC INDICATOR is lit when AC ADAPTER is connected correctly.
Installing the RECHARGEABLE NiMH Battery (All models)
NOTE: The battery enclosed in the product package is not charged, and needs to be
charged for about 4 hours before use.
NOTE: Turn off the power and unplug AC ADAPTER before inserting the battery. Make sure " O " side of MAIN
POWER SWITCH is pressed down.
(Fig. 1)
Remove BATTERY COMPARTMENT COVER by
loosening and removing the screw. (Fig. 1)
Connect BATTERY PLUG to BATTERY
CONNECTOR inside the battery compartment
and insert the battery. (Fig. 2)
(Fig. 2)
Put back BATTERY COMPARTMENT COVER and
close it by inserting and tightening the screw.
BATTERY PLUG
Connect AC ADAPTER PLUG and plug AC
ADAPTER in the power socket to charge the
battery. The battery is charged regardless of whether
the e-sphygTM 2 is powered on or off.
(Fig. 3)
Orange light of AC INDICATOR indicates that
the battery is being charged. (Fig. 3)
The battery is fully charged after approximately 4 hours.
Unplug AC ADAPTER after the light turns
green as it indicates the battery is charged.
The color of the AC INDICATOR
may switch to green and return to
orange if the 9002 is operated
while charging battery, however it
does not indicate a problem.
BATTERY MARK flashes in the segment LCD when the battery charge is low.
Only a few more measurements remain before the battery runs down.
The battery needs to be recharged when BATTERY MARK is displayed.
Measurement cannot be made.
NOTE: The rechargeable batteries may not be completely full after their initial charge or when
they have not been used for an extended period of time. This should be solved once the unit
has been used a few times and the batteries have been charged and discharged.
Battery life
Life of the rechargeable NiMH battery is approximately 2 years. However it may vary depending on operating conditions. Replace the battery when BATTERY MARK is displayed
often or when frequent charging of the battery becomes necessary.
Tips on prolonging the battery life
The device is powered by the AC ADAPTER when it is connected;
the installed battery is not used if the AC ADAPTER is connected.
• Remove the battery when operating the device with the AC ADAPTER for an
extended period of time or when the battery does not need to be charged.
• Avoid charging the battery if it is not completely exhausted.
Do not forcefully remove the battery or pull out the plugs holding
cords and cables.
Use indicated AC Adapter and the battery only.
Contact your dealer if they are damaged.
POWER MARK
The device goes to energy saver mode when it is left turned on and not operated
for approximately 3 minutes. The mark will be displayed for an hour and then disappear.
Make sure to turn off the device by pressing "O " side of MAIN POWER SWITCH down
after each use especially when the device is powered by the battery.
The device activates from energy saver mode when either START/STOP button or
SET/MEMORY button is pressed. It is recommended to activate the device by pressing
SET/MEMORY button since the device could start inflation if START/STOP button is
pressed. Press START/STOP button again and stop inflation if the cuff is not wrapped
around arm.
How to Assemble Wall Model
1.
Securely attach wall bracket to flat surface using enclosed
mollys and screws at desired height. (It is advised to use a
level to ensure proper mounting). (Figure 1)
2.
Attach manometer to wall bracket by lowering atop wall
bracket, sliding male tab into female seat of the bracket. Secure the two together using the (6mm) allen bolt and washer
from below. Tighten securely with large (6mm) allen wrench
(Figure 2).
3.
Securely attach cuff basket to flat surface to left of manometer using enclosed mollys and screws at desired height. (It is
advised to use a level to ensure even mounting) (Figures 3 4).
4. Attach 8 foot length coiled tubing to air inlet on face of esphyg 2TM (Figure 5). Insert “male” luer connector (891M) on
free end of coiled tubing to “female” luer connector (891F) on
bladder tubing (Figure 6). Fold cuff and store in basket.
300
290
280
270
L
POWER
260
250
2
80
130
82
40
e-sphyg
240
230
70
60
220
210
200
190
180
170
160
150
140
130
73
120
110
AC
PRESET PRESSURE
180
220 MANUAL
50
140
30
100
20
260
280
AUTO
Figure 3
10
SET/MEMORY
START/STOP
100
90
LOW BATTERY
POWER
80
70
AC
PRESET
60
URE
180
50
140
30
100
220 MANUAL
40
20
260
280
AUTO
10
SET/MEMORY
Figure 4
START/STOP
Figure 5
Figure 6
How to Assemble Mobile Model
1.
With base on its side connect upright outer pole to base
using large (6mm) allen bolt. Tighten with large (6mm)
allen key provided. Tighten hardware as securely as
possible. (Note: To prevent loosening, hardware must be
tightened securely and periodically checked) (Figure 1).
2.
Slide spring and stainless steel inner pole inside outer
pole with open end up (Figure 2).
3.
Loosen (3mm) allen bolt on collar of cuff storage basket
with small (3mm) allen key provided. Place cuff storage
basket on top of stainless steel inner pole making sure
the pole goes completely inside collar and tighten allen
bolt with key (Figure 3).
4.
Attach manometer to basket using (6mm) allen bolt and
washer as shown. Tighten securely with large (6mm)
allen key (Figure 4).
5.
Connect tubing as noted in Wall configuration #4.
6.
Adjust height of manometer by loosening adjusting knob
and raising or lowering inner pole until gauge is at desired height. Tighten adjusting knob by hand (Figure 5).
Figure 1
Figure 2
300
290
280
270
260
250
2
e-sphyg
240
230
220
210
200
130
82
190
180
170
160
150
140
130
73
120
110
100
90
LOW BATTERY
POWER
80
70
60
AC
PRESET PRESSURE
180
220 MANUAL
50
140
30
100
40
20
260
280
AUTO
10
SET/MEMORY
START/STOP
Figure 3
Figure 4
Figure 5
Cuff Connections
PLUG / PORT
CONNECTION
AIR CONNECTOR
(Coiled Tubing)
1. Squeeze the middle of the plastic air connector
on theend of coiled tubing between thumb and
forefinger, and insert into the air connection port on
the face of the e-sphyg 2TM. Make sure connector
firmly “lock” snaps into the port (Figure 1).
Figure 1
2. Firmly insert male connector of coiled tubing
into female connector at end of the AdcuffT
bladder tubing. Be sure the connectors are
tight (Figure 2).
Figure 2
MALE
CONNECTOR
(Coiled Tubing)
FEMALE CONNECTOR
(Bladder Tube)
Taking Blood Pressure (Auto Mode)
Turn on the device by pressing "I" side of MAIN POWER SWITCH.
Move MODE SELECTOR downward and set the device to "AUTO".
See page 15 for "MANUAL" measurement.
Set the initial inflation value with PRESET PRESSURE KNOB.
Select the pressure approximately 30 to 40 mmHg above
expected systolic pressure.
Pressure can be set between 100 mmHg and 280 mmHg.
Set the pressure at 180 mmHg if patient's systolic pressure is
difficult to predict.
The cuff is re-pressurized to a higher value if the preset
pressure is too low for blood pressure to be taken during cuff
deflation.
Apply the cuff to patient's arm.
Choose the right size of cuff for
your patient. NOTE: Only these 3 cuffs
may be used in auto mode.
ARM CIRCUMFERENCE
9.0 to 15.7 inches (23.0 to 40.0 cm)
13.3 to 19.6 inches (34.0 to 50.0 cm)
7.4 to 10.6 inches (19.0 to 27.0 cm)
CUFF SIZE
ADULT
LARGE ADULT
SMALL ADULT
The lower edge of the cuff should be about 1” (2 to 3 cm) above
the inner elbow and BLADDER TUBE should be over the inner
part of the arm, positioning the ARTERY MARK of the cuff over
the brachial artery.
Press the surface of the cuff to make sure that the hook and
loop adhesive fastens securely.
The cuff should be wrapped loosely enough so that two fingers can be placed between
the cuff and patient's arm. If the cuff is wrapped tighter or looser than this,
inaccurate blood pressure readings may result.
If your patient is wearing a shirt that might restrict circulation in his/her upper arm or he/she
rolls his/her sleeve up over the upper arm, the blood flow will be restricted,
preventing accurate measurement.
Press START/STOP button.
The cuff is inflated automatically after zero settings.
Pressurization stops when pressure reaches the preset pressure value and
pressure starts to descend.
Heart mark flashes in the segment LCD synchronizing detected pulse.
Deflation rate is displayed at the lower right corner of the segment LCD.
Press START/STOP button whenever the measurement
should be interrupted.
The device will stop during any course of measurement
procedure and rapidly exhaust air from the cuff.
Air is rapidly exhausted from the cuff as
measurement completes.
Blood pressure and pulse rate are displayed.
Turn off the device by pressing "O" side of MAIN POWER SWITCH.
The device will go to the energy saver mode after approximately
3 minutes if it is not turned off. See page 10.
Make sure your patient is relaxed, has taken at least 5 minutes of rest before measurement
and refrains from talking or moving during measurement.
Confirm that the cuff is kept at the height of patient's heart during measurement.
Do not execute repeated measurements for congestion of blood could result in false measurement. Allow the patient's arm to rest for at least 5 minutes.
Taking Blood Pressure (Manual Mode)
When you want to take your patient's blood pressure using the auscultatory method with
a stethoscope, set the device to "MANUAL" mode.
Turn on the device by pressing " I " side of MAIN POWER SWITCH.
Move MODE SELECTOR upward and set the device to "MANUAL".
See page 13 for “AUTO” measurement.
Set the initial inflation value with PRESET PRESSURE KNOB.
Details on preset pressure … page 13.
Press SET/MEMORY button to confirm and/or select the
appropriate deflation rate.
The deflation rate is displayed at the lower right corner of the
segment display.
The deflation rate can be selected from 2.5, 4.5 and 6.5 mmHg\s.
The set deflation rate returns to the default value (2.5) when the
device is turned off.
Apply the cuff and stethoscope to the patient's arm in the same
manner as the usual auscultatory method.
Press START/STOP button.
The cuff is inflated automatically after zero settings.
Pressurization stops when pressure reaches the preset pressure value and
pressure starts to descend.
Deflation rate is displayed at the lower right corner of the segment LCD.
NOTE: Press START/STOP button whenever the measurement
should be interrupted. The device will rapidly exhaust air from the cuff.
If cuff inflation was not sufficient, press and hold down
START/STOP button once deflation has started and the cuff
is pressurized again. Pressurization will continue while the
button is pressed. Pressure does not exceed 290 mmHg.
Press START/STOP button when blood pressure is taken and air
is rapidly exhausted from the cuff.
Air is also rapidly exhausted from the cuff when pressure
descends to 30 mmHg.
Turn off the device by pressing "O" side of MAIN POWER SWITCH.
The device will be in the energy saver mode approximately after
3 minutes if it is not turned off. See page 10.
Make sure your patient is relaxed, has taken at least 5 minutes of rest before
measurement, and refrains from talking or moving during measurement.
Confirm that the cuff is kept at the height of patient's heart during measurement.
Do not execute repeated measurements for congestion of blood could result
in false measurement. Allow the patient's arm to rest for at least 5 minutes.
Memory Function
Measured result obtained in "AUTO" mode is automatically saved
in the memory and can be recalled until next measurement is taken.
The result is not saved when the measurement is performed
in "MANUAL" mode.
To recall the result, turn on the device by pressing "I" side of
MAIN POWER SWITCH and set the device to "AUTO" with
MODE SELECTOR.
Press SET/MEMORY button and the last
result from "AUTO" measurement is displayed.
Turn off the device by pressing "O" side of MAIN POWER SWITCH.
The device will be in the energy saver mode approximately after
3 minutes if it is not turned off. See page 10.
Error Displays and Troubleshooting
ERROR SYMBOL/SYMPTOM
Nothing is being
displayed when
MAIN POWER SWITCH
is pressed down in the
ON position.
CAUSE
REMEDY
OVER-PRESSURIZATION:
The cuff was inflated to the
maximum pressure because
of movement of body, etc.
Make sure that
the patient
stays still during
measurement.
MEASUREMENT ERROR:
Measurement could not be
made because of moving or
talking during measurement.
Make sure the
patient remains
still and quiet
during measurement.
INFLATION ERROR:
AIR PLUG is not correctly
inserted.
Reinsert AIR PLUG and make
sure that it is securely inserted.
Noise was detected.
Make sure that the patient
stays still and quiet during
measurement.
DEFLATION ERROR:
Movement or talking was
detected during measurement.
Make sure the patient
remains still and
quiet during measurement.
Extreme changes in pressure
occurred during measurement.
Do not let patient move during
measurement.
CHECKING MODE:
See page 21.
Turn off the device once and
then turn it on again to take
measurement.
NO POWER:
AC ADAPTER is not
correctly connected.
Reinsert AC ADAPTER and
make sure that it is securely
inserted.
Battery is exhausted.
Charge the battery or use
AC ADAPTER.
9002 was left turned on but
has not been operated for
over an hour.
Turn off the device or press
START/STOP button or
SET/MEMORY button
to activate the device
from energy saver mode.
Error Displays and Troubleshooting
ERROR SYMBOL/SYMPTOM
CAUSE
REMEDY
LOW BATTERY:
Battery is weak.
Change the battery. Only a
few measurements can be
made before the battery
runs down.
Charge the battery.
Measurement cannot be
conducted.
BATTERY ERROR:
Battery is exhausted.
The indication appearing during LCD segment test, which
is performed when
the unit is turned on, does
not indicate low battery
or battery error.
ENERGY SAVER MODE:
The device was left turned
on and has not been
operated for over
approximately 3 minutes.
Measurement is
interrupted once and
the cuff is inflated again.
When the preset pressure
value was not high enough to
make measurement or when
noise was detected, the cuff
is pressurized again to a
higher level.
Patient moved during
measurement.
Turn off the device or press
START/STOP button or
SET/MEMORY button to
activate the device from
energy saving mode.
Make sure to turn off the
device by pressing “o” side
of MAIN POWER SWITCH
after use.
This does not indicate a
problem.
Make sure that the patient
stays still and quiet during
measurement.
Blood pressure is
different each time.
The reading is extremely
low (or high).
Patient is not being measured
with correct posture.
Blood pressure readings
constantly vary with time
of measurement and physical
and mental condition.
Make sure that
the patient is
being measured with
correct posture.
Pulse rate is too low
(or too high).
Patient moved during
measurement. There was not
enough rest taken before
measurement.
Make sure that the patient
stays still during
measurement. Allow your
patient to rest for at least
5 minutes.
Error Displays and Troubleshooting
ERROR SYMBOL/SYMPTOM
CAUSE
REMEDY
Measurement result
cannot be recalled or
is not stored.
Blood pressure was taken in
“MANUAL” mode.
Measurement result is saved
only when it is taken in
“AUTO” mode.
Cuff inflation does
not start.
Battery is exhausted.
AC INDICATOR is lit
even when 9002 is
turned off.
The column LCD is
dim or brightness is
not steady.
The battery is inserted.
9002 is operated with
the battery.
Measurement cannot be
made when BATTERY MARK
is displayed. Recharge the
battery.
AC INDICATOR also indicates
whether the battery is being
charged or it is not being
charged.
Difference in voltages
between AC ADAPTER and
the battery lead to differences
in LCD brightness. This does
not indicate a functional
problem.
If you cannot get correct measurement with the methods above, do not tamper
with the internal mechanism. Contact your dealer. If the unit malfunctions, return
it to the dealer or an authorized service representative for servicing according to
the warranty. The manufacturer provides service data to qualified dealers.
Care and Maintenance
Because the device includes precision parts, care should be taken to avoid
extreme temperature variations, humidity, shock, dust, and direct sunlight.
Do not drop or strike the device. Make sure not to expose the unit to moisture.
This unit is not water resistant.
Use only a soft, dry cloth to clean the device. Do not use gasoline, paint thinner, chemicals such as strong bases, strong acids, oxidizing agents, and reducing agents, or other strong solvents on the unit. Since the cuffs may
absorb perspiration and other fluids, inspect them for stains and discoloration
after each use. Sponge with a damp cloth. If necessary the cuff can be washed
in cool water with mild soap or detergent-disinfectant. Remember to remove
the bladder prior to washing. After washing, the cuff should be rinsed and allowed to air dry. NEVER iron.
When storing the device, do not place heavy objects on it and do not coil BLADDER
TUBE too tightly. When the unit has been stored at a temperature below the
freezing point, keep it for at least 1 hour in a warm place before using. Remove
the battery if the device is to be stored for an extended period of time. Keep
the batteries out of the reach of children.
Caution: Do not inflate the cuff when it is not wrapped around an arm.
Caution: Do not disassemble or modify the device.
We suggest that the device be checked every 2 years. This operation may only
be performed by the manufacturer or by firms authorized by the manufacturer.
Checking pressure accuracy
Connect a cuff wrapped around a firm cylinder to the 9002
e-sphygTM 2 and a standard manometer. Turn on the 9002
e-sphygTM 2 while pressing and holding the START/STOP
button down. Release the button after the initial display (all segment display) disappears. Two "0"s are displayed and the 9002
e-sphygTM 2 is in CHECKING MODE. Inflate the cuff with an
inflation bulb and compare the readings. Pressure accuracy is
to be ±3mmHg. Contact dealer if accuracy of your 9002 esphygTM 2 is invalid.
(A test kit may be purchased from an authorized dealer)
9002
e-sphygTM 2
BLADDER
TUBE
9002
PORT
9002W - Wall Unit Parts & Tools
ADC Item
Item no.
e-sphygTM 2
9002
1
300
290
1.
280
270
260
250
2
e-sphyg
240
230
2.
6mm Allen Wrench
752M-116
3.
Wall Bracket
952-103
220
210
200
130
82
190
180
170
160
150
140
130
110
4.
Wall Basket with
(3) screws / (3) mollys
2
73
120
100
90
80
70
60
952-025
752M-116
LOW BATTERY
POWER
AC
PRESET PRESSURE
180
220 MANUAL
50
140
30
100
40
260
20
280
AUTO
10
5.
Coiled tubing
885N
6.
Mounting Bolt/Washer (1)
972-101
7.
Connector
9002-2
8.
Connector, Male
891M
9.
Connector, Female
891F
SET/MEMORY
START/STOP
9002
3
10. AdcuffTM & Bladder, Adult
845-11ABK-IF
11. (2) Screws (for wall bracket)
952-104
12. (2) Mollys (for wall bracket)
952-105
952-103
4
952-025
6
11
8
972-101
891M
5
10
952-104
SELECT CUFF
LARGER
X
E / MA
RANG
ADCUFF
9
7
ARTERY
ADULT SIZE
885N
9002-2
891F
845-11ABK-IF
12
952-105
9002M - Mobile Unit Parts & Tools
ADC Item
Item no.
1
1.
e-sphygTM 2
9002
2.
6mm Allen Wrench
752M-116
3.
3mm Allen Wrench
752M-117
260
200
300
290
2
280
270
250
2
e-sphyg
240
230
220
210
4.
Mounting Bolt/Washer (2)
972-101
5.
Mobile Stand
752M-02
752M-116
130
82
190
180
170
160
150
140
130
73
120
110
100
90
6.
Coiled tubing
LOW BATTERY
POWER
80
885N
70
60
AC
PRESET PRESSURE
180
220 MANUAL
50
140
30
100
40
260
20
7.
Connector
9002-2
8.
Connector, Male
891M
9.
Connector, Female
891F
280
SET/MEMORY
10. AdcuffTM & Bladder, Adult
AUTO
10
START/STOP
752M-117
9002
3
845-11ABK-IF
4
972-101
7
9002-2
5
10
6
SELECT CUFF
LARGER
E
RANG
X
/ MA
ADCUFF
752M-02
8
9
ARTERY
ADULT SIZE
885N
891M
891F
845-11ABK-IF
Mobile Base Assembly Parts
9
8
9B
5
2
7
4
3
1
6A
6
3A
ADC Item
Item no.
ADC Item
Item no.
1 Center Pole Screw (1) Washer (1) 972-101
6
2 Base
972-080
6A Gasket, Rubber
972-107A
3 Casters (5)
972-106
7
Inner Pole
972-110
3A Single Caster
972-106-1
8
Basket Tightening Key
972-111
4 Outer Pole
972-107
9
Basket
972-112
5 Knob
972-108
9B Manometer Mounting Hardware 752-114
Spring
972-109
Specifications
Operating Principle:
Indicator:
Pressure Indicating Range:
Measuring Range:
Accuracy:
Inflation :
Deflation:
Exhaust:
Power Supply:
Power Consumption :
Memory:
Operating Environment:
Storage Environment:
Coverage Arm Circumference
Adult Size Cuff:
Large Adult Size Cuff:
Small Adult Size Cuff:
Oscillometric method*
300 digits column LCD and 10 digits segment LCD
0 to 300 mmHg (cuff pressure)
50 to 250 mmHg (systolic)
40 to 180 mmHg (diastolic)
40 to 160 bpm (pulse rate)
±3 mmHg (cuff pressure)
±5% of reading (pulse rate)
Automatic inflation
Electric control valve
Automatic exhaust valve
7.0 VDC AC adapter (MODEL 9605+02225-1UOC) or
4.8 VDC rechargeable NiMH battery
14W (max.)
single measurement result*
+50°F to+104°F, 15 to 90% relative humidity
-4°F to+122°F, 15 to 95% relative humidity
9.0 to 15.7 inches (23.0 to 40.0 cm)
13.3 to 19.6 inches (34.0 to 50.0 cm)
7.4 to 10.6 inches (19.0 to 27.0 cm)
Main Unit
Weight:
Size:
Specifications are subject to change
without notice due to improvements
in performance.
* marks only apply to "AUTO"
measurement.
Approx. 2.2 lb. [1000 g], without AC adapter or battery
5.4 x 10.6 x 3.8 in [136 x 266 x 96 mm] (W x D x H)
Symbol
Definition
Symbol
Important Warning/Caution
Latex-Free
Circumference Size
Conforms to EU Standards
Definition
Authorized European
Represenative’s Information
Manufacturer’s Information
°F
Temperature Limit
Humidity Limitation
Limited Warranty
American Diagnostic Corporation (ADC®) warrants its products against defects in
materials and workmanship under normal use and service as follows:
1. Warranty service extends to the original retail purchaser only and commences
with the date of delivery.
2. The entire sphygmomanometer is warranted for two years.
3. Cuff, bladder and coiled tubing are warranted for three years.
4. The manometer is warranted to remain accurate to ±3mmHg over its full
range when compared to a reference standard for life.
What is Covered: Repair, or replacement of parts, and labor.
What is not covered: Transportation charges to and from ADC®. Damages caused
by abuse, misuse, accident, or negligence. Incidental, special, or consequential
damages. Some states do not allow the exclusion or limitation of incidental,
special, or consequential damages, so this limitation may not apply to you.
To Obtain Warranty Service: Send item(s) postage paid to ADC®, Attn: Service Dept.,
55 Commerce Dr., Hauppauge, NY 11788. Please include your name and address,
daytime phone no., proof of purchase, a brief note explaining the problem, and
$2.00 to cover the cost of return shipping and handling.
Implied Warranty: Any implied warranty shall be limited in duration to the terms of
this warranty and in no case beyond the original selling price (except where
prohibited by law). This warranty gives you specific legal rights and you may have
other rights which vary from state to state.
To Register Your Product, visit us at
www.adctoday.com/register
Replacement Parts
Component
Part No. Latex-free
Model Use
Coiled Tubing 4’
886N
Desk
Coiled Tubing 8’
885N
All Models
Cuff & Bladder - Sm. Adult
845-10SABK-IF
All Models
Cuff & Bladder - Adult
845-11ABK-IF
All Models
Cuff & Bladder - Lg. Adult
845-12XBK-IF
All Models
891F
All Models
Male Luer Conncetor
891M
All Models
Plastic Connector
9002-2
All Models
AC Adapter
9002-3
All Models
Rechargeable Battery Pack
9002-5
All Models
Female Luer Conncetor
FOR QUESTIONS, COMMENTS,
OR SUGGESTIONS
CALL TOLL FREE: 1-800-ADC-2670
OR VISIT
WWW.ADCTODAY.COM/FEEDBACK
Many ADC instruction manuals are available on our website in other languages at
www.adctoday.com/care
©2013 ADC®. All rights reserved. No one is permitted to reproduce or duplicate in any form, this
manual or any part thereof without the expressed written permission of ADC®. ADC® assumes no
responsibility for any injury to anyone, or for any illegal or improper use of the product that may
result from failure to use the product in accordance with the instructions, cautions, warnings, or
statement of intended use published in this manual. The 9002 e-sphyg 2TM and AdcuffTM are trademarks of ADC®.
ADC
55 Commerce Drive
Hauppauge, NY 11788
U.S.A.
Inspected in the U.S.A.
Made in China
tel: 631-273-9600, 1-800-232-2670
fax: 631-273-9659
www.adctoday.com
EC
REP
ADC (UK) Ltd.
Unit 6, PO14 1TH
United Kingdom
IB p/n 93-9002-00 rev 8 english
email: [email protected]