1
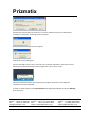
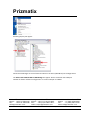
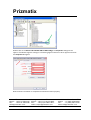
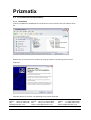
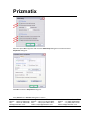
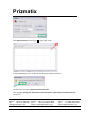
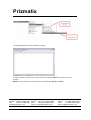
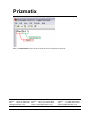
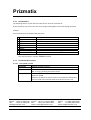
Prizmatix USER MANUAL TLCC-01 Triple LED Current Controller Version: 07 Date: 25.03.2011 Main Office European Sales Office North America Sales Office Phone: +972-27-2500097 Phone: +44-(0)77-9172-9592 Phone: +1-(248)-436-8085 Fax: +972-27-2500096 Fax: +44-(0)20-7681-2977 Fax: +1-(248)-281-5236 [email protected] [email protected] [email protected] P.O . B. 423 4 M od iin- I lite 7 19 19, Is rae l Prizmatix Table of Contents 1 Introduction ..................................................................................................................... 3 1.1 Features ............................................................................................................................ 3 1.2 Specifications .................................................................................................................... 3 1.3 Overview ........................................................................................................................... 4 2 Safety ............................................................................................................................... 5 3 Manual Operating the TLCC‐01 ......................................................................................... 6 4 3.1 Initial power up ................................................................................................................ 6 3.2 LED Channel Selection ...................................................................................................... 6 3.3 LED Channel Power Setting .............................................................................................. 6 3.4 ON/OFF of Single Channel ................................................................................................ 7 3.5 ON/OFF of All Channels .................................................................................................... 7 PC Operating of TLCC‐01 ................................................................................................... 8 4.1 Installation of the Microcontroller Driver ........................................................................ 8 4.2 The LabVIEW Based Software ........................................................................................ 14 4.2.1 Installation ............................................................................................................. 14 4.2.2 Prizmatix_TLCC‐01 software usage ....................................................................... 17 4.3 Computer Interface by Terminal Style Commands ........................................................ 18 4.3.1 Introduction ........................................................................................................... 18 4.3.2 How to create a new Hyper Terminal communication link ................................... 18 4.3.3 Command Set ........................................................................................................ 27 4.3.4 Commands Description ......................................................................................... 27 4.4 Tips ................................................................................................................................. 30 4.4.1 Tip#1 How to find Device COM port number? ...................................................... 30 Main Office European Sales Office North America Sales Office Phone: +972-27-2500097 Phone: +44-(0)77-9172-9592 Phone: +1-(248)-436-8085 Fax: +972-27-2500096 Fax: +44-(0)20-7681-2977 Fax: +1-(248)-281-5236 [email protected] [email protected] [email protected] P.O . B. 423 4 M od iin- I lite 7 19 19, Is rae l Prizmatix 1 Introduction The TLCC‐01 Benchtop Triple LED Current Controller is designed to provide a low noise current for driving a variety of High Power LEDs in continuous (CW) or chopped operation mode by external TTL input. The internal microcontroller provides a simple user interface for LED power adjustment and ON/OFF power control of each channel. The USB link enables easy connection of the system to PC, as well as integration of the LED light source with various image analysis software and microscope automation software packages. 1.1 Features • • • • • • • Three separate LED drivers Constant current or chopping operation modes Precise LED current setting TTL external trigger input USB link Computer control via hyper terminal style commands or LabView Free control software provided (Win XP/2000/Vista) 1.2 Specifications Max. output current: factory preset to 350, 500,700 or 1000mA Output voltage: 1‐15 V TTL modulation frequency: DC – 10 KHz Connector for LED: 9‐pin D‐type Connector for TTL input: BNC Input power supply: 24 VDC, 1A Power adaptor input: 100‐240 VAC, 1A, 47‐63Hz Controller dimensions: 195mm x 70mm x 170mm (W x H x L) without extrusions Power adaptor dimensions: 60mm x 35mm x 10mm (W x H x L) Specifications are subject to change without notice. Main Office European Sales Office North America Sales Office Phone: +972-27-2500097 Phone: +44-(0)77-9172-9592 Phone: +1-(248)-436-8085 Fax: +972-27-2500096 Fax: +44-(0)20-7681-2977 Fax: +1-(248)-281-5236 [email protected] [email protected] [email protected] P.O . B. 423 4 M od iin- I lite 7 19 19, Is rae l Prizmatix 1.3 Overview Front Panel controls of TLCC‐01 Back panel controls of TLCC‐01 Main Office European Sales Office North America Sales Office Phone: +972-27-2500097 Phone: +44-(0)77-9172-9592 Phone: +1-(248)-436-8085 Fax: +972-27-2500096 Fax: +44-(0)20-7681-2977 Fax: +1-(248)-281-5236 [email protected] [email protected] [email protected] P.O . B. 423 4 M od iin- I lite 7 19 19, Is rae l Prizmatix 2 Safety Before applying power to the power adaptor of the TLCC‐01 system, make sure that the protective conductor of the 3 conductor mains power cord is correctly connected to the protective earth contact of the socket outlet! Improper grounding can cause electric shock with damages to your health or even death! When wiring the device disconnect it from the power source and turn OFF the main switch on the back panel of the TLCC‐01. Not doing so may result in electric shock, injury and/or damage of your equipment. Prizmatix products are NOT authorized for use as components in life support devices or systems. The TLCC‐01 and the Mic‐LED‐XXX LED heads must not be operated in explosion endangered environments! Any maintenance shall be performed ONLY by Prizmatix authorized technician. Cellular phones or other radio transmitters are not to be used within the range of few meters of this unit. The head of Mic‐LED‐XXX can contain an UV and other intense light! In case of UV LED intense UV light can be emitted by the system during operation. Precautions must be taken to prevent looking directly at the UV light with unprotected eyes or illuminating the UV light on skin. Do not look directly into the UV light or look through the optical system during operation of the device. This can be harmful to the eyes even for brief periods due to the high intensity of the UV light. If viewing the light is necessary, use light protective glasses to avoid damage by the intense light. Main Office European Sales Office North America Sales Office Phone: +972-27-2500097 Phone: +44-(0)77-9172-9592 Phone: +1-(248)-436-8085 Fax: +972-27-2500096 Fax: +44-(0)20-7681-2977 Fax: +1-(248)-281-5236 [email protected] [email protected] [email protected] P.O . B. 423 4 M od iin- I lite 7 19 19, Is rae l Prizmatix 3 Manual Operating the TLCC01 3.1 Initial power up Connect the power adaptor to the TLCC‐01 controller and the 9 pin D‐Type connectors according to the specified current. Switch ON the system by the ON/OFF toggle switch on the back panel of the device. The following message will appear on the screen: PRIZMATIX LIGHT SOURCE SYS 1.6c4 Press the center OK button on the 5 keys switch. Following message will appear: LED>ch1 nm >>00 LED>ch3 nm 00 3.2 LED Channel Selection Press the Left / Right arrows keys on the 5 keys switch to scroll the LED channels. Following message will appear: LED>ch1 nm 00 LED>ch2 nm >>00 Remark: by default the microcontroller supports more than 3 channels actually available in TLCC‐01 model. Please ignore these additional channels. 3.3 LED Channel Power Setting To increase or decrease the power setting of specific LED channel scroll to the specific channel by Left / Right arrows keys and then use Up/Down arrows keys of the 5 keys switch to increase or decrease the LED light power. Each click on the key will increase the value by 1 unit. Press and hold the key to get faster scrolling of the values. LED>ch3 nm >>86 LED>ch4 nm 00 Remark: the units on the display are relative units from 00 to 99. The LED actual power is not necessarily linear proportional to these numbers. Main Office European Sales Office North America Sales Office Phone: +972-27-2500097 Phone: +44-(0)77-9172-9592 Phone: +1-(248)-436-8085 Fax: +972-27-2500096 Fax: +44-(0)20-7681-2977 Fax: +1-(248)-281-5236 [email protected] [email protected] [email protected] P.O . B. 423 4 M od iin- I lite 7 19 19, Is rae l Prizmatix 3.4 ON/OFF of Single Channel In order to switch the LED ON/OFF after the power setting, use the center OK button on the 5 keys switch. The (*) mark will appear adjacent to the powered ON LED like this example: LED>ch3 nm >>86* LED>ch4 nm 00 3.5 ON/OFF of All Channels In order to switch the all LEDs ON/OFF at once after the power setting; Use Left / Right arrows keys to scroll beyond the last LED channel, following message will appear: ALL LEDs ON Press center OK button on the 5 keys switch, to change all LEDs to ON state, the display will change to: ALL LEDs OFF Main Office European Sales Office North America Sales Office Phone: +972-27-2500097 Phone: +44-(0)77-9172-9592 Phone: +1-(248)-436-8085 Fax: +972-27-2500096 Fax: +44-(0)20-7681-2977 Fax: +1-(248)-281-5236 [email protected] [email protected] [email protected] P.O . B. 423 4 M od iin- I lite 7 19 19, Is rae l Prizmatix 4 PC Operating of TLCC01 4.1 Installation of the Microcontroller Driver Remark: DO NOT connect the TLCC‐01 USB cable to the computer at this stage of the installation. The USB cable shall be connected at final stage of the installation. Insert the CD‐ROM into CD‐ROM driver and browse it for the Silicon Labs. Driver Double click on the CP210x_VCP_Win2K_XP_S2K3.exe to run the setup. The following screen will appear: Click on the Next button, the following screen will appear: Main Office European Sales Office North America Sales Office Phone: +972-27-2500097 Phone: +44-(0)77-9172-9592 Phone: +1-(248)-436-8085 Fax: +972-27-2500096 Fax: +44-(0)20-7681-2977 Fax: +1-(248)-281-5236 [email protected] [email protected] [email protected] P.O . B. 423 4 M od iin- I lite 7 19 19, Is rae l Prizmatix Choose "I accept the terms and the license agreement" and click Next, following screen will appear: You can choose other destination directory or accept the default installation directory, click on Next to proceed. Following screen will appear: Main Office European Sales Office North America Sales Office Phone: +972-27-2500097 Phone: +44-(0)77-9172-9592 Phone: +1-(248)-436-8085 Fax: +972-27-2500096 Fax: +44-(0)20-7681-2977 Fax: +1-(248)-281-5236 [email protected] [email protected] [email protected] P.O . B. 423 4 M od iin- I lite 7 19 19, Is rae l Prizmatix Click on Install to proceed with installation, following screen will appear: Important: Choose the option "Launch the CP210x VCP Driver Installer" Click on Finish to finish the initial installation and to start the driver installation. The following screen will appear: Main Office European Sales Office North America Sales Office Phone: +972-27-2500097 Phone: +44-(0)77-9172-9592 Phone: +1-(248)-436-8085 Fax: +972-27-2500096 Fax: +44-(0)20-7681-2977 Fax: +1-(248)-281-5236 [email protected] [email protected] [email protected] P.O . B. 423 4 M od iin- I lite 7 19 19, Is rae l Prizmatix Choose alternative location for the driver or leave the default and start the installation by clicking on Install button. Following screen will appear: After some time following screen will appear: Click OK to close the dialog box. Connect the USB connector of the TLCC‐01 to the computer USB socket. After few moments following message will be displayed at the right lower corner of the screen: After few moments the driver will automatically recognize the device. At this stage the installation has been completed. In order to check the device, Click My Computer with Right Mouse Button and choose Manage from the menu. Main Office European Sales Office North America Sales Office Phone: +972-27-2500097 Phone: +44-(0)77-9172-9592 Phone: +1-(248)-436-8085 Fax: +972-27-2500096 Fax: +44-(0)20-7681-2977 Fax: +1-(248)-281-5236 [email protected] [email protected] [email protected] P.O . B. 423 4 M od iin- I lite 7 19 19, Is rae l Prizmatix Following display will appear: Chose Device Manager on the Left Panel and Click on the Ports (COM & LPT) on the Right Panel. The Silicon Labs CP210x USB to UART Bridge will appear. Please remember the COM port number for farther software configuration. In current example it is COM4. Main Office European Sales Office North America Sales Office Phone: +972-27-2500097 Phone: +44-(0)77-9172-9592 Phone: +1-(248)-436-8085 Fax: +972-27-2500096 Fax: +44-(0)20-7681-2977 Fax: +1-(248)-281-5236 [email protected] [email protected] [email protected] P.O . B. 423 4 M od iin- I lite 7 19 19, Is rae l Prizmatix Double click on the Silicon Labs CP210x USB to UART Bridge, the Properties dialog box will appear. If needed change the settings as in following figure and click on OK to approve and close the Properties dialog box. Now the driver installation is completed and the device works properly. Main Office European Sales Office North America Sales Office Phone: +972-27-2500097 Phone: +44-(0)77-9172-9592 Phone: +1-(248)-436-8085 Fax: +972-27-2500096 Fax: +44-(0)20-7681-2977 Fax: +1-(248)-281-5236 [email protected] [email protected] [email protected] P.O . B. 423 4 M od iin- I lite 7 19 19, Is rae l Prizmatix 4.2 The LabVIEW Based Software 4.2.1 Installation Insert the CD‐ROM into CD‐ROM driver and browse it for the Prizmatix TLCC‐01 software setup file: Double click on the setup.exe to initialize the setup procedure. The following screen will be displayed: Click Next button to continue. The following screen will be displayed: Main Office European Sales Office North America Sales Office Phone: +972-27-2500097 Phone: +44-(0)77-9172-9592 Phone: +1-(248)-436-8085 Fax: +972-27-2500096 Fax: +44-(0)20-7681-2977 Fax: +1-(248)-281-5236 [email protected] [email protected] [email protected] P.O . B. 423 4 M od iin- I lite 7 19 19, Is rae l Prizmatix Here you can either choose another directory for the software installation or continue with the default directory. Click Next to continue, following screen will appear: Click on Next to start installation process. Following screen will appear: Main Office European Sales Office North America Sales Office Phone: +972-27-2500097 Phone: +44-(0)77-9172-9592 Phone: +1-(248)-436-8085 Fax: +972-27-2500096 Fax: +44-(0)20-7681-2977 Fax: +1-(248)-281-5236 [email protected] [email protected] [email protected] P.O . B. 423 4 M od iin- I lite 7 19 19, Is rae l Prizmatix Wait till the automatic setup will be finished. At the end the following screen will appear: Click Finish to end the setup process. The Prizmatix_TLCC‐01 software will appear at Start>All Programs menu. Click Prizmatix_TLCC‐01 to launch the software. Main Office European Sales Office North America Sales Office Phone: +972-27-2500097 Phone: +44-(0)77-9172-9592 Phone: +1-(248)-436-8085 Fax: +972-27-2500096 Fax: +44-(0)20-7681-2977 Fax: +1-(248)-281-5236 [email protected] [email protected] [email protected] P.O . B. 423 4 M od iin- I lite 7 19 19, Is rae l Prizmatix 4.2.2 Prizmatix_TLCC01 software usage After software launch select the Configuration Tab and configure the appropriate COM port as described at the end of section 4.1 There is no need to change other settings. After section of appropriate COM port close the software and re‐open it again, check that the COM port is correct. Select LED Operation Tab. Here you can change the sliders of each one of the LED channels to set its power. You can either click and drag the slider or write the desired value in the control. After setup of required power click on Apply button to transfer the values to the TLCC‐01 controller. The LED ON/OFF button will switch all LEDs channels ON/OFF. The Stop button will quit the software. Main Office European Sales Office North America Sales Office Phone: +972-27-2500097 Phone: +44-(0)77-9172-9592 Phone: +1-(248)-436-8085 Fax: +972-27-2500096 Fax: +44-(0)20-7681-2977 Fax: +1-(248)-281-5236 [email protected] [email protected] [email protected] P.O . B. 423 4 M od iin- I lite 7 19 19, Is rae l Prizmatix 4.3 Computer Interface by Terminal Style Commands 4.3.1 Introduction The TLCC‐01 has a USB interface that allows user to control LEDs from host computer using the terminal style commands. The connection of the TLCC‐01 to the computer is accomplished by a USB cable supplied with the device. Please refer first to the section 4.1 for instructions regarding driver installation. Refer to section 4.3.2 on how to create the HyperTerminal communication link. 4.3.2 How to create a new Hyper Terminal communication link In order to create a new HyperTerminal connection, following steps are required: Click on Start: All Programs: Accessories: Communications: HyperTerminal Remark: If you already have created HyperTerminal XXXX you will see additional HyperTerminal icon at lower part of the list. In such case click on the most upper item marked as HyperTerminal. Main Office European Sales Office North America Sales Office Phone: +972-27-2500097 Phone: +44-(0)77-9172-9592 Phone: +1-(248)-436-8085 Fax: +972-27-2500096 Fax: +44-(0)20-7681-2977 Fax: +1-(248)-281-5236 [email protected] [email protected] [email protected] P.O . B. 423 4 M od iin- I lite 7 19 19, Is rae l Prizmatix Following dialog box may appear. Check the Don't ask me this question again check box and press either Yes or No button (this selection does not influence TLCC‐01 controller functionality). New Connection ‐ HyperTerminal screen will appear along with Connection Description dialog box: Type Name and Select the Icon, Press OK to proceed. In next dialog box press OK regardless on the information which will be displayed. Main Office European Sales Office North America Sales Office Phone: +972-27-2500097 Phone: +44-(0)77-9172-9592 Phone: +1-(248)-436-8085 Fax: +972-27-2500096 Fax: +44-(0)20-7681-2977 Fax: +1-(248)-281-5236 [email protected] [email protected] [email protected] P.O . B. 423 4 M od iin- I lite 7 19 19, Is rae l Prizmatix The following dialog box will appear: Press the Modify… button, you will get the Properties dialog box. Select the Connect To tab and change the Connect using setting to the COM port number of the device. The number of COM port was found during the driver installation (see above). In current example it is COM4 Main Office European Sales Office North America Sales Office Phone: +972-27-2500097 Phone: +44-(0)77-9172-9592 Phone: +1-(248)-436-8085 Fax: +972-27-2500096 Fax: +44-(0)20-7681-2977 Fax: +1-(248)-281-5236 [email protected] [email protected] [email protected] P.O . B. 423 4 M od iin- I lite 7 19 19, Is rae l Prizmatix Still at the Connect To tab, click on Configure… button. You will get COM4 Properties Dialog Box: Configure the Port Settings in following way: • • • • • Port speed: 115200 Data bits: 8 Parity: None Stop Bits: 1 Flow control: None Main Office European Sales Office North America Sales Office Phone: +972-27-2500097 Phone: +44-(0)77-9172-9592 Phone: +1-(248)-436-8085 Fax: +972-27-2500096 Fax: +44-(0)20-7681-2977 Fax: +1-(248)-281-5236 [email protected] [email protected] [email protected] P.O . B. 423 4 M od iin- I lite 7 19 19, Is rae l Prizmatix press OK button. Now you will be back to the Properties dialog box. Choose the Settings tab Change the Emulation to TTY and press ASCII Setup… button. You will get ASCII Setup dialog box. Select the check boxes as in the following figure: Main Office European Sales Office North America Sales Office Phone: +972-27-2500097 Phone: +44-(0)77-9172-9592 Phone: +1-(248)-436-8085 Fax: +972-27-2500096 Fax: +44-(0)20-7681-2977 Fax: +1-(248)-281-5236 [email protected] [email protected] [email protected] P.O . B. 423 4 M od iin- I lite 7 19 19, Is rae l Prizmatix After that press OK to approve and close the ASCII Setup dialog box. You will be back to Properties dialog box Click OK to close the Properties dialog box. Press Cancel in the Connect dialog box to close it. Main Office European Sales Office North America Sales Office Phone: +972-27-2500097 Phone: +44-(0)77-9172-9592 Phone: +1-(248)-436-8085 Fax: +972-27-2500096 Fax: +44-(0)20-7681-2977 Fax: +1-(248)-281-5236 [email protected] [email protected] [email protected] P.O . B. 423 4 M od iin- I lite 7 19 19, Is rae l Prizmatix Close HyperTerminal by clicking on X at upper right corner: In following dialog box, click on Yes to save the newly defined connection. This will finish the setup of HyperTerminal Connection. Click on Start: All Programs: Accessories: Communications: HyperTerminal: Prizmatix TLCC‐01 connection. Main Office European Sales Office North America Sales Office Phone: +972-27-2500097 Phone: +44-(0)77-9172-9592 Phone: +1-(248)-436-8085 Fax: +972-27-2500096 Fax: +44-(0)20-7681-2977 Fax: +1-(248)-281-5236 [email protected] [email protected] [email protected] P.O . B. 423 4 M od iin- I lite 7 19 19, Is rae l Prizmatix The following HyperTerminal window will appear: In order to check the connection, type simple command like $Ver% to get system version number. Remark: The commands are case sensitive, therefore type $Ver% not $ver%. Main Office European Sales Office North America Sales Office Phone: +972-27-2500097 Phone: +44-(0)77-9172-9592 Phone: +1-(248)-436-8085 Fax: +972-27-2500096 Fax: +44-(0)20-7681-2977 Fax: +1-(248)-281-5236 [email protected] [email protected] [email protected] P.O . B. 423 4 M od iin- I lite 7 19 19, Is rae l Prizmatix Refer to Command Set section of this manual for full list of possible commands. Main Office European Sales Office North America Sales Office Phone: +972-27-2500097 Phone: +44-(0)77-9172-9592 Phone: +1-(248)-436-8085 Fax: +972-27-2500096 Fax: +44-(0)20-7681-2977 Fax: +1-(248)-281-5236 [email protected] [email protected] [email protected] P.O . B. 423 4 M od iin- I lite 7 19 19, Is rae l Prizmatix 4.3.3 Command Set The following table is a quick reference table for the TLCC‐01 command set. A host computer may control the TLCC‐01 by simply sending ASCII commands through standard USB port. All commands must use UPPER CASE characters. # Command Description 1 $V% Get system version 2 $R% Reset of the system 3 $CY,XX% Set power of LED at specified channel 4 $A% Get value of LED power 5 $DXX,YY,ZZ...% Set power of LEDs at all channels* 6 $NX% Set number of active channels 7 $K% Set all active channels to ON/OFF toggle switch function 8 $LXXX,YYY,ZZZ,…% Set the LCD representation of the channels* * Most TLCC‐01 devices have 4 channels software therefore the command shall include four channels like for example: $D99,83,56,00% 4.3.4 Commands Description 4.3.4.1 Get system version Description Request the Device version. Syntax $V% Response NN if the command was valid NN ‐ A string containing the device version Example Command: $V% Response: Vr1.4 Requests the device to send its version. The response indicates that the command was successful and that the device version is 1.4 Main Office European Sales Office North America Sales Office Phone: +972-27-2500097 Phone: +44-(0)77-9172-9592 Phone: +1-(248)-436-8085 Fax: +972-27-2500096 Fax: +44-(0)20-7681-2977 Fax: +1-(248)-281-5236 [email protected] [email protected] [email protected] P.O . B. 423 4 M od iin- I lite 7 19 19, Is rae l Prizmatix 4.3.4.2 Reset of the system Description Resets the Device setting to the default values. $R% Syntax Response R if the command was valid and done Example Command: $R% Response: R Resets the Device setting to the default values. The response indicates that the command was successful and that the device was reset. 4.3.4.3 Set power of LED at specified channel Description Sets power of the specified LED channel. $CY,XX,% Syntax Y channel number XX power intensity Response C if the command was valid Example Command: $01,89,% Response: C Requests the device to set the power level of channel #01 to a value of 89. The response indicates that the command was successful and that the device channel #01 was set to the power level of 89. 4.3.4.4 Get value of LED power Description Gets power of all LED channels. $A% Syntax Response AMM,NN,KK,LL if the command was valid MM, NN, KK, LL – are strings containing the power value in a.u. from 00 to 99. Example Command: $A% Response: A36,88,95,00 Request the device to report the power level of all channels. The response indicates that the command was successful and that the device is at power level channel is: #1=36, #2=88, #3=95, #4=00. Main Office European Sales Office North America Sales Office Phone: +972-27-2500097 Phone: +44-(0)77-9172-9592 Phone: +1-(248)-436-8085 Fax: +972-27-2500096 Fax: +44-(0)20-7681-2977 Fax: +1-(248)-281-5236 [email protected] [email protected] [email protected] P.O . B. 423 4 M od iin- I lite 7 19 19, Is rae l Prizmatix 4.3.4.5 Set power of LEDs at all channels Description Sets power of all LED channels at once. $DXX,YY,ZZ...,% Syntax XX channel #1 power. YY channel #2 power. ZZ channel #3 power. ....... Response D if the command was valid and done Example Command: $D29,42,63,00% Response: D Requests the device to set the power level of all channels to specified values. The response indicates that the command was successful and that the device channel #01,#02,#03,#04 were set to the power levels 29,42,63,00 respectively as requested. 4.3.4.6 Set number of active channels Description Sets number of active channels. $NX% Syntax X number of active channels. Response N if the command was valid and done. Example Command: $N2% Response: 2 Requests the device to set the number of active channels. The response indicates that the command was successful and that the device is configured to 2 active channels 4.3.4.7 Set all active channels to ON/OFF toggle function Description Sets all active channels to ON or OFF state. $K% Syntax Response K if the command was valid and done The controller toggling the led ON/OFF to the intensity set before Example Command: $K% Response: K Changes the state of all LED channels from ON to OFF and vice versa. The response indicates that the command was successful and that the device channels changed their state. Main Office European Sales Office North America Sales Office Phone: +972-27-2500097 Phone: +44-(0)77-9172-9592 Phone: +1-(248)-436-8085 Fax: +972-27-2500096 Fax: +44-(0)20-7681-2977 Fax: +1-(248)-281-5236 [email protected] [email protected] [email protected] P.O . B. 423 4 M od iin- I lite 7 19 19, Is rae l Prizmatix 4.3.4.8 Set the LCD representation of the channels Description Sets the way the channels are represented on the LCD screen of the TLCC‐01 device. $LXXX,YYY,ZZZ,...,% Syntax Response ‘L’ if the command was valid and done Example Command: $L365,405,480% Response: L Changes the representation of the LED channels on the device LCD screen to the specified values. It is useful for programming the wavelength of the LED sources to be displayed for the user. In this example the system was programmed to display that the LED channels #01,#02,#03 are 365nm, 405nm and 480nm LEDs respectively. The response indicates that the command was successful. 4.4 Tips 4.4.1 Tip#1 How to find Device COM port number? In order to check the device COM port number: a) Click My Computer with Right Mouse Button and choose Manage from the menu. Main Office European Sales Office North America Sales Office Phone: +972-27-2500097 Phone: +44-(0)77-9172-9592 Phone: +1-(248)-436-8085 Fax: +972-27-2500096 Fax: +44-(0)20-7681-2977 Fax: +1-(248)-281-5236 [email protected] [email protected] [email protected] P.O . B. 423 4 M od iin- I lite 7 19 19, Is rae l Prizmatix Following display will appear: Chose Device Manager on the Left Panel and Click on the Ports (COM & LPT) on the Right Panel. The Silicon Labs CP210x USB to UART Bridge will appear. Note the COM port number at the end of the line. In current example it is COM4. Main Office European Sales Office North America Sales Office Phone: +972-27-2500097 Phone: +44-(0)77-9172-9592 Phone: +1-(248)-436-8085 Fax: +972-27-2500096 Fax: +44-(0)20-7681-2977 Fax: +1-(248)-281-5236 [email protected] [email protected] [email protected] P.O . B. 423 4 M od iin- I lite 7 19 19, Is rae l